
User Manual (ENGLISH)
Page 4
... digital cable standard. When you further information. Please contact your local cable service provider needs to be inserted into the slot, the TV screen will be noted that CableCARD is a concerted effort to acquire a CableCARD. These PCMCIA card modules or CableCARDs will show the message ... how to download necessary data such as channel information or subscription information from your particular connections. For more information on the TV screen to page 22 for the first time, this process the digital cable service provider or CableCARD may not be provided by DTLA...
... digital cable standard. When you further information. Please contact your local cable service provider needs to be inserted into the slot, the TV screen will be noted that CableCARD is a concerted effort to acquire a CableCARD. These PCMCIA card modules or CableCARDs will show the message ... how to download necessary data such as channel information or subscription information from your particular connections. For more information on the TV screen to page 22 for the first time, this process the digital cable service provider or CableCARD may not be provided by DTLA...
User Manual (ENGLISH)
Page 6
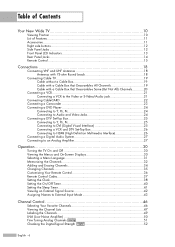
... 12 Front Panel LED Indicators 13 Rear Panel Jacks ...14 Remote Control...15 Connections 18 Connecting VHF and UHF Antennas 18 Antennas with 75-ohm Round Leads 18 Connecting Cable TV 19 Cable without a Cable Box 19... Audio System 27 Connecting to an Analog Amplifier 27 Operation 30 Turning the TV On and Off 30 Viewing the Menus and On-Screen Displays 30 Selecting a Menu Language 31 Memorizing the Channels 32 Adding and Erasing...47 Labeling the Channels 49 LNA (Low Noise Amplifier 50 Fine Tuning Analog Channels Analog 51 Checking the Digital-Signal Strength Digital 52 English - 6
... 12 Front Panel LED Indicators 13 Rear Panel Jacks ...14 Remote Control...15 Connections 18 Connecting VHF and UHF Antennas 18 Antennas with 75-ohm Round Leads 18 Connecting Cable TV 19 Cable without a Cable Box 19... Audio System 27 Connecting to an Analog Amplifier 27 Operation 30 Turning the TV On and Off 30 Viewing the Menus and On-Screen Displays 30 Selecting a Menu Language 31 Memorizing the Channels 32 Adding and Erasing...47 Labeling the Channels 49 LNA (Low Noise Amplifier 50 Fine Tuning Analog Channels Analog 51 Checking the Digital-Signal Strength Digital 52 English - 6
User Manual (ENGLISH)
Page 7
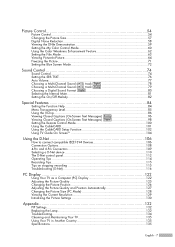
... Using the Color Weakness Enhancement Feature 62 Setting the Film Mode 63 Viewing Picture-In-Picture 64 Freezing the Picture 71 Setting the Blue Screen Mode 72 Sound Control 74 Sound Control ...74 Setting the SRS TSXT 76 Auto Volume...77 Choosing a Multi-Channel Sound (MTS) track... Messages) Analog 96 Viewing Closed Captions (On-Screen Text Messages) Digital 98 Setting the Remote Control Mode 100 Using the CableCARD 101 Using the CableCARD Setup Function 102 Using TV Guide On ScreenTM 104 Using the D-Net 106 How to connect compatible IEEE1394 Devices 106 Connection Options 108 4-...
... Using the Color Weakness Enhancement Feature 62 Setting the Film Mode 63 Viewing Picture-In-Picture 64 Freezing the Picture 71 Setting the Blue Screen Mode 72 Sound Control 74 Sound Control ...74 Setting the SRS TSXT 76 Auto Volume...77 Choosing a Multi-Channel Sound (MTS) track... Messages) Analog 96 Viewing Closed Captions (On-Screen Text Messages) Digital 98 Setting the Remote Control Mode 100 Using the CableCARD 101 Using the CableCARD Setup Function 102 Using TV Guide On ScreenTM 104 Using the D-Net 106 How to connect compatible IEEE1394 Devices 106 Connection Options 108 4-...
User Manual (ENGLISH)
Page 10
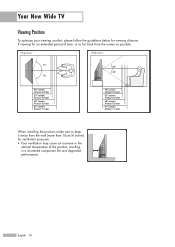
If viewing for ventilation purposes. • Poor ventilation may cause an increase in the internal temperature of time, sit as far back from the screen as possible. When installing the product, make sure to keep it away from the wall (more than 10cm/4 inches) for an extended period of the product, resulting in a shortened component life and degraded performance. English - 10 Your New Wide TV Viewing Position To optimize your viewing comfort, please follow the guidelines below for viewing distance.
If viewing for ventilation purposes. • Poor ventilation may cause an increase in the internal temperature of time, sit as far back from the screen as possible. When installing the product, make sure to keep it away from the wall (more than 10cm/4 inches) for an extended period of the product, resulting in a shortened component life and degraded performance. English - 10 Your New Wide TV Viewing Position To optimize your viewing comfort, please follow the guidelines below for viewing distance.
User Manual (ENGLISH)
Page 11
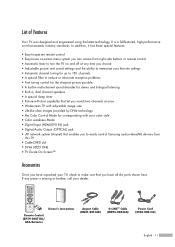
... Input (HDMI/DVI IN) jack • Digital Audio Output (OPTICAL) jack • AV network system (Anynet) that enables you to easily control Samsung audio-video(AV) devices from right side buttons or remote control • Automatic timer to -use on and off at any piece is a full... shown here. In addition, it has these special features: • Easy-to-operate remote control • Easy-to turn the TV on -screen menu system you can access from this TV. • CableCARD slot • D-Net (IEEE1394) • TV Guide On Screen™ Accessories Once you have unpacked your dealer.
... Input (HDMI/DVI IN) jack • Digital Audio Output (OPTICAL) jack • AV network system (Anynet) that enables you to easily control Samsung audio-video(AV) devices from right side buttons or remote control • Automatic timer to -use on and off at any piece is a full... shown here. In addition, it has these special features: • Easy-to-operate remote control • Easy-to turn the TV on -screen menu system you can access from this TV. • CableCARD slot • D-Net (IEEE1394) • TV Guide On Screen™ Accessories Once you have unpacked your dealer.
User Manual (ENGLISH)
Page 12
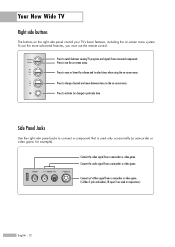
... signal from a camcorder or video game. Side Panel Jacks Use the right side panel jacks to activate (or change channels and move between viewing TV programs and signals from a camcorder or video game. Connect the audio signal from connected components. Press to connect a component that is used in ...Press to select items when using the on -screen menu. Press to raise or lower the volume and to switch between items on the on -screen menu system. Press to change ) a particular item. Press to see the on -screen menu. Your New Wide TV Right side buttons The buttons on the right...
... signal from a camcorder or video game. Side Panel Jacks Use the right side panel jacks to activate (or change channels and move between viewing TV programs and signals from a camcorder or video game. Connect the audio signal from connected components. Press to connect a component that is used in ...Press to select items when using the on -screen menu. Press to raise or lower the volume and to switch between items on the on -screen menu system. Press to change ) a particular item. Press to see the on -screen menu. Your New Wide TV Right side buttons The buttons on the right...
User Manual (ENGLISH)
Page 15
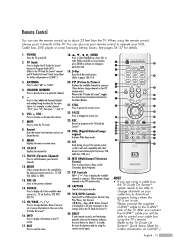
... ScreenTM, toggles the state between your VCR, Cable box, DVD player or some Samsung Set-top boxes, VCR, Cable box, DVD, etc.) 26. FAV.CH (Favorite Channel) Press to display information on the TV screen. 17. INFO Press to switch between locked and unlocked in the Video Window. 21...same station. You can use the remote control up Anynet devices. 9. POWER Turns the TV on -screen menu. 10. P.SIZE Press to change channels on G-LINKTM.) 3. NOTE • If you will work compatibly with other devices (some Samsung Set-top boxes. VOL +, VOL Press to select "AIR" or "CABLE". 4....
... ScreenTM, toggles the state between your VCR, Cable box, DVD player or some Samsung Set-top boxes, VCR, Cable box, DVD, etc.) 26. FAV.CH (Favorite Channel) Press to display information on the TV screen. 17. INFO Press to switch between locked and unlocked in the Video Window. 21...same station. You can use the remote control up Anynet devices. 9. POWER Turns the TV on -screen menu. 10. P.SIZE Press to change channels on G-LINKTM.) 3. NOTE • If you will work compatibly with other devices (some Samsung Set-top boxes. VOL +, VOL Press to select "AIR" or "CABLE". 4....
User Manual (ENGLISH)
Page 21
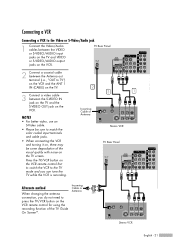
... - 21 Connecting a VCR Connecting a VCR to TV") on the VCR and the ANT 1 IN (CABLE) on the TV. 3 Connect a video cable between the VIDEO or S-VIDEO/AUDIO input jacks on the TV and VIDEO or S-VIDEO/AUDIO output jacks on the TV screen. TV Rear Panel 2 Connect a coaxial cable between the Antenna ...out terminal (i.e., "OUT to the Video or S-Video/Audio jack 1 Connect the Video/Audio cables between the S-VIDEO IN jack on the TV and the S-VIDEO OUT...
... - 21 Connecting a VCR Connecting a VCR to TV") on the VCR and the ANT 1 IN (CABLE) on the TV. 3 Connect a video cable between the VIDEO or S-VIDEO/AUDIO input jacks on the TV and VIDEO or S-VIDEO/AUDIO output jacks on the TV screen. TV Rear Panel 2 Connect a coaxial cable between the Antenna ...out terminal (i.e., "OUT to the Video or S-Video/Audio jack 1 Connect the Video/Audio cables between the S-VIDEO IN jack on the TV and the S-VIDEO OUT...

User Manual (ENGLISH)
Page 22
... Channel List" is displayed during channel information configuration. 2 When channel information configuration is finished, the message "Updating Completed" is now updated. Incoming Cable or Antenna TV Rear Panel Please insert the card as shown. Connections Connecting CableCARD You must obtain a CableCARD from a local cable service provider. 1 Insert the CableCARD into the "CableCARD...
... Channel List" is displayed during channel information configuration. 2 When channel information configuration is finished, the message "Updating Completed" is now updated. Incoming Cable or Antenna TV Rear Panel Please insert the card as shown. Connections Connecting CableCARD You must obtain a CableCARD from a local cable service provider. 1 Insert the CableCARD into the "CableCARD...
User Manual (ENGLISH)
Page 30
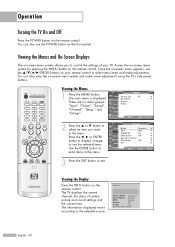
...on the remote control. The information displayed varies according to exit. Viewing the Menus and On-Screen Displays The on-screen menu system allows you want in the menu. Once the on-screen menu appears, use the ENTER buttons on the front panel. Viewing the Menus Input 1 Press... the MENU button. Input Source List : TV Edit Name √ √ There are six menu groups: Picture Anynet "Input", "Picture", "Sound", Sound D-...
...on the remote control. The information displayed varies according to exit. Viewing the Menus and On-Screen Displays The on-screen menu system allows you want in the menu. Once the on-screen menu appears, use the ENTER buttons on the front panel. Viewing the Menus Input 1 Press... the MENU button. Input Source List : TV Edit Name √ √ There are six menu groups: Picture Anynet "Input", "Picture", "Sound", Sound D-...

User Manual (ENGLISH)
Page 31
...Input Picture Sound Channel Setup Listings Language : EEnngglilsihsh Time Español V-Chip Français Caption Menu Transparency : Medium Blue Screen : Off Color Weakness ▼ More Move Enter Return English - 31 Selecting a Menu Language 1 Press the MENU button. Press... Picture Sound Channel Setup Listings Language : English √ Time √ V-Chip √ Caption √ Menu Transparency : Medium √ Blue Screen : Off √ Color Weakness √ ▼ More Move Enter Return 2 Press the ENTER button to select "English", "Español"...
...Input Picture Sound Channel Setup Listings Language : EEnngglilsihsh Time Español V-Chip Français Caption Menu Transparency : Medium Blue Screen : Off Color Weakness ▼ More Move Enter Return English - 31 Selecting a Menu Language 1 Press the MENU button. Press... Picture Sound Channel Setup Listings Language : English √ Time √ V-Chip √ Caption √ Menu Transparency : Medium √ Blue Screen : Off √ Color Weakness √ ▼ More Move Enter Return 2 Press the ENTER button to select "English", "Español"...
User Manual (ENGLISH)
Page 38
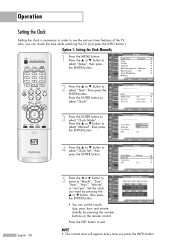
...Picture Sound Channel Setup Listings Language : English √ Time √ V-Chip √ Caption √ Menu Transparency : Medium √ Blue Screen : Off √ Color Weakness √ ▼ More Move Enter Return 2 Press the ... Clock Input Picture Sound Channel Setup Clock Mode ..."Hour", "Minute", or "am /pm -- -- -- Input Picture Sound Channel Setup Listings • You can check the time while watching the TV. (Just press the INFO button.) Option 1: Setting the Clock Manually 1 Press the MENU button. Press the ENTER button to select "Clock Mode...
...Picture Sound Channel Setup Listings Language : English √ Time √ V-Chip √ Caption √ Menu Transparency : Medium √ Blue Screen : Off √ Color Weakness √ ▼ More Move Enter Return 2 Press the ... Clock Input Picture Sound Channel Setup Clock Mode ..."Hour", "Minute", or "am /pm -- -- -- Input Picture Sound Channel Setup Listings • You can check the time while watching the TV. (Just press the INFO button.) Option 1: Setting the Clock Manually 1 Press the MENU button. Press the ENTER button to select "Clock Mode...
User Manual (ENGLISH)
Page 39
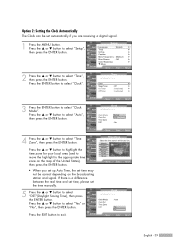
Setup Input Picture Sound Channel Setup Listings Language : English √ Time √ V-Chip √ Caption √ Menu Transparency : Medium √ Blue Screen : Off √ Color Weakness √ ▼ More Move Enter Return 2 Press the ... Press the ... or † button to exit. If there is a difference between the ...
Setup Input Picture Sound Channel Setup Listings Language : English √ Time √ V-Chip √ Caption √ Menu Transparency : Medium √ Blue Screen : Off √ Color Weakness √ ▼ More Move Enter Return 2 Press the ... Press the ... or † button to exit. If there is a difference between the ...
User Manual (ENGLISH)
Page 40
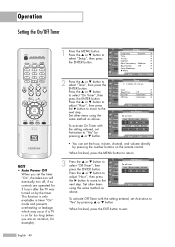
...; button. Press the ... Operation Setting the On/Off Timer NOTE • Auto Power Off When you are operated for 3 hours after the TV was turned on by the timer. Press the ... or † button to select "Time", then press the ENTER button. or † .... Setup Input Picture Sound Channel Setup Listings Language : English √ Time √ V-Chip √ Caption √ Menu Transparency : Medium √ Blue Screen : Off √ Color Weakness √ ▼ More Move Enter Return Time Input 1/ 1/ 2005/ 12 : 00 am No ▼ Move Adjust Return...
...; button. Press the ... Operation Setting the On/Off Timer NOTE • Auto Power Off When you are operated for 3 hours after the TV was turned on by the timer. Press the ... or † button to select "Time", then press the ENTER button. or † .... Setup Input Picture Sound Channel Setup Listings Language : English √ Time √ V-Chip √ Caption √ Menu Transparency : Medium √ Blue Screen : Off √ Color Weakness √ ▼ More Move Enter Return Time Input 1/ 1/ 2005/ 12 : 00 am No ▼ Move Adjust Return...
User Manual (ENGLISH)
Page 41
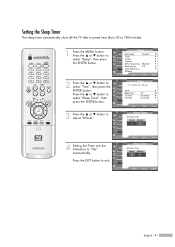
...... Press the ... Setup Input Picture Sound Channel Setup Listings Language : English √ Time √ V-Chip √ Caption √ Menu Transparency : Medium √ Blue Screen : Off √ Color Weakness √ ▼ More Move Enter Return Time Input 1/ 1/ 2005/ 12 : 00 am Picture Clock √ Sound Sleep Timer : Off ...† button to 180 minutes). 1 Press the MENU button. Setting the Sleep Timer The sleep timer automatically shuts off the TV after a preset time (from 30 to select "Sleep Timer", then press the ENTER button. 3 Press the ...
...... Press the ... Setup Input Picture Sound Channel Setup Listings Language : English √ Time √ V-Chip √ Caption √ Menu Transparency : Medium √ Blue Screen : Off √ Color Weakness √ ▼ More Move Enter Return Time Input 1/ 1/ 2005/ 12 : 00 am Picture Clock √ Sound Sleep Timer : Off ...† button to 180 minutes). 1 Press the MENU button. Setting the Sleep Timer The sleep timer automatically shuts off the TV after a preset time (from 30 to select "Sleep Timer", then press the ENTER button. 3 Press the ...

User Manual (ENGLISH)
Page 55
...: Dynamic √ 100 45 75 60 R 50 : Cool1 √ Enter Return ▲ Contrast 90 ▼ NOTES • "Tint" doesn't operate in HDMI or 480p Component or higher modes. • The Tint cannot be adjusted while watching Digital TV. You can also select these options (Contrast, ...60 R 50 : Cool1 Enter Return 4 Press the ... English - 55 or † button. Press the œ or √ button to personal preference. or † button to select "Picture", then press the ENTER button. Continued... Customizing the Picture Settings You can use the on-screen menus to...
...: Dynamic √ 100 45 75 60 R 50 : Cool1 √ Enter Return ▲ Contrast 90 ▼ NOTES • "Tint" doesn't operate in HDMI or 480p Component or higher modes. • The Tint cannot be adjusted while watching Digital TV. You can also select these options (Contrast, ...60 R 50 : Cool1 Enter Return 4 Press the ... English - 55 or † button. Press the œ or √ button to personal preference. or † button to select "Picture", then press the ENTER button. Continued... Customizing the Picture Settings You can use the on-screen menus to...

User Manual (ENGLISH)
Page 57
... • "Panorama": Use this mode for the wide aspect ratio of a panoramic picture. • "Zoom1": Magnifies the size of the picture on screen. • "Zoom2": Magnifies the size of the picture more than "Zoom1". • "4:3": Sets the picture to select "Picture", then press the ...ENTER button. This is a standard TV screen size. English - 57 or † button to 4:3 normal mode. Picture Input Mode : Standard √ Picture Size Digital NR : 16:9 : On √...
... • "Panorama": Use this mode for the wide aspect ratio of a panoramic picture. • "Zoom1": Magnifies the size of the picture on screen. • "Zoom2": Magnifies the size of the picture more than "Zoom1". • "4:3": Sets the picture to select "Picture", then press the ...ENTER button. This is a standard TV screen size. English - 57 or † button to 4:3 normal mode. Picture Input Mode : Standard √ Picture Size Digital NR : 16:9 : On √...
User Manual (ENGLISH)
Page 58
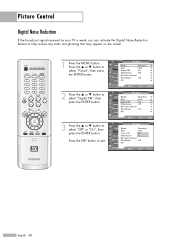
... the ... Press the EXIT button to help reduce any static and ghosting that may appear on the screen. 1 Press the MENU button. Picture Control Digital Noise Reduction If the broadcast signal received by your TV is weak, you can activate the Digital Noise Reduction feature to exit. or † button to select...
... the ... Press the EXIT button to help reduce any static and ghosting that may appear on the screen. 1 Press the MENU button. Picture Control Digital Noise Reduction If the broadcast signal received by your TV is weak, you can activate the Digital Noise Reduction feature to exit. or † button to select...
User Manual (ENGLISH)
Page 59
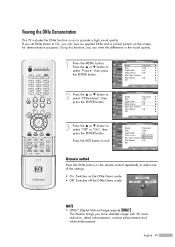
...DNIe Demo : OOfff My Color Control On Film Mode : Off PIP Listings Move Enter Return Alternate method Press the DNIe button on the screen, for demonstration purposes. If you set DNIe Demo to On, you more detailed image with 3D noise reduction, detail enhancement, contrast enhancement ...Natural Image engine) This feature brings you can view the difference in the visual quality. 1 Press the MENU button. Viewing the DNIe Demonstration This TV includes the DNIe function so as to select "Picture", then press the ENTER button. 2 Press the ... English - 59 Press the EXIT ...
...DNIe Demo : OOfff My Color Control On Film Mode : Off PIP Listings Move Enter Return Alternate method Press the DNIe button on the screen, for demonstration purposes. If you set DNIe Demo to On, you more detailed image with 3D noise reduction, detail enhancement, contrast enhancement ...Natural Image engine) This feature brings you can view the difference in the visual quality. 1 Press the MENU button. Viewing the DNIe Demonstration This TV includes the DNIe function so as to select "Picture", then press the ENTER button. 2 Press the ... English - 59 Press the EXIT ...
User Manual (ENGLISH)
Page 60
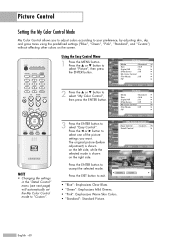
The original picture (before adjustment) is shown on the left side, while the selected mode is shown on the screen. Using the Easy Control Menu 1 Press the MENU button. Picture Input Mode : Standard √ Picture Size Digital NR : 16:9 : On √ √ Sound DNIe Demo : ...
The original picture (before adjustment) is shown on the left side, while the selected mode is shown on the screen. Using the Easy Control Menu 1 Press the MENU button. Picture Input Mode : Standard √ Picture Size Digital NR : 16:9 : On √ √ Sound DNIe Demo : ...


