Owner Instructions
Page 2
Table of Contents Your New Wide TV 6 Replacing the Lamp 6 List of Features ...8 Accessories ...8 Side Panel Buttons 9 Side Panel Jacks 9 Front Panel LED Indicators 10 Rear Panel Jacks 11 Remote Control ...12 Installing Batteries in the Remote Control 13 Connections ...16 Connecting VHF and UHF ... R, G, B 23 Connecting to HDMI (High Definition Multimedia Interface 23 Operation ...26 Turning the TV On and Off 26 Viewing the Menus and On-Screen Displays 26 Selecting the Menu Language 27 Selecting the Antenna Input 27 Memorizing the Channels 28 Adding and Erasing Channels 29 Changing ...
Table of Contents Your New Wide TV 6 Replacing the Lamp 6 List of Features ...8 Accessories ...8 Side Panel Buttons 9 Side Panel Jacks 9 Front Panel LED Indicators 10 Rear Panel Jacks 11 Remote Control ...12 Installing Batteries in the Remote Control 13 Connections ...16 Connecting VHF and UHF ... R, G, B 23 Connecting to HDMI (High Definition Multimedia Interface 23 Operation ...26 Turning the TV On and Off 26 Viewing the Menus and On-Screen Displays 26 Selecting the Menu Language 27 Selecting the Antenna Input 27 Memorizing the Channels 28 Adding and Erasing Channels 29 Changing ...
Owner Instructions
Page 8
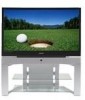
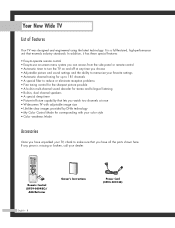
...8226; Easy-to-operate remote control • Easy-to-use on-screen menu system you can access from the side panel or remote control • Automatic timer to turn the TV on and off at once • Widescreen TV with adjustable image size • Life-like clear images provided by DNle technology...for corresponding with your color style • Color weakness Mode Accessories Once you have all the parts shown here. Your New Wide TV List of Features Your TV was designed and engineered using the latest technology. If any time you choose • Adjustable picture and sound settings and the ...
...8226; Easy-to-operate remote control • Easy-to-use on-screen menu system you can access from the side panel or remote control • Automatic timer to turn the TV on and off at once • Widescreen TV with adjustable image size • Life-like clear images provided by DNle technology...for corresponding with your color style • Color weakness Mode Accessories Once you have all the parts shown here. Your New Wide TV List of Features Your TV was designed and engineered using the latest technology. If any time you choose • Adjustable picture and sound settings and the ...
Owner Instructions
Page 9
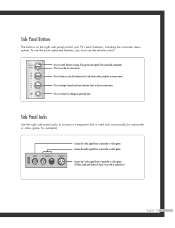
... to lower or raise the volume and to see the on -screen menu. Side Panel Jacks Use the right side panel jacks to activate (or change channels and move between viewing TV programs and signals from a camcorder or video game. Connect an S-video signal from a camcorder... change ) a particular item. Press to connect a component that is used in conjunction.) English - 9 Press to switch between items on the on -screen menu system. Connect the audio signal from a camcorder or video game. (S-Video 3 jack and Audio L/R input 3 are used only occasionally (a camcorder or video...
... to lower or raise the volume and to see the on -screen menu. Side Panel Jacks Use the right side panel jacks to activate (or change channels and move between viewing TV programs and signals from a camcorder or video game. Connect an S-video signal from a camcorder... change ) a particular item. Press to connect a component that is used in conjunction.) English - 9 Press to switch between items on the on -screen menu system. Connect the audio signal from a camcorder or video game. (S-Video 3 jack and Audio L/R input 3 are used only occasionally (a camcorder or video...
Owner Instructions
Page 12
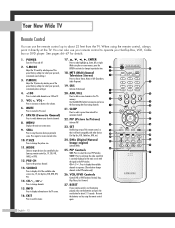
S.MODE Adjust the TV sound by the Samsung remote control (i.e., TV, STB, VCR, CABLE, or DVD). 12. VOL +, VOL - Press again to mute the TV sound. 7. P.SIZE Press to change ) a particular item. 18. While using the on the TV screen. 16. SLEEP Press to activate (or change the picture size...., press the ENTER to select a preset time interval for about 23 feet from the TV. INFO Press to increase or decrease the volume. 6. SRS Activates TruSurround. 20. POWER Turns the TV on -screen menu. 9. MODE Selects a target device to be controlled by selecting one of the preset ...
S.MODE Adjust the TV sound by the Samsung remote control (i.e., TV, STB, VCR, CABLE, or DVD). 12. VOL +, VOL - Press again to mute the TV sound. 7. P.SIZE Press to change ) a particular item. 18. While using the on the TV screen. 16. SLEEP Press to activate (or change the picture size...., press the ENTER to select a preset time interval for about 23 feet from the TV. INFO Press to increase or decrease the volume. 6. SRS Activates TruSurround. 20. POWER Turns the TV on -screen menu. 9. MODE Selects a target device to be controlled by selecting one of the preset ...

Owner Instructions
Page 19
...converter box with the VCR, select "ANT 2 IN" (whichever channel is available when select "Ant.2" in the "Antenna" channel menu. You should keep your TV selected to "ANT 1 IN" so that you can not program using the remote control, such as programming your favorite channels and ...and the second output is vacant in your TV there may be features that you can use the TV's features. If you have a S-VHS VCR, use the TV features. Connecting a Cable Converter Box This connection allows you to record one audio cable. TV Rear Panel From Cable Caution: If you have ...
...converter box with the VCR, select "ANT 2 IN" (whichever channel is available when select "Ant.2" in the "Antenna" channel menu. You should keep your TV selected to "ANT 1 IN" so that you can not program using the remote control, such as programming your favorite channels and ...and the second output is vacant in your TV there may be features that you can use the TV's features. If you have a S-VHS VCR, use the TV features. Connecting a Cable Converter Box This connection allows you to record one audio cable. TV Rear Panel From Cable Caution: If you have ...

Owner Instructions
Page 26
or † button to select to select menu items and make some adjustments using the TV's side panel buttons. Once the on-screen menu appears, use the ENTER on your TV. The main menu is displayed. The TV displays the current channel, the status of your remote control ...Picture Sound SRS TSXT MTS - - : - - Input Input Source List : TV Edit Name √ √ There are five menu groups: Picture "Input", "Picture", "Sound", Sound "Channel" and "Setup". Operation Turning the TV On and Off Press the POWER button on the remote control. Viewing the Menus and...
or † button to select to select menu items and make some adjustments using the TV's side panel buttons. Once the on-screen menu appears, use the ENTER on your TV. The main menu is displayed. The TV displays the current channel, the status of your remote control ...Picture Sound SRS TSXT MTS - - : - - Input Input Source List : TV Edit Name √ √ There are five menu groups: Picture "Input", "Picture", "Sound", Sound "Channel" and "Setup". Operation Turning the TV On and Off Press the POWER button on the remote control. Viewing the Menus and...

Owner Instructions
Page 27
...Enter Return 2 Press the ENTER button to exit. Press the EXIT button to select "Antenna". Selecting the Menu Language Choose a language for the on-screen menus: English, Spanish or French. 1 Press the MENU button. Press the ... Input Picture Sound Channel Setup Setup Language Time V-Chip Caption Blue Screen Melody Color ... select "Channel", then press the ENTER button. or † button to two different signal sources by choosing the antenna input (1 or 2). 1 Press the MENU button. or † button to select "Setup", then press the ENTER button. Press the ...
...Enter Return 2 Press the ENTER button to exit. Press the EXIT button to select "Antenna". Selecting the Menu Language Choose a language for the on-screen menus: English, Spanish or French. 1 Press the MENU button. Press the ... Input Picture Sound Channel Setup Setup Language Time V-Chip Caption Blue Screen Melody Color ... select "Channel", then press the ENTER button. or † button to two different signal sources by choosing the antenna input (1 or 2). 1 Press the MENU button. or † button to select "Setup", then press the ENTER button. Press the ...

Owner Instructions
Page 28
... type of the available channels for viewing. There are connected to the TV (i.e., an antenna or a cable system). 1 Press the MENU button. NOTES • "STD", "HRC" and "IRC" identify various types of cable TV systems. Contact your TV can memorize and store all of signal source that exists in Memory". .... After the available channels are memorized, use the CH and CH buttons to select "Air". Operation Memorizing the Channels Your TV can begin memorizing the available channels, you connected cable, press the ... or † button to scan through the channels.
... type of the available channels for viewing. There are connected to the TV (i.e., an antenna or a cable system). 1 Press the MENU button. NOTES • "STD", "HRC" and "IRC" identify various types of cable TV systems. Contact your TV can memorize and store all of signal source that exists in Memory". .... After the available channels are memorized, use the CH and CH buttons to select "Air". Operation Memorizing the Channels Your TV can begin memorizing the available channels, you connected cable, press the ... or † button to scan through the channels.

Owner Instructions
Page 29
... Program Start Enter Return Adding and Erasing Channels You can add channels that were not memorized or delete unwanted channels from memory. 1 Press the MENU button. or † button to start the auto program. Press the ENTER button to select "Channel", then press the ENTER button. 2 Press... press the ENTER button. 2 Press the ... Press the ... Press the EXIT button to select "Add/Delete", then press the ENTER button. The TV begins memorizing all of the available stations. or † button to exit. Input Picture Sound Channel Setup Channel Antenna : Ant.1 Air/CATV : Air...
... Program Start Enter Return Adding and Erasing Channels You can add channels that were not memorized or delete unwanted channels from memory. 1 Press the MENU button. or † button to start the auto program. Press the ENTER button to select "Channel", then press the ENTER button. 2 Press... press the ENTER button. 2 Press the ... Press the ... Press the EXIT button to select "Add/Delete", then press the ENTER button. The TV begins memorizing all of the available stations. or † button to exit. Input Picture Sound Channel Setup Channel Antenna : Ant.1 Air/CATV : Air...

Owner Instructions
Page 31
... (such as Favorite channels. Press the ... or † button to exit. Selecting Your Favorite Channels You can be set as TV and CATV). To Store Your Favorite Channels: 1 Press the MENU button. Input Picture Sound Channel Setup Channel Antenna : Ant.1 Air/CATV : Air Auto Program Add/Delete Favorite Channels Name Fine Tune...
... (such as Favorite channels. Press the ... or † button to exit. Selecting Your Favorite Channels You can be set as TV and CATV). To Store Your Favorite Channels: 1 Press the MENU button. Input Picture Sound Channel Setup Channel Antenna : Ant.1 Air/CATV : Air Auto Program Add/Delete Favorite Channels Name Fine Tune...

Owner Instructions
Page 32
..., the channel scan function works on the main picture only. or † button to select "Channel", then press the ENTER button. Picture Scan √ The TV scans all of the Sound channels memorized. Press the ... Operation Scanning the Channels The...
..., the channel scan function works on the main picture only. or † button to select "Channel", then press the ENTER button. Picture Scan √ The TV scans all of the Sound channels memorized. Press the ... Operation Scanning the Channels The...

Owner Instructions
Page 33
... ▼ More Move Enter Return 3 Press the button to move to the channel to be assigned to the channel that will be labeled. 2 Press the MENU button. Clear Clear Select a second letter or digit Sound Air 4 - - - - Press the ... Clear Clear then press the ENTER button. English - 33 When ... the channel label will appear next to the channel number. or † button, as Channel Air 5 Air 6 ------- When you add or delete the TV channel, the labeled channels list will also be added or deleted. 1 Press the CH or CH button to tune to a new name, Input Picture Air...
... ▼ More Move Enter Return 3 Press the button to move to the channel to be assigned to the channel that will be labeled. 2 Press the MENU button. Clear Clear Select a second letter or digit Sound Air 4 - - - - Press the ... Clear Clear then press the ENTER button. English - 33 When ... the channel label will appear next to the channel number. or † button, as Channel Air 5 Air 6 ------- When you add or delete the TV channel, the labeled channels list will also be added or deleted. 1 Press the CH or CH button to tune to a new name, Input Picture Air...

Owner Instructions
Page 34
... Settings to the Factory Defaults You can return to the factory default picture settings. 4 Press the MENU button to select "Mode". Input Picture Sound Channel Setup Mode Mode : Standard √ Contrast 90 Brightness 50 Sharpness 50 Color 50 Tint 50 50 Reset Move Enter Return English - 34 Input Picture Sound Channel Setup Mode Mode : Standard √...
... Settings to the Factory Defaults You can return to the factory default picture settings. 4 Press the MENU button to select "Mode". Input Picture Sound Channel Setup Mode Mode : Standard √ Contrast 90 Brightness 50 Sharpness 50 Color 50 Tint 50 50 Reset Move Enter Return English - 34 Input Picture Sound Channel Setup Mode Mode : Standard √...

Owner Instructions
Page 35
..." or "Cinema" by pressing the P.MODE button (or by making a selection from the menu). Input Picture Sound Channel Setup Mode Mode : Standard √ Contrast 90 Brightness 50 Sharpness 50 Color 50 Tint 50 50 Reset Move Enter Return 3 Press the ENTER button again to select "Mode". English - 35...or † button to exit. or † button to select one of the standard picture settings. Using Automatic Picture Settings Your TV has automatic picture settings ("Dynamic", "Standard" and "Cinema") that are preset at the factory. Input Picture Sound Channel Setup Mode ...
..." or "Cinema" by pressing the P.MODE button (or by making a selection from the menu). Input Picture Sound Channel Setup Mode Mode : Standard √ Contrast 90 Brightness 50 Sharpness 50 Color 50 Tint 50 50 Reset Move Enter Return 3 Press the ENTER button again to select "Mode". English - 35...or † button to exit. or † button to select one of the standard picture settings. Using Automatic Picture Settings Your TV has automatic picture settings ("Dynamic", "Standard" and "Cinema") that are preset at the factory. Input Picture Sound Channel Setup Mode ...

Owner Instructions
Page 36
Using the MUTE Button At any time, you can use one of the TV with the remote control. Mute To turn mute off . Customizing the Sound The sound settings can be adjusted to select "Sound", then press the ENTER ...button. buttons to select "Equalizer", then press the ENTER button. See next page.) 1 Press the MENU button. Press the ... Operation Sound Control You can temporarily cut off the sound. Input Picture Sound Channel Setup Sound Mode Equalizer SRS TSXT MTS Auto...
Using the MUTE Button At any time, you can use one of the TV with the remote control. Mute To turn mute off . Customizing the Sound The sound settings can be adjusted to select "Sound", then press the ENTER ...button. buttons to select "Equalizer", then press the ENTER button. See next page.) 1 Press the MENU button. Press the ... Operation Sound Control You can temporarily cut off the sound. Input Picture Sound Channel Setup Sound Mode Equalizer SRS TSXT MTS Auto...

Owner Instructions
Page 37
... Adjust Return Using Automatic Sound Settings Your TV has automatic sound settings ("Standard", "Music", "Movie" and "Speech") that is mostly dialogue (i.e., news). • Choose "Custom" to recall your personalized sound settings. 1 Press the MENU button. You can activate these sound settings... by pressing the S.MODE button (or by making a selection from the menu), or you can select "Custom", which automatically recalls your personalized settings. Press ...
... Adjust Return Using Automatic Sound Settings Your TV has automatic sound settings ("Standard", "Music", "Movie" and "Speech") that is mostly dialogue (i.e., news). • Choose "Custom" to recall your personalized sound settings. 1 Press the MENU button. You can activate these sound settings... by pressing the S.MODE button (or by making a selection from the menu), or you can select "Custom", which automatically recalls your personalized settings. Press ...

Owner Instructions
Page 38
Set the clock you can check the time while watching the TV. (Just press the INFO button.) 1 Press the MENU button. or † button, then press the ENTER button. This function is available in order to select "Clock Set". Press the ... or † button to ... : Off √ Melody : On √ Color Weakness √ PC √ Move Enter Return 2 Press the ENTER button to use the various timer features of the TV. English - 38 am √ Off √ Off √ Off √ Channel Setup Move Enter Return 3 Press the œ or √ button to move to "...
Set the clock you can check the time while watching the TV. (Just press the INFO button.) 1 Press the MENU button. or † button, then press the ENTER button. This function is available in order to select "Clock Set". Press the ... or † button to ... : Off √ Melody : On √ Color Weakness √ PC √ Move Enter Return 2 Press the ENTER button to use the various timer features of the TV. English - 38 am √ Off √ Off √ Off √ Channel Setup Move Enter Return 3 Press the œ or √ button to move to "...
Owner Instructions
Page 39
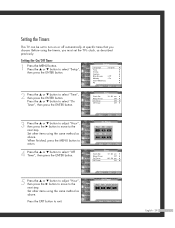
... "Hour", then press the √ button to move to the next step. Set other items using the same method as above . When finished, press the MENU button to exit. Activation 10 No Move Adjust Return 4 Press the ... Input Picture Sound Channel Setup On Timer Hour ▲ 12 ▼ Ch 03 Min... √ Off √ 06 : 30 am Vol. or † button to select "On Timer", then press the ENTER button. Press the ... Setting the Timers This TV can be set to turn on or off automatically at specific times that you must set the...
... "Hour", then press the √ button to move to the next step. Set other items using the same method as above . When finished, press the MENU button to exit. Activation 10 No Move Adjust Return 4 Press the ... Input Picture Sound Channel Setup On Timer Hour ▲ 12 ▼ Ch 03 Min... √ Off √ 06 : 30 am Vol. or † button to select "On Timer", then press the ENTER button. Press the ... Setting the Timers This TV can be set to turn on or off automatically at specific times that you must set the...

Owner Instructions
Page 40
... press the ENTER button. NOTE • If no signal is received for 15 minutes, the TV will be automatically turned off the TV after a preset time (from "30 Min." or † button to 180 minutes). 1 Press the MENU button. Operation Setting the Sleep Timer The sleep timer automatically shuts off . to "180 Min...
... press the ENTER button. NOTE • If no signal is received for 15 minutes, the TV will be automatically turned off the TV after a preset time (from "30 Min." or † button to 180 minutes). 1 Press the MENU button. Operation Setting the Sleep Timer The sleep timer automatically shuts off . to "180 Min...

Owner Instructions
Page 41
... MENU button. Input Picture Sound Channel Setup Input Source List : TV Edit Name Move Enter √ √ Return 2 Press the ENTER button to select a signal source, then press the ENTER button. or † button to select "Source List". Input Picture Sound Channel Setup Source List TV AV1... to select "Input". NOTE • When you connect equipment to the TV, you can choose between the following sets of jacks: "AV1", "AV2", "S-Video1", "S-Video2", "Component1", "Component2", "PC", "DVI" or "HDMI" on the TV's rear panel, and "AV3" or "S-Video3" on the AV1 remote control repeatedly...
... MENU button. Input Picture Sound Channel Setup Input Source List : TV Edit Name Move Enter √ √ Return 2 Press the ENTER button to select a signal source, then press the ENTER button. or † button to select "Source List". Input Picture Sound Channel Setup Source List TV AV1... to select "Input". NOTE • When you connect equipment to the TV, you can choose between the following sets of jacks: "AV1", "AV2", "S-Video1", "S-Video2", "Component1", "Component2", "PC", "DVI" or "HDMI" on the TV's rear panel, and "AV3" or "S-Video3" on the AV1 remote control repeatedly...


