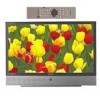
User Manual (ENGLISH)
Page 4
...TV 10 Replacing the Lamp 10 List of Features ...12 Checking Parts...12 Side Panel Buttons 13 Side Panel Jacks 13 Front Panel LED Indicators 14 Rear...to Y,PB,PR 26 Connecting to DVI (Digital Visual Interface 26 Connecting to R,G,B 27 Operation ...30 Turning the TV On and Off 30 Viewing the... Menus and Displays 30 Selecting the Menu Language 31 Selecting the Antenna Input 31 Channel ...Mode 59 Changing the Screen Size 60 Special Audio Options 61 MTS Settings: Choosing a Soundtrack 61 Virtual Dolby 62 BBE ...63 Auto Volume 64 Setting...
...TV 10 Replacing the Lamp 10 List of Features ...12 Checking Parts...12 Side Panel Buttons 13 Side Panel Jacks 13 Front Panel LED Indicators 14 Rear...to Y,PB,PR 26 Connecting to DVI (Digital Visual Interface 26 Connecting to R,G,B 27 Operation ...30 Turning the TV On and Off 30 Viewing the... Menus and Displays 30 Selecting the Menu Language 31 Selecting the Antenna Input 31 Channel ...Mode 59 Changing the Screen Size 60 Special Audio Options 61 MTS Settings: Choosing a Soundtrack 61 Virtual Dolby 62 BBE ...63 Auto Volume 64 Setting...
User Manual (ENGLISH)
Page 8
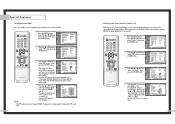
...when a signal source is for the TV to warm up, so normal brightness may be connected to these to connect the component video/audio signals from a DVD player or a set top box when using the component video input jacks. Ø PC/DVI AUDIO INPUT jacks Connect these terminals. Auto Timer ON.../OFF has been set and the set will automatically appear in RF, Video and S-Video modes. ˆ Component1, 2, 3 jacks (Y, PB, PR, L, R) Use these jacks to the audio-output jacks on your TV. Check if the ventilation hole on the rear of ...
...when a signal source is for the TV to warm up, so normal brightness may be connected to these to connect the component video/audio signals from a DVD player or a set top box when using the component video input jacks. Ø PC/DVI AUDIO INPUT jacks Connect these terminals. Auto Timer ON.../OFF has been set and the set will automatically appear in RF, Video and S-Video modes. ˆ Component1, 2, 3 jacks (Y, PB, PR, L, R) Use these jacks to the audio-output jacks on your TV. Check if the ventilation hole on the rear of ...

User Manual (ENGLISH)
Page 14
... audio cables between the PC/DVI AUDIO IN jacks on the TV and the AUDIO OUT jacks on the Set Top Box. 2 Connect video cables between the Component (1, 2 or 3) Y, PB and PR inputs on the TV and Y, PB and PR (or Y, CB, CR) outputs on the Set Top Box. TV Rear Panel 2 Connect video cables between... the PC IN jack on the TV and the R.G.B OUT jack on the Set Top Box. Note: For an...
... audio cables between the PC/DVI AUDIO IN jacks on the TV and the AUDIO OUT jacks on the Set Top Box. 2 Connect video cables between the Component (1, 2 or 3) Y, PB and PR inputs on the TV and Y, PB and PR (or Y, CB, CR) outputs on the Set Top Box. TV Rear Panel 2 Connect video cables between... the PC IN jack on the TV and the R.G.B OUT jack on the Set Top Box. Note: For an...

User Manual (ENGLISH)
Page 20
.... The level indicator will disappear and the Video menu will see the items "Contrast", "Brightness", "Sharpness", "Color" or "Tint". 3 Press the ... Input Picture Sound Channel Setup Picture Picture Mode : Dynamic √ Custom Picture √ Color Tone : Normal √ Film Mode : Off √ DNIe :... Enter Return 4 Press the œ or √ button to raise or lower the value of the TV. You can change . NOTE • Tint doesn't operate in PC, DVI or 480p-Component or higher modes. 38 Using Automatic ("Standard") Picture Settings 1 Press the P.MODE button ...
.... The level indicator will disappear and the Video menu will see the items "Contrast", "Brightness", "Sharpness", "Color" or "Tint". 3 Press the ... Input Picture Sound Channel Setup Picture Picture Mode : Dynamic √ Custom Picture √ Color Tone : Normal √ Film Mode : Off √ DNIe :... Enter Return 4 Press the œ or √ button to raise or lower the value of the TV. You can change . NOTE • Tint doesn't operate in PC, DVI or 480p-Component or higher modes. 38 Using Automatic ("Standard") Picture Settings 1 Press the P.MODE button ...
User Manual (ENGLISH)
Page 24
...particular signal source, then press the ENTER button to select "Source List". Input Picture Sound Channel Setup Input Source List Edit Name Move Enter √ √ Return 2 Press the ... C- H-D- Input Picture Sound Channel Setup Input Source List Edit Name Move Enter √ √ Return 3 Press...switch between the following sets of jacks: Video1, Video2, S-Video1, S-Video2, Component1, Component2, Component3, DVI or PC on the TV's rear panel, and Video3 or S-Video3 on the TV's side panel. 46 Assigning Names to select external device: VCR, DVD, Cable STB, HD STB, ...
...particular signal source, then press the ENTER button to select "Source List". Input Picture Sound Channel Setup Input Source List Edit Name Move Enter √ √ Return 2 Press the ... C- H-D- Input Picture Sound Channel Setup Input Source List Edit Name Move Enter √ √ Return 3 Press...switch between the following sets of jacks: Video1, Video2, S-Video1, S-Video2, Component1, Component2, Component3, DVI or PC on the TV's rear panel, and Video3 or S-Video3 on the TV's side panel. 46 Assigning Names to select external device: VCR, DVD, Cable STB, HD STB, ...
User Manual (ENGLISH)
Page 35
... Component1, Component2, Component3, PC, and DVI. 68 Selecting a Signal Source (Antenna or Cable) for PIP If the PIP source is TV during PIP ON, you have not connected Input Picture Sound Channel Setup PIP PIP : On √ PIP Source : TV √ PIP Swap PIP Size :... : IMRCain Move Enter Return 69 or † button to select "PIP", then press the ENTER button. Input If a Cable TV system is Picture providing the signal, press the ... Input Picture Sound Channel Setup Picture Picture Mode : Dynamic √ Custom Picture √ Color Tone : Normal √...
... Component1, Component2, Component3, PC, and DVI. 68 Selecting a Signal Source (Antenna or Cable) for PIP If the PIP source is TV during PIP ON, you have not connected Input Picture Sound Channel Setup PIP PIP : On √ PIP Source : TV √ PIP Swap PIP Size :... : IMRCain Move Enter Return 69 or † button to select "PIP", then press the ENTER button. Input If a Cable TV system is Picture providing the signal, press the ... Input Picture Sound Channel Setup Picture Picture Mode : Dynamic √ Custom Picture √ Color Tone : Normal √...

User Manual (ENGLISH)
Page 36
...; Move Enter Return 2 Press the ... or † button to select "PIP Swap", then press the ENTER button. Input Picture Sound Channel Setup PIP PIP : On √ PIP Source : TV √ PIP Swap PIP Size : Large √ PIP Position √ PIP Channel : Air 11 √ Air/CATV...the ENTER button. or † button to select "Picture", then press the ENTER button. The PIP image will appear in the PC and DVI mode. 71 Input Picture Sound Channel Setup Picture Picture Mode : Dynamic √ Custom Picture √ Color Tone : Normal √ Film Mode : Off ...
...; Move Enter Return 2 Press the ... or † button to select "PIP Swap", then press the ENTER button. Input Picture Sound Channel Setup PIP PIP : On √ PIP Source : TV √ PIP Swap PIP Size : Large √ PIP Position √ PIP Channel : Air 11 √ Air/CATV...the ENTER button. or † button to select "Picture", then press the ENTER button. The PIP image will appear in the PC and DVI mode. 71 Input Picture Sound Channel Setup Picture Picture Mode : Dynamic √ Custom Picture √ Color Tone : Normal √ Film Mode : Off ...
User Manual (ENGLISH)
Page 43
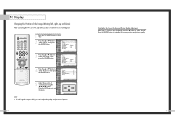
... Caption √ Language : English √ Melody : On √ Blue Screen : Off √ PC Setup √ Move Enter Return Input Picture Sound Channel Setup Setup Time √ V-Chip √ Closed Caption √ Language : English √ Melody : On √ Blue...Setup Move Enter Return Auto in Progress Please Wait 85 NOTES • When this TV is used as PC are supported for the signal input to select "Setup", then press the ENTER button. 3 Press the ... Only ...if a non-standard video format is selected. or † button to the DVI jack.
... Caption √ Language : English √ Melody : On √ Blue Screen : Off √ PC Setup √ Move Enter Return Input Picture Sound Channel Setup Setup Time √ V-Chip √ Closed Caption √ Language : English √ Melody : On √ Blue...Setup Move Enter Return Auto in Progress Please Wait 85 NOTES • When this TV is used as PC are supported for the signal input to select "Setup", then press the ENTER button. 3 Press the ... Only ...if a non-standard video format is selected. or † button to the DVI jack.
User Manual (ENGLISH)
Page 45
... select "Recall". PC Display Changing the Position of the Image (Moving left, right, up and down) After connecting the TV to your PC, adjust the position of screen if it is input to DVI, you can't adjust the quality and position of screen by pressing the button. or † button to select "Setup...
... select "Recall". PC Display Changing the Position of the Image (Moving left, right, up and down) After connecting the TV to your PC, adjust the position of screen if it is input to DVI, you can't adjust the quality and position of screen by pressing the button. or † button to select "Setup...

User Manual (ENGLISH)
Page 46
.... The name of the screen mode will be displayed at the bottom of the input source. Wide PC Expand Scales the picture to 92% of the screen regardless of the aspect ratio of input source. PC Display Changing the Screen Size (PC mode) When you press the ... for the PC mode. 90 Aspect Supported settings Source (PC/DVI) 1920 x 1080i 1280 x 720 1024 x 768 720 x 483 (480p) Others Aspect Wide TV ➝ 4:3 Wide TV ➝ Wide PC ➝ Expand ➝ 4:3 Wide TV ➝ Wide PC ➝ Expand Wide TV ➝ 4:3 Wide TV ➝ Wide PC ➝ Expand ➝ 4:3 NOTES ...
.... The name of the screen mode will be displayed at the bottom of the input source. Wide PC Expand Scales the picture to 92% of the screen regardless of the aspect ratio of input source. PC Display Changing the Screen Size (PC mode) When you press the ... for the PC mode. 90 Aspect Supported settings Source (PC/DVI) 1920 x 1080i 1280 x 720 1024 x 768 720 x 483 (480p) Others Aspect Wide TV ➝ 4:3 Wide TV ➝ Wide PC ➝ Expand ➝ 4:3 Wide TV ➝ Wide PC ➝ Expand Wide TV ➝ 4:3 Wide TV ➝ Wide PC ➝ Expand ➝ 4:3 NOTES ...

User Manual (ENGLISH)
Page 8
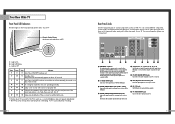
... L, R) Receives the DTV video/audio signals from a set top box. For more information, please see "Connections". Lamp cover on the rear panel of the set will shut off. " DVI (Digital Video Interface) jack Receives the digital signals from a set top box or PC etc. ' RS-232C jack ˝ PC VIDEO...-A terminal out to the video output port on your TV. Note: Only 480p, 720p and 1080i formats are two sets of video input jacks and one set of component video input jacks on rear of your PC. Rear Panel Jacks Use the rear panel jacks to an external source, such as two ...
... L, R) Receives the DTV video/audio signals from a set top box. For more information, please see "Connections". Lamp cover on the rear panel of the set will shut off. " DVI (Digital Video Interface) jack Receives the digital signals from a set top box or PC etc. ' RS-232C jack ˝ PC VIDEO...-A terminal out to the video output port on your TV. Note: Only 480p, 720p and 1080i formats are two sets of video input jacks and one set of component video input jacks on rear of your PC. Rear Panel Jacks Use the rear panel jacks to an external source, such as two ...

User Manual (ENGLISH)
Page 14
...(480p/720p/10801i) PC AUDIO Y ANT-A Pb ANT A-OUT MONITOR OUT Pr VIDEO 2 L L ANT-B S-VIDEO 1 S-VIDEO 2 VIDEO 1 R R V L R DVI PC RS-232C DTV Set Top Box TV Rear Panel Component1 Component1/2 (480i/480p) (480p/720p/10801i) PC AUDIO Y ANT-A Pb ANT A-OUT MONITOR OUT Pr VIDEO 2 L L ANT-B S-VIDEO 1 S-VIDEO 2 ... DVI DTV Set Top Box Connecting to Y,Pb,Pr 1 Connect a set of audio cables between the PC AUDIO IN jacks on the TV and the AUDIO OUT jacks on the Set Top Box. 2 Connect video cables between the Component2 or Component3 Y, Pb and Pr inputs on the TV ...
...(480p/720p/10801i) PC AUDIO Y ANT-A Pb ANT A-OUT MONITOR OUT Pr VIDEO 2 L L ANT-B S-VIDEO 1 S-VIDEO 2 VIDEO 1 R R V L R DVI PC RS-232C DTV Set Top Box TV Rear Panel Component1 Component1/2 (480i/480p) (480p/720p/10801i) PC AUDIO Y ANT-A Pb ANT A-OUT MONITOR OUT Pr VIDEO 2 L L ANT-B S-VIDEO 1 S-VIDEO 2 ... DVI DTV Set Top Box Connecting to Y,Pb,Pr 1 Connect a set of audio cables between the PC AUDIO IN jacks on the TV and the AUDIO OUT jacks on the Set Top Box. 2 Connect video cables between the Component2 or Component3 Y, Pb and Pr inputs on the TV ...

User Manual (ENGLISH)
Page 33
... signals, see "Viewing an External Signal Source" (See page 41). NOTE • The PIP subscreen doesn't support ANT-B, Component1, Component2, Component3, PC, and DVI. 65 Move the joystick down to select PIP, then press the joystick to enter. The PIP image will not appear if you turn the...the PIP mode. 64 Selecting an External Signal You can use PIP to view a signal from these inputs will appear in the corner of your TV. If you don't have not connected any equipment to the TV's input jacks. Selecting a PIP Screen 1 Press the Menu button. Move the joystick down to select PIP,...
... signals, see "Viewing an External Signal Source" (See page 41). NOTE • The PIP subscreen doesn't support ANT-B, Component1, Component2, Component3, PC, and DVI. 65 Move the joystick down to select PIP, then press the joystick to enter. The PIP image will not appear if you turn the...the PIP mode. 64 Selecting an External Signal You can use PIP to view a signal from these inputs will appear in the corner of your TV. If you don't have not connected any equipment to the TV's input jacks. Selecting a PIP Screen 1 Press the Menu button. Move the joystick down to select PIP,...
User Manual (ENGLISH)
Page 41
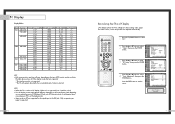
... self-adjust to enter. 2 Press the Menu button. Move the joystick up Your TV as a PC display, 32-bit color is supported. 80 How to Set up or down to select "Auto Adjust". 3 Press the joystick to the DVI jack. Move the joystick down to select "PC", then press the joystick to... PC display screen might appear different, depending on the manufacturer (and depending on the type of Windows). Check your PC instruction book for the signal input to enter. 81 Freq Polarity Pixel Clock Sep Com SOG VGA 640x350 800x449 31.47 kHz P 70.00 Hz N 25.175 MHz 0 0 x 720x400 900x449 31...
... self-adjust to enter. 2 Press the Menu button. Move the joystick up Your TV as a PC display, 32-bit color is supported. 80 How to Set up or down to select "Auto Adjust". 3 Press the joystick to the DVI jack. Move the joystick down to select "PC", then press the joystick to... PC display screen might appear different, depending on the manufacturer (and depending on the type of Windows). Check your PC instruction book for the signal input to enter. 81 Freq Polarity Pixel Clock Sep Com SOG VGA 640x350 800x449 31.47 kHz P 70.00 Hz N 25.175 MHz 0 0 x 720x400 900x449 31...

User Manual (ENGLISH)
Page 42
...Remove picture noise (vertical stripes) on the screen by moving the joystick right or left , right, up and down) After connecting the TV to your PC, adjust the position of screen if it is not set properly, then vertical stripes will become black and return to the ... normal operation.) 83 PC Display Picture Quality Adjustment The purpose of picture quality adjustment is input to DVI, you can't adjust the quality and position of picture. NOTE • When 'Recall' is active, the TV screen will appear on the remote control. To Initialize the Screen Position and Picture Quality...
...Remove picture noise (vertical stripes) on the screen by moving the joystick right or left , right, up and down) After connecting the TV to your PC, adjust the position of screen if it is not set properly, then vertical stripes will become black and return to the ... normal operation.) 83 PC Display Picture Quality Adjustment The purpose of picture quality adjustment is input to DVI, you can't adjust the quality and position of picture. NOTE • When 'Recall' is active, the TV screen will appear on the remote control. To Initialize the Screen Position and Picture Quality...

User Manual (ENGLISH)
Page 43
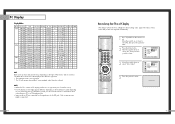
... changing the aspect ratio of input source. The screen displays in sequence. Aspect Supported settings Source (PC/DVI) 1920 x 1080i 1280 x 720 1024 x 768 720 x 483 (480p) Others Aspect Wide(TV) Wide(TV) ➝ Wide(PC) Wide(TV) ➝ Wide(PC) ➝ Expand Wide(TV) ➝ Wide(PC) ➝ Normal Wide(TV) ➝ Wide(PC) ➝ Expand...
... changing the aspect ratio of input source. The screen displays in sequence. Aspect Supported settings Source (PC/DVI) 1920 x 1080i 1280 x 720 1024 x 768 720 x 483 (480p) Others Aspect Wide(TV) Wide(TV) ➝ Wide(PC) Wide(TV) ➝ Wide(PC) ➝ Expand Wide(TV) ➝ Wide(PC) ➝ Normal Wide(TV) ➝ Wide(PC) ➝ Expand...


