

Open Source Guide (ENGLISH)
Page 1
...which are distributed under the MPL. For software which are distributed under the OpenSSL Project. com). This product uses some software programs which is allowed only for software interchange...; The precise terms and conditions for questions regarding open sources, contact Samsung via Email (vdswmanager@samsung. they know that is addressed as a special exception, the source ...In addition, mere aggregation of this License. 9. or, b) Accompany it . The original manual has wrong versions of patent infringement or for any later version", you modify it with two...
...which are distributed under the MPL. For software which are distributed under the OpenSSL Project. com). This product uses some software programs which is allowed only for software interchange...; The precise terms and conditions for questions regarding open sources, contact Samsung via Email (vdswmanager@samsung. they know that is addressed as a special exception, the source ...In addition, mere aggregation of this License. 9. or, b) Accompany it . The original manual has wrong versions of patent infringement or for any later version", you modify it with two...
User Manual (ENGLISH)
Page 7
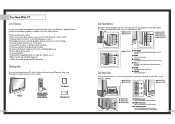
Television Remote Control (BP59-00048A)/ AAA Batteries (4301-000121) This Manual Warranty Card 12 Side Panel Buttons The buttons on the side panel control your TV, check to make sure that you must use the more advanced features, you have all the parts shown here. Press to lower ...camcorder or video game. ˇ S-VIDEO Input jack Connect an S-video signal from the side panel or remote control • Automatic timer to turn the TV on and off . Use the side panel jacks to connect a component that exceeds industry standards. To use the remote control. œ HLN467W1 œ ...
Television Remote Control (BP59-00048A)/ AAA Batteries (4301-000121) This Manual Warranty Card 12 Side Panel Buttons The buttons on the side panel control your TV, check to make sure that you must use the more advanced features, you have all the parts shown here. Press to lower ...camcorder or video game. ˇ S-VIDEO Input jack Connect an S-video signal from the side panel or remote control • Automatic timer to turn the TV on and off . Use the side panel jacks to connect a component that exceeds industry standards. To use the remote control. œ HLN467W1 œ ...
User Manual (ENGLISH)
Page 13
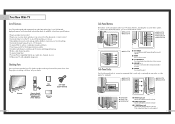
...with the camcorder.) 3 Connect a video cable between the VIDEO OUT jack on the DVD player and the VIDEO IN jack on the TV. TV Rear Panel Incoming Cable or Antenna 2 To enable Component video viewing, connect video cables between the AUDIO OUTPUT jack on the camcorder and ...External Signal Source" in this manual. Connections Connecting a Camcorder The side panel jacks on your TV make it easy to connect a camcorder to your TV. You can use your DVD player's owner's manual. TV Side Panel Camcorder 24 Connecting a DVD Player The rear panel jacks on your TV make it easy to connect ...
...with the camcorder.) 3 Connect a video cable between the VIDEO OUT jack on the DVD player and the VIDEO IN jack on the TV. TV Rear Panel Incoming Cable or Antenna 2 To enable Component video viewing, connect video cables between the AUDIO OUTPUT jack on the camcorder and ...External Signal Source" in this manual. Connections Connecting a Camcorder The side panel jacks on your TV make it easy to connect a camcorder to your TV. You can use your DVD player's owner's manual. TV Side Panel Camcorder 24 Connecting a DVD Player The rear panel jacks on your TV make it easy to connect ...

User Manual (ENGLISH)
Page 14
... of audio cables between the PC/DVI AUDIO IN jacks on the TV and the AUDIO OUT jacks on the Set Top Box. Connecting to DVI (Digital Visual Interface) 1 Connect a set of Component video, see your Set Top Box owner's manual. TV Rear Panel 2 Connect video cables between the Component (1, 2 or 3) ...Y, PB and PR inputs on the TV and Y, PB and PR (or Y, CB, CR) outputs on the Set Top Box. Note: For an ...
... of audio cables between the PC/DVI AUDIO IN jacks on the TV and the AUDIO OUT jacks on the Set Top Box. Connecting to DVI (Digital Visual Interface) 1 Connect a set of Component video, see your Set Top Box owner's manual. TV Rear Panel 2 Connect video cables between the Component (1, 2 or 3) ...Y, PB and PR inputs on the TV and Y, PB and PR (or Y, CB, CR) outputs on the Set Top Box. Note: For an ...

User Manual (ENGLISH)
Page 28
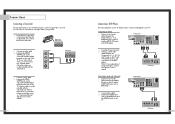
Move 0 Return Enter 54 LNA (Low Noise Amplifier) If the TV is Fine Tuned To store the fine tuning setting in the TV's memory, press the ENTER button. (A * icon will appear.) Reset Move 3 Return Enter Fine Tune To reset the fine tuning to fine tune. 2 Press the ...press the ENTER button. or † button to select "Channel", then press the ENTER button. Special Features Fine Tuning Channels Fine tuning lets you manually adjust the TV's tuner if you have difficulty tuning in a channel. 1 Using the number buttons on the remote control, select the channel you want to Air 12...
Move 0 Return Enter 54 LNA (Low Noise Amplifier) If the TV is Fine Tuned To store the fine tuning setting in the TV's memory, press the ENTER button. (A * icon will appear.) Reset Move 3 Return Enter Fine Tune To reset the fine tuning to fine tune. 2 Press the ...press the ENTER button. or † button to select "Channel", then press the ENTER button. Special Features Fine Tuning Channels Fine tuning lets you manually adjust the TV's tuner if you have difficulty tuning in a channel. 1 Using the number buttons on the remote control, select the channel you want to Air 12...
User Manual (ENGLISH)
Page 7
...the remote control. œ HLN467W œ HLN567W œ HLN437W œ HLN507W œ HLN4365W œ HLN5065W Side Panel Jacks œ HLN617W Œ TV/VIDEO Press to switch between viewing TV programs and signals from connected components. ´ MENU Press to see the on-screen menu. ˇ M ...use the more advanced features, you choose • Adjustable picture and sound settings and the ability to memorize your dealer. Television This Manual A/V Cable (AA39-40001B) Remote Control (BP59-00016A)/ AAA Batteries (4301-000121) Warranty Card 12 Side Panel Buttons The buttons ...
...the remote control. œ HLN467W œ HLN567W œ HLN437W œ HLN507W œ HLN4365W œ HLN5065W Side Panel Jacks œ HLN617W Œ TV/VIDEO Press to switch between viewing TV programs and signals from connected components. ´ MENU Press to see the on-screen menu. ˇ M ...use the more advanced features, you choose • Adjustable picture and sound settings and the ability to memorize your dealer. Television This Manual A/V Cable (AA39-40001B) Remote Control (BP59-00016A)/ AAA Batteries (4301-000121) Warranty Card 12 Side Panel Buttons The buttons ...

User Manual (ENGLISH)
Page 13
.... 2 Connect an audio cable between the Component1 (Y, Pb and Pr) jacks on the TV and Y, Pb and Pr (or Y, Cb, Cr) output jacks on the side of the TV. You can use your DVD player's owner's manual. They are usually included with the camcorder.) To watch a tape, follow your camera's... instructions and the section on "Viewing an External Signal Source" in this manual. 24 Connecting a DVD Player The rear panel jacks on the TV. 25 Connecting to audio and video jacks 1 Connect a set of audio cables between the Component1AUDIO IN jacks on the...
.... 2 Connect an audio cable between the Component1 (Y, Pb and Pr) jacks on the TV and Y, Pb and Pr (or Y, Cb, Cr) output jacks on the side of the TV. You can use your DVD player's owner's manual. They are usually included with the camcorder.) To watch a tape, follow your camera's... instructions and the section on "Viewing an External Signal Source" in this manual. 24 Connecting a DVD Player The rear panel jacks on the TV. 25 Connecting to audio and video jacks 1 Connect a set of audio cables between the Component1AUDIO IN jacks on the...

User Manual (ENGLISH)
Page 14
...For an explanation of Component video, see your Set Top Box owner's manual. Connecting to DVI (Digital Visual Interface) 1 Connect a set of audio cables between the PC AUDIO IN jacks on the TV and the AUDIO OUT jacks on the Set Top Box. 2 Connect video...) PC AUDIO Y ANT-A Pb ANT A-OUT MONITOR OUT Pr VIDEO 2 L L ANT-B S-VIDEO 1 S-VIDEO 2 VIDEO 1 R R V L R DVI PC RS-232C DTV Set Top Box TV Rear Panel Component1 Component1/2 (480i/480p) (480p/720p/10801i) PC AUDIO Y ANT-A Pb ANT A-OUT MONITOR OUT Pr VIDEO 2 L L ANT-B S-VIDEO 1 S-VIDEO 2 VIDEO 1 R R V ...
...For an explanation of Component video, see your Set Top Box owner's manual. Connecting to DVI (Digital Visual Interface) 1 Connect a set of audio cables between the PC AUDIO IN jacks on the TV and the AUDIO OUT jacks on the Set Top Box. 2 Connect video...) PC AUDIO Y ANT-A Pb ANT A-OUT MONITOR OUT Pr VIDEO 2 L L ANT-B S-VIDEO 1 S-VIDEO 2 VIDEO 1 R R V L R DVI PC RS-232C DTV Set Top Box TV Rear Panel Component1 Component1/2 (480i/480p) (480p/720p/10801i) PC AUDIO Y ANT-A Pb ANT A-OUT MONITOR OUT Pr VIDEO 2 L L ANT-B S-VIDEO 1 S-VIDEO 2 VIDEO 1 R R V ...

User Manual (ENGLISH)
Page 25
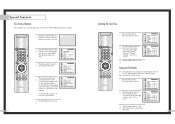
... Control Modes: Cable Box • When your TV's volume. 49 Note on after set up correctly. Pressing the corresponding button on page 51 of this manual for your brand of cable box. If no ...codes listed for your remote is set up correctly. Your cable box should turn on page 51 of this manual for your remote is set up , repeat steps 2, 3, and 4, but try one of the other ... MODE button and make sure that the Cable LED is illuminated. 3 Press the Set button on your TV's remote control. 4 Using the number buttons on your remote control, enter three digits of the VCR code...
... Control Modes: Cable Box • When your TV's volume. 49 Note on after set up correctly. Pressing the corresponding button on page 51 of this manual for your brand of cable box. If no ...codes listed for your remote is set up correctly. Your cable box should turn on page 51 of this manual for your remote is set up , repeat steps 2, 3, and 4, but try one of the other ... MODE button and make sure that the Cable LED is illuminated. 3 Press the Set button on your TV's remote control. 4 Using the number buttons on your remote control, enter three digits of the VCR code...

User Manual (ENGLISH)
Page 26
... Codes Note on Using Remote Control Modes: DVD • When your remote control is in "DVD" mode, the volume buttons still control your TV's volume. DVD Codes 50 51 If there is more than one code listed, try each code, 000 through 008. Make sure you enter three digits of DVD. Special... Your DVD 1 Turn off your DVD. 2 Press the MODE button and make sure that the DVD LED is illuminated. 3 Press the SET button on your TV's remote control. 4 Using the number buttons on your remote control, enter three digits of the DVD code listed on page 51 of this...
... Codes Note on Using Remote Control Modes: DVD • When your remote control is in "DVD" mode, the volume buttons still control your TV's volume. DVD Codes 50 51 If there is more than one code listed, try each code, 000 through 008. Make sure you enter three digits of DVD. Special... Your DVD 1 Turn off your DVD. 2 Press the MODE button and make sure that the DVD LED is illuminated. 3 Press the SET button on your TV's remote control. 4 Using the number buttons on your remote control, enter three digits of the DVD code listed on page 51 of this...
User Manual (ENGLISH)
Page 27
Special Features Fine Tuning Channels Fine tuning lets you manually adjust the TV's tuner if you have difficulty tuning in 480i only. 53 Setting the Film Mode On: Automatically senses and processes film signals from all sources and ... the Menu button to exit. Move the joystick down to select SETUP, then press the joystick to enter. 3 Press the joystick to enter in the TV's memory, move the joystick up. (A heart icon will appear.) To reset the fine tuning to "0," move the joystick down to select Film Mode, then move...
Special Features Fine Tuning Channels Fine tuning lets you manually adjust the TV's tuner if you have difficulty tuning in 480i only. 53 Setting the Film Mode On: Automatically senses and processes film signals from all sources and ... the Menu button to exit. Move the joystick down to select SETUP, then press the joystick to enter. 3 Press the joystick to enter in the TV's memory, move the joystick up. (A heart icon will appear.) To reset the fine tuning to "0," move the joystick down to select Film Mode, then move...


