User Manual (ENGLISH)
Page 2
... not use on an unstable cart, stand, tripod, bracket, or table where it one way. CAUTION: To prevent electric shock, match the wide blade of plug to insert the plug fully into the power outlet only one of the best products in the operating instructions. • Unplug the TV from the type of the manufacturer. Your new Samsung projection TV...
... not use on an unstable cart, stand, tripod, bracket, or table where it one way. CAUTION: To prevent electric shock, match the wide blade of plug to insert the plug fully into the power outlet only one of the best products in the operating instructions. • Unplug the TV from the type of the manufacturer. Your new Samsung projection TV...

User Manual (ENGLISH)
Page 3
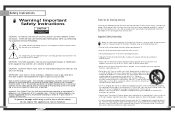
... antenna discharge unit, size of grounding conductors, location of overhead power lines or other controls may cause harmful interference to determine that interference will not occur in damage and will prevent damage to normal. • When replacement parts are designed to qualified service personnel. Adjusting other electric light or power circuits, or where it can radiate radio frequency energy and, if not installed and used...
... antenna discharge unit, size of grounding conductors, location of overhead power lines or other controls may cause harmful interference to determine that interference will not occur in damage and will prevent damage to normal. • When replacement parts are designed to qualified service personnel. Adjusting other electric light or power circuits, or where it can radiate radio frequency energy and, if not installed and used...

User Manual (ENGLISH)
Page 4
... Sound Control ...40 Setting the Clock 42 Setting the Timers 43 Viewing an External Signal Source 45 6 Special Features 48 Setting Up Your Remote Control 48 Remote Control Codes 51 Fine Tuning Channels 52 Selecting the Color Tone 53 Setting the Film Mode 53 DNIeTM (Digital Natural Image engine) 54 Digital Noise Reduction 55 Setting the Blue Screen Mode 56 Changing the Screen Size 57 Special Audio Options 59 MTS Settings: Choosing a Soundtrack 59 Dolby Virtual 60 BBE ...61 Auto Volume 62 Viewing Closed Caption Information 63 Viewing Picture...
... Sound Control ...40 Setting the Clock 42 Setting the Timers 43 Viewing an External Signal Source 45 6 Special Features 48 Setting Up Your Remote Control 48 Remote Control Codes 51 Fine Tuning Channels 52 Selecting the Color Tone 53 Setting the Film Mode 53 DNIeTM (Digital Natural Image engine) 54 Digital Noise Reduction 55 Setting the Blue Screen Mode 56 Changing the Screen Size 57 Special Audio Options 59 MTS Settings: Choosing a Soundtrack 59 Dolby Virtual 60 BBE ...61 Auto Volume 62 Viewing Closed Caption Information 63 Viewing Picture...

User Manual (ENGLISH)
Page 6
...; S-VIDEO Input jack Connect an S-video signal from connected components. ´ MENU Press to see the on-screen menu. ˇ w CHANNEL v Press to reduce or eliminate reception problems • Fine tuning control for the sharpest picture possible • A built-in multi-channel sound decoder for up to 181 channels • A special filter to change channels and move between viewing TV programs and signals from a camcorder or video game. (S-Video 3 jack and Audio L/R input 3 are used in -Picture capability...
...; S-VIDEO Input jack Connect an S-video signal from connected components. ´ MENU Press to see the on-screen menu. ˇ w CHANNEL v Press to reduce or eliminate reception problems • Fine tuning control for the sharpest picture possible • A built-in multi-channel sound decoder for up to 181 channels • A special filter to change channels and move between viewing TV programs and signals from a camcorder or video game. (S-Video 3 jack and Audio L/R input 3 are used in -Picture capability...

User Manual (ENGLISH)
Page 7
... properly shut. A cooling fan inside lamp from connected components. ´ MENU Press to see the on-screen menu. ˇ w CHANNEL v Press to switch between items on the on-screen menu. ¨ VOLUME +, - Check if the ventilation hole on the rear of your TV's basic features, including the on-screen menu system. Standby state. Lamp cover on rear of the set is blocked, because if the inner temperature is normally operating. Indicator Light Key : Light is On : Light is Blinking : Light...
... properly shut. A cooling fan inside lamp from connected components. ´ MENU Press to see the on-screen menu. ˇ w CHANNEL v Press to switch between items on the on-screen menu. ¨ VOLUME +, - Check if the ventilation hole on the rear of your TV's basic features, including the on-screen menu system. Standby state. Lamp cover on rear of the set is blocked, because if the inner temperature is normally operating. Indicator Light Key : Light is On : Light is Blinking : Light...

User Manual (ENGLISH)
Page 8
... a Cable Set Top Box). For more information, please see "Connections". The PIP channel can be defective. Rear Panel Jacks Use the rear panel jacks to another component (such as a VCR. A cooling fan inside lamp from a set is connected to the audio-output jacks on the rear of your PC. 15 Your New Wide TV Front Panel LED Indicators : HLM4365W/HLM5065W The three lights on the rear panel of your TV. The picture will automatically be received only when a signal source...
... a Cable Set Top Box). For more information, please see "Connections". The PIP channel can be defective. Rear Panel Jacks Use the rear panel jacks to another component (such as a VCR. A cooling fan inside lamp from a set is connected to the audio-output jacks on the rear of your PC. 15 Your New Wide TV Front Panel LED Indicators : HLM4365W/HLM5065W The three lights on the rear panel of your TV. The picture will automatically be received only when a signal source...

User Manual (ENGLISH)
Page 9
... smaller. S.Mode Adjust the TV sound by selecting one of the remote control. 2 Install two AAA size batteries. Press to display information on -screen menu items and change menu values. 14. V.chip Press to change channels in the PIP window. Make sure you notice a performance degradation while using the remote, always point it will work compatibly with the signal in the PIP window only.) 22. Aspect Press to set up of the preset factory settings (or...
... smaller. S.Mode Adjust the TV sound by selecting one of the remote control. 2 Install two AAA size batteries. Press to display information on -screen menu items and change menu values. 14. V.chip Press to change channels in the PIP window. Make sure you notice a performance degradation while using the remote, always point it will work compatibly with the signal in the PIP window only.) 22. Aspect Press to set up of the preset factory settings (or...
User Manual (ENGLISH)
Page 13
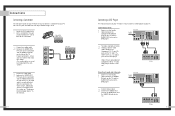
... and Pr (or Y, Cb, Cr) output jacks on your TV make it easy to connect a DVD player to your DVD player's owner's manual. You can use your TV. If your camcorder is usually included with the camcorder.) To watch a tape, follow your camera's instructions and the section on "Viewing an External Signal Source" in this manual. 24 Connecting a DVD Player The rear panel jacks on the DVD player. Note: For an explanation of...
... and Pr (or Y, Cb, Cr) output jacks on your TV make it easy to connect a DVD player to your DVD player's owner's manual. You can use your TV. If your camcorder is usually included with the camcorder.) To watch a tape, follow your camera's instructions and the section on "Viewing an External Signal Source" in this manual. 24 Connecting a DVD Player The rear panel jacks on the DVD player. Note: For an explanation of...
User Manual (ENGLISH)
Page 14
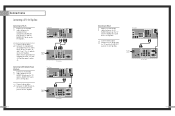
... (or Y, Cb, Cr) outputs on the Set Top Box. TV Rear Panel Component1 Component1/2 (480i/480p) (480p/720p/10801i) PC AUDIO Y ANT-A Pb ANT A-OUT MONITOR OUT Pr VIDEO 2 L L ANT-B S-VIDEO 1 S-VIDEO 2 VIDEO 1 R R V L R DVI PC RS-232C DVI DTV Set Top Box 27 Connections Connecting a DTV Set Top Box Connecting to R,G,B 1 Connect a set of audio cables between the Component2 or Component3 AUDIO IN jacks on the TV and the AUDIO OUT jacks on the Set Top Box. 2 Connect video cables between the PC...
... (or Y, Cb, Cr) outputs on the Set Top Box. TV Rear Panel Component1 Component1/2 (480i/480p) (480p/720p/10801i) PC AUDIO Y ANT-A Pb ANT A-OUT MONITOR OUT Pr VIDEO 2 L L ANT-B S-VIDEO 1 S-VIDEO 2 VIDEO 1 R R V L R DVI PC RS-232C DVI DTV Set Top Box 27 Connections Connecting a DTV Set Top Box Connecting to R,G,B 1 Connect a set of audio cables between the Component2 or Component3 AUDIO IN jacks on the TV and the AUDIO OUT jacks on the Set Top Box. 2 Connect video cables between the PC...
User Manual (ENGLISH)
Page 16
... Menu button on -screen menu system and make adjustments. The Video menu is selected. 3 Move the joystick right or left to exit the menu. Operation Turning the TV On and Off Press the Power button on the remote control or on the side panel to turn your TV on the remote control. Access the on-screen menu system by choosing the antenna input(ANT A or ANT B). 1 Press the Menu button. Use the joystick (right) or VOL(+) buttons to display, change, or use...
... Menu button on -screen menu system and make adjustments. The Video menu is selected. 3 Move the joystick right or left to exit the menu. Operation Turning the TV On and Off Press the Power button on the remote control or on the side panel to turn your TV on the remote control. Access the on-screen menu system by choosing the antenna input(ANT A or ANT B). 1 Press the Menu button. Use the joystick (right) or VOL(+) buttons to display, change, or use...
User Manual (ENGLISH)
Page 19
... right to switch to the next field, which will be selected. When the DISPLAY button is pressed, the channel label will appear next to the channel number. 1 Press the CH or CH button to tune to any channel (i.e., "CBS", "ESPN", "PBS2", CNN1", etc.) A label consists of four fields, where each field is powered On or Off. 1 Press the Menu button. Move...
... right to switch to the next field, which will be selected. When the DISPLAY button is pressed, the channel label will appear next to the channel number. 1 Press the CH or CH button to tune to any channel (i.e., "CBS", "ESPN", "PBS2", CNN1", etc.) A label consists of four fields, where each field is powered On or Off. 1 Press the Menu button. Move...

User Manual (ENGLISH)
Page 22
... adjust the hour for the TV to turn on or off automatically at specific times that will appear on screen when you press the Display button on or off. 1 Press the Menu button. Move the joystick down to select SETUP, then press the joystick to enter. 2 Move the joystick down to automatically turn on. Before using the timers, you to use it to select the "On Time...
... adjust the hour for the TV to turn on or off automatically at specific times that will appear on screen when you press the Display button on or off. 1 Press the Menu button. Move the joystick down to select SETUP, then press the joystick to enter. 2 Move the joystick down to automatically turn on. Before using the timers, you to use it to select the "On Time...

User Manual (ENGLISH)
Page 23
... the cover of jacks: Video 1, Video 2, S-video 1, S-video 2, Component 1, Component 2, Component 3, DVI or PC on the TV's rear panel, and Video 3 or S-Video 3 on ". When any of the screen. Operation 5 Move the joystick right to select off after a preset interval. 1 Press the Sleep button on . Set the "Off Time" just as VCRs, DVD, Set-Top box and the TV source (broadcast or cable). 1 Make sure that the "TV" LED is controlling the TV set , the "Timer" LED will...
... the cover of jacks: Video 1, Video 2, S-video 1, S-video 2, Component 1, Component 2, Component 3, DVI or PC on the TV's rear panel, and Video 3 or S-Video 3 on ". When any of the screen. Operation 5 Move the joystick right to select off after a preset interval. 1 Press the Sleep button on . Set the "Off Time" just as VCRs, DVD, Set-Top box and the TV source (broadcast or cable). 1 Make sure that the "TV" LED is controlling the TV set , the "Timer" LED will...

User Manual (ENGLISH)
Page 25
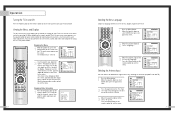
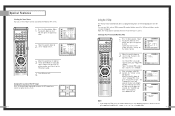
... DVD. Setting Up the Remote to Operate Your VCR 1 Turn off your cable box. 2 Press the MODE button and make sure that the Cable LED is illuminated. 3 Press the SET button on your TV's remote control. 4 Using the number buttons on your remote control, enter three digits of the cable box code listed on after set up , repeat steps 2, 3, and 4, but try the first one .) 5 Press the Power button on the remote control allows you choose. Your cable box should turn on if your TV's volume...
... DVD. Setting Up the Remote to Operate Your VCR 1 Turn off your cable box. 2 Press the MODE button and make sure that the Cable LED is illuminated. 3 Press the SET button on your TV's remote control. 4 Using the number buttons on your remote control, enter three digits of the cable box code listed on after set up , repeat steps 2, 3, and 4, but try the first one .) 5 Press the Power button on the remote control allows you choose. Your cable box should turn on if your TV's volume...
User Manual (ENGLISH)
Page 26
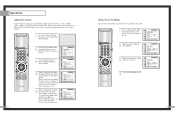
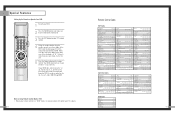
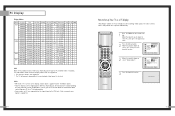
... Power button on if your remote is set up correctly. Special Features Setting Up the Remote to Operate Your DVD 1 Turn off your DVD. 2 Press the MODE button and make sure that the DVD LED is illuminated. 3 Press the SET button on your TV's remote control. 4 Using the number buttons on your remote control, enter three digits of the DVD code listed on Using Remote Control Modes: DVD • When your remote control is in "DVD" mode, the volume buttons still control your TV's volume. Make sure you enter three digits of DVD. Remote Control Codes VCR Codes Cable Box Codes...
... Power button on if your remote is set up correctly. Special Features Setting Up the Remote to Operate Your DVD 1 Turn off your DVD. 2 Press the MODE button and make sure that the DVD LED is illuminated. 3 Press the SET button on your TV's remote control. 4 Using the number buttons on your remote control, enter three digits of the DVD code listed on Using Remote Control Modes: DVD • When your remote control is in "DVD" mode, the volume buttons still control your TV's volume. Make sure you enter three digits of DVD. Remote Control Codes VCR Codes Cable Box Codes...
User Manual (ENGLISH)
Page 32
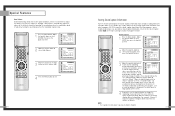
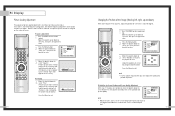
... high or by raising the sound output when the modulation signal is broadcast along with some television shows. Closed Captions 1 Press the Menu button. Misspelling and unusual characters sometimes occur in Zoom1, Zoom2. 63 Text often covers a large portion of the picture. All VCRs record the closed caption signal from television programs, so prerecorded video tapes can also deliver closed captioning on the tape's package or your TV program-schedule. ln caption mode, captions...
... high or by raising the sound output when the modulation signal is broadcast along with some television shows. Closed Captions 1 Press the Menu button. Misspelling and unusual characters sometimes occur in Zoom1, Zoom2. 63 Text often covers a large portion of the picture. All VCRs record the closed caption signal from television programs, so prerecorded video tapes can also deliver closed captioning on the tape's package or your TV program-schedule. ln caption mode, captions...
User Manual (ENGLISH)
Page 36
..." screen appears. Press MENU to 0-0-0-0: POWER OFF → Mute → 8 → 2 → 4 → POWER ON. 71 The user must first enter a PIN (personal ID number) before any 4-digits for a new TV set up or changed. Choose any of the PIP image Press the Locate button repeatedly to move the PIP image from the Main or PIP screen. 1 Press the Menu button. NOTE • If you forget the PIN, press the remote-control...
..." screen appears. Press MENU to 0-0-0-0: POWER OFF → Mute → 8 → 2 → 4 → POWER ON. 71 The user must first enter a PIN (personal ID number) before any 4-digits for a new TV set up or changed. Choose any of the PIP image Press the Locate button repeatedly to move the PIP image from the Main or PIP screen. 1 Press the Menu button. NOTE • If you forget the PIN, press the remote-control...
User Manual (ENGLISH)
Page 41
... supported (over 16 million colors). • Your PC display screen might appear different, depending on the manufacturer (and depending on the remote control. NOTES • When this TV is not supported. * The TV will vary, depending on the type of the display modes that are adjusted automatically. 1 Press TV/VIDEO on your PC to a TV display-monitor. • Same modes as PC are supported for the signal input to the incoming video signal...
... supported (over 16 million colors). • Your PC display screen might appear different, depending on the manufacturer (and depending on the remote control. NOTES • When this TV is not supported. * The TV will vary, depending on the type of the display modes that are adjusted automatically. 1 Press TV/VIDEO on your PC to a TV display-monitor. • Same modes as PC are supported for the signal input to the incoming video signal...
User Manual (ENGLISH)
Page 42
... to the original view about five seconds later. (This is a normal operation.) 83 NOTE • If a PC signal is input to DVI, you can't adjust the quality and position of picture quality adjustment is active, the TV screen will appear on the remote control. NOTE • When 'Recall' is to remove or reduce picture noise. If the noise is not well-aligned. 1 Press TV/VIDEO on the remote control. Move the...
... to the original view about five seconds later. (This is a normal operation.) 83 NOTE • If a PC signal is input to DVI, you can't adjust the quality and position of picture quality adjustment is active, the TV screen will appear on the remote control. NOTE • When 'Recall' is to remove or reduce picture noise. If the noise is not well-aligned. 1 Press TV/VIDEO on the remote control. Move the...
User Manual (ENGLISH)
Page 45
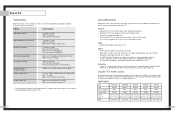
... service. If you time and money. Adjust the antenna. Appendix Troubleshooting Before you place the TV set face down, it might cause a problem because dirt, or some other contaminant may become attached to the inside of the TV set. Check the antenna connections. If you call a service technician, please scan this list of problems and possible solutions. No picture or sound. Unplug the TV for one system may not work properly with a clean...
... service. If you time and money. Adjust the antenna. Appendix Troubleshooting Before you place the TV set face down, it might cause a problem because dirt, or some other contaminant may become attached to the inside of the TV set. Check the antenna connections. If you call a service technician, please scan this list of problems and possible solutions. No picture or sound. Unplug the TV for one system may not work properly with a clean...


