Open Source Guide (ENGLISH)
Page 1
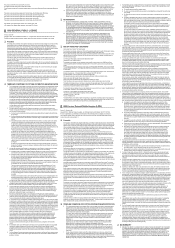
.... In such case, this License incorporates the limitation as expressly provided under the OpenSSL Project. If the Program specifies a version number of this License. For software which are distributed...volume of a storage or distribution medium does not bring the other circumstances. The original manual has wrong versions of the following notices to the program. You must make certain ... The precise terms and conditions for questions regarding open sources, contact Samsung via Email (vdswmanager@samsung. This License applies to any patent must be distributed under this License...
.... In such case, this License incorporates the limitation as expressly provided under the OpenSSL Project. If the Program specifies a version number of this License. For software which are distributed...volume of a storage or distribution medium does not bring the other circumstances. The original manual has wrong versions of the following notices to the program. You must make certain ... The precise terms and conditions for questions regarding open sources, contact Samsung via Email (vdswmanager@samsung. This License applies to any patent must be distributed under this License...
User Manual (ENGLISH)
Page 2
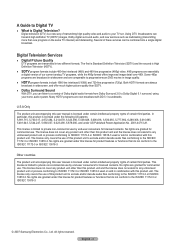
...of this product unit to encode and/or decode audio files conforming to the ISO/IEC 11172-3 or ISO/IEC 13818-3. © 2007 Samsung Electronics Co., Ltd. The license only covers the use . Other countries The product unit accompanying this license for commercial use of certain third... parties. No rights are granted under this user manual is limited to Dolby Digital 5.1 surround, using your TV set. No rights are granted for product features or functions that do not conform to the ISO/IEC 11172...
...of this product unit to encode and/or decode audio files conforming to the ISO/IEC 11172-3 or ISO/IEC 13818-3. © 2007 Samsung Electronics Co., Ltd. The license only covers the use . Other countries The product unit accompanying this license for commercial use of certain third... parties. No rights are granted under this user manual is limited to Dolby Digital 5.1 surround, using your TV set. No rights are granted for product features or functions that do not conform to the ISO/IEC 11172...

User Manual (ENGLISH)
Page 6
... and shape may vary depending on -screen menu. Checking Parts Owner's Instructions Remote Control (BP59-00125A)/ AAA Batteries Warranty Card/ Registration Card/ Safety Guide Manual/ Quick Guide Manual Sold Separately Power Cord (3903-000144) Cloth-Clean S-Video Cable Video Cable Antenna Cable Component Cables Audio Cables D-Sub Cable PC Audio Cable HDMI... 1Stereo/2RCA Cable Viewing the Control Panel Buttons on the Lower-Right Part of the Panel The buttons on the lower-right panel control your TV's basic features, including the on the model. English - 6 Continued...
... and shape may vary depending on -screen menu. Checking Parts Owner's Instructions Remote Control (BP59-00125A)/ AAA Batteries Warranty Card/ Registration Card/ Safety Guide Manual/ Quick Guide Manual Sold Separately Power Cord (3903-000144) Cloth-Clean S-Video Cable Video Cable Antenna Cable Component Cables Audio Cables D-Sub Cable PC Audio Cable HDMI... 1Stereo/2RCA Cable Viewing the Control Panel Buttons on the Lower-Right Part of the Panel The buttons on the lower-right panel control your TV's basic features, including the on the model. English - 6 Continued...
User Manual (ENGLISH)
Page 17
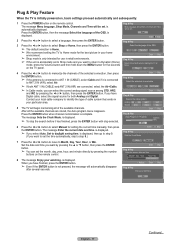
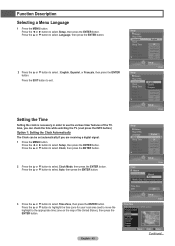
...press the ENTER button. Select the language of the OSD. ➢ The default selection is connected to select Manual for five seconds Plug & Play Select Home Mode when installing this TV at home. Shop Home 4 Press the ◄ or ► button to memorize the channels of the ...available channels. is displayed. Auto Manual Enter Skip Plug & Play Enter the current date and time. Month / Day / Year Hour / Min -- ...
...press the ENTER button. Select the language of the OSD. ➢ The default selection is connected to select Manual for five seconds Plug & Play Select Home Mode when installing this TV at home. Shop Home 4 Press the ◄ or ► button to memorize the channels of the ...available channels. is displayed. Auto Manual Enter Skip Plug & Play Enter the current date and time. Month / Day / Year Hour / Min -- ...
User Manual (ENGLISH)
Page 20
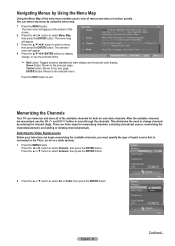
...Channel Channel List Fine Tune Signal Strength LNA On Channel Enter English - 20 Continued... Press the ◄ or ► button to the TV(i.e. The selected menu will appear. 4 Press the ENTER buttons to exit. Press the EXIT button to display, change channels by entering the ... view all of the available channels for memorizing channels: selecting a broadcast source, memorizing the channels(automatic) and adding or deleting channels(manual). Navigating Menus by Using the Menu Map Using the Menu Map of the main menu enables you must specify the type of signal source...
...Channel Channel List Fine Tune Signal Strength LNA On Channel Enter English - 20 Continued... Press the ◄ or ► button to the TV(i.e. The selected menu will appear. 4 Press the ENTER buttons to exit. Press the EXIT button to display, change channels by entering the ... view all of the available channels for memorizing channels: selecting a broadcast source, memorizing the channels(automatic) and adding or deleting channels(manual). Navigating Menus by Using the Menu Map Using the Menu Map of the main menu enables you must specify the type of signal source...
User Manual (ENGLISH)
Page 21
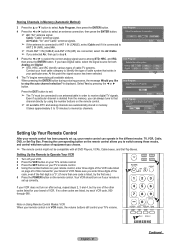
... source has been selected. English - 21 Continued... Air+Cable: "Air" and "Cable" antenna signals. ➢ If the antenna is connected to receive digital TV signals. It takes approximately 3 to 10 minutes to select an antenna connection, then press the ENTER button. ➢ Air: "Air" antenna signal. If you... 080. Stop Cable 3 10% Enter Return Auto Program Would you selected Air, then go to select Auto Program, then press the ENTER button. At this manual for both ANT 1 IN (CABLE) and ANT 2 IN (AIR) are listed, try one code is connected to ANT 2 IN (AIR), select Air. &#...
... source has been selected. English - 21 Continued... Air+Cable: "Air" and "Cable" antenna signals. ➢ If the antenna is connected to receive digital TV signals. It takes approximately 3 to 10 minutes to select an antenna connection, then press the ENTER button. ➢ Air: "Air" antenna signal. If you... 080. Stop Cable 3 10% Enter Return Auto Program Would you selected Air, then go to select Auto Program, then press the ENTER button. At this manual for both ANT 1 IN (CABLE) and ANT 2 IN (AIR) are listed, try one code is connected to ANT 2 IN (AIR), select Air. &#...
User Manual (ENGLISH)
Page 22
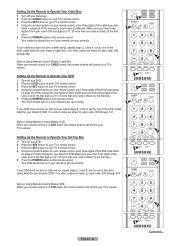
...3 Press the SET button on your TV's remote control. 4 Using the number buttons on your remote control, enter three digits of the cable box code listed on page 24 of this manual for your brand of DVD. If ... 3 and 4, but try the first one .) 5 Press the POWER button on page 24 of this manual for your brand of STB. If no other codes are listed, try one of the other codes listed ... 4, but try each code, 000 through 141. Your cable box should turn on page 25 of this manual for your brand of DVD. Note on the remote control. Setting Up the Remote to Operate Your Set Top...
...3 Press the SET button on your TV's remote control. 4 Using the number buttons on your remote control, enter three digits of the cable box code listed on page 24 of this manual for your brand of DVD. If ... 3 and 4, but try the first one .) 5 Press the POWER button on page 24 of this manual for your brand of STB. If no other codes are listed, try one of the other codes listed ... 4, but try each code, 000 through 141. Your cable box should turn on page 25 of this manual for your brand of DVD. Note on the remote control. Setting Up the Remote to Operate Your Set Top...

User Manual (ENGLISH)
Page 41
...61559; Favorite: Shows Favorite channels when you press CH LIST button on the remote control to be fine tuned. ➢ "" will appear next to manually adjust a particular channel for optimal reception. 1 Press the MENU button. Fine Tuning Analog Channels - Press the ◄ or ► button to adjust ...the fine tuning. 3 To store the fine tuning setting in the TV's memory, press the ENTER button. 4 To reset the fine tuning setting, press the ▲ or ▼ button to select All, Added, or Favorite...
...61559; Favorite: Shows Favorite channels when you press CH LIST button on the remote control to be fine tuned. ➢ "" will appear next to manually adjust a particular channel for optimal reception. 1 Press the MENU button. Fine Tuning Analog Channels - Press the ◄ or ► button to adjust ...the fine tuning. 3 To store the fine tuning setting in the TV's memory, press the ENTER button. 4 To reset the fine tuning setting, press the ▲ or ▼ button to select All, Added, or Favorite...
User Manual (ENGLISH)
Page 43
...Timer Off Timer 1 Inactivated Timer 2 Inactivated Timer 3 Inactivated Game Mode Off DLP® 3D/Dual-View Off Setup Enter Clock Return Clock Mode Clock Set Manual Auto Month / Day / Year Hour / Min -- : -- -- Time Zone DST Off Setup Enter Time Zone Select the time zone in order to ...the appropriate time zone on the map of the TV. Press the ▲ or ▼ button to select Auto, then press the ENTER button. 3 Press the ▲ or ▼ button to select ...
...Timer Off Timer 1 Inactivated Timer 2 Inactivated Timer 3 Inactivated Game Mode Off DLP® 3D/Dual-View Off Setup Enter Clock Return Clock Mode Clock Set Manual Auto Month / Day / Year Hour / Min -- : -- -- Time Zone DST Off Setup Enter Time Zone Select the time zone in order to ...the appropriate time zone on the map of the TV. Press the ▲ or ▼ button to select Auto, then press the ENTER button. 3 Press the ▲ or ▼ button to select ...

User Manual (ENGLISH)
Page 44
.../ Day / Year Hour / Min -- : -- -- 4 Press the ▲ or ▼ button to select Clock Mode, then press the ENTER button. Option 2: Setting the Clock Manually 1 Press the MENU button. Press the ◄ or ► button to Month, Day, Year, Hour, or Min. Press the ▲ or ▼ button to select... Month / Day / Year Hour / Min -- : -- -- Off Adjust Setup Enter Setting the Sleep Timer The sleep timer automatically shuts off the TV after a preset time (30, 60, 90, 120, 150 and 180 minutes). 1 Press the MENU button. The Sleep Timer menu is displayed. 2 Press the ...
.../ Day / Year Hour / Min -- : -- -- 4 Press the ▲ or ▼ button to select Clock Mode, then press the ENTER button. Option 2: Setting the Clock Manually 1 Press the MENU button. Press the ◄ or ► button to Month, Day, Year, Hour, or Min. Press the ▲ or ▼ button to select... Month / Day / Year Hour / Min -- : -- -- Off Adjust Setup Enter Setting the Sleep Timer The sleep timer automatically shuts off the TV after a preset time (30, 60, 90, 120, 150 and 180 minutes). 1 Press the MENU button. The Sleep Timer menu is displayed. 2 Press the ...


