
Quick Guide (ENGLISH)
Page 1
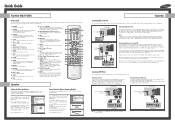
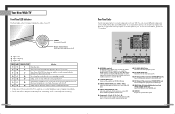
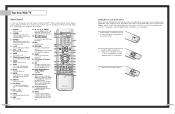
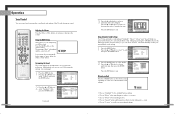
...select "ANT 2 IN" (whichever channel is vacant in the TV's memory. ADD/DEL Press to select "Air/CATV", then press the ENTER button. PIP (Picture In Picture) Activates PIP. 23. SET Used during a particular scene. DNIe (Digital Natural Image engine) Activates DNIe. 25. Press the ... Press the ... or †...or † button to "ANT 1 IN" so that descrambles some or all channels. You can also use your TV there may be controlled by the Samsung remote control (i.e., TV, STB, VCR, CABLE, or DVD). 12. When you use a converter box with a cable box that you are connected to ...
...select "ANT 2 IN" (whichever channel is vacant in the TV's memory. ADD/DEL Press to select "Air/CATV", then press the ENTER button. PIP (Picture In Picture) Activates PIP. 23. SET Used during a particular scene. DNIe (Digital Natural Image engine) Activates DNIe. 25. Press the ... Press the ... or †...or † button to "ANT 1 IN" so that descrambles some or all channels. You can also use your TV there may be controlled by the Samsung remote control (i.e., TV, STB, VCR, CABLE, or DVD). 12. When you use a converter box with a cable box that you are connected to ...
Quick Guide (ENGLISH)
Page 2
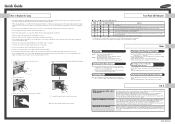
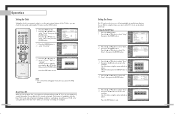
..., and then use a screwdriver to remove the screw. 4 Separate the Lamp from the engine by holding screw on the lamp cover after turning off . The picture will shut off your monitor is very hot. Please contact a certified technician. • It takes about 25 seconds. A cooling fan inside the lamp cover or... item, and should be replaced from time to time for lamp regulation and usage is marked on the label. Lamp may have any effects on picture quality. Check if the ventilation hole on the rear of the DLP. DLP : Select the channel 3 with cable converter.
..., and then use a screwdriver to remove the screw. 4 Separate the Lamp from the engine by holding screw on the lamp cover after turning off . The picture will shut off your monitor is very hot. Please contact a certified technician. • It takes about 25 seconds. A cooling fan inside the lamp cover or... item, and should be replaced from time to time for lamp regulation and usage is marked on the label. Lamp may have any effects on picture quality. Check if the ventilation hole on the rear of the DLP. DLP : Select the channel 3 with cable converter.
User Manual (ENGLISH)
Page 2
... Channels 28 Adding and Erasing Channels 29 Changing Channels 30 Selecting Your Favorite Channels 31 Scanning the Channels 32 Labeling the Channels 33 Picture Control ...34 Sound Control ...36 Setting the Clock 38 Setting the Timers 39 Viewing an External Signal Source 41 Assigning Names to ...Your Remote Control 46 Remote Control Codes 47 Fine Tuning Channels 48 LNA (Low Noise Amplifier 49 Selecting the Color Tone 50 Changing the Picture Size 51 Digital Noise Reduction 52 DNIeTM (Digital Natural Image engine) 53 Setting the MCC (My Color Control) Mode 54 Setting the...
... Channels 28 Adding and Erasing Channels 29 Changing Channels 30 Selecting Your Favorite Channels 31 Scanning the Channels 32 Labeling the Channels 33 Picture Control ...34 Sound Control ...36 Setting the Clock 38 Setting the Timers 39 Viewing an External Signal Source 41 Assigning Names to ...Your Remote Control 46 Remote Control Codes 47 Fine Tuning Channels 48 LNA (Low Noise Amplifier 49 Selecting the Color Tone 50 Changing the Picture Size 51 Digital Noise Reduction 52 DNIeTM (Digital Natural Image engine) 53 Setting the MCC (My Color Control) Mode 54 Setting the...
User Manual (ENGLISH)
Page 5
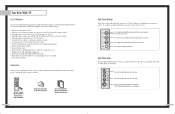
...filter to see the on -screen menu system. Press to reduce or eliminate reception problems • Fine tuning control for the sharpest picture possible • A built-in multi-channel sound decoder for stereo and bilingual listening • Built-in, dual channel speakers • ...A special sleep timer • Picture-in conjunction.) 9 Connect an S-video signal from a camcorder or video game. (S-Video 3 jack and Audio L/R input 3 are used only ...
...filter to see the on -screen menu system. Press to reduce or eliminate reception problems • Fine tuning control for the sharpest picture possible • A built-in multi-channel sound decoder for stereo and bilingual listening • Built-in, dual channel speakers • ...A special sleep timer • Picture-in conjunction.) 9 Connect an S-video signal from a camcorder or video game. (S-Video 3 jack and Audio L/R input 3 are used only ...
User Manual (ENGLISH)
Page 6
The picture will automatically appear in RF, Video and S-Video modes. ˆ Component1, 2 jacks (Y, PB, PR, L, R) Use these to the video output jack on rear of the ...
The picture will automatically appear in RF, Video and S-Video modes. ˆ Component1, 2 jacks (Y, PB, PR, L, R) Use these to the video output jack on rear of the ...
User Manual (ENGLISH)
Page 7
... press the ENTER to select the size of the available video sources (i.e., TV, Set-Top box, VCR, DVD, DTV, PC). 14. PIP (Picture In Picture) Activates PIP. 23. RESET If your personal, customized sound settings.) 3. MTS (Multichannel Television Stereo) Press to the previous channel. 13. P.MODE ...Adjust the TV picture by the Samsung remote control (i.e., TV, STB, VCR, CABLE, or DVD). 12. EXIT Press to exit the menu. 17 ENTER Press to select highlight ...
... press the ENTER to select the size of the available video sources (i.e., TV, Set-Top box, VCR, DVD, DTV, PC). 14. PIP (Picture In Picture) Activates PIP. 23. RESET If your personal, customized sound settings.) 3. MTS (Multichannel Television Stereo) Press to the previous channel. 13. P.MODE ...Adjust the TV picture by the Samsung remote control (i.e., TV, STB, VCR, CABLE, or DVD). 12. EXIT Press to exit the menu. 17 ENTER Press to select highlight ...

User Manual (ENGLISH)
Page 14
...status of your remote control to enter items in the menu. Press the ... Press the ... Channel Setup Move Enter Exit 2 Press the ... Input Picture Sound Channel Setup Picture Mode Color Tone Size Digital NR DNIe MCC Film Mode PIP : Standard √ : Warm1 √ √ : Off √ : On...button to two different signal sources by pressing the MENU button on -screen menu system allows you want in the menu. Input Picture Sound Channel Setup Channel Antenna : AAnntt..11 Air/CATV : AAirnt.2 Auto Program Add/Delete Favorite Channels Name Fine Tune ▼...
...status of your remote control to enter items in the menu. Press the ... Press the ... Channel Setup Move Enter Exit 2 Press the ... Input Picture Sound Channel Setup Picture Mode Color Tone Size Digital NR DNIe MCC Film Mode PIP : Standard √ : Warm1 √ √ : Off √ : On...button to two different signal sources by pressing the MENU button on -screen menu system allows you want in the menu. Input Picture Sound Channel Setup Channel Antenna : AAnntt..11 Air/CATV : AAirnt.2 Auto Program Add/Delete Favorite Channels Name Fine Tune ▼...

User Manual (ENGLISH)
Page 15
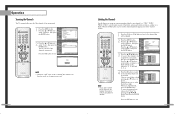
... or delete unwanted channels from memory. 1 Press the MENU button. or † button to the appropriate channel, then repeat above. Input Picture Sound Channel Setup Channel Antenna : Ant.1 Air/CATV : Air Auto Program Add/Delete Favorite Channels Name Fine Tune ▼ More Move Enter.... Selecting the Video Signal Source Before your particular area. or † button to add or delete channels. 29 Press the ... Input Picture Sound Channel Setup Channel Antenna : Ant.1 Air/CATV : Air Auto Program Add/Delete Favorite Channels Name Fine Tune ▼ More Move...
... or delete unwanted channels from memory. 1 Press the MENU button. or † button to the appropriate channel, then repeat above. Input Picture Sound Channel Setup Channel Antenna : Ant.1 Air/CATV : Air Auto Program Add/Delete Favorite Channels Name Fine Tune ▼ More Move Enter.... Selecting the Video Signal Source Before your particular area. or † button to add or delete channels. 29 Press the ... Input Picture Sound Channel Setup Channel Antenna : Ant.1 Air/CATV : Air Auto Program Add/Delete Favorite Channels Name Fine Tune ▼ More Move...
User Manual (ENGLISH)
Page 16
....) You will change channels when you to any channel (even one favorite channel to select "Channel", then press the ENTER button. Input Picture Sound Channel Setup Channel Antenna : Ant.1 Air/CATV : Air Auto Program Add/Delete Favorite Channels Name Fine Tune ▼ More Move ... memorized). When you use the number buttons to tune to quickly and easily find frequently watched channels by direct selection using the number buttons. Input Picture Sound Channel Setup Favorite Channels Air 2 Air 3 Air 4 Air 5 Air 6 Air 7 Air 8 ▼ Move ✔ Enter Return Press...
....) You will change channels when you to any channel (even one favorite channel to select "Channel", then press the ENTER button. Input Picture Sound Channel Setup Channel Antenna : Ant.1 Air/CATV : Air Auto Program Add/Delete Favorite Channels Name Fine Tune ▼ More Move ... memorized). When you use the number buttons to tune to quickly and easily find frequently watched channels by direct selection using the number buttons. Input Picture Sound Channel Setup Favorite Channels Air 2 Air 3 Air 4 Air 5 Air 6 Air 7 Air 8 ▼ Move ✔ Enter Return Press...
User Manual (ENGLISH)
Page 17
...: A...Z, ✽, blank, 0...9, -). 4 Press the √ button to switch to the next field, which will appear next to a new name, Input Picture Air 2 Air 3 Name ▲ A ▼ ---- or † button to select "Scan", then press the Channel Input ▲ More LNA : ...On √ ENTER button. Clear Clear above. Input Picture Sound Channel Setup Channel Antenna : Ant.1 Air/CATV : Air Auto Program Add/Delete Favorite Channels Name Fine Tune ▼ More Move Enter Return ...
...: A...Z, ✽, blank, 0...9, -). 4 Press the √ button to switch to the next field, which will appear next to a new name, Input Picture Air 2 Air 3 Name ▲ A ▼ ---- or † button to select "Scan", then press the Channel Input ▲ More LNA : ...On √ ENTER button. Clear Clear above. Input Picture Sound Channel Setup Channel Antenna : Ant.1 Air/CATV : Air Auto Program Add/Delete Favorite Channels Name Fine Tune ▼ More Move Enter Return ...

User Manual (ENGLISH)
Page 18
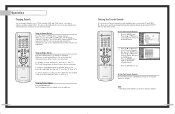
...: Off √ √ Move Enter Return 2 Press the ENTER button to increase or decrease the value of a particular item. Resetting the Picture Settings to the Factory Defaults You can activate either "Dynamic", "Standard" or "Cinema" by pressing the P.MODE button (or by making a ...personal preference. (Alternatively, you can use the on the remote control repeatedly to select one of the standard picture settings. Press the ... Input Picture Sound Channel Setup Mode Mode : SDtaynnadmaircd Contrast Standard 90 Brightness Cinema 50 Sharpness 50 Color 50 Tint 50 ...
...: Off √ √ Move Enter Return 2 Press the ENTER button to increase or decrease the value of a particular item. Resetting the Picture Settings to the Factory Defaults You can activate either "Dynamic", "Standard" or "Cinema" by pressing the P.MODE button (or by making a ...personal preference. (Alternatively, you can use the on the remote control repeatedly to select one of the standard picture settings. Press the ... Input Picture Sound Channel Setup Mode Mode : SDtaynnadmaircd Contrast Standard 90 Brightness Cinema 50 Sharpness 50 Color 50 Tint 50 ...
User Manual (ENGLISH)
Page 19
... (i.e., news). • Choose "Custom" to select "Mode". Continued... or † button to select "Equalizer", then press the ENTER button. Input Picture Sound Channel Setup Equalizer R + + 0 0 L - - You can activate these sound settings by pressing the S.MODE button (or by making a...√ : Off √ : Stereo √ : Off √ : Off √ Move Enter Return 2 Press the ... button. Input Picture Sound Channel Setup Sound Mode Equalizer SRS TSXT MTS Auto Volume Internal Mute : SSttannddaarrdd Music : OfMf ovie : SStepreeeoch : OCfuf stom : Off Move Enter...
... (i.e., news). • Choose "Custom" to select "Mode". Continued... or † button to select "Equalizer", then press the ENTER button. Input Picture Sound Channel Setup Equalizer R + + 0 0 L - - You can activate these sound settings by pressing the S.MODE button (or by making a...√ : Off √ : Stereo √ : Off √ : Off √ Move Enter Return 2 Press the ... button. Input Picture Sound Channel Setup Sound Mode Equalizer SRS TSXT MTS Auto Volume Internal Mute : SSttannddaarrdd Music : OfMf ovie : SStepreeeoch : OCfuf stom : Off Move Enter...
User Manual (ENGLISH)
Page 20
...NOTE • The current time will eventually be set the TV's clock, as above . Setting the On/Off Timer 1 Press the MENU button. Input Picture Sound Channel Setup Setup Language : English √ Time √ V-Chip √ Caption √ Blue Screen : Off √ Melody : On &#... in order to select "Setup", then press the ENTER button. or † button to turn on or off , if you want by timer. Input Picture Sound Channel Setup Setup Language : English √ Time √ V-Chip √ Caption √ Blue Screen : Off √ Melody : On ...
...NOTE • The current time will eventually be set the TV's clock, as above . Setting the On/Off Timer 1 Press the MENU button. Input Picture Sound Channel Setup Setup Language : English √ Time √ V-Chip √ Caption √ Blue Screen : Off √ Melody : On &#... in order to select "Setup", then press the ENTER button. or † button to turn on or off , if you want by timer. Input Picture Sound Channel Setup Setup Language : English √ Time √ V-Chip √ Caption √ Blue Screen : Off √ Melody : On ...
User Manual (ENGLISH)
Page 21
... of the preset values from "30 Min." Press the ... or † button to select the preset time you want, then press the ENTER button. Input Picture Sound Channel Setup Setup Language : English √ Time √ V-Chip √ Caption √ Blue Screen : Off √ Melody : On √ ... control repeatedly to the TV, you connect equipment to select an external signal source. or † button to select "Source List". Input Picture Sound Channel Setup Time Clock Set Sleep Timer On Timer Off Timer 10 : 30 am √ 11 : 30 pm √ Channel ...
... of the preset values from "30 Min." Press the ... or † button to select the preset time you want, then press the ENTER button. Input Picture Sound Channel Setup Setup Language : English √ Time √ V-Chip √ Caption √ Blue Screen : Off √ Melody : On √ ... control repeatedly to the TV, you connect equipment to select an external signal source. or † button to select "Source List". Input Picture Sound Channel Setup Time Clock Set Sleep Timer On Timer Off Timer 10 : 30 am √ 11 : 30 pm √ Channel ...

User Manual (ENGLISH)
Page 22
... Move Enter √ √ Return 2 Press the ... a-b-le STB : - - NOTE • In the PIP mode, the main and sub pictures are stilled at the same time. Press the ... Press the appropriate buttons to control your remote control unit for access to exit. or † button... VCR or DVD, including Rewind, Stop, Play/Pause and Fast Forward. Press the ENTER button to select a signal source, then press the ENTER button. Input Picture Sound Channel Setup Edit Name AV1 AV2 AV3 S-Video1 S-Video2 S-Video3 Component1 ▼ More V-CR : - - - D-VD : - t-el-lite STB : ...
... Move Enter √ √ Return 2 Press the ... a-b-le STB : - - NOTE • In the PIP mode, the main and sub pictures are stilled at the same time. Press the ... Press the appropriate buttons to control your remote control unit for access to exit. or † button... VCR or DVD, including Rewind, Stop, Play/Pause and Fast Forward. Press the ENTER button to select a signal source, then press the ENTER button. Input Picture Sound Channel Setup Edit Name AV1 AV2 AV3 S-Video1 S-Video2 S-Video3 Component1 ▼ More V-CR : - - - D-VD : - t-el-lite STB : ...

User Manual (ENGLISH)
Page 25
...then press the ENTER button. or † button to exit. Move The symbol "*" is displayed. If you want to "On". Input Picture Sound Channel Setup Channel Antenna : Ant.1 Air/CATV : Air Auto Program Add/Delete Favorite Channels Name Fine Tune ▼ More Move ...Enter Return 2 Press the ... Input Picture Sound Channel Setup Channel Antenna : Ant.1 Air/CATV : Air Auto Program Add/Delete Favorite Channels Name Fine Tune ▼ More Move Enter...
...then press the ENTER button. or † button to exit. Move The symbol "*" is displayed. If you want to "On". Input Picture Sound Channel Setup Channel Antenna : Ant.1 Air/CATV : Air Auto Program Add/Delete Favorite Channels Name Fine Tune ▼ More Move ...Enter Return 2 Press the ... Input Picture Sound Channel Setup Channel Antenna : Ant.1 Air/CATV : Air Auto Program Add/Delete Favorite Channels Name Fine Tune ▼ More Move Enter...

User Manual (ENGLISH)
Page 26
... Setup Size Wide Panorama Zoom1 Zoom2 4:3 Move Enter Return Alternate method Press the P.SIZE button on screen using the scroll function. Input Picture Sound Channel Setup Picture Mode Color Tone Size Digital NR DNIe MCC Film Mode PIP : Standard √ : Warm1 √ √ : Off √...or † button to exit. Press the ... With PIP Off, it returns to your viewing requirements. 1 Press the MENU button. Input Picture Sound Channel Setup Picture Mode Color Tone Size Digital NR DNIe MCC Film Mode PIP : Standard √ : Warm1 √ √ : Off √ ...
... Setup Size Wide Panorama Zoom1 Zoom2 4:3 Move Enter Return Alternate method Press the P.SIZE button on screen using the scroll function. Input Picture Sound Channel Setup Picture Mode Color Tone Size Digital NR DNIe MCC Film Mode PIP : Standard √ : Warm1 √ √ : Off √...or † button to exit. Press the ... With PIP Off, it returns to your viewing requirements. 1 Press the MENU button. Input Picture Sound Channel Setup Picture Mode Color Tone Size Digital NR DNIe MCC Film Mode PIP : Standard √ : Warm1 √ √ : Off √ ...

User Manual (ENGLISH)
Page 27
... √ : Off √ : On √ √ : Off √ √ Move Enter Return 3 Press the ... Input Picture Sound Channel Setup Picture Mode Color Tone Size Digital NR DNIe MCC Film Mode PIP : Standard : Warm1 : OOfff : OOnn : Off Move Enter Return 52 DNIeTM ...: Warm1 √ √ : Off √ : On √ √ : Off √ √ Move Enter Return 3 Press the ... Input Picture Sound Channel Setup Picture Mode Color Tone Size Digital NR DNIe MCC Film Mode PIP : Standard √ : Warm1 √ √ : Off √ : On √ &#...
... √ : Off √ : On √ √ : Off √ √ Move Enter Return 3 Press the ... Input Picture Sound Channel Setup Picture Mode Color Tone Size Digital NR DNIe MCC Film Mode PIP : Standard : Warm1 : OOfff : OOnn : Off Move Enter Return 52 DNIeTM ...: Warm1 √ √ : Off √ : On √ √ : Off √ √ Move Enter Return 3 Press the ... Input Picture Sound Channel Setup Picture Mode Color Tone Size Digital NR DNIe MCC Film Mode PIP : Standard √ : Warm1 √ √ : Off √ : On √ &#...

User Manual (ENGLISH)
Page 28
... √ : Off √ : On √ √ : Off √ √ Move Enter Return 2 Press the ... Input Picture MCC Easy Control : Turkish Blue √ Detail Control √ Sound Channel Setup Move Enter Return Original Turkish Blue Press the ENTER button to ... "Custom") without affecting other colors on the screen. The previously adjusted MCC Colors will be reset to select "Easy Control". Input Picture Sound Channel Setup Picture Mode Color Tone Size Digital NR DNIe MCC Film Mode PIP : Standard √ : Warm1 √ √ : Off &#...
... √ : Off √ : On √ √ : Off √ √ Move Enter Return 2 Press the ... Input Picture MCC Easy Control : Turkish Blue √ Detail Control √ Sound Channel Setup Move Enter Return Original Turkish Blue Press the ENTER button to ... "Custom") without affecting other colors on the screen. The previously adjusted MCC Colors will be reset to select "Easy Control". Input Picture Sound Channel Setup Picture Mode Color Tone Size Digital NR DNIe MCC Film Mode PIP : Standard √ : Warm1 √ √ : Off &#...

User Manual (ENGLISH)
Page 29
...Standard : Warm1 : Off : On : OffOff On Move Enter Return NOTE • Film mode is supported in 480i only. 56 Viewing Picture-In-Picture One of the most best features of your TV is active. • This feature doesn't operate in the corner of the screen. ... √ : Warm1 √ √ : Off √ : On √ √ : Off √ √ Move Enter Return 3 Press the ... Input Picture Sound Channel Setup Picture Mode Color Tone Size Digital NR DNIe MCC Film Mode PIP : Standard √ : Warm1 √ √ : Off √ : On √ √ : Off...
...Standard : Warm1 : Off : On : OffOff On Move Enter Return NOTE • Film mode is supported in 480i only. 56 Viewing Picture-In-Picture One of the most best features of your TV is active. • This feature doesn't operate in the corner of the screen. ... √ : Warm1 √ √ : Off √ : On √ √ : Off √ √ Move Enter Return 3 Press the ... Input Picture Sound Channel Setup Picture Mode Color Tone Size Digital NR DNIe MCC Film Mode PIP : Standard √ : Warm1 √ √ : Off √ : On √ √ : Off...

