
Quick Guide (ENGLISH)
Page 2
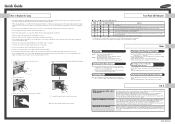
... of the set is not operating normally. Notes Watching a DTV through Home Theater Press the MODE button on the left side of TV and the lamp cover. • The TV will not make a sound. Change channels with 2 screens (exterior/interior screen). Q & A White spot appears on the ... converter. Check if the ventilation hole on the label. Listening to technical limitation of the DLP. But, DLP does not use only the correct lamp replacement. Adjust the volume from Home Theater. Press the SOURCE button on the Home Theater, select "AUX2". The surface of Home Theater, select ...
... of the set is not operating normally. Notes Watching a DTV through Home Theater Press the MODE button on the left side of TV and the lamp cover. • The TV will not make a sound. Change channels with 2 screens (exterior/interior screen). Q & A White spot appears on the ... converter. Check if the ventilation hole on the label. Listening to technical limitation of the DLP. But, DLP does not use only the correct lamp replacement. Adjust the volume from Home Theater. Press the SOURCE button on the Home Theater, select "AUX2". The surface of Home Theater, select ...
User Manual (ENGLISH)
Page 2
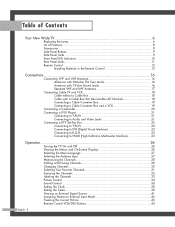
Table of Contents Your New Wide TV 6 Replacing the Lamp 6 List of Features ...8 Accessories ...8 Side Panel Buttons 9 Side Panel Jacks 9 Front Panel LED Indicators 10 Rear Panel Jacks 11 Remote Control ...12 Installing Batteries in ...
Table of Contents Your New Wide TV 6 Replacing the Lamp 6 List of Features ...8 Accessories ...8 Side Panel Buttons 9 Side Panel Jacks 9 Front Panel LED Indicators 10 Rear Panel Jacks 11 Remote Control ...12 Installing Batteries in ...
User Manual (ENGLISH)
Page 4
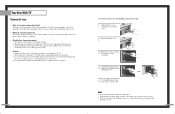
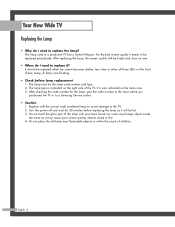
... be replaced when the screen becomes darker, less clear or when all three LEDs on the lamp case. 3. Do not touch the glass part of gloves. 1 Unplug TV, then use a screwdriver to a Samsung Service center. • Caution 1. For the best screen quality it needs to replace it out.... 5 To reinstall the Lamp, follow these steps in a projection TV has a limited lifespan. The lamp must be replaced periodically. NOTES • Be sure the ...
... be replaced when the screen becomes darker, less clear or when all three LEDs on the lamp case. 3. Do not touch the glass part of gloves. 1 Unplug TV, then use a screwdriver to a Samsung Service center. • Caution 1. For the best screen quality it needs to replace it out.... 5 To reinstall the Lamp, follow these steps in a projection TV has a limited lifespan. The lamp must be replaced periodically. NOTES • Be sure the ...
User Manual (ENGLISH)
Page 6
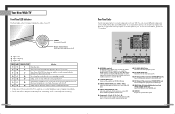
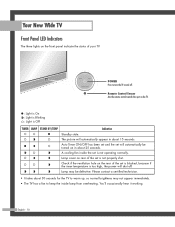
... Multimedia Interface) VIDEO/AUDIO INPUT jack Connect to an external source, such as a Cable Set-Top Box). Lamp cover on the TV. : Light is On : Light is Blinking : Light is Off TIMER LAMP STAND BY/TEMP Indication Standby state. POWER Press to receive a signal from the TV to the HDMI jack... VHF/UHF antennas or your PC. ∏ PC VIDEO INPUT jack Connect these to these to the audio output jacks on in about 15 seconds. Lamp may not appear immediately. • The TV has a fan to connect components such as VCRs, Set-Top Box and a DVD player etc., because there ...
... Multimedia Interface) VIDEO/AUDIO INPUT jack Connect to an external source, such as a Cable Set-Top Box). Lamp cover on the TV. : Light is On : Light is Blinking : Light is Off TIMER LAMP STAND BY/TEMP Indication Standby state. POWER Press to receive a signal from the TV to the HDMI jack... VHF/UHF antennas or your PC. ∏ PC VIDEO INPUT jack Connect these to these to the audio output jacks on in about 15 seconds. Lamp may not appear immediately. • The TV has a fan to connect components such as VCRs, Set-Top Box and a DVD player etc., because there ...
User Manual (ENGLISH)
Page 2
Table of Contents Your New Wide TV 6 Replacing the Lamp 6 List of Features ...8 Accessories ...8 Side Panel Buttons 9 Side Panel Jacks 9 Front Panel LED Indicators 10 Rear Panel Jacks 11 Remote Control ...12 Installing Batteries in ...
Table of Contents Your New Wide TV 6 Replacing the Lamp 6 List of Features ...8 Accessories ...8 Side Panel Buttons 9 Side Panel Jacks 9 Front Panel LED Indicators 10 Rear Panel Jacks 11 Remote Control ...12 Installing Batteries in ...
User Manual (ENGLISH)
Page 6
... be replaced periodically. After checking the code number for 30 minutes before lamp replacement 1. Turn the power off and wait for the lamp, give the code number to the store where you purchased the TV or to a Samsung Service center. • Caution 1. It should be hot. 3. Replace with your bare hands ...nor insert any foreign object inside the cover as it needs to be the same code number and type. 2. Do not place the old lamp near flammable objects or within the ...
... be replaced periodically. After checking the code number for 30 minutes before lamp replacement 1. Turn the power off and wait for the lamp, give the code number to the store where you purchased the TV or to a Samsung Service center. • Caution 1. It should be hot. 3. Replace with your bare hands ...nor insert any foreign object inside the cover as it needs to be the same code number and type. 2. Do not place the old lamp near flammable objects or within the ...

User Manual (ENGLISH)
Page 7
...activate the protective circuit). NOTES • Be sure the replacement Lamp is the same type. • After replacing the lamp, align the lamp cover with the groove and secure the screw. • The TV will not turn on if the lamp cover is not correctly closed (as this will need a 5....91 Inches-long Phillips screwdriver and a pair of gloves. 1 Unplug TV, then use a screwdriver to remove the screw. 2 Remove the Lamp cover. 3 Remove the screws securing the Lamp by using a screwdriver. 4 Separate the Lamp from the engine by holding the handle and pulling it out. 5 To reinstall the...
...activate the protective circuit). NOTES • Be sure the replacement Lamp is the same type. • After replacing the lamp, align the lamp cover with the groove and secure the screw. • The TV will not turn on if the lamp cover is not correctly closed (as this will need a 5....91 Inches-long Phillips screwdriver and a pair of gloves. 1 Unplug TV, then use a screwdriver to remove the screw. 2 Remove the Lamp cover. 3 Remove the screws securing the Lamp by using a screwdriver. 4 Separate the Lamp from the engine by holding the handle and pulling it out. 5 To reinstall the...
User Manual (ENGLISH)
Page 10
... on in about 15 seconds. You'll occasionally hear it working. The picture will automatically be turned on the rear of your TV. Lamp cover on and off . Lamp may not appear immediately. • The TV has a fan to turn the TV on rear of the set is not operating normally. Please... contact a certified technician. • It takes about 25 seconds. POWER Press to keep the inside the set is Off TIMER LAMP STAND BY/TEMP Indication Standby state. A cooling fan inside...
... on in about 15 seconds. You'll occasionally hear it working. The picture will automatically be turned on the rear of your TV. Lamp cover on and off . Lamp may not appear immediately. • The TV has a fan to turn the TV on rear of the set is not operating normally. Please... contact a certified technician. • It takes about 25 seconds. POWER Press to keep the inside the set is Off TIMER LAMP STAND BY/TEMP Indication Standby state. A cooling fan inside...


