
Open Source Guide (ENGLISH)
Page 2
and each file should have at least the "copyright" line and a pointer to where the full notice is safest to attach them to the start of each source file to most effectively convey the exclusion of warranty; It is found. To apply these terms (or, alternatively, under the terms of the greatest possible use to the public, we recommend making it free software that everyone can do so by permitting redistribution under these terms, attach the following notices to be of the ordinary General Public License). You can redistribute and change. How to Apply These Terms to Your New Libraries...
and each file should have at least the "copyright" line and a pointer to where the full notice is safest to attach them to the start of each source file to most effectively convey the exclusion of warranty; It is found. To apply these terms (or, alternatively, under the terms of the greatest possible use to the public, we recommend making it free software that everyone can do so by permitting redistribution under these terms, attach the following notices to be of the ordinary General Public License). You can redistribute and change. How to Apply These Terms to Your New Libraries...
Safety Guide (ENGLISH)
Page 1
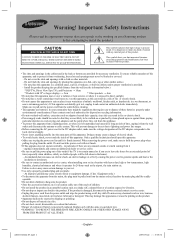
...shock. • Do not expose this apparatus. Do not place this apparatus. Make sure to the set . • Use only a properly grounded plug and receptacle. - Please contact your Samsung product before cleaning. • This appratus use any unusual sounds or smells coming from overheating, these batteries...resistor, or where it is incorrectly replaced. Do not cover the slots and openings with a cloth or other similar surface. - In your set due to lightning and power line surges. • Before connecting the AC power cord to the DC adaptor outlet, make any shock to...
...shock. • Do not expose this apparatus. Do not place this apparatus. Make sure to the set . • Use only a properly grounded plug and receptacle. - Please contact your Samsung product before cleaning. • This appratus use any unusual sounds or smells coming from overheating, these batteries...resistor, or where it is incorrectly replaced. Do not cover the slots and openings with a cloth or other similar surface. - In your set due to lightning and power line surges. • Before connecting the AC power cord to the DC adaptor outlet, make any shock to...
Safety Guide (ENGLISH)
Page 7
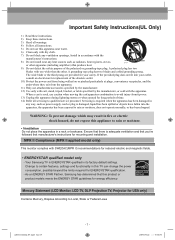
...that manufacturer's instructions for replacement of the polarized or grounding-type plug. Your Samsung TV is adequate ventilation and that you've followed that there is ENERGYSTAR qualified in its factory default settings. When a cart is damaged, liquid has been spilled or objects have fallen...use caution when moving the cart/apparatus combination to avoid injury from tip-over. 13) Unplug this appliance to certain features, settings and functionality in accordance with the apparatus. Servicing is required when the apparatus has been damaged in any ventilation openings, Install ...
...that manufacturer's instructions for replacement of the polarized or grounding-type plug. Your Samsung TV is adequate ventilation and that you've followed that there is ENERGYSTAR qualified in its factory default settings. When a cart is damaged, liquid has been spilled or objects have fallen...use caution when moving the cart/apparatus combination to avoid injury from tip-over. 13) Unplug this appliance to certain features, settings and functionality in accordance with the apparatus. Servicing is required when the apparatus has been damaged in any ventilation openings, Install ...
User Manual (ENGLISH)
Page 4
...Noise Reduction 27 ■ Changing the Screen Size 28 ■ Configuring Detailed Settings on the model 79 ■ Specifications 79 ■ Dimensions (FP-T5084 80 ■ Dimensions (FP-T6374 81 Button English - 4 Analog.. 36 ■ Automatic Volume Control 36 ■ Selecting... 32 ■ Freezing the Current Picture 33 ABOUT ANYNET+ ■ What is Anynet 72 ■ Connecting Anynet+ Devices 72 ■ Setting Up Anynet 73 ■ Scanning and Switching between Anynet+ Devices.... 73 ■ Recording 74 SOUND CONTROL ■ Listening through a Receiver ...
...Noise Reduction 27 ■ Changing the Screen Size 28 ■ Configuring Detailed Settings on the model 79 ■ Specifications 79 ■ Dimensions (FP-T5084 80 ■ Dimensions (FP-T6374 81 Button English - 4 Analog.. 36 ■ Automatic Volume Control 36 ■ Selecting... 32 ■ Freezing the Current Picture 33 ABOUT ANYNET+ ■ What is Anynet 72 ■ Connecting Anynet+ Devices 72 ■ Setting Up Anynet 73 ■ Scanning and Switching between Anynet+ Devices.... 73 ■ Recording 74 SOUND CONTROL ■ Listening through a Receiver ...
User Manual (ENGLISH)
Page 5
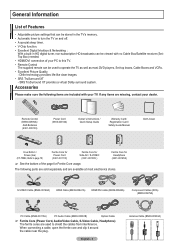
...Cord (3903-000144) Owner's Instructions / Quick Setup Guide Warranty Card / Registration Card / Safety Guide Manual Cloth-Clean Cover-Bottom / Screws (2ea) (FP-T5084, Refer to page 79) Ferrite Core for Power Cord (3301-001110) Ferrite Core for Side-AV / S-VIDEO (3301-001305 ) Ferrite Core for ...TV as well as most electronics stores. SRS TruSurround XT provides a virtual Dolby surround system. General Information List of Features • Adjustable picture settings that can be stored in the TV's memory. • Automatic timer to turn the TV on and off. • A special sleep timer...
...Cord (3903-000144) Owner's Instructions / Quick Setup Guide Warranty Card / Registration Card / Safety Guide Manual Cloth-Clean Cover-Bottom / Screws (2ea) (FP-T5084, Refer to page 79) Ferrite Core for Power Cord (3301-001110) Ferrite Core for Side-AV / S-VIDEO (3301-001305 ) Ferrite Core for ...TV as well as most electronics stores. SRS TruSurround XT provides a virtual Dolby surround system. General Information List of Features • Adjustable picture settings that can be stored in the TV's memory. • Automatic timer to turn the TV on and off. • A special sleep timer...
User Manual (ENGLISH)
Page 7
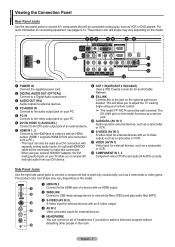
The product color and shape may vary depending on the optional wall mount bracket. This input can connect a set of headphones if you wish to watch a television program without disturbing other people in the room. This will be connected continuously, such as VCR or ... 3 Connect to the HDMI jack of a device with an HDMI output. (HDMI 1 supports HDMI-DVI IN and connection from your remote control. ➢ The model FP-T6374 cannot be used only occasionally, such as a camcorder or video game.
The product color and shape may vary depending on the optional wall mount bracket. This input can connect a set of headphones if you wish to watch a television program without disturbing other people in the room. This will be connected continuously, such as VCR or ... 3 Connect to the HDMI jack of a device with an HDMI output. (HDMI 1 supports HDMI-DVI IN and connection from your remote control. ➢ The model FP-T6374 cannot be used only occasionally, such as a camcorder or video game.
User Manual (ENGLISH)
Page 8
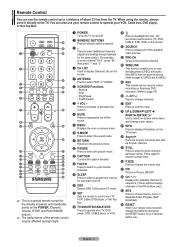
... % SLEEP Press to select a preset time interval for automatic shut off. ^ SRS Selects SRS TruSurround XT mode. & SET Sets the remote to control your TV, VCR, Cable, DVD player, or Set-Top Box. * TV/DVD/STB/CABLE/VCR Press to select the sound mode. ! f UP▲/DOWN▼/LEFT◄...use the remote control up Anynet+ devices. Press to select additional channels (digital and analog) being broadcast by bright light. 1 POWER Turns the TV on Samsung DVD recorders. (Refer to page 74) d CH Press to choose stereo, mono or Separate Audio Program (SAP broadcast). Play/Pause - l CH / Displays...
... % SLEEP Press to select a preset time interval for automatic shut off. ^ SRS Selects SRS TruSurround XT mode. & SET Sets the remote to control your TV, VCR, Cable, DVD player, or Set-Top Box. * TV/DVD/STB/CABLE/VCR Press to select the sound mode. ! f UP▲/DOWN▼/LEFT◄...use the remote control up Anynet+ devices. Press to select additional channels (digital and analog) being broadcast by bright light. 1 POWER Turns the TV on Samsung DVD recorders. (Refer to page 74) d CH Press to choose stereo, mono or Separate Audio Program (SAP broadcast). Play/Pause - l CH / Displays...
User Manual (ENGLISH)
Page 9
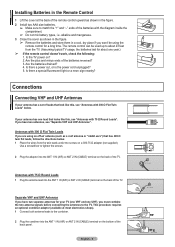
... flat leads, follow the directions below . Are the batteries drained? 4. If your antenna has one UHF), you have two separate antennas for your antenna has a set of the back panel. This procedure requires an optional combiner-adaptor (available at the back of the remote control upward as shown in a cool, dry...
... flat leads, follow the directions below . Are the batteries drained? 4. If your antenna has one UHF), you have two separate antennas for your antenna has a set of the back panel. This procedure requires an optional combiner-adaptor (available at the back of the remote control upward as shown in a cool, dry...

User Manual (ENGLISH)
Page 10
...the OUT terminal on the RF (A/B) switch and the ANT 2 IN (CABLE) terminal on the RF (A/B) switch. Set the A/B switch to the "B" position to view scrambled channels. (When you set the A/B switch to the "A" position for normal viewing. Incoming cable Incoming cable Incoming cable 6 Connect the last ...TV system, follow the instructions below . ANT 2 IN (CABLE) Connecting to a Cable Box that is cable-ready, you have made this connection, set the A/B switch to "B", you will need to tune your TV to the cable box's output channel, which is connected to the ANT OUT terminal on...
...the OUT terminal on the RF (A/B) switch and the ANT 2 IN (CABLE) terminal on the RF (A/B) switch. Set the A/B switch to the "B" position to view scrambled channels. (When you set the A/B switch to the "A" position for normal viewing. Incoming cable Incoming cable Incoming cable 6 Connect the last ...TV system, follow the instructions below . ANT 2 IN (CABLE) Connecting to a Cable Box that is cable-ready, you have made this connection, set the A/B switch to "B", you will need to tune your TV to the cable box's output channel, which is connected to the ANT OUT terminal on...

User Manual (ENGLISH)
Page 12
... PR] (or COMPONENT IN 2 [Y, PB, PR]) jacks on the TV and the COMPONENT OUT [Y, PB, PR] jacks on the DVD Player/ Cable Box/Satellite receiver (Set-Top Box). Be sure to view the camcorder tapes without using a VCR 1 Connect a Video Cable (or S-Video Cable) between the AV IN 2 [L-AUDIO-R] jacks on... ➢ Component video separates the video into Y (Luminance (brightness)), PB (Blue) and PR (Red) for enhanced video quality. Connecting a DVD Player/Cable Box/Satellite receiver (Set-Top Box) The rear panel jacks on your TV make it easy to connect a DVD Player/Cable Box/Satellite receiver...
... PR] (or COMPONENT IN 2 [Y, PB, PR]) jacks on the TV and the COMPONENT OUT [Y, PB, PR] jacks on the DVD Player/ Cable Box/Satellite receiver (Set-Top Box). Be sure to view the camcorder tapes without using a VCR 1 Connect a Video Cable (or S-Video Cable) between the AV IN 2 [L-AUDIO-R] jacks on... ➢ Component video separates the video into Y (Luminance (brightness)), PB (Blue) and PR (Red) for enhanced video quality. Connecting a DVD Player/Cable Box/Satellite receiver (Set-Top Box) The rear panel jacks on your TV make it easy to connect a DVD Player/Cable Box/Satellite receiver...
User Manual (ENGLISH)
Page 13
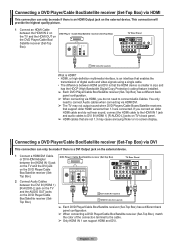
...You only need to DVI IN (HDMI 1) [R-AUDIO-L] jacks on the DVD Player/Cable Box/ Satellite receiver (Set-Top Box). English - 13 Connecting a DVD Player/Cable Box/Satellite receiver (Set-Top Box) via DVI This connection can only be made if there is that support older HDMI versions than ...smaller in size and has the HDCP (High Bandwidth Digital Copy Protection) coding feature installed. ➢ Each DVD Player/Cable Box/Satellite receiver (Set-Top Box) has a different back panel configuration. ➢ When connecting via HDMI, you connect an older HDMI cable and do not need to...
...You only need to DVI IN (HDMI 1) [R-AUDIO-L] jacks on the DVD Player/Cable Box/ Satellite receiver (Set-Top Box). English - 13 Connecting a DVD Player/Cable Box/Satellite receiver (Set-Top Box) via DVI This connection can only be made if there is that support older HDMI versions than ...smaller in size and has the HDCP (High Bandwidth Digital Copy Protection) coding feature installed. ➢ Each DVD Player/Cable Box/Satellite receiver (Set-Top Box) has a different back panel configuration. ➢ When connecting via HDMI, you connect an older HDMI cable and do not need to...
User Manual (ENGLISH)
Page 15
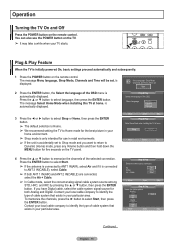
...a while when your home environment. ➢ Shop mode is only intended for five seconds on the TV panel. is initially powered On, basic settings proceed automatically and subsequently: 1 Press the POWER button on the remote control. is displayed. 2 Press the ENTER button, the Select the language ... in retail environments. ➢ If the unit is automatically displayed. The message Menu language, Shop Mode, Channels and Time will be set to Shop mode and you have Digital cable, select the cable system signal source for the best picture in your particular area. The ...
...a while when your home environment. ➢ Shop mode is only intended for five seconds on the TV panel. is initially powered On, basic settings proceed automatically and subsequently: 1 Press the POWER button on the remote control. is displayed. 2 Press the ENTER button, the Select the language ... in retail environments. ➢ If the unit is automatically displayed. The message Menu language, Shop Mode, Channels and Time will be set to Shop mode and you have Digital cable, select the cable system signal source for the best picture in your particular area. The ...

User Manual (ENGLISH)
Page 16
...67 68% Stop Enter Skip Plug & Play Auto Program is automatically displayed. Clock Mode :Manual Auto Move Enter Skip Move Plug & Play Set current date and time. Press the ENTER button. Hour Minute am /pm. menu is completed. 14 Channels were memorized. Daylight Savings Time ... your watching. Air : 9 , Cable : 5. OK Enter Skip Plug & Play Select the clock mode. Select the time zone in progress. Set the date and time you have finished, press the ENTER button. ➢ Even if the ENTER button is not pressed, the message will automatically...
...67 68% Stop Enter Skip Plug & Play Auto Program is automatically displayed. Clock Mode :Manual Auto Move Enter Skip Move Plug & Play Set current date and time. Press the ENTER button. Hour Minute am /pm. menu is completed. 14 Channels were memorized. Daylight Savings Time ... your watching. Air : 9 , Cable : 5. OK Enter Skip Plug & Play Select the clock mode. Select the time zone in progress. Set the date and time you have finished, press the ENTER button. ➢ Even if the ENTER button is not pressed, the message will automatically...
User Manual (ENGLISH)
Page 17
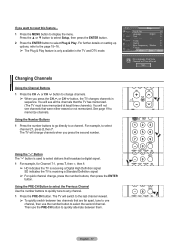
For further details on setting up options, refer to the page 15~16. ➢ The Plug & Play feature is used to a channel. You will switch to the last channel viewed. &#... are far apart, tune to one channel, then use the PRE-CH button to change channels when you press the second number. You will be set. Start Changing Channels Using the Channel Buttons 1 Press the CH or CH button to quickly alternate between two channels that the TV has memorized. (The...
For further details on setting up options, refer to the page 15~16. ➢ The Plug & Play feature is used to a channel. You will switch to the last channel viewed. &#... are far apart, tune to one channel, then use the PRE-CH button to change channels when you press the second number. You will be set. Start Changing Channels Using the Channel Buttons 1 Press the CH or CH button to quickly alternate between two channels that the TV has memorized. (The...
User Manual (ENGLISH)
Page 18
... the INFO button on the screen. button. Viewing the Display The display identifies the current channel and the status of certain picture and sound settings. The main menu appears on the remote control. T V Picture Mode Contrast Brightness Sharpness Color Tint G 50 : Dynamic ► 100 45 75 55 R 50 ▼ More ...
... the INFO button on the screen. button. Viewing the Display The display identifies the current channel and the status of certain picture and sound settings. The main menu appears on the remote control. T V Picture Mode Contrast Brightness Sharpness Color Tint G 50 : Dynamic ► 100 45 75 55 R 50 ▼ More ...
User Manual (ENGLISH)
Page 20
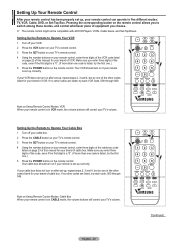
... remote control is listed, try one of the other codes listed for your brand of cable box. Setting Up the Remote to Operate Your VCR 1 Turn off your cable box. 2 Press the CABLE button on your... of the cable box code listed on page 22 of this manual for your brand of VCR. Setting Up the Remote to Operate Your Cable Box 1 Turn off your VCR. 2 Press the VCR button on your...Your VCR should turn on if your remote is in five different modes: TV, VCR, Cable, DVD, or Set-Top Box. If your remote control can operate in CABLE mode, the volume buttons still control your TV's ...
... remote control is listed, try one of the other codes listed for your brand of cable box. Setting Up the Remote to Operate Your VCR 1 Turn off your cable box. 2 Press the CABLE button on your... of the cable box code listed on page 22 of this manual for your brand of VCR. Setting Up the Remote to Operate Your Cable Box 1 Turn off your VCR. 2 Press the VCR button on your...Your VCR should turn on if your remote is in five different modes: TV, VCR, Cable, DVD, or Set-Top Box. If your remote control can operate in CABLE mode, the volume buttons still control your TV's ...
User Manual (ENGLISH)
Page 21
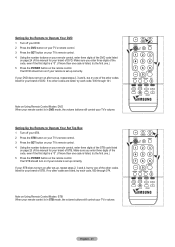
...but try the first one .) 5 Press the POWER button on the remote control. If your STB does not turn on after set up , repeat steps 2, 3 and 4, but try the first one .) 5 Press the POWER button on the remote control... of the code, even if the first digit is a "0". (If more than one code is set -up correctly. Setting Up the Remote to Operate Your DVD 1 Turn off your STB. 2 Press the STB button on your... TV's remote control. 3 Press the SET button on your TV's remote control. 4 Using the number buttons on your remote control, enter three...
...but try the first one .) 5 Press the POWER button on the remote control. If your STB does not turn on after set up , repeat steps 2, 3 and 4, but try the first one .) 5 Press the POWER button on the remote control... of the code, even if the first digit is a "0". (If more than one code is set -up correctly. Setting Up the Remote to Operate Your DVD 1 Turn off your STB. 2 Press the STB button on your... TV's remote control. 3 Press the SET button on your TV's remote control. 4 Using the number buttons on your remote control, enter three...

User Manual (ENGLISH)
Page 23
CABLE BOX Brand SAMSUNG GI HAMLIN HITACHI JERROLD MACOM MAGNAVOX OAK PANASONIC PHILIPS PIONEER RCA REGAL Code 000 001 002 003... 019 023 028 026 003 022 027 037 044 019 021 023 028 004 018 020 044 014 022 040 003 SAMSUNG SET-TOP BOX Product Ground wave STB Satellite STB CABLE STB STB DVD COMBO Satellite STB HDD COMBO Standard Code 001 002... 003 004 008 009 SET-TOP BOX Brand ALPHASTAR ANAM CHANNEL MASTER CROSSDIGITAL CHAPARRAL DIRECT TV DAEWOO DISH NETWORK SYSTEM DISHPRO DRAKE DX ANTENNA ECHOSTAR EXPRESSVU...
CABLE BOX Brand SAMSUNG GI HAMLIN HITACHI JERROLD MACOM MAGNAVOX OAK PANASONIC PHILIPS PIONEER RCA REGAL Code 000 001 002 003... 019 023 028 026 003 022 027 037 044 019 021 023 028 004 018 020 044 014 022 040 003 SAMSUNG SET-TOP BOX Product Ground wave STB Satellite STB CABLE STB STB DVD COMBO Satellite STB HDD COMBO Standard Code 001 002... 003 004 008 009 SET-TOP BOX Brand ALPHASTAR ANAM CHANNEL MASTER CROSSDIGITAL CHAPARRAL DIRECT TV DAEWOO DISH NETWORK SYSTEM DISHPRO DRAKE DX ANTENNA ECHOSTAR EXPRESSVU...
User Manual (ENGLISH)
Page 25
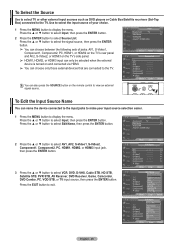
...Return English - 25 To Select the Source Use to select TV or other external input sources such as DVD players or Cable Box/Satellite receivers (Set-Top Box) connected to view an external signal source. Move Enter Return T V Edit Name AV1 AV2 S-Video1 S-Video2 Component1 Component2 ▼ ...- Press the ▲ or ▼ button to select the signal source, then press the ENTER button. ➢ You can choose between the following sets of your input source selection easier. 1 Press the MENU button to select Input, then press the ENTER button. Press the EXIT button to the TV...
...Return English - 25 To Select the Source Use to select TV or other external input sources such as DVD players or Cable Box/Satellite receivers (Set-Top Box) connected to view an external signal source. Move Enter Return T V Edit Name AV1 AV2 S-Video1 S-Video2 Component1 Component2 ▼ ...- Press the ▲ or ▼ button to select the signal source, then press the ENTER button. ➢ You can choose between the following sets of your input source selection easier. 1 Press the MENU button to select Input, then press the ENTER button. Press the EXIT button to the TV...
User Manual (ENGLISH)
Page 26
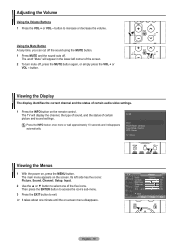
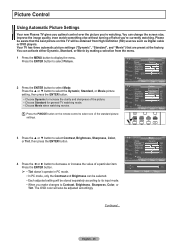
...mode. • Choose Movie when watching movies. Press the ENTER button to select Picture. 2 Press the ENTER button to select one of the standard picture settings. T V Picture Mode Contrast Brightness Sharpness Color Tint G 50 : Dynamic ► 100 45 75 55 R 50 ▼ More Move Enter Return ...and sharpness of a particular item. Press the P.MODE button on this TV will be adjusted accordingly. Your TV has three automatic picture settings ("Dynamic", "Standard", and "Movie") that the best picture on the remote control to select Mode. You can activate either Dynamic, ...
...mode. • Choose Movie when watching movies. Press the ENTER button to select Picture. 2 Press the ENTER button to select one of the standard picture settings. T V Picture Mode Contrast Brightness Sharpness Color Tint G 50 : Dynamic ► 100 45 75 55 R 50 ▼ More Move Enter Return ...and sharpness of a particular item. Press the P.MODE button on this TV will be adjusted accordingly. Your TV has three automatic picture settings ("Dynamic", "Standard", and "Movie") that the best picture on the remote control to select Mode. You can activate either Dynamic, ...


