Quick Guide (KOREAN)
Page 6
4 VESA WALL MOUNT VESA WALL MOUNT 10 cm Wall Mount 설치하기 1-3
4 VESA WALL MOUNT VESA WALL MOUNT 10 cm Wall Mount 설치하기 1-3

User Manual (KOREAN)
Page 17
4 VESA WALL MOUNT VESA WALL MOUNT 10 cm Wall Mount 설치하기 2-3
4 VESA WALL MOUNT VESA WALL MOUNT 10 cm Wall Mount 설치하기 2-3

Quick Guide (ENGLISH)
Page 5
... down on the cloth so that complies with the VESA specifications. Turn the product off and unplug the power cord from the wall outlet. 2. Separate the stand. 4. Align the groove of the part of the product faces downwards. 3. Stand (Optional) 1. A. Stand Mount B. Place a soft cloth or cushion on the...surface to the stand with the groove in the stand (desk-top stand, wall mount stand or another stand) and firmly fix the stand by fastening the screw. 1-3 Installing the Product Lift up the monitor stand to the maximum angle with your left hand, and remove the back decoration ...
... down on the cloth so that complies with the VESA specifications. Turn the product off and unplug the power cord from the wall outlet. 2. Separate the stand. 4. Align the groove of the part of the product faces downwards. 3. Stand (Optional) 1. A. Stand Mount B. Place a soft cloth or cushion on the...surface to the stand with the groove in the stand (desk-top stand, wall mount stand or another stand) and firmly fix the stand by fastening the screw. 1-3 Installing the Product Lift up the monitor stand to the maximum angle with your left hand, and remove the back decoration ...

Quick Guide (ENGLISH)
Page 6
...performed by an authorized installation engineer. • When installing the product using a wall mount, purchase a wall mount that provides at least 10 cm of space from the wall. • The company shall not ... the product and connect the other end of the PC with the standard VESA specifications and do not assemble them using excessive force. • If you use screws that are... not compatible with the standard VESA specifications, the length of the screw may differ depending on the corresponding specifications. •...
...performed by an authorized installation engineer. • When installing the product using a wall mount, purchase a wall mount that provides at least 10 cm of space from the wall. • The company shall not ... the product and connect the other end of the PC with the standard VESA specifications and do not assemble them using excessive force. • If you use screws that are... not compatible with the standard VESA specifications, the length of the screw may differ depending on the corresponding specifications. •...
User Manual (ENGLISH)
Page 16
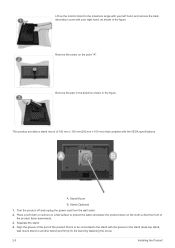
This product provides a stand mount of 100 mm x 100 mm(200 mm x 100 mm) that is to be connected to the stand with the groove in the stand (desk-top stand, wall mount stand or another stand) ... fix the stand by fastening the screw. 2-3 Installing the Product Separate the stand. 4. Stand Mount B. Turn the product off and unplug the power cord from the wall outlet. 2. Align the... figure. Stand (Optional) 1. Remove the part in the direction shown in the figure. Lift up the monitor stand to protect the panel and place the product down on the point "A". Place a soft cloth or ...
This product provides a stand mount of 100 mm x 100 mm(200 mm x 100 mm) that is to be connected to the stand with the groove in the stand (desk-top stand, wall mount stand or another stand) ... fix the stand by fastening the screw. 2-3 Installing the Product Separate the stand. 4. Stand Mount B. Turn the product off and unplug the power cord from the wall outlet. 2. Align the... figure. Stand (Optional) 1. Remove the part in the direction shown in the figure. Lift up the monitor stand to protect the panel and place the product down on the point "A". Place a soft cloth or ...
User Manual (ENGLISH)
Page 17
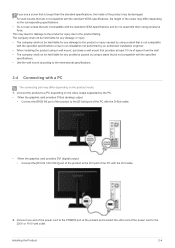
... do not assemble them using a stand that is not compatible with the specified specifications. • Use the wall mount according to the DVI port of the PC with the standard VESA specifications, the length of the screw may result in damage to the product or injury due to the 220V or... force. Connect the product to a PC depending on the video output supported by an authorized installation engineer. • When installing the product using a wall mount, purchase a wall mount that provides at least 10 cm of space from the wall. • The company shall not be damaged. • For wall...
... do not assemble them using a stand that is not compatible with the specified specifications. • Use the wall mount according to the DVI port of the PC with the standard VESA specifications, the length of the screw may result in damage to the product or injury due to the 220V or... force. Connect the product to a PC depending on the video output supported by an authorized installation engineer. • When installing the product using a wall mount, purchase a wall mount that provides at least 10 cm of space from the wall. • The company shall not be damaged. • For wall...


