

User Manual
Page 9
... red. Use the DIS function or half-press [Shutter] to ensure the subject is caused by setting shooting options. Red eye is focused. (p. 33) Photos are blurred. This can occur if you use the flash. • Turn off the flash or avoid capturing photos in a dusty place. • Set ISO sensitivity options. (p. 59) Photos are blurred when shooting at night. Basic troubleshooting Learn to solve common problems...
... red. Use the DIS function or half-press [Shutter] to ensure the subject is caused by setting shooting options. Red eye is focused. (p. 33) Photos are blurred. This can occur if you use the flash. • Turn off the flash or avoid capturing photos in a dusty place. • Set ISO sensitivity options. (p. 59) Photos are blurred when shooting at night. Basic troubleshooting Learn to solve common problems...
User Manual
Page 10
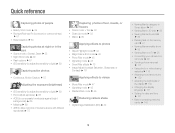
... • Deleting files on the memory card f 87 • Viewing files as a slide show f 89 • Viewing files on a TV f 98 • Connecting your camera to a computer f 99 • Sending photos via email f 111 • Using photo or video sharing websites f 115 • Adjusting sound and volume f 129 • Adjusting the brightness of the display f 130 • Changing the display language f 131 • Setting the date and time f 131...
... • Deleting files on the memory card f 87 • Viewing files as a slide show f 89 • Viewing files on a TV f 98 • Connecting your camera to a computer f 99 • Sending photos via email f 111 • Using photo or video sharing websites f 115 • Adjusting sound and volume f 129 • Adjusting the brightness of the display f 130 • Changing the display language f 131 • Setting the date and time f 131...

User Manual
Page 11
... battery and memory card 18 Charging the battery and turning on your camera ...... 19 Charging the battery 19 Turning on your camera 19 Performing the initial setup 20 Learning icons 22 Using the touch screen 23 Setting the touch screen and sound 25 Setting the display type for the touch screen 25 Setting the sound 25 Using the Home screen 26 Accessing the Home screen 26 Icons on the Home screen 26 Rearranging icons 28 Capturing photos 29 Zooming 30 Reducing camera...
... battery and memory card 18 Charging the battery and turning on your camera ...... 19 Charging the battery 19 Turning on your camera 19 Performing the initial setup 20 Learning icons 22 Using the touch screen 23 Setting the touch screen and sound 25 Setting the display type for the touch screen 25 Setting the sound 25 Using the Home screen 26 Accessing the Home screen 26 Icons on the Home screen 26 Rearranging icons 28 Capturing photos 29 Zooming 30 Reducing camera...

User Manual
Page 12
... Detecting eye blinking 65 Using Smart Face Recognition 65 Registering faces as your favorites (My Star 66 Adjusting brightness and color 68 Adjusting the exposure manually (EV 68 Compensating for backlighting (ACB 69 Changing the metering option 69 Selecting a light source (White balance 70 Using burst modes 72 Applying effects/Adjusting images 73 Applying Smart Filter effects 73 Adjusting your photos 76 Reducing the zoom sound 77 Available shooting options by shooting mode...
... Detecting eye blinking 65 Using Smart Face Recognition 65 Registering faces as your favorites (My Star 66 Adjusting brightness and color 68 Adjusting the exposure manually (EV 68 Compensating for backlighting (ACB 69 Changing the metering option 69 Selecting a light source (White balance 70 Using burst modes 72 Applying effects/Adjusting images 73 Applying Smart Filter effects 73 Adjusting your photos 76 Reducing the zoom sound 77 Available shooting options by shooting mode...

User Manual
Page 14
... videos to a PC 123 Sending photos or videos to a Blu-ray disc Player ....... 124 About the Wakeup on LAN(WOL) feature 125 Settings 127 Settings menu 128 Accessing the settings menu 128 Sound 129 Display 129 Connectivity 130 General 131 Appendixes 133 Error messages 134 Camera maintenance 135 Cleaning your camera 135 Using or storing the camera 136 About memory cards 137 About the battery 139 Before contacting a service center 143 Camera...
... videos to a PC 123 Sending photos or videos to a Blu-ray disc Player ....... 124 About the Wakeup on LAN(WOL) feature 125 Settings 127 Settings menu 128 Accessing the settings menu 128 Sound 129 Display 129 Connectivity 130 General 131 Appendixes 133 Error messages 134 Camera maintenance 135 Cleaning your camera 135 Using or storing the camera 136 About memory cards 137 About the battery 139 Before contacting a service center 143 Camera...

User Manual
Page 15
... Camera layout 16 Inserting the battery and memory card ... 18 Charging the battery and turning on your camera 19 Charging the battery 19 Turning on your camera's layout, icons, and basic functions for getting a clearer photo 33 Basic functions Learn about your camera 19 Performing the initial setup 20 Learning icons 22 Using the touch screen 23 Setting the touch screen and sound ...... 25 Setting the display type for the touch screen 25 Setting the sound 25 Using the Home screen...
... Camera layout 16 Inserting the battery and memory card ... 18 Charging the battery and turning on your camera 19 Charging the battery 19 Turning on your camera's layout, icons, and basic functions for getting a clearer photo 33 Basic functions Learn about your camera 19 Performing the initial setup 20 Learning icons 22 Using the touch screen 23 Setting the touch screen and sound ...... 25 Setting the display type for the touch screen 25 Setting the sound 25 Using the Home screen...

User Manual
Page 34
... focus frame appears in red. Reducing camera shake Set the Digital Image Stabilization option to reduce camera shake. (p. 32) Half-pressing the shutter button When h is blocking the lens. Tips for getting a clearer photo Holding your camera correctly Ensure nothing is displayed Half-press [Shutter] to adjust the focus. The aperture remains open longer and it may be harder to hold the camera steady long enough to take a clear picture. • Use...
... focus frame appears in red. Reducing camera shake Set the Digital Image Stabilization option to reduce camera shake. (p. 32) Half-pressing the shutter button When h is blocking the lens. Tips for getting a clearer photo Holding your camera correctly Ensure nothing is displayed Half-press [Shutter] to adjust the focus. The aperture remains open longer and it may be harder to hold the camera steady long enough to take a clear picture. • Use...

User Manual
Page 38
... as camera shake, lighting, or distance to the subject. • Even if you can capture photos with simple adjustments to brightness and color. 1 On the Home screen, touch . 2 Drag the sliders to adjust Brightness and Color. Extended functions 37 Brightness Color 3 Align your subject in the frame, and then half-press [Shutter] to focus. 4 Press [Shutter] to capture the photo. Using shooting modes 3 Half-press [Shutter] to focus. •...
... as camera shake, lighting, or distance to the subject. • Even if you can capture photos with simple adjustments to brightness and color. 1 On the Home screen, touch . 2 Drag the sliders to adjust Brightness and Color. Extended functions 37 Brightness Color 3 Align your subject in the frame, and then half-press [Shutter] to focus. 4 Press [Shutter] to capture the photo. Using shooting modes 3 Half-press [Shutter] to focus. •...

User Manual
Page 40
Using shooting modes Using the Night Shot mode In Night Shot mode, you can use a slow shutter speed to adjust shutter speed and aperture value. Increase the aperture value to prevent overexposure. 1 On the Home screen, touch . 2 Drag the dials on the screen to the arrow directions below to extend the time the shutter stays open. Shutter speed Aperture value 3 Align your subject in the frame, and then half-press [Shutter] to focus. 4 Press [Shutter] to make skin appear lighter...
Using shooting modes Using the Night Shot mode In Night Shot mode, you can use a slow shutter speed to adjust shutter speed and aperture value. Increase the aperture value to prevent overexposure. 1 On the Home screen, touch . 2 Drag the dials on the screen to the arrow directions below to extend the time the shutter stays open. Shutter speed Aperture value 3 Align your subject in the frame, and then half-press [Shutter] to focus. 4 Press [Shutter] to make skin appear lighter...

User Manual
Page 45
... Object Highlight effect cannot be used with various effects. Using effect modes Capture photos or record videos with the Optical zoom at 3X or higher. • Digital zoom is not within the optimum range, you use. 3 Drag the sliders to focus. • When the camera can capture a photo but the Object Highlight effect will appear. Blur Tone 4 Half-press [Shutter] to adjust Blur and Tone.
... Object Highlight effect cannot be used with various effects. Using effect modes Capture photos or record videos with the Optical zoom at 3X or higher. • Digital zoom is not within the optimum range, you use. 3 Drag the sliders to focus. • When the camera can capture a photo but the Object Highlight effect will appear. Blur Tone 4 Half-press [Shutter] to adjust Blur and Tone.

User Manual
Page 53
... Detecting eye blinking 65 Using Smart Face Recognition 65 Registering faces as your favorites (My Star 66 Adjusting brightness and color 68 Adjusting the exposure manually (EV) ...... 68 Compensating for backlighting (ACB) ...... 69 Changing the metering option 69 Selecting a light source (White balance) ... 70 Using burst modes 72 Applying effects/Adjusting images ......... 73 Applying Smart Filter effects 73 Adjusting your photos 76 Reducing the zoom sound 77 Available shooting options by shooting mode...
... Detecting eye blinking 65 Using Smart Face Recognition 65 Registering faces as your favorites (My Star 66 Adjusting brightness and color 68 Adjusting the exposure manually (EV) ...... 68 Compensating for backlighting (ACB) ...... 69 Changing the metering option 69 Selecting a light source (White balance) ... 70 Using burst modes 72 Applying effects/Adjusting images ......... 73 Applying Smart Filter effects 73 Adjusting your photos 76 Reducing the zoom sound 77 Available shooting options by shooting mode...
User Manual
Page 98
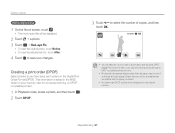
... a print order (DPOF) Select photos to print and save your memory card for photos stored in the internal memory. Ensure that your photo dimensions are wider than the paper may be displayed. 2 Touch “ a photo. 3 Touch m “ Red-eye Fix. • To view the original photo, touch Before. • To view the adjusted photo, touch After. 4 Touch s to a print shop that supports DPOF (Digital Print Order Format) or you can print photos directly through a DPOF-compatible printer at home. • Photos...
... a print order (DPOF) Select photos to print and save your memory card for photos stored in the internal memory. Ensure that your photo dimensions are wider than the paper may be displayed. 2 Touch “ a photo. 3 Touch m “ Red-eye Fix. • To view the original photo, touch Before. • To view the adjusted photo, touch After. 4 Touch s to a print shop that supports DPOF (Digital Print Order Format) or you can print photos directly through a DPOF-compatible printer at home. • Photos...

User Manual
Page 108
... Accessing a website 115 Uploading photos or videos 115 Using a smart phone as a remote shutter release 116 Viewing photos or videos on AllShare devices 118 Viewing photos or videos on a TV screen 118 Viewing photos or videos on another device (renderer 120 Sending or receiving photos or videos with another camera 121 Sending photos or videos to another camera 121 Receiving photos or videos from another camera 121 Using Auto Backup to send photos or videos 123 Installing the program for...
... Accessing a website 115 Uploading photos or videos 115 Using a smart phone as a remote shutter release 116 Viewing photos or videos on AllShare devices 118 Viewing photos or videos on a TV screen 118 Viewing photos or videos on another device (renderer 120 Sending or receiving photos or videos with another camera 121 Sending photos or videos to another camera 121 Receiving photos or videos from another camera 121 Using Auto Backup to send photos or videos 123 Installing the program for...
User Manual
Page 111
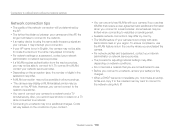
... not authorized to use free WLANs that require a user agreement and additional information when you cannot connect to the network via a printer. • You cannot connect your camera to a network and a TV simultaneously. Costs will take to connect to the network. • If a nearby device is using Auto IP. txt file and copy it to the inserted memory card to connect to the network...
... not authorized to use free WLANs that require a user agreement and additional information when you cannot connect to the network via a printer. • You cannot connect your camera to a network and a TV simultaneously. Costs will take to connect to the network. • If a nearby device is using Auto IP. txt file and copy it to the inserted memory card to connect to the network...

User Manual
Page 116
... unable to upload photos or videos due to file sharing websites. Uploading photos or videos 1 Access the website with the date they were captured. • The speed of uploading photos or videos may differ depending on your photos or videos to server errors, touch Retry. • Uploaded photos or videos may affect how quickly photos upload or web pages open. Using photo or video sharing websites Upload your camera. Accessing a website 1 On the Home screen, touch...
... unable to upload photos or videos due to file sharing websites. Uploading photos or videos 1 Access the website with the date they were captured. • The speed of uploading photos or videos may differ depending on your photos or videos to server errors, touch Retry. • Uploaded photos or videos may affect how quickly photos upload or web pages open. Using photo or video sharing websites Upload your camera. Accessing a website 1 On the Home screen, touch...

User Manual
Page 133
Auto Power Off Set the camera to automatically turn off when the camera is connected to display the date and time on in the camera before using them to help the camera focus. (Off, On*) Format the internal memory and the memory card (formatting will properly recognize your camera will delete all files, including protected files). (Yes, No) Errors can occur if you use a memory card formatted by another brand of the photo. • Some printer models may not print the date and...
Auto Power Off Set the camera to automatically turn off when the camera is connected to display the date and time on in the camera before using them to help the camera focus. (Off, On*) Format the internal memory and the memory card (formatting will properly recognize your camera will delete all files, including protected files). (Yes, No) Errors can occur if you use a memory card formatted by another brand of the photo. • Some printer models may not print the date and...
User Manual
Page 135
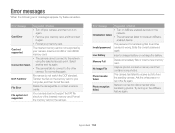
.... Try turning on the network. Try connecting again. Memory Full No Image File Photo transfer failed. Select another Invalid password. File Error Delete the damaged file or contact a service center. Card not supported. Connection failed. • The camera cannot connect to locate an AllShareenabled device. File system not supported. Card Error • Remove your memory card. Initialization failed. • The camera has failed to the network using the selected access point. Error messages When the following error messages appear...
.... Try turning on the network. Try connecting again. Memory Full No Image File Photo transfer failed. Select another Invalid password. File Error Delete the damaged file or contact a service center. Card not supported. Connection failed. • The camera cannot connect to locate an AllShareenabled device. File system not supported. Card Error • Remove your memory card. Initialization failed. • The camera has failed to the network using the selected access point. Error messages When the following error messages appear...

User Manual
Page 144
... some modes. Situation Suggested remedies • There is inserted correctly. When you leave your camera at a service center, be replaced over time. Recharge if needed. • Batteries are still having trouble with your device, contact your pocket. • Using the flash or recording videos depletes the battery quickly. The camera heats up . Get a new memory card. • Make sure that the camera is switched on the camera The power turns off...
... some modes. Situation Suggested remedies • There is inserted correctly. When you leave your camera at a service center, be replaced over time. Recharge if needed. • Batteries are still having trouble with your device, contact your pocket. • Using the flash or recording videos depletes the battery quickly. The camera heats up . Get a new memory card. • Make sure that the camera is switched on the camera The power turns off...

User Manual
Page 161
... 146 Charging 19 Cleaning camera body 135 lens 135 touch screen 135 Close up shot Close up mode 38 macro 60 Connecting to a computer Mac 104 Windows 99 Contrast Playback mode 95 Shooting mode 76 D Date/Time set 131 Deleting files 87 Digital Image Stabilization (DIS) 32 DIgital Print Order Format 97 Digital zoom 31 Disconnecting the camera 103 Display brightness 130 Display set 25 E Editing photos 93 Editing videos capturing 91 trimming 91 Enlarging 88 Error messages 134 F Face detection 63 Flash auto...
... 146 Charging 19 Cleaning camera body 135 lens 135 touch screen 135 Close up shot Close up mode 38 macro 60 Connecting to a computer Mac 104 Windows 99 Contrast Playback mode 95 Shooting mode 76 D Date/Time set 131 Deleting files 87 Digital Image Stabilization (DIS) 32 DIgital Print Order Format 97 Digital zoom 31 Disconnecting the camera 103 Display brightness 130 Display set 25 E Editing photos 93 Editing videos capturing 91 trimming 91 Enlarging 88 Error messages 134 F Face detection 63 Flash auto...

User Manual
Page 163
... 105 Playback button 17 Playback mode 81 Power button 17 Power save mode 130 Printing photos 105 Program mode 40 Protecting files 87 Q Quick view 130 R Red-eye Playback mode 97 Shooting mode 57 Remote Viewfinder 116 Reset 132 Resolution Playback mode 93 Shooting mode 53 Retouching faces Playback mode 96 Shooting mode 39 Rotating 94 S Saturation Playback mode 95 Shooting mode 76 Scene mode 38 Self portrait shot 64 Service center 143 Settings 128 Sharpness 76 Shooting portraits Beauty Shot mode 39 blink detection 65 face detection 63 red-eye 58 red-eye fix 58 self...
... 105 Playback button 17 Playback mode 81 Power button 17 Power save mode 130 Printing photos 105 Program mode 40 Protecting files 87 Q Quick view 130 R Red-eye Playback mode 97 Shooting mode 57 Remote Viewfinder 116 Reset 132 Resolution Playback mode 93 Shooting mode 53 Retouching faces Playback mode 96 Shooting mode 39 Rotating 94 S Saturation Playback mode 95 Shooting mode 76 Scene mode 38 Self portrait shot 64 Service center 143 Settings 128 Sharpness 76 Shooting portraits Beauty Shot mode 39 blink detection 65 face detection 63 red-eye 58 red-eye fix 58 self...


