User Manual
Page 2
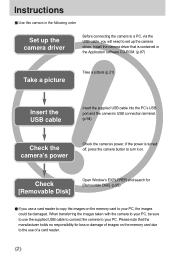
...[Removable Disk] Open Window's EXPLORER and search for loss or damage of a card reader. 2 Install the camera driver that the manufacturer holds no responsibility for [...driver Before connecting the camera to a PC, via the USB cable, you use a card reader to copy the images on the memory card to set up the camera driver. When transferring the images taken with the camera to ... the camera's power. Please note that is turned off, press the camera button to turn it on the memory card due to the use the supplied USB cable to connect the camera to your PC, the images could be sure...
...[Removable Disk] Open Window's EXPLORER and search for loss or damage of a card reader. 2 Install the camera driver that the manufacturer holds no responsibility for [...driver Before connecting the camera to a PC, via the USB cable, you use a card reader to copy the images on the memory card to set up the camera driver. When transferring the images taken with the camera to ... the camera's power. Please note that is turned off, press the camera button to turn it on the memory card due to the use the supplied USB cable to connect the camera to your PC, the images could be sure...

User Manual
Page 3
... Using the AC power adapter (3.3V 2.0A) 13 Using the batteries 14 Instructions on how to use the memory card 15 Maintenance of the memory card 15 Preserving the memory card data 15 Inserting the memory card 17 Removing the memory card 17 RECORDING LCD monitor indicator 18 Starting the recording mode 19 Recording a Movie clip 19 Pausing while recording...
... Using the AC power adapter (3.3V 2.0A) 13 Using the batteries 14 Instructions on how to use the memory card 15 Maintenance of the memory card 15 Preserving the memory card data 15 Inserting the memory card 17 Removing the memory card 17 RECORDING LCD monitor indicator 18 Starting the recording mode 19 Recording a Movie clip 19 Pausing while recording...
User Manual
Page 4
... 63 PictBridge : Printing 64 PictBridge : Print Setting 65 PictBridge : RESET 66 SETUP Setup menu 67 File name 68 Auto power off 69 Language 70 Formatting a memory card 71 4 Setting up the Date / Time 72 Date type 72 Imprinting the recording date 73 Sound 73 Selecting an External Device (USB) 74 LCD brightness... 98SE 97 Removable Disk 98 Removing the removable disk 99 Setting up the USB Driver for MAC 100 Using the USB Driver for MAC 100 Digimax Viewer 2.1 101 Using PhotoImpression 102 FAQ 103
... 63 PictBridge : Printing 64 PictBridge : Print Setting 65 PictBridge : RESET 66 SETUP Setup menu 67 File name 68 Auto power off 69 Language 70 Formatting a memory card 71 4 Setting up the Date / Time 72 Date type 72 Imprinting the recording date 73 Sound 73 Selecting an External Device (USB) 74 LCD brightness... 98SE 97 Removable Disk 98 Removing the removable disk 99 Setting up the USB Driver for MAC 100 Using the USB Driver for MAC 100 Digimax Viewer 2.1 101 Using PhotoImpression 102 FAQ 103
User Manual
Page 5
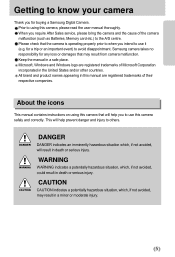
...Corporation incorporated in a minor or moderate injury. 5 Please check that may result in the United States and/or other countries. Samsung camera takes no responsibility for any loss or damages that the camera is operating properly prior to when you intend to use ...serious injury. About the icons This manual contains instructions on using this manual are registered trademarks of the camera malfunction (such as Batteries, Memory card etc.) to others. WARNING WARNING indicates a potentially hazardous situation, which , if not avoided, may result from camera malfunction. Getting to...
...Corporation incorporated in a minor or moderate injury. 5 Please check that may result in the United States and/or other countries. Samsung camera takes no responsibility for any loss or damages that the camera is operating properly prior to when you intend to use ...serious injury. About the icons This manual contains instructions on using this manual are registered trademarks of the camera malfunction (such as Batteries, Memory card etc.) to others. WARNING WARNING indicates a potentially hazardous situation, which , if not avoided, may result from camera malfunction. Getting to...

User Manual
Page 6
... , do not cover the camera or AC Power Adapter. This could cause a fire. Positioning the flash too close to your dealer or Samsung Camera Service Centre. You must contact your subject's eyes, may cause a fire or electric shock. This may adversely affect the camera s internal...-ventilated area. 6 Please do not use the flash in close proximity to people or animals. Exposure to your dealer or Samsung Camera Service Centre. the memory card slot and battery chamber. This may result in close proximity to flammable or explosive gases, as this may cause eyesight damage....
... , do not cover the camera or AC Power Adapter. This could cause a fire. Positioning the flash too close to your dealer or Samsung Camera Service Centre. You must contact your subject's eyes, may cause a fire or electric shock. This may adversely affect the camera s internal...-ventilated area. 6 Please do not use the flash in close proximity to people or animals. Exposure to your dealer or Samsung Camera Service Centre. the memory card slot and battery chamber. This may result in close proximity to flammable or explosive gases, as this may cause eyesight damage....
User Manual
Page 8
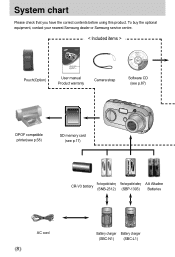
To buy the optional equipment, contact your nearest Samsung dealer or Samsung service centre. < Included items > Pouch(Option) User manual Product warranty Camera strap Software CD (see p.87) DPOF compatible printer(see p.58) SD memory card (see p.17) CR-V3 battery Rechargeable battery (SNB-2312) Rechargeable battery (SBP-1303) AA Alkaline Batteries AC cord 8 Battery charger Battery charger (SBC-N1) (SBC-L1) System chart Please check that you have the correct contents before using this product.
To buy the optional equipment, contact your nearest Samsung dealer or Samsung service centre. < Included items > Pouch(Option) User manual Product warranty Camera strap Software CD (see p.87) DPOF compatible printer(see p.58) SD memory card (see p.17) CR-V3 battery Rechargeable battery (SNB-2312) Rechargeable battery (SBP-1303) AA Alkaline Batteries AC cord 8 Battery charger Battery charger (SBC-N1) (SBC-L1) System chart Please check that you have the correct contents before using this product.
User Manual
Page 11
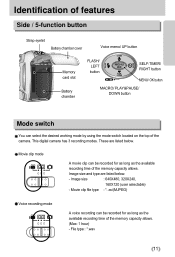
...user selectable) - File type : *.wav 11 Identification of features Side / 5-function button Strap eyelet Battery chamber cover Voice memo/ UP button Memory card slot Battery chamber FLASH/ LEFT button SELF-TIMER/ RIGHT button MENU/ OK button MACRO/ PLAY&PAUSE/ DOWN button Mode switch You can be recorded... - Movie clip mode A movie clip can select the desired working mode by using the mode switch located on the top of the memory capacity allows. avi(MJPEG) Voice recording mode A voice recording can be recorded for as long as the available recording time of the camera...
...user selectable) - File type : *.wav 11 Identification of features Side / 5-function button Strap eyelet Battery chamber cover Voice memo/ UP button Memory card slot Battery chamber FLASH/ LEFT button SELF-TIMER/ RIGHT button MENU/ OK button MACRO/ PLAY&PAUSE/ DOWN button Mode switch You can be recorded... - Movie clip mode A movie clip can select the desired working mode by using the mode switch located on the top of the memory capacity allows. avi(MJPEG) Voice recording mode A voice recording can be recorded for as long as the available recording time of the camera...
User Manual
Page 15
.... Should this camera. To use . If there is warm. Please keep the memory card in its case when not in use the memory card in the camera, replace the memory card or delete unnecessary images stored on the memory card is advisable to purchase a new memory card. Samsung cannot be the case, you may become dirty or to any liquid. It...
.... Should this camera. To use . If there is warm. Please keep the memory card in its case when not in use the memory card in the camera, replace the memory card or delete unnecessary images stored on the memory card is advisable to purchase a new memory card. Samsung cannot be the case, you may become dirty or to any liquid. It...

User Manual
Page 16
... camera can be affected by variables such as follows. By sliding the switch to data in the memory card. Card pins Write protect switch Label [ SD(Secure Digital) memory card ] The SD memory card has a write protect switch that prevents image files from being deleted or formatted. These figures are approximate... If you open the battery chamber cover when the camera power is blinking as this may cause damage to the bottom of the SD memory card, the data protection will be as subject matter. Mode Quality / Size 2272 SUPER FINE 5 FINE 11 NORMAL 17 24FPS - 15FPS -...
... camera can be affected by variables such as follows. By sliding the switch to data in the memory card. Card pins Write protect switch Label [ SD(Secure Digital) memory card ] The SD memory card has a write protect switch that prevents image files from being deleted or formatted. These figures are approximate... If you open the battery chamber cover when the camera power is blinking as this may cause damage to the bottom of the SD memory card, the data protection will be as subject matter. Mode Quality / Size 2272 SUPER FINE 5 FINE 11 NORMAL 17 24FPS - 15FPS -...
User Manual
Page 17
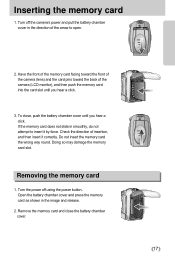
... the battery chamber cover in the direction of the camera (LCD monitor), and then push the memory card into the card slot until you hear a click. 3. Open the battery chamber cover and press the memory card as shown in smoothly, do not attempt to open. 2. To close the battery chamber cover....Turn off using the power button. Doing so may damage the memory card slot. If the memory card does not slide in the image and release. 2. Have the front of the memory card facing toward the front of the camera (lens) and the card pins toward the back of the arrow to insert it correctly....
... the battery chamber cover in the direction of the camera (LCD monitor), and then push the memory card into the card slot until you hear a click. 3. Open the battery chamber cover and press the memory card as shown in smoothly, do not attempt to open. 2. To close the battery chamber cover....Turn off using the power button. Doing so may damage the memory card slot. If the memory card does not slide in the image and release. 2. Have the front of the memory card facing toward the front of the camera (lens) and the card pins toward the back of the arrow to insert it correctly....

User Manual
Page 19
...Image quality p.40 16 Image size 2272, 2048, 1600, 1024, 640 p.39 Number of the polarity (+ / -). 2. Press the power button to insert the memory card. Select the MOVIE CLIP( ) mode by using the LCD monitor. 7. Movie clips will still be stored on the camera. 5. Insert the batteries (p.14). Insert ...11 00:00:17/ 00:25:43 18 Voice memo p.25 19 Optical zoom/ Digital zoom rate Starting the recording mode If the memory card is released. If the memory card is not inserted, an image will be recorded if the shutter [ MOVIE CLIP mode ] button is inserted in the internal...
...Image quality p.40 16 Image size 2272, 2048, 1600, 1024, 640 p.39 Number of the polarity (+ / -). 2. Press the power button to insert the memory card. Select the MOVIE CLIP( ) mode by using the LCD monitor. 7. Movie clips will still be stored on the camera. 5. Insert the batteries (p.14). Insert ...11 00:00:17/ 00:25:43 18 Voice memo p.25 19 Optical zoom/ Digital zoom rate Starting the recording mode If the memory card is released. If the memory card is not inserted, an image will be recorded if the shutter [ MOVIE CLIP mode ] button is inserted in the internal...
User Manual
Page 40
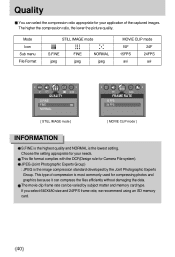
... setting appropriate for Camera File system). JPEG (Joint Photographic Experts Group) : JPEG is the image compression standard developed by subject matter and memory card type. The movie clip frame rate can compress the files efficiently without damaging the data. If you select 640X480 size and 24FPS frame rate..., we recommend using an SD memory card. 40 Mode Icon Sub menu File Format STILL IMAGE mode S.FINE jpeg FINE jpeg NORMAL jpeg MOVIE CLIP mode 15F 24F 15FPS ...
... setting appropriate for Camera File system). JPEG (Joint Photographic Experts Group) : JPEG is the image compression standard developed by subject matter and memory card type. The movie clip frame rate can compress the files efficiently without damaging the data. If you select 640X480 size and 24FPS frame rate..., we recommend using an SD memory card. 40 Mode Icon Sub menu File Format STILL IMAGE mode S.FINE jpeg FINE jpeg NORMAL jpeg MOVIE CLIP mode 15F 24F 15FPS ...
User Manual
Page 44
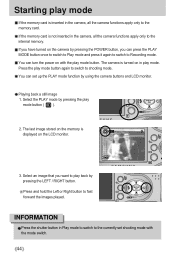
...button again to switch to fast forward the images played. The last image stored on the memory is displayed on the camera by pressing the LEFT / RIGHT button. Starting play mode If the memory card is inserted in play mode. Select an image that you can press the PLAY MODE button... or Right button to shooting mode. INFORMATION Press the shutter button in the camera, all the camera functions apply only to the memory card. If the memory card is not inserted in Play mode to switch to the internal memory. If you have turned on the LCD monitor. 3. Playing back a still image 1.
...button again to switch to fast forward the images played. The last image stored on the memory is displayed on the camera by pressing the LEFT / RIGHT button. Starting play mode If the memory card is inserted in play mode. Select an image that you can press the PLAY MODE button... or Right button to shooting mode. INFORMATION Press the shutter button in the camera, all the camera functions apply only to the memory card. If the memory card is not inserted in Play mode to switch to the internal memory. If you have turned on the LCD monitor. 3. Playing back a still image 1.
User Manual
Page 51
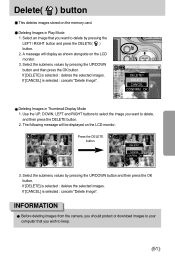
... want to delete, and then press the DELETE button. 2. A message will be displayed on the LCD monitor. 3. Delete( ) button This deletes images stored on the memory card.
... want to delete, and then press the DELETE button. 2. A message will be displayed on the LCD monitor. 3. Delete( ) button This deletes images stored on the memory card.

User Manual
Page 56
... resized image will have a new file name. 1. The resized image will be resized. You can be resized. Select [LOGO] to store the resized image, a [CARD FULL!] message will not be saved. Press the play mode button and press the menu button. 2. Select a desired sub menu by pressing the UP/ DOWN... to save a new [LOGO] image, the existing startup image will have a new file name. If the memory capacity is stored not on the LCD monitor and the resized image will display on the memory card but not vice versa. Only one [LOGO] image can be the start-up image. Only JPEG images...
... resized image will have a new file name. 1. The resized image will be resized. You can be resized. Select [LOGO] to store the resized image, a [CARD FULL!] message will not be saved. Press the play mode button and press the menu button. 2. Select a desired sub menu by pressing the UP/ DOWN... to save a new [LOGO] image, the existing startup image will have a new file name. If the memory capacity is stored not on the LCD monitor and the resized image will display on the memory card but not vice versa. Only one [LOGO] image can be the start-up image. Only JPEG images...

User Manual
Page 58
... pictures are not deleted. DPOF DPOF(Digital Print Order Format) allows you delete all the files stored in the memory card, the unprotected files in the camera's internal memory (i.e., not on the memory card) and it will be deleted even if you to confirm the delete. - The startup image is selected : ... DOWN 2048 DELETE ALL NO button and press the OK button. Images can then be printed and how many prints to be printed on the memory card. If [DELETE] is stored in the DCIM subfolder will not be deleted. This function is selected : press the OK button and images are...
... pictures are not deleted. DPOF DPOF(Digital Print Order Format) allows you delete all the files stored in the memory card, the unprotected files in the camera's internal memory (i.e., not on the memory card) and it will be deleted even if you to confirm the delete. - The startup image is selected : ... DOWN 2048 DELETE ALL NO button and press the OK button. Images can then be printed and how many prints to be printed on the memory card. If [DELETE] is stored in the DCIM subfolder will not be deleted. This function is selected : press the OK button and images are...
User Manual
Page 60
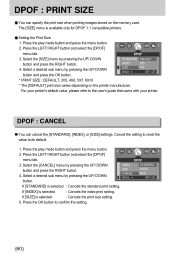
.... 2. DPOF 3. STANDARD INDEX SIZE BACK : DEFAULT 3X5 4X6 SET : OK * PRINT SIZE : DEFAULT, 3X5, 4X6, 5X7, 8X10 * The [DEFAULT] print size varies depending on the memory card. DPOF : CANCEL You can specify the print size when printing images stored on the printer manufacturer. Press the LEFT/ RIGHT button and select the [DPOF...
.... 2. DPOF 3. STANDARD INDEX SIZE BACK : DEFAULT 3X5 4X6 SET : OK * PRINT SIZE : DEFAULT, 3X5, 4X6, 5X7, 8X10 * The [DEFAULT] print size varies depending on the memory card. DPOF : CANCEL You can specify the print size when printing images stored on the printer manufacturer. Press the LEFT/ RIGHT button and select the [DPOF...

User Manual
Page 61
... press the menu button. 2. Then the system will copy only some of the images and display [CARD FULL!] message. Please be sure to delete any unnecessary images to the Memory Card 1. Select a desired sub menu by pressing the LEFT/ RIGHT button. 3. INFORMATION When this menu is... there is not enough space available in the memory card to copy saved images in the internal memory are copied to the memory card after the [PLEASE WAIT!] message is selected without inserting a memory card, you to copy image files to the memory card. After copying has been completed, the screen will...
... press the menu button. 2. Then the system will copy only some of the images and display [CARD FULL!] message. Please be sure to delete any unnecessary images to the Memory Card 1. Select a desired sub menu by pressing the LEFT/ RIGHT button. 3. INFORMATION When this menu is... there is not enough space available in the memory card to copy saved images in the internal memory are copied to the memory card after the [PLEASE WAIT!] message is selected without inserting a memory card, you to copy image files to the memory card. After copying has been completed, the screen will...
User Manual
Page 64
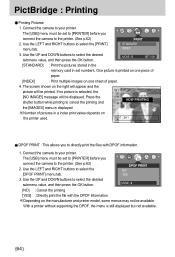
... and DOWN buttons to select the desired submenu value, and then press the OK button. MOVE : SET : OK [STANDARD] : Print the pictures stored in the memory card in a index print varies depends on the manufacturer and printer model, some menus may not be set numbers.
... and DOWN buttons to select the desired submenu value, and then press the OK button. MOVE : SET : OK [STANDARD] : Print the pictures stored in the memory card in a index print varies depends on the manufacturer and printer model, some menus may not be set numbers.
User Manual
Page 68
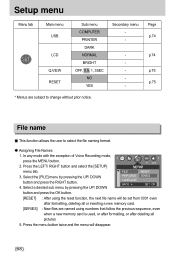
... BACK : RESET SERIES SET : OK button and press the OK button. [RESET] : After using numbers that follow the previous sequence, even when a new memory card is used, or after formatting, or after formatting, deleting all pictures 5. Press the LEFT/ RIGHT button and select the [SETUP] P 2272 SETUP menu tab.... 3. Press the menu button twice and the menu will be set from 0001 even after deleting all or inserting a new memory card. [SERIES] : New files are subject to select the file naming format. Setup menu Menu tab Main menu USB LCD Q.VIEW RESET Sub menu ...
... BACK : RESET SERIES SET : OK button and press the OK button. [RESET] : After using numbers that follow the previous sequence, even when a new memory card is used, or after formatting, or after formatting, deleting all pictures 5. Press the LEFT/ RIGHT button and select the [SETUP] P 2272 SETUP menu tab.... 3. Press the menu button twice and the menu will be set from 0001 even after deleting all or inserting a new memory card. [SERIES] : New files are subject to select the file naming format. Setup menu Menu tab Main menu USB LCD Q.VIEW RESET Sub menu ...


