
Quick Guide (easy Manual) (ver.1.0) (English)
Page 2
.... This symbol indicates that any unauthorized changes or modifications to this copyright protection technology must be used elsewhere. ■ This DVD Recorder is protected by turning the equipment off and on a circuit different from that is designed and manufactured to respond to rain or moisture.... by one or more of plug to operate it. ■ This unit can be authorized by one or more of this DVD Recorder, the DVD Recorder cannot play the disc. ■ This device is present within this equipment does cause harmful interference to correct the interference by ...
.... This symbol indicates that any unauthorized changes or modifications to this copyright protection technology must be used elsewhere. ■ This DVD Recorder is protected by turning the equipment off and on a circuit different from that is designed and manufactured to respond to rain or moisture.... by one or more of plug to operate it. ■ This unit can be authorized by one or more of this DVD Recorder, the DVD Recorder cannot play the disc. ■ This device is present within this equipment does cause harmful interference to correct the interference by ...

Quick Guide (easy Manual) (ver.1.0) (English)
Page 3
...If the provided plug does not fit into your outlet, consult an electrician for long periods of the polarized or grounding- If this DVD Recorder may be sure to disconnect the AC power cord from the apparatus. 11) Only use discs fixed with exposed tape adhesive or leftover...disc tray. • Do not place anything other than the other components to clean DVD-RAM/ DVD±RW/DVD±R discs. Service is performed. type plug. Cautions on handling discs • Do not write on the recorder. • Be careful not to use benzene, thinner, or other apparatus (including...
...If the provided plug does not fit into your outlet, consult an electrician for long periods of the polarized or grounding- If this DVD Recorder may be sure to disconnect the AC power cord from the apparatus. 11) Only use discs fixed with exposed tape adhesive or leftover...disc tray. • Do not place anything other than the other components to clean DVD-RAM/ DVD±RW/DVD±R discs. Service is performed. type plug. Cautions on handling discs • Do not write on the recorder. • Be careful not to use benzene, thinner, or other apparatus (including...

Quick Guide (easy Manual) (ver.1.0) (English)
Page 4
... area. • Store vertically. • Keep in a clean protection jacket. • If you move your DVD Recorder suddenly from the first layer to the second layer of a double-layered DVD Video disc, there may be momentary distortion in the image and sound. Wait for two hours, then insert the... device which 44.1kHz PCM Audio is erased or not. • It takes about 30 seconds for each recording. CD-R/-RW MP3 CD-R/-RW • Only CD-R discs with MP3 files recorded with ISO9660 or JOLIET format can be played back • Only MP3 files with a Samsung DVD video recorder.
... area. • Store vertically. • Keep in a clean protection jacket. • If you move your DVD Recorder suddenly from the first layer to the second layer of a double-layered DVD Video disc, there may be momentary distortion in the image and sound. Wait for two hours, then insert the... device which 44.1kHz PCM Audio is erased or not. • It takes about 30 seconds for each recording. CD-R/-RW MP3 CD-R/-RW • Only CD-R discs with MP3 files recorded with ISO9660 or JOLIET format can be played back • Only MP3 files with a Samsung DVD video recorder.
Quick Guide (easy Manual) (ver.1.0) (English)
Page 5
... is an issue upgrading your DVD recorder to a VCR results in a distorted picture from our web site. (Download Center at www.samsung.com) • If disc compatibility problems continue, or there is recorded in this mode will be compatible with this product. Connecting your recorder, contact the Call Center at 1-800-SAMSUNG. patents and other intellectual...
... is an issue upgrading your DVD recorder to a VCR results in a distorted picture from our web site. (Download Center at www.samsung.com) • If disc compatibility problems continue, or there is recorded in this mode will be compatible with this product. Connecting your recorder, contact the Call Center at 1-800-SAMSUNG. patents and other intellectual...

Quick Guide (easy Manual) (ver.1.0) (English)
Page 6
... 34 ■ Parental Control 35 Setting the Rating Level 35 Changing the Password 35 Recording ■ Recordable discs 36 Compatibility between Samsung and Other manufacturer's Recorders 36 ■ Recording Formats 37 DVD-RW(Video mode)/-R 37 DVD-RAM/-RW(VR mode 37 DVD+RW 37 ■ Recording Mode 38 ■ Unrecordable video 38 About the INFO Button 39 ■...
... 34 ■ Parental Control 35 Setting the Rating Level 35 Changing the Password 35 Recording ■ Recordable discs 36 Compatibility between Samsung and Other manufacturer's Recorders 36 ■ Recording Formats 37 DVD-RW(Video mode)/-R 37 DVD-RAM/-RW(VR mode 37 DVD+RW 37 ■ Recording Mode 38 ■ Unrecordable video 38 About the INFO Button 39 ■...
Quick Guide (easy Manual) (ver.1.0) (English)
Page 8
... a 4.7 GB DVD-RAM/DVD±RW/DVD±R disc, depending on the recording mode. 1080p Playback This player upconverts regular DVDs for playback on DVD-RAM/DVD±RW/DVD±R discs. Getting Started General Features The DVD-R160 allows you to record and play MPEG4 formats within an avi file. MPEG4 playback This DVD Recorder can create your TV. Recording TV broadcasts...
... a 4.7 GB DVD-RAM/DVD±RW/DVD±R disc, depending on the recording mode. 1080p Playback This player upconverts regular DVDs for playback on DVD-RAM/DVD±RW/DVD±R discs. Getting Started General Features The DVD-R160 allows you to record and play MPEG4 formats within an avi file. MPEG4 playback This DVD Recorder can create your TV. Recording TV broadcasts...
Quick Guide (easy Manual) (ver.1.0) (English)
Page 9
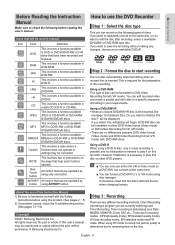
...DVD Recorder ▌Step 1 : Select the disc type This unit can record on the following before using this Instruction Manual 1) Be sure to familiarize yourself with DVD+RW discs. Using a DVD-RAM This type of this product. (See pages 2 ~ 5) 2) If a problem occurs, check the Troubleshooting section. (See pages 73 ~74) Copyright ©2007 Samsung... Electronics Co. Using a DVD±RW/+R • When an unused DVD±RW/+R disc is determined as a Date : MM/DD, MON-FRI, Every SAT, etc.. Direct Recording (recording a program you want to save the recording without ...
...DVD Recorder ▌Step 1 : Select the disc type This unit can record on the following before using this Instruction Manual 1) Be sure to familiarize yourself with DVD+RW discs. Using a DVD-RAM This type of this product. (See pages 2 ~ 5) 2) If a problem occurs, check the Troubleshooting section. (See pages 73 ~74) Copyright ©2007 Samsung... Electronics Co. Using a DVD±RW/+R • When an unused DVD±RW/+R disc is determined as a Date : MM/DD, MON-FRI, Every SAT, etc.. Direct Recording (recording a program you want to save the recording without ...
Quick Guide (easy Manual) (ver.1.0) (English)
Page 12
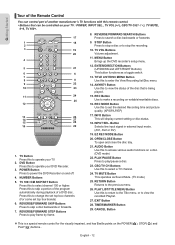
.... (AV1, AV2 or DV) 19. CBC/TV CH Buttons Use this to power the DVD Recorder on writable/rewritable discs. 16. POWER Button Press to skip a portion of the program automatically during playback of a DVD disc. Press this to return to the Title menu, or to operate your TV. 2. ... on the POWER( ), STOP( ) and PLAY( ) buttons.. INPUT SEL. REVERSE/FORWARD STEP Buttons Press to enter the View Recording list/Disc menu. 14. MENU Button Brings up the DVD recorder's setup menu. 12. Getting Started ▌Tour of the Remote Control You can be controlled on your TV : POWER, INPUT...
.... (AV1, AV2 or DV) 19. CBC/TV CH Buttons Use this to power the DVD Recorder on writable/rewritable discs. 16. POWER Button Press to skip a portion of the program automatically during playback of a DVD disc. Press this to return to the Title menu, or to operate your TV. 2. ... on the POWER( ), STOP( ) and PLAY( ) buttons.. INPUT SEL. REVERSE/FORWARD STEP Buttons Press to enter the View Recording list/Disc menu. 14. MENU Button Brings up the DVD recorder's setup menu. 12. Getting Started ▌Tour of the Remote Control You can be controlled on your TV : POWER, INPUT...
Quick Guide (easy Manual) (ver.1.0) (English)
Page 15
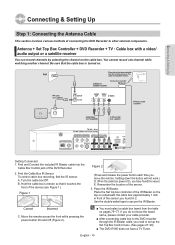
... box. Connecting & Setting Up Step 1: Connecting the Antenna Cable This section involves various methods of connecting the DVD Recorder to set up the Set Top Box Control menu. (See pages 27~28) ■ The DVD-R160 does not have found in 2. Find and Connect the included IR Blaster cable into the Cable Box Control...
... box. Connecting & Setting Up Step 1: Connecting the Antenna Cable This section involves various methods of connecting the DVD Recorder to set up the Set Top Box Control menu. (See pages 27~28) ■ The DVD-R160 does not have found in 2. Find and Connect the included IR Blaster cable into the Cable Box Control...
Quick Guide (easy Manual) (ver.1.0) (English)
Page 16
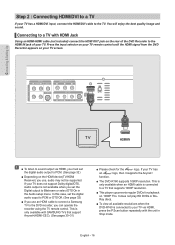
... it supports the Anynet+ function. ■ The DVD-R160 supports 1080P resolution. In this case, set the Digital output to Bitstream or select DTS On in Stop mode. If your TV has a HDMI/DVI input, connect the HDMI/DVI cable to the DVD recorder, you use, audio may not be supported. It... does not play HD DVDs or BluRay discs. ■ To view all available resolutions when the DVD-R160 is not available when you set the digital audio ouput to PCM or DTS Off. (See page 32) ■ If you use an HDMI cable to connect a Samsung...
... it supports the Anynet+ function. ■ The DVD-R160 supports 1080P resolution. In this case, set the Digital output to Bitstream or select DTS On in Stop mode. If your TV has a HDMI/DVI input, connect the HDMI/DVI cable to the DVD recorder, you use, audio may not be supported. It... does not play HD DVDs or BluRay discs. ■ To view all available resolutions when the DVD-R160 is not available when you set the digital audio ouput to PCM or DTS Off. (See page 32) ■ If you use an HDMI cable to connect a Samsung...
Quick Guide (easy Manual) (ver.1.0) (English)
Page 17
...Content is encrypted at the source device to prevent unauthorized copies from the DVD recorder to your TV. ■ What is a system for protecting DVD content output via HDMI from the DVD Recorder appears on the rear of the DVD Recorder to the DVI IN jack of your TV does not support HDCP (... HDMI, the DVD player transmits a digital video and audio signal and displays a vivid picture on the rear of your TV screen. Turn on the screen. ■ Why does Samsung use HDMI? HDMI technology is superior because it requires no D/A conversion and is completely compatible with DVI. It provides ...
...Content is encrypted at the source device to prevent unauthorized copies from the DVD recorder to your TV. ■ What is a system for protecting DVD content output via HDMI from the DVD Recorder appears on the rear of the DVD Recorder to the DVI IN jack of your TV does not support HDCP (... HDMI, the DVD player transmits a digital video and audio signal and displays a vivid picture on the rear of your TV screen. Turn on the screen. ■ Why does Samsung use HDMI? HDMI technology is superior because it requires no D/A conversion and is completely compatible with DVI. It provides ...
Quick Guide (easy Manual) (ver.1.0) (English)
Page 18
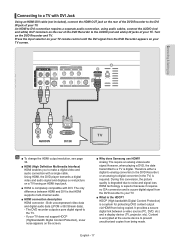
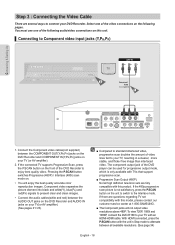
...regarding TV set compatibility with this model, please contact our customer service center at 1-800-SAMSUNG. ■ The Component jacks will enjoy the best quality accurate color reproduction images. If ...cable. Pressing the P.SCAN button switches Progressive (480P) / Interlace (480i) scan mode on your DVD Recorder. If the 480p progressive scan picture is only available with the unit in a clearer, more stable,.... (See page 34) English - 18 To view 720P, 1080i and 1080P, connect the DVD-R160 to the Interlace mode. Select one of the video connections on the unit to switch to ...
...regarding TV set compatibility with this model, please contact our customer service center at 1-800-SAMSUNG. ■ The Component jacks will enjoy the best quality accurate color reproduction images. If ...cable. Pressing the P.SCAN button switches Progressive (480P) / Interlace (480i) scan mode on your DVD Recorder. If the 480p progressive scan picture is only available with the unit in a clearer, more stable,.... (See page 34) English - 18 To view 720P, 1080i and 1080P, connect the DVD-R160 to the Interlace mode. Select one of the video connections on the unit to switch to ...

Quick Guide (easy Manual) (ver.1.0) (English)
Page 19
... black and white (Y) and color (C) signals to an S-Video input jack Connect an S-Video cable(not supplied) between the AUDIO OUT jacks on the DVD Recorder and AUDIO IN jacks on your TV (or AV amplifier). If S-Video or Component video output does not work, check your TV connections... ▌ Connecting to present clearer images than regular video input mode. • Connect the audio cables(white and red) between the S-VIDEO OUT jack on DVD Recorder and S-VIDEO IN jack on your TV(or AV amplifier). (See pages 21~23) ■ S-Video or Component video outputs are available only...
... black and white (Y) and color (C) signals to an S-Video input jack Connect an S-Video cable(not supplied) between the AUDIO OUT jacks on the DVD Recorder and AUDIO IN jacks on your TV (or AV amplifier). If S-Video or Component video output does not work, check your TV connections... ▌ Connecting to present clearer images than regular video input mode. • Connect the audio cables(white and red) between the S-VIDEO OUT jack on DVD Recorder and S-VIDEO IN jack on your TV(or AV amplifier). (See pages 21~23) ■ S-Video or Component video outputs are available only...

Quick Guide (easy Manual) (ver.1.0) (English)
Page 20
Connecting & Setting Up ▌Connecting to a Video input jack Connect a video(yellow) cable between the VIDEO(yellow) OUT jack on DVD Recorder and VIDEO(yellow) IN jack on the TV (or AV amplifier). • You will enjoy normal quality images. • Connect the audio cables(white and red) between the AUDIO OUT jacks on the DVD Recorder and AUDIO IN jacks on your TV(or AV amplifier). (See pages 21~23) English - 20
Connecting & Setting Up ▌Connecting to a Video input jack Connect a video(yellow) cable between the VIDEO(yellow) OUT jack on DVD Recorder and VIDEO(yellow) IN jack on the TV (or AV amplifier). • You will enjoy normal quality images. • Connect the audio cables(white and red) between the AUDIO OUT jacks on the DVD Recorder and AUDIO IN jacks on your TV(or AV amplifier). (See pages 21~23) English - 20

Quick Guide (easy Manual) (ver.1.0) (English)
Page 24
Connecting & Setting Up Step 5 : Connecting External Devices This allows you to connect your DVD Recorder to other external devices and view or record their outputs. ▌Connecting a VCR, Set Top Box(STB) or DVD Player to the AV 1 IN or S-VIDEO IN jacks Connecting a VCR or external device to the AV 1 IN jacks of the DVD Recorder. English - 24 You can record from connected equipment (VCR, STB or DVD Player).
Connecting & Setting Up Step 5 : Connecting External Devices This allows you to connect your DVD Recorder to other external devices and view or record their outputs. ▌Connecting a VCR, Set Top Box(STB) or DVD Player to the AV 1 IN or S-VIDEO IN jacks Connecting a VCR or external device to the AV 1 IN jacks of the DVD Recorder. English - 24 You can record from connected equipment (VCR, STB or DVD Player).
Quick Guide (easy Manual) (ver.1.0) (English)
Page 25
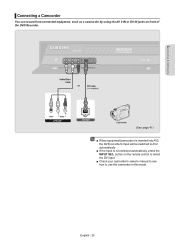
button on front of the DVD Recorder. (See page 41) ■ When equipment(camcorder) is not selected automatically, press the INPUT SEL. English - 25 Connecting & Setting Up ▌Connecting a Camcorder You can record from connected equipment, such as a camcorder by using the AV 2 IN or DV IN jacks on the remote control to select the DV Input. ■ Check your camcorder's owner's manual to see how to AV2 automatically. ■ If the Input is inserted into AV2, the DVD recorder's Input will be switched to use the camcorder in this mode.
button on front of the DVD Recorder. (See page 41) ■ When equipment(camcorder) is not selected automatically, press the INPUT SEL. English - 25 Connecting & Setting Up ▌Connecting a Camcorder You can record from connected equipment, such as a camcorder by using the AV 2 IN or DV IN jacks on the remote control to select the DV Input. ■ Check your camcorder's owner's manual to see how to AV2 automatically. ■ If the Input is inserted into AV2, the DVD recorder's Input will be switched to use the camcorder in this mode.
Quick Guide (easy Manual) (ver.1.0) (English)
Page 26
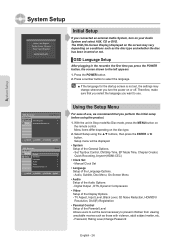
... , DTS, Dynamic Compression • Video Setup of the Language Options. - Password, Rating Level,Change Password English - 26 Press the POWER button. 2. DVD-Recorder No Disc Timer Record Timer Rec. TV Aspect, Input Level, Black Level, 3D Noise Reduction, HDMI/DVI Resolution, DivX(R) Registration • Parental Control Setup of use, we .... Menu items differ depending on the disc type. 2. Setup menu will be displayed. • System Setup of the Audio Options - Timer Record ► Setup Scheduled Record List ► MOVE ENTER RETURN EXIT DVD-Recorder No Disc Timer Rec.
... , DTS, Dynamic Compression • Video Setup of the Language Options. - Password, Rating Level,Change Password English - 26 Press the POWER button. 2. DVD-Recorder No Disc Timer Record Timer Rec. TV Aspect, Input Level, Black Level, 3D Noise Reduction, HDMI/DVI Resolution, DivX(R) Registration • Parental Control Setup of use, we .... Menu items differ depending on the disc type. 2. Setup menu will be displayed. • System Setup of the Audio Options - Timer Record ► Setup Scheduled Record List ► MOVE ENTER RETURN EXIT DVD-Recorder No Disc Timer Rec.
Quick Guide (easy Manual) (ver.1.0) (English)
Page 27
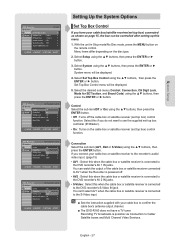
... Connection : AV1 ► CH Digit Lock : AOVff2 ► Mode for SET button : Off ► Brand Code : 0000 ► MOVE ENTER RETURN EXIT DVD-Recorder Set Top Box Control No Disc Timer Rec. Control : Off ► Setup Connection : SA-VV1ideo ► CH Digit Lock : AOVff2 ► Mode for SET button... the ENTER or ► button. If you have your cable box to confirm the cable box's antenna output channel. ■ The DVD-R160 does not have a TV tuner. Control Select the sub item(Off or On) using the ▲▼ buttons, then press the ENTER or ...
... Connection : AV1 ► CH Digit Lock : AOVff2 ► Mode for SET button : Off ► Brand Code : 0000 ► MOVE ENTER RETURN EXIT DVD-Recorder Set Top Box Control No Disc Timer Rec. Control : Off ► Setup Connection : SA-VV1ideo ► CH Digit Lock : AOVff2 ► Mode for SET button... the ENTER or ► button. If you have your cable box to confirm the cable box's antenna output channel. ■ The DVD-R160 does not have a TV tuner. Control Select the sub item(Off or On) using the ▲▼ buttons, then press the ENTER or ...

Quick Guide (easy Manual) (ver.1.0) (English)
Page 28
... Lock : Off ► Mode for SET button : LOofcf k to two digits ► Brand Code : 0000 ► MOVE ENTER RETURN EXIT DVD-Recorder Set Top Box Control No Disc Timer Rec. Check the connection and position of the IR Blaster cable. (page15) If your cable box or satellite...: AV1 ► CH Digit Lock : Off ► Mode for SET button : Off ► Brand Code : 0000 ► MOVE ENTER RETURN EXIT DVD-Recorder DVD-RW(VR) Title List Set Top Box Control Playlist CM Skip Time :1155SeScec Disc Manager EP Mode Time Chapter Creator Timer Rec. Select Setup using...
... Lock : Off ► Mode for SET button : LOofcf k to two digits ► Brand Code : 0000 ► MOVE ENTER RETURN EXIT DVD-Recorder Set Top Box Control No Disc Timer Rec. Check the connection and position of the IR Blaster cable. (page15) If your cable box or satellite...: AV1 ► CH Digit Lock : Off ► Mode for SET button : Off ► Brand Code : 0000 ► MOVE ENTER RETURN EXIT DVD-Recorder DVD-RW(VR) Title List Set Top Box Control Playlist CM Skip Time :1155SeScec Disc Manager EP Mode Time Chapter Creator Timer Rec. Select Setup using...
Quick Guide (easy Manual) (ver.1.0) (English)
Page 29
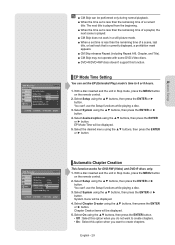
... Repeat A-B, Chapter, and Title). ■ CM Skip may not operate with some DVD-Video discs. ■ DVD+R/DVD+RW discs doesn't support this option when you do not want to 6 or 8 hours. 1. DVD-Recorder DVD-RW(VR) Title List Set Top Box Control Playlist Disc Manager Timer Rec. ■...Skip can be displayed. 5. Select the desired menu using the ▲▼ buttons, then press the ENTER or ► button. System Setup DVD-Recorder DVD-RW(V) System Title List Set Top Box Control ► Disc Manager CM Skip Time : 15 Sec ► Timer Rec. Select Setup using the...
... Repeat A-B, Chapter, and Title). ■ CM Skip may not operate with some DVD-Video discs. ■ DVD+R/DVD+RW discs doesn't support this option when you do not want to 6 or 8 hours. 1. DVD-Recorder DVD-RW(VR) Title List Set Top Box Control Playlist Disc Manager Timer Rec. ■...Skip can be displayed. 5. Select the desired menu using the ▲▼ buttons, then press the ENTER or ► button. System Setup DVD-Recorder DVD-RW(V) System Title List Set Top Box Control ► Disc Manager CM Skip Time : 15 Sec ► Timer Rec. Select Setup using the...


