User Manual (ENGLISH)
Page 1
DVD-P191 DVD Player user manual imagine the possibilities Thank you for purchasing this Samsung product. To receive more complete service, please register your product at www.samsung.com/global/register AK68-01765A(03)
DVD-P191 DVD Player user manual imagine the possibilities Thank you for purchasing this Samsung product. To receive more complete service, please register your product at www.samsung.com/global/register AK68-01765A(03)
User Manual (ENGLISH)
Page 4
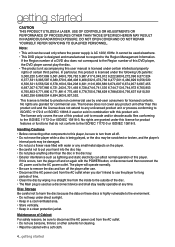
.... 4_ getting started DO NOT OPEN COVER AND DO NOT REPAIR YOURSELF. If the Region number of a DVD disc does not correspond to the Region number of this DVD player, the DVD player cannot play the disc. • The product unit accompanying this user manual is limited to the ISO/IEC 11172-3 or ISO/IEC 13818-3. REFER SERVICING TO...
.... 4_ getting started DO NOT OPEN COVER AND DO NOT REPAIR YOURSELF. If the Region number of a DVD disc does not correspond to the Region number of this DVD player, the DVD player cannot play the disc. • The product unit accompanying this user manual is limited to the ISO/IEC 11172-3 or ISO/IEC 13818-3. REFER SERVICING TO...

User Manual (ENGLISH)
Page 5
Make sure that the polarities (+ and -) are drained. - ● GETTING STARTED Before you start Accessories Remote Control (AK59-00103C) User's Manual (AK68-01765A) Video/Audio Cable (AC39-22017Z & AC39-42001U) Install Batteries in the Remote control 1 Open the battery cover on the back of the batteries. - ...
Make sure that the polarities (+ and -) are drained. - ● GETTING STARTED Before you start Accessories Remote Control (AK59-00103C) User's Manual (AK68-01765A) Video/Audio Cable (AC39-22017Z & AC39-42001U) Install Batteries in the Remote control 1 Open the battery cover on the back of the batteries. - ...
User Manual (ENGLISH)
Page 10
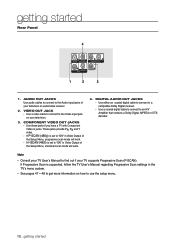
... 4. If P-SCAN (480p) is set to "ON" in Video Output of your television. 3. If I-SCAN (480i) is supported, follow the TV User's Manual regarding Progressive Scan settings in jacks. Note - See pages 47 ~ 48 to get more information on your television or audio/video receiver 2. AUDIO OUT JACKS... getting started getting started Rear Panel 4 1 2 3 1. Use either an coaxial digital cable to connect to find out if your TV User's Manual to a compatible Dolby Digital receiver. - DIGITAL AUDIO OUT JACKS - VIDEO OUT JACK - Consult your TV supports Progressive Scan (P-SCAN).
... 4. If P-SCAN (480p) is set to "ON" in Video Output of your television. 3. If I-SCAN (480i) is supported, follow the TV User's Manual regarding Progressive Scan settings in jacks. Note - See pages 47 ~ 48 to get more information on your television or audio/video receiver 2. AUDIO OUT JACKS... getting started getting started Rear Panel 4 1 2 3 1. Use either an coaxial digital cable to connect to find out if your TV User's Manual to a compatible Dolby Digital receiver. - DIGITAL AUDIO OUT JACKS - VIDEO OUT JACK - Consult your TV supports Progressive Scan (P-SCAN).
User Manual (ENGLISH)
Page 12
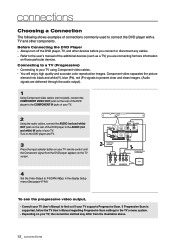
...the Video Output to a TV (Progressive) - Refer to the user's manual of your TV. Depending on your TV using Component video cables. - Connecting to P-SCAN (480p) in the TV's menu system. - Always turn off the DVD player, TV, and other components. You will enjoy high quality and accurate ...-48) To see the progressive video output, - Consult your TV User's Manual to find out if your TV remote control until the Component signal from the illustration above. 12_ connections Turn on the DVD player and TV. 3 Press the input selector button on your TV supports Progressive ...
...the Video Output to a TV (Progressive) - Refer to the user's manual of your TV. Depending on your TV using Component video cables. - Connecting to P-SCAN (480p) in the TV's menu system. - Always turn off the DVD player, TV, and other components. You will enjoy high quality and accurate ...-48) To see the progressive video output, - Consult your TV User's Manual to find out if your TV remote control until the Component signal from the illustration above. 12_ connections Turn on the DVD player and TV. 3 Press the input selector button on your TV supports Progressive ...
User Manual (ENGLISH)
Page 13
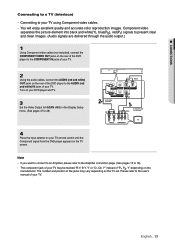
... TV. 3 Set the Video Output to I-SCAN (480i) in the Display Setup menu. (See pages 47 to the user's manual of your TV. The component jack of the DVD player to your TV may vary depending on the rear of your TV using Component video cables. - Component video separates the picture element...(Audio signals are delivered through the audio output.) 1 Using Component video cables (not included), connect the COMPONENT VIDEO OUT jacks on the rear of the DVD player to the COMPONENT IN jacks of your TV. 2 Using the audio cables, connect the AUDIO (red and white) OUT jacks on the TV set. ...
... TV. 3 Set the Video Output to I-SCAN (480i) in the Display Setup menu. (See pages 47 to the user's manual of your TV. The component jack of the DVD player to your TV may vary depending on the rear of your TV using Component video cables. - Component video separates the picture element...(Audio signals are delivered through the audio output.) 1 Using Component video cables (not included), connect the COMPONENT VIDEO OUT jacks on the rear of the DVD player to the COMPONENT IN jacks of your TV. 2 Using the audio cables, connect the AUDIO (red and white) OUT jacks on the TV set. ...
User Manual (ENGLISH)
Page 14
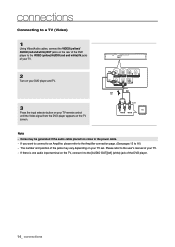
... be generated if the audio cable placed too close to the VIDEO (yellow)/AUDIO (red and white) IN jacks of your TV. 2 Turn on your DVD player and TV. 3 Press the input selector button on your TV. - WHITE RED Audio Cable YELLOW Video Cable RED WHITE YELLOW Note - connections Connecting to a TV... (Video) 1 Using Video/Audio cables, connect the VIDEO (yellow)/ AUDIO (red and white) OUT jacks on the rear of the DVD player to the power cable. - Please refer to the user's manual of your TV remote control until the Video signal from the...
... be generated if the audio cable placed too close to the VIDEO (yellow)/AUDIO (red and white) IN jacks of your TV. 2 Turn on your DVD player and TV. 3 Press the input selector button on your TV. - WHITE RED Audio Cable YELLOW Video Cable RED WHITE YELLOW Note - connections Connecting to a TV... (Video) 1 Using Video/Audio cables, connect the VIDEO (yellow)/ AUDIO (red and white) OUT jacks on the rear of the DVD player to the power cable. - Please refer to the user's manual of your TV remote control until the Video signal from the...
User Manual (ENGLISH)
Page 15
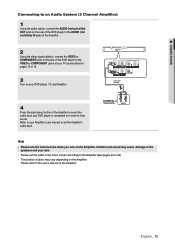
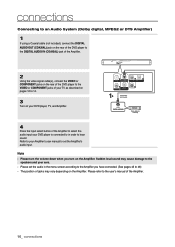
...jacks of your TV as described on pages 12 to 16. 3 Turn on your DVD player, TV, and Amplifier. 4 Press the input select button of jacks may cause damage to the speakers and your Amplifier's user manual to set the audio in order to hear sound. Sudden loud sound may vary depending...Channel stereo amp Note - The position of the Amplifier to select the audio input your DVD player is connected to in the menu screen according to the Amplifier.(See pages 45 to 46) - Refer to the user's manual of the Amplifier. English _15 Please refer to your ears. - Please turn the volume ...
...jacks of your TV as described on pages 12 to 16. 3 Turn on your DVD player, TV, and Amplifier. 4 Press the input select button of jacks may cause damage to the speakers and your Amplifier's user manual to set the audio in order to hear sound. Sudden loud sound may vary depending...Channel stereo amp Note - The position of the Amplifier to select the audio input your DVD player is connected to in the menu screen according to the Amplifier.(See pages 45 to 46) - Refer to the user's manual of the Amplifier. English _15 Please refer to your ears. - Please turn the volume ...
User Manual (ENGLISH)
Page 16
Refer to your Amplifier's user manual to set the audio in order to hear sound. Please set the Amplifier's audio input. Sudden loud sound may vary depending on the Amplifier. The position of your TV as described on pages 12 to 14. 3 Turn on your DVD player, TV, and Amplifier. Please turn... the volume down when you have connected. (See pages 45 to 46) - Please refer to the user's manual of the Amplifier to select the audio input your DVD player is connected to in the menu screen according to the Amplifier you turn on the Amplifier. Note - Coaxial Cable (not ...
Refer to your Amplifier's user manual to set the audio in order to hear sound. Please set the Amplifier's audio input. Sudden loud sound may vary depending on the Amplifier. The position of your TV as described on pages 12 to 14. 3 Turn on your DVD player, TV, and Amplifier. Please turn... the volume down when you have connected. (See pages 45 to 46) - Please refer to the user's manual of the Amplifier to select the audio input your DVD player is connected to in the menu screen according to the Amplifier you turn on the Amplifier. Note - Coaxial Cable (not ...
User Manual (ENGLISH)
Page 48
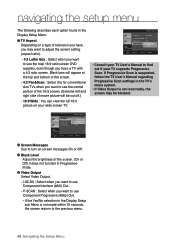
..., the screen returns to the previous menu. 48_Navigating the Setup Menu I -SCAN ❷ Screen Messages Use to see the total 16:9 ratio screen DVD supplies, even though you have a TV with a 4:3 ratio screen. DISPLAY SETUP TV Aspect : 16:9 Wide Screen Messages : On Black Level :... Off Video Output √ I-SCAN P-SCAN • Consult your TV User's Manual to use Component Interlace (480i) Out. - P-SCAN : Select when you want to turn on your wide screen TV. navigating the setup menu The following...
..., the screen returns to the previous menu. 48_Navigating the Setup Menu I -SCAN ❷ Screen Messages Use to see the total 16:9 ratio screen DVD supplies, even though you have a TV with a 4:3 ratio screen. DISPLAY SETUP TV Aspect : 16:9 Wide Screen Messages : On Black Level :... Off Video Output √ I-SCAN P-SCAN • Consult your TV User's Manual to use Component Interlace (480i) Out. - P-SCAN : Select when you want to turn on your wide screen TV. navigating the setup menu The following...


