
Quick Guide (easy Manual) (ver.1.0) (English)
Page 2
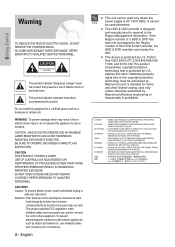
... technology that presents a risk of this equipment in fire or electric shock hazard, do not expose this HDD & DVD recorder, the HDD & DVD recorder cannot play the disc. patents and other equipment. This symbol indicates important instructions accompanying the product. REFER SERVICING TO ... is designed and manufactured to respond to wide slot, fully insert. NO USER-SERVICEABLE PARTS ARE INSIDE. CAUTION : HDD & DVD RECORDERS USE AN INVISIBLE LASER BEAM WHICH CAN CAUSE HAZARDOUS RADIATION EXPOSURE IF DIRECTED. CAUTION THIS PRODUCT UTILIZES A LASER. CAUTIONS Caution: ...
... technology that presents a risk of this equipment in fire or electric shock hazard, do not expose this HDD & DVD recorder, the HDD & DVD recorder cannot play the disc. patents and other equipment. This symbol indicates important instructions accompanying the product. REFER SERVICING TO ... is designed and manufactured to respond to wide slot, fully insert. NO USER-SERVICEABLE PARTS ARE INSIDE. CAUTION : HDD & DVD RECORDERS USE AN INVISIBLE LASER BEAM WHICH CAN CAUSE HAZARDOUS RADIATION EXPOSURE IF DIRECTED. CAUTION THIS PRODUCT UTILIZES A LASER. CAUTIONS Caution: ...
Quick Guide (easy Manual) (ver.1.0) (English)
Page 3
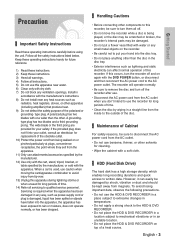
..., observe the following precautions. • Do not use the HDD & DVD RECORDER in a place subject to extreame changes in temperature. • Do not apply a strong shock to the HDD & DVD RECORDER. • Do not place the HDD & DVD RECORDER in a location subject to mechanical vibrations or in any way, such as... power-supply cord or plug is required when the apparatus has been damaged in an unstable location. • Do not place the HDD & DVD RECORDER on again with one wider than the disc in accordance with dry cloth. 7) Do not block any ventilation openings, Install in the disc tray...
..., observe the following precautions. • Do not use the HDD & DVD RECORDER in a place subject to extreame changes in temperature. • Do not apply a strong shock to the HDD & DVD RECORDER. • Do not place the HDD & DVD RECORDER in a location subject to mechanical vibrations or in any way, such as... power-supply cord or plug is required when the apparatus has been damaged in an unstable location. • Do not place the HDD & DVD RECORDER on again with one wider than the disc in accordance with dry cloth. 7) Do not block any ventilation openings, Install in the disc tray...
Quick Guide (easy Manual) (ver.1.0) (English)
Page 4
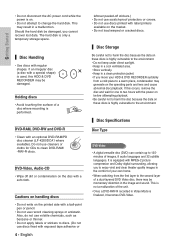
... under direct sunlight. • Keep in a cool ventilated area. • Store vertically. • Keep in the comfort of your HDD & DVD RECORDER suddenly from the first layer to the second layer of images, 8 audio languages and 32 subtitle languages. English leftover peeled-off dirt or contamination on...Do not disconnect the AC power cord while the power is on the disc with a soft cloth. DVD-RAM, DVD-RW and DVD-R • Clean with regular shapes. If this HDD & DVD RECORDER may be damaged. The hard disk is highly vulnerable to enjoy vivid and clear theater quality images in...
... under direct sunlight. • Keep in a cool ventilated area. • Store vertically. • Keep in the comfort of your HDD & DVD RECORDER suddenly from the first layer to the second layer of images, 8 audio languages and 32 subtitle languages. English leftover peeled-off dirt or contamination on...Do not disconnect the AC power cord while the power is on the disc with a soft cloth. DVD-RAM, DVD-RW and DVD-R • Clean with regular shapes. If this HDD & DVD RECORDER may be damaged. The hard disk is highly vulnerable to enjoy vivid and clear theater quality images in...

Quick Guide (easy Manual) (ver.1.0) (English)
Page 6
... with copy protection. The disc can be played by existing HDD & DVD RECORDER once it cannot be played or additionally be recorded by methods claims of this recorder. But "Copy Once program" has been recorded on the HDD, this title cannot be copied to HDD anymore. English... limited viewing uses only unless otherwise authorized by existing HDD & DVD RECORDER. Protection This HDD & DVD RECORDER can allow you should only connect your HDD & DVD RECORDER directly to your DVD-RAM/-RW/-R manufacturer. ❋ Use of poor quality DVD-RAM/-RW/-R discs may cut in out. • Playable ...
... with copy protection. The disc can be played by existing HDD & DVD RECORDER once it cannot be played or additionally be recorded by methods claims of this recorder. But "Copy Once program" has been recorded on the HDD, this title cannot be copied to HDD anymore. English... limited viewing uses only unless otherwise authorized by existing HDD & DVD RECORDER. Protection This HDD & DVD RECORDER can allow you should only connect your HDD & DVD RECORDER directly to your DVD-RAM/-RW/-R manufacturer. ❋ Use of poor quality DVD-RAM/-RW/-R discs may cut in out. • Playable ...
Quick Guide (easy Manual) (ver.1.0) (English)
Page 8
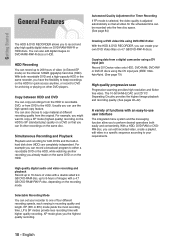
... Storage 4 Disc Specifications 4 Disc Copy 6 General Features 10 Before Reading the User's Manual 11 How to use the HDD & DVD RECORDER 11 Unpacking 13 Description 15 Front Panel 15 Front Panel Display 15 Rear Panel 16 Tour of the Remote Control 17 Connecting & Setting... 18 Step 1: Connecting the Antenna Cable 19 Method 1 : Antenna + HDD & DVD RECORDER + TV : No Cable box 19 Method 2 : Antenna + Cable box + HDD & DVD RECORDER + TV : Cable box with many scrambled channels 20 Method 3 : Antenna + HDD & DVD RECORDER + Cable box + TV : Cable box with a few scrambled channels 20 Step ...
... Storage 4 Disc Specifications 4 Disc Copy 6 General Features 10 Before Reading the User's Manual 11 How to use the HDD & DVD RECORDER 11 Unpacking 13 Description 15 Front Panel 15 Front Panel Display 15 Rear Panel 16 Tour of the Remote Control 17 Connecting & Setting... 18 Step 1: Connecting the Antenna Cable 19 Method 1 : Antenna + HDD & DVD RECORDER + TV : No Cable box 19 Method 2 : Antenna + Cable box + HDD & DVD RECORDER + TV : Cable box with many scrambled channels 20 Method 3 : Antenna + HDD & DVD RECORDER + Cable box + TV : Cable box with a few scrambled channels 20 Step ...
Quick Guide (easy Manual) (ver.1.0) (English)
Page 10
Copy between HDD and DVD You can copy recordings from the HDD to recordable DVD, or from DVD to copy material at different recording quality from a digital camcorder using a DV input jack Record DV Device video onto HDD, DVD-RAM, DVD-RW or DVD-R discs using DVD-RW/-R disc With the HDD & DVD RECORDER, you can create your recorder to DVD for archiving or playing on...
Copy between HDD and DVD You can copy recordings from the HDD to recordable DVD, or from DVD to copy material at different recording quality from a digital camcorder using a DV input jack Record DV Device video onto HDD, DVD-RAM, DVD-RW or DVD-R discs using DVD-RW/-R disc With the HDD & DVD RECORDER, you can create your recorder to DVD for archiving or playing on...

Quick Guide (easy Manual) (ver.1.0) (English)
Page 11
...disc can be formatted in DVD-Video Recording format (VR mode). You can be cancelled. Using a DVD-R This type of disc can play this product. (See pages 2~7) 2) If a problem occurs, check the Troubleshooting. (See pages 123~126) Copyright ©2005 Samsung Electronics Co. English - ... a recording without the prior written permission of Samsung Electronics Co. RW This involves a function available in VCD or CD-R/CD-RW discs. ANYKEY A function that can record on which MP3 is required for the preparation of recording on various DVD components. You can record files ...
...disc can be formatted in DVD-Video Recording format (VR mode). You can be cancelled. Using a DVD-R This type of disc can play this product. (See pages 2~7) 2) If a problem occurs, check the Troubleshooting. (See pages 123~126) Copyright ©2005 Samsung Electronics Co. English - ... a recording without the prior written permission of Samsung Electronics Co. RW This involves a function available in VCD or CD-R/CD-RW discs. ANYKEY A function that can record on which MP3 is required for the preparation of recording on various DVD components. You can record files ...
Quick Guide (easy Manual) (ver.1.0) (English)
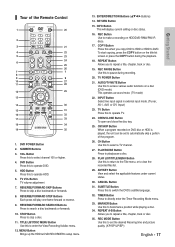
Page 17
... Press to search a disc backwards or forwards. 10. MARKER Button Use this to play one-frame forward or reverse. 9. MENU Button Brings up the HDD & DVD RECORDER's setup menu. 13. RETURN Button 15. This operates as sound mute. (TV mode) 22. TV Button Press this to operate TV. 24. CH Button Use... menu. 33. INFO Button This will play /pause a disc. 28. REC Button Use to DVD. REPEAT Button Allows you copy DVD to HDD or HDD to make a recording on DVD disc or HDD is played, the unit can be set the desired Recoring time and picture quality. (XP/SP/LP/EP) English - 17 ...
... Press to search a disc backwards or forwards. 10. MARKER Button Use this to play one-frame forward or reverse. 9. MENU Button Brings up the HDD & DVD RECORDER's setup menu. 13. RETURN Button 15. This operates as sound mute. (TV mode) 22. TV Button Press this to operate TV. 24. CH Button Use... menu. 33. INFO Button This will play /pause a disc. 28. REC Button Use to DVD. REPEAT Button Allows you copy DVD to HDD or HDD to make a recording on DVD disc or HDD is played, the unit can be set the desired Recoring time and picture quality. (XP/SP/LP/EP) English - 17 ...
Quick Guide (easy Manual) (ver.1.0) (English)
Page 18
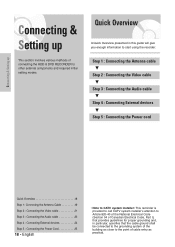
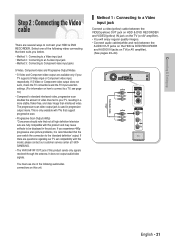
Connecting & Setting up Connecting & Setting up This section involves various methods of cable entry as close to the point of connecting the HDD & DVD RECORDER to start using the recorder. Step 1 : Connecting the Antenna cable † Step 2 : Connecting the Video cable † Step 3 : Connecting the Audio cable † Step 4 : Connecting External devices † Step...
Connecting & Setting up Connecting & Setting up This section involves various methods of cable entry as close to the point of connecting the HDD & DVD RECORDER to start using the recorder. Step 1 : Connecting the Antenna cable † Step 2 : Connecting the Video cable † Step 3 : Connecting the Audio cable † Step 4 : Connecting External devices † Step...
Quick Guide (easy Manual) (ver.1.0) (English)
Page 19
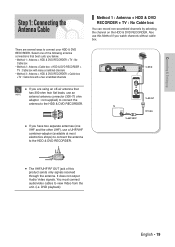
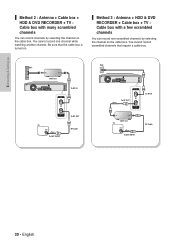
...scrambled channels • Method 3 : Antenna + HDD & DVD RECORDER + Cable box +TV : Cable box with a few scrambled channels Method 1 : Antenna + HDD & DVD RECORDER + TV : No Cable box You can record non-scrambled channels by selecting the channel on the HDD & DVD RECORDER. DVD playback) English - 19 You must connect audio/video cables to... other UHF), use an NOTE external antenna connector (300-75 ohm adaptor : not supplied) to connect the antenna to the HDD & DVD RECORDER. To RF OUT TV RF Cable To ANT INPUT I If you watch channels without cable box. To RF IN I The VHF/UHF...
...scrambled channels • Method 3 : Antenna + HDD & DVD RECORDER + Cable box +TV : Cable box with a few scrambled channels Method 1 : Antenna + HDD & DVD RECORDER + TV : No Cable box You can record non-scrambled channels by selecting the channel on the HDD & DVD RECORDER. DVD playback) English - 19 You must connect audio/video cables to... other UHF), use an NOTE external antenna connector (300-75 ohm adaptor : not supplied) to connect the antenna to the HDD & DVD RECORDER. To RF OUT TV RF Cable To ANT INPUT I If you watch channels without cable box. To RF IN I The VHF/UHF...
Quick Guide (easy Manual) (ver.1.0) (English)
Page 20
Connecting & Setting up Method 2 : Antenna + Cable box + HDD & DVD RECORDER + TV : Cable box with a few scrambled channels You can record channels by selecting the channel on the cable box. Wall Cable box To RF IN TV To ANT INPUT To RF OUT RF Cable ...box TV To ANT INPUT RF Cable 20 - Be sure that require a cable box. You cannot record one channel while watching another channel. You cannot record scrambled channels that the cable box is turned on the cable box. Method 3 : Antenna + HDD & DVD RECORDER + Cable box + TV : Cable box with many scrambled channels You can...
Connecting & Setting up Method 2 : Antenna + Cable box + HDD & DVD RECORDER + TV : Cable box with a few scrambled channels You can record channels by selecting the channel on the cable box. Wall Cable box To RF IN TV To ANT INPUT To RF OUT RF Cable ...box TV To ANT INPUT RF Cable 20 - Be sure that require a cable box. You cannot record one channel while watching another channel. You cannot record scrambled channels that the cable box is turned on the cable box. Method 3 : Antenna + HDD & DVD RECORDER + Cable box + TV : Cable box with many scrambled channels You can...
Quick Guide (easy Manual) (ver.1.0) (English)
Page 21
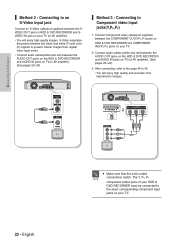
... connecting that the user switch the connection to a Video input jack Connect a video(yellow) cable between the VIDEO(yellow) OUT jack on HDD & DVD RECORDER and VIDEO(yellow) IN jack on the TV (or AV amplifier). • You will enjoy regular quality images. • Connect audio cables(white ...and red) between the AUDIO OUT jacks on the HDD & DVD RECORDER and AUDIO IN jacks on TV(or AV amplifier). (See pages 23~24) yellow yellow English - 21 Connecting & Setting up Video/Audio Cable Step 2 ...
... connecting that the user switch the connection to a Video input jack Connect a video(yellow) cable between the VIDEO(yellow) OUT jack on HDD & DVD RECORDER and VIDEO(yellow) IN jack on the TV (or AV amplifier). • You will enjoy regular quality images. • Connect audio cables(white ...and red) between the AUDIO OUT jacks on the HDD & DVD RECORDER and AUDIO IN jacks on TV(or AV amplifier). (See pages 23~24) yellow yellow English - 21 Connecting & Setting up Video/Audio Cable Step 2 ...
Quick Guide (easy Manual) (ver.1.0) (English)
Page 22
...page 40 to 42. • You will enjoy high quality images. Connect audio cables (white and red) between the AUDIO OUT jacks on the HDD & DVD RECORDER and AUDIO IN jacks on your TV. 2. Method 2 : Connecting to an S-Video input jack Connect an S-Video cable(not supplied) between the SVIDEO ...signals to present clearer images than regular video input mode. • Connect audio cables(white and red) between the AUDIO OUT jacks on the HDD & DVD RECORDER and AUDIO IN jacks on TV(or AV amplifier). (See pages 23~24) Method 3 : Connecting to the exact corresponding component input jacks on your ...
...page 40 to 42. • You will enjoy high quality images. Connect audio cables (white and red) between the AUDIO OUT jacks on the HDD & DVD RECORDER and AUDIO IN jacks on your TV. 2. Method 2 : Connecting to an S-Video input jack Connect an S-Video cable(not supplied) between the SVIDEO ...signals to present clearer images than regular video input mode. • Connect audio cables(white and red) between the AUDIO OUT jacks on the HDD & DVD RECORDER and AUDIO IN jacks on TV(or AV amplifier). (See pages 23~24) Method 3 : Connecting to the exact corresponding component input jacks on your ...
Quick Guide (easy Manual) (ver.1.0) (English)
Page 23
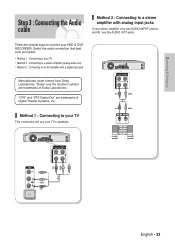
... a digital input jack Manufactured under license from Dolby Laboratories. Connecting & Setting up white red Step 3 : Connecting the Audio cable Method 2 : Connecting to connect your HDD & DVD RECORDER.
... a digital input jack Manufactured under license from Dolby Laboratories. Connecting & Setting up white red Step 3 : Connecting the Audio cable Method 2 : Connecting to connect your HDD & DVD RECORDER.
Quick Guide (easy Manual) (ver.1.0) (English)
Page 24
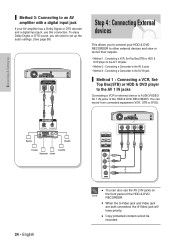
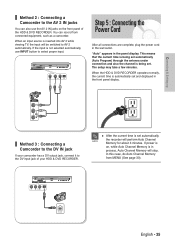
...up Method 3: Connecting to an AV amplifier with a digital input jack If your HDD & DVD RECORDER to other external devices and view or record their outputs. • Method 1 : Connecting a VCR, Set-Top Box(STB) or HDD & DVD player to the AV 1 IN jacks • Method 2 : Connecting a Camcorder to the...and a digital input jack, use the AV 2 IN jacks on the front panel of the HDD & DVD RECORDER. You can also use this connection. English or I Copy protected content cannot be recorded. Connecting & Setting up the audio settings. (See page 38) or Step 4 : Connecting External devices This...
...up Method 3: Connecting to an AV amplifier with a digital input jack If your HDD & DVD RECORDER to other external devices and view or record their outputs. • Method 1 : Connecting a VCR, Set-Top Box(STB) or HDD & DVD player to the AV 1 IN jacks • Method 2 : Connecting a Camcorder to the...and a digital input jack, use the AV 2 IN jacks on the front panel of the HDD & DVD RECORDER. You can also use this connection. English or I Copy protected content cannot be recorded. Connecting & Setting up the audio settings. (See page 38) or Step 4 : Connecting External devices This...
Quick Guide (easy Manual) (ver.1.0) (English)
Page 25
..." appears in process, Auto Channel Memory will stop. If power is on the front panel of your HDD & DVD RECORDER. This means that the current time is being set automatically, the recorder will be switched to AV 2 automatically. I After the current time is in the panel display. English - 25...to the DV IN jack If your camcorder has a DV output jack, connect it to the DV input jack of the HDD & DVD RECORDER. When the HDD & DVD RECORDER operates normally, the current time is not selected automatically, use the AV 2 IN jacks on , while Auto Channel Memory is set automatically...
..." appears in process, Auto Channel Memory will stop. If power is on the front panel of your HDD & DVD RECORDER. This means that the current time is being set automatically, the recorder will be switched to AV 2 automatically. I After the current time is in the panel display. English - 25...to the DV IN jack If your camcorder has a DV output jack, connect it to the DV input jack of the HDD & DVD RECORDER. When the HDD & DVD RECORDER operates normally, the current time is not selected automatically, use the AV 2 IN jacks on , while Auto Channel Memory is set automatically...
Quick Guide (easy Manual) (ver.1.0) (English)
Page 26
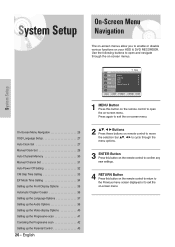
...Press these buttons on remote control to move the selection bar to cycle through the on -screen menu. English HDD Title Music Photo Timer Record System Language Audio Video Parental Control Setup Setup MOVE SELECT RETURN EXIT 1 MENU Button Press this button on the remote control to open and... RETURN Button Press this button on the remote control to return to the Previous menu screen displayed or to exit the on your HDD & DVD RECORDER. On-Screen Menu System Setup Navigation The on-screen menus allow you to enable or disable various functions on -screen menu. System Setup On...
...Press these buttons on remote control to move the selection bar to cycle through the on -screen menu. English HDD Title Music Photo Timer Record System Language Audio Video Parental Control Setup Setup MOVE SELECT RETURN EXIT 1 MENU Button Press this button on the remote control to open and... RETURN Button Press this button on the remote control to return to the Previous menu screen displayed or to exit the on your HDD & DVD RECORDER. On-Screen Menu System Setup Navigation The on-screen menus allow you to enable or disable various functions on -screen menu. System Setup On...

Quick Guide (easy Manual) (ver.1.0) (English)
Page 32
... √ button. • Off : Auto power off is disabled. • 2 Hour : HDD & DVD RECORDER will automatically turns off for 6 hours after the last button is pressed. • 6 Hour : HDD & DVD RECORDER will automatically turns off function is reached during a playback or recording, the device will be displayed. System menu will operate until the playback or...
... √ button. • Off : Auto power off is disabled. • 2 Hour : HDD & DVD RECORDER will automatically turns off for 6 hours after the last button is pressed. • 6 Hour : HDD & DVD RECORDER will automatically turns off function is reached during a playback or recording, the device will be displayed. System menu will operate until the playback or...

Quick Guide (easy Manual) (ver.1.0) (English)
Page 38
... disc subtitles. • Disc Menu: For the disc menu contained on the disc • On-Screen Menu: For the on-screen menu of your HDD & DVD RECORDER. 5 Press the ...† buttons to select the desired language option, press the ENTER or √ button. I Press the RETURN or œ button to ...8224; buttons to select the desired language, then press the ENTER or √ button. Setting up the Audio Options You can connect the HDD & DVD RECORDER to select Setup, then press the ENTER or √ button. Allow you to setup the Audio device and sound status depending on the disc. HDD...
... disc subtitles. • Disc Menu: For the disc menu contained on the disc • On-Screen Menu: For the on-screen menu of your HDD & DVD RECORDER. 5 Press the ...† buttons to select the desired language option, press the ENTER or √ button. I Press the RETURN or œ button to ...8224; buttons to select the desired language, then press the ENTER or √ button. Setting up the Audio Options You can connect the HDD & DVD RECORDER to select Setup, then press the ENTER or √ button. Allow you to setup the Audio device and sound status depending on the disc. HDD...

Quick Guide (easy Manual) (ver.1.0) (English)
Page 41
.... (See page 22) Video Output Mode Progressive Scan 1 With the unit in stop mode" appears on the front of the HDD & DVD RECORDER to Progressive input. Press the œ √ buttons to confirm Progressive scan mode. will appear. will appear. Yes No I Progressive... setting is only available when the HDD & DVD RECORDER is possible only on stop mode. 2 The message "Please, set your TV to enjoy. To deactivate, press [STOP] key." The message "...
.... (See page 22) Video Output Mode Progressive Scan 1 With the unit in stop mode" appears on the front of the HDD & DVD RECORDER to Progressive input. Press the œ √ buttons to confirm Progressive scan mode. will appear. will appear. Yes No I Progressive... setting is only available when the HDD & DVD RECORDER is possible only on stop mode. 2 The message "Please, set your TV to enjoy. To deactivate, press [STOP] key." The message "...


