
User Manual (ENGLISH)
Page 4
...-4 It cannot be used elsewhere. • This DVD player is being played, or the disc may be scratched or broken, and the player's internal parts may be sure to disconnect the AC power cord from the inside to the outside of this player. In particular, this user manual is licensed under direct sunlight. • Keep...
...-4 It cannot be used elsewhere. • This DVD player is being played, or the disc may be scratched or broken, and the player's internal parts may be sure to disconnect the AC power cord from the inside to the outside of this player. In particular, this user manual is licensed under direct sunlight. • Keep...
User Manual (ENGLISH)
Page 12
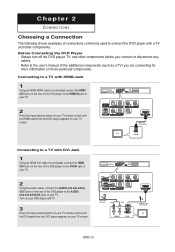
... before you are connecting for more information on those particular components. Refer to the user's manual of the additional components (such as a TV) you connect or disconnect any cables. - Before Connecting the DVD Player - Turn on your DVD player and TV. 3 Press the input selector button on your TV remote control until the HDMI... Included) Connecting to a TV with DVI Jack 1 Using an HDMI-DVI cable (not included), connect the HDMI OUT jack on the rear of the DVD player to the DVI IN jack of your TV. 2 Using the audio cables, connect the AUDIO (red and white) OUT jacks on the rear of the...
... before you are connecting for more information on those particular components. Refer to the user's manual of the additional components (such as a TV) you connect or disconnect any cables. - Before Connecting the DVD Player - Turn on your DVD player and TV. 3 Press the input selector button on your TV remote control until the HDMI... Included) Connecting to a TV with DVI Jack 1 Using an HDMI-DVI cable (not included), connect the HDMI OUT jack on the rear of the DVD player to the DVI IN jack of your TV. 2 Using the audio cables, connect the AUDIO (red and white) OUT jacks on the rear of the...

User Manual (ENGLISH)
Page 13
...-13 Please refer to the user's manual of the HDMI SEL. This player upconverts regular DVDs for protecting DVD content output via HDMI/DVI from being made. If your TV. - If an HDMI or HDMI-DVI cable is plugged into TV, the DVD player's output is encrypted at the source ...TV remote control. This is degraded due to prevent unauthorized copies from the player to make a digital video and audio connection with Samsung TVs that support Anynet+(HDMICEC).(see page 56-57) - Using HDMI, the DVD player transmits a digital video and audio signal which displays a vivid picture on 1080p...
...-13 Please refer to the user's manual of the HDMI SEL. This player upconverts regular DVDs for protecting DVD content output via HDMI/DVI from being made. If your TV. - If an HDMI or HDMI-DVI cable is plugged into TV, the DVD player's output is encrypted at the source ...TV remote control. This is degraded due to prevent unauthorized copies from the player to make a digital video and audio connection with Samsung TVs that support Anynet+(HDMICEC).(see page 56-57) - Using HDMI, the DVD player transmits a digital video and audio signal which displays a vivid picture on 1080p...
User Manual (ENGLISH)
Page 14
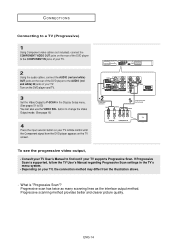
Consult your TV User's Manual to find out if your TV, the connection method may differ from the DVD player appears on the TV screen. Depending on your TV ...Progressive) 1 Using Component video cables (not included), connect the COMPONENT VIDEO OUT jacks on the rear of the DVD player to the COMPONENT IN jacks of your TV. 2 Using the audio cables, connect the AUDIO (red and white... (Included) RED Component cable (not included) WHITE RED BLUE GREEN 4 Press the input selector button on the DVD player and TV. 3 Set the Video Output to 53) You can also use the VIDEO SEL. If Progressive Scan...
Consult your TV User's Manual to find out if your TV, the connection method may differ from the DVD player appears on the TV screen. Depending on your TV ...Progressive) 1 Using Component video cables (not included), connect the COMPONENT VIDEO OUT jacks on the rear of the DVD player to the COMPONENT IN jacks of your TV. 2 Using the audio cables, connect the AUDIO (red and white... (Included) RED Component cable (not included) WHITE RED BLUE GREEN 4 Press the input selector button on the DVD player and TV. 3 Set the Video Output to 53) You can also use the VIDEO SEL. If Progressive Scan...

User Manual (ENGLISH)
Page 15
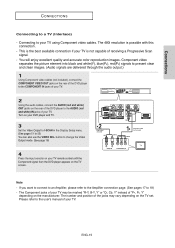
...Using Component video cables (not included), connect the COMPONENT VIDEO OUT jacks on the rear of the DVD player to the COMPONENT IN jacks of your TV. If you want to connect to an Amplifier, please ...on the TV screen. Turn on your TV remote control until the Component signal from the DVD player appears on your DVD player and TV. 3 Set the Video Output to I-SCAN in the Display Setup menu. (...Using the audio cables, connect the AUDIO (red and white) OUT jackls on the rear of the DVD player to the user's manual of "PR, PB, Y" depending on the TV set. The Component jacks of your TV may ...
...Using Component video cables (not included), connect the COMPONENT VIDEO OUT jacks on the rear of the DVD player to the COMPONENT IN jacks of your TV. If you want to connect to an Amplifier, please ...on the TV screen. Turn on your TV remote control until the Component signal from the DVD player appears on your DVD player and TV. 3 Set the Video Output to I-SCAN in the Display Setup menu. (...Using the audio cables, connect the AUDIO (red and white) OUT jackls on the rear of the DVD player to the user's manual of "PR, PB, Y" depending on the TV set. The Component jacks of your TV may ...

User Manual (ENGLISH)
Page 16
Please refer to the user's manual of your TV set. ENG-16 Noise may vary depending on your TV. - If ... (See pages 51 to 53). button to change the Video Output mode. (See page 16) 4 Press the input selector button on your DVD player and TV. 3 Set the Video Output to I -SCAN ➝ P-SCAN). CONNECTIONS Connecting to a TV (Video) 1 Using Video/Audio ...cables, connect the VIDEO (yellow)/AUDIO (red and white) OUT jacks on the rear of the DVD player to the VIDEO (yellow)/AUDIO (red and white) IN jacks of your TV. 2 Turn on your TV remote control until the ...
Please refer to the user's manual of your TV set. ENG-16 Noise may vary depending on your TV. - If ... (See pages 51 to 53). button to change the Video Output mode. (See page 16) 4 Press the input selector button on your DVD player and TV. 3 Set the Video Output to I -SCAN ➝ P-SCAN). CONNECTIONS Connecting to a TV (Video) 1 Using Video/Audio ...cables, connect the VIDEO (yellow)/AUDIO (red and white) OUT jacks on the rear of the DVD player to the VIDEO (yellow)/AUDIO (red and white) IN jacks of your TV. 2 Turn on your TV remote control until the ...

User Manual (ENGLISH)
Page 17
...manual to set the audio in order to hear sound. ENG-17 Refer to your ears. - Please set the Amplifier's audio input. 2-Channel stereo amp Note - Please refer to 50) - WHITE RED Audio Cable (Included) RED WHITE 4 Press the input select button of the Amplifier to select the audio input your DVD player... an Audio System (2 Channel Amplifier) 1 Using the audio cables, connect the AUDIO (red and white) OUT jacks on the rear of the DVD player to the AUDIO (red and white) IN jacks of the Amplifier. 2 Using the video signal cable(s), connect the HDMI, COMPONENT or VIDEO OUT...
...manual to set the audio in order to hear sound. ENG-17 Refer to your ears. - Please set the Amplifier's audio input. 2-Channel stereo amp Note - Please refer to 50) - WHITE RED Audio Cable (Included) RED WHITE 4 Press the input select button of the Amplifier to select the audio input your DVD player... an Audio System (2 Channel Amplifier) 1 Using the audio cables, connect the AUDIO (red and white) OUT jacks on the rear of the DVD player to the AUDIO (red and white) IN jacks of the Amplifier. 2 Using the video signal cable(s), connect the HDMI, COMPONENT or VIDEO OUT...

User Manual (ENGLISH)
Page 18
... connected. (See pages 49 to the speakers and your DVD player, TV, and Amplifier. Sudden loud sound may vary depending on the Amplifier. Please set the audio in order to set the Amplifier's audio input. Refer to your Amplifier's user manual to hear sound. The position of jacks may cause damage...Please refer to 16. 3 Turn on pages 14 to the user's manual of your TV as described on your ears. - Note - If using a Coaxial cable (not included), connect the DIGITAL AUDIO OUT (COAXIAL) jack on the rear of the DVD player to the DIGITAL AUDIO IN (COAXIAL) jack of the Amplifier. 2 Using...
... connected. (See pages 49 to the speakers and your DVD player, TV, and Amplifier. Sudden loud sound may vary depending on the Amplifier. Please set the audio in order to set the Amplifier's audio input. Refer to your Amplifier's user manual to hear sound. The position of jacks may cause damage...Please refer to 16. 3 Turn on pages 14 to the user's manual of your TV as described on your ears. - Note - If using a Coaxial cable (not included), connect the DIGITAL AUDIO OUT (COAXIAL) jack on the rear of the DVD player to the DIGITAL AUDIO IN (COAXIAL) jack of the Amplifier. 2 Using...

User Manual (ENGLISH)
Page 56
...8730;C)O: Onn Enter Return Menu ▼ To make the setup menu disappear, press the MENU button. 5 Set the Anynet+ function on your Samsung TV. (See your TV instruction manual for more information.). • When you must turn Anynet+(HDMI-CEC) On in the Setup Menu. 1 With the unit in Stop mode,... press the ‹ or ENTER button. 3 Press the œ/ƒ buttons to "On"on your DVD Player., then press the ‹ or ENTER button. This is only available with SAMSUNG TVs that can be used to operate this DVD Player using an HDMI Cable. (see pages 12-13) This is done by connecting the...
...8730;C)O: Onn Enter Return Menu ▼ To make the setup menu disappear, press the MENU button. 5 Set the Anynet+ function on your Samsung TV. (See your TV instruction manual for more information.). • When you must turn Anynet+(HDMI-CEC) On in the Setup Menu. 1 With the unit in Stop mode,... press the ‹ or ENTER button. 3 Press the œ/ƒ buttons to "On"on your DVD Player., then press the ‹ or ENTER button. This is only available with SAMSUNG TVs that can be used to operate this DVD Player using an HDMI Cable. (see pages 12-13) This is done by connecting the...

User Manual (ENGLISH)
Page 60
... of your TV is setup correctly. • Screen Jitter may occur when frame rate is set to the user's manual of DVD player. • See if the TV supports this 480p/720p/1080i/1080p DVD player. Abnormal HDMI output • If snow noise appears on the screen, it means that TV does not support screen...
... of your TV is setup correctly. • Screen Jitter may occur when frame rate is set to the user's manual of DVD player. • See if the TV supports this 480p/720p/1080i/1080p DVD player. Abnormal HDMI output • If snow noise appears on the screen, it means that TV does not support screen...

User Manual (ENGLISH)
Page 4
... power cord from the AC outlet when you don't intend to ISO/IEC 11172-3 or ISO/IEC 13818-3 used elsewhere. • This DVD player is licensed under certain intellectual property rights of this product unit. If this product unit and the license does not extend to any unlicensed product...jacket. Note: • This unit can affect normal operation of certain third parties. In particular, this user manual is AC 120V, 60Hz. No rights are granted for commercial use the player for long periods of the disc. • The Main plug is used only where the power supply is ...
... power cord from the AC outlet when you don't intend to ISO/IEC 11172-3 or ISO/IEC 13818-3 used elsewhere. • This DVD player is licensed under certain intellectual property rights of this product unit. If this product unit and the license does not extend to any unlicensed product...jacket. Note: • This unit can affect normal operation of certain third parties. In particular, this user manual is AC 120V, 60Hz. No rights are granted for commercial use the player for long periods of the disc. • The Main plug is used only where the power supply is ...

User Manual (ENGLISH)
Page 12
... included), connect the HDMI OUT jack on the rear of the DVD player to the DVI IN jack of your TV. 2 Using the audio cables, connect the AUDIO (red and white) OUT jacks on your TV screen. Refer to the user's manual of the additional components (such as a TV) you connect or disconnect... on the rear of your TV. 2 Press the input selector button on your TV remote control until the DVI signal from the DVD player appears on the rear of the DVD player to the AUDIO (red and white) IN jacks of your TV. HDMI cable (Not Included) Connecting to the HDMI IN jack of...
... included), connect the HDMI OUT jack on the rear of the DVD player to the DVI IN jack of your TV. 2 Using the audio cables, connect the AUDIO (red and white) OUT jacks on your TV screen. Refer to the user's manual of the additional components (such as a TV) you connect or disconnect... on the rear of your TV. 2 Press the input selector button on your TV remote control until the DVI signal from the DVD player appears on the rear of the DVD player to the AUDIO (red and white) IN jacks of your TV. HDMI cable (Not Included) Connecting to the HDMI IN jack of...

User Manual (ENGLISH)
Page 13
...TV does not support HDCP (High-bandwidth Digital content protection), snow noise appears on 1080p TVs. It provides a secure digital link between Samsung TV and this DVD player, you can operate this conversion, the picture quality is digital. etc) and a display device (TV, projector, etc). If an HDMI... jack. • HDMI connection description HDMI connector - Please refer to make a digital video and audio connection with Samsung TVs that support Anynet+(HDMI- If you to the user's manual of the HDMI SEL. If your TV. - Video and audio are selected in the TV) is only available ...
...TV does not support HDCP (High-bandwidth Digital content protection), snow noise appears on 1080p TVs. It provides a secure digital link between Samsung TV and this DVD player, you can operate this conversion, the picture quality is digital. etc) and a display device (TV, projector, etc). If an HDMI... jack. • HDMI connection description HDMI connector - Please refer to make a digital video and audio connection with Samsung TVs that support Anynet+(HDMI- If you to the user's manual of the HDMI SEL. If your TV. - Video and audio are selected in the TV) is only available ...

User Manual (ENGLISH)
Page 14
...use the VIDEO SEL. If Progressive Scan is possible with this connection. - Turn on the DVD player and TV. 3 Set the Video Output to P-SCAN in the TV's menu system. - Consult your TV User's Manual to the AUDIO (red and white) IN jacks of your TV. The 480p resolution is supported...clearer picture quality. 1 Using Component video cables (not included), connect the COMPONENT VIDEO OUT jacks on the rear of the DVD player to the COMPONENT IN jacks of the DVD player to find out if your TV supports Progressive Scan. To see the progressive video output, - ENG-14 CONNECTIONS Connecting to...
...use the VIDEO SEL. If Progressive Scan is possible with this connection. - Turn on the DVD player and TV. 3 Set the Video Output to P-SCAN in the TV's menu system. - Consult your TV User's Manual to the AUDIO (red and white) IN jacks of your TV. The 480p resolution is supported...clearer picture quality. 1 Using Component video cables (not included), connect the COMPONENT VIDEO OUT jacks on the rear of the DVD player to the COMPONENT IN jacks of the DVD player to find out if your TV supports Progressive Scan. To see the progressive video output, - ENG-14 CONNECTIONS Connecting to...
User Manual (ENGLISH)
Page 15
... are delivered through the audio output.) 1 Using Component video cables (not included), connect the COMPONENT VIDEO OUT jacks on the rear of the DVD player to the COMPONENT IN jacks of your TV. 2 Using the audio cables, connect the AUDIO (red and white) OUT jackls on the rear... Connecting to 18) - You will enjoy excellent quality and accurate color reproduction images. button to the user's manual of your TV remote control until the Component signal from the DVD player appears on the manufacturer. Please refer to change the Video Output mode. (See page 16) WHITE RED BLUE...
... are delivered through the audio output.) 1 Using Component video cables (not included), connect the COMPONENT VIDEO OUT jacks on the rear of the DVD player to the COMPONENT IN jacks of your TV. 2 Using the audio cables, connect the AUDIO (red and white) OUT jackls on the rear... Connecting to 18) - You will enjoy excellent quality and accurate color reproduction images. button to the user's manual of your TV remote control until the Component signal from the DVD player appears on the manufacturer. Please refer to change the Video Output mode. (See page 16) WHITE RED BLUE...

User Manual (ENGLISH)
Page 16
...) YELLOW Video Cable (Included) RED WHITE YELLOW Note - Please refer to the [AUDIO OUT][left] (white) jack of the DVD player. - Noise may vary depending on the TV, connect it to the user's manual of your TV. - button to the power cable. - The number and position of the jacks may be generated if...
...) YELLOW Video Cable (Included) RED WHITE YELLOW Note - Please refer to the [AUDIO OUT][left] (white) jack of the DVD player. - Noise may vary depending on the TV, connect it to the user's manual of your TV. - button to the power cable. - The number and position of the jacks may be generated if...

User Manual (ENGLISH)
Page 17
Refer to your Amplifier's user manual to set the audio in order to hear sound. The position of jacks may cause damage to the speakers and your DVD player is connected to in the menu screen according to the Amplifier.(See pages 49 to 50) - Please set the Amplifier's audio input. 2-...audio input your ears. - Please refer to the user's manual of the Amplifier. Connections CONNECTIONS Connecting to an Audio System (2 Channel Amplifier) 1 Using the audio cables, connect the AUDIO (red and white) OUT jacks on the rear of the DVD player to the AUDIO (red and white) IN jacks of the...
Refer to your Amplifier's user manual to set the audio in order to hear sound. The position of jacks may cause damage to the speakers and your DVD player is connected to in the menu screen according to the Amplifier.(See pages 49 to 50) - Please set the Amplifier's audio input. 2-...audio input your ears. - Please refer to the user's manual of the Amplifier. Connections CONNECTIONS Connecting to an Audio System (2 Channel Amplifier) 1 Using the audio cables, connect the AUDIO (red and white) OUT jacks on the rear of the DVD player to the AUDIO (red and white) IN jacks of the...

User Manual (ENGLISH)
Page 18
... user manual to set the audio in order to your ears. - Please remove the dust cover before using an Optical cable (not included), connect the DIGITAL AUDIO OUT (OPTICAL) jack on the rear of the DVD player to the...If using a Coaxial cable (not included), connect the DIGITAL AUDIO OUT (COAXIAL) jack on the rear of the DVD player to the DIGITAL AUDIO IN (COAXIAL) jack of the Amplifier. 2 Using the video signal cable(s), connect the ...have connected. (See pages 49 to select the audio input your DVD player, TV, and Amplifier. Please refer to the user's manual of the Amplifier to 50) -
... user manual to set the audio in order to your ears. - Please remove the dust cover before using an Optical cable (not included), connect the DIGITAL AUDIO OUT (OPTICAL) jack on the rear of the DVD player to the...If using a Coaxial cable (not included), connect the DIGITAL AUDIO OUT (COAXIAL) jack on the rear of the DVD player to the DIGITAL AUDIO IN (COAXIAL) jack of the Amplifier. 2 Using the video signal cable(s), connect the ...have connected. (See pages 49 to select the audio input your DVD player, TV, and Amplifier. Please refer to the user's manual of the Amplifier to 50) -

User Manual (ENGLISH)
Page 56
...manual for more information.). • When you must turn Anynet+(HDMI-CEC) On in the Setup Menu. 1 With the unit in Stop mode, press the MENU button. 2 Press the ›/‚ buttons to select Setup, then press the Š or ENTER button. 3 Press the ›/‚ buttons to operate this DVD Player...+ function on the TV remote control, the OSD to the right will appear. To operate Anynet+, you press Anynet+ button on your Samsung TV. (See your DVD Player., then press the Š or ENTER button. Language Setup Š Audio Setup Š Display Setup Š Parental Setup : &#...
...manual for more information.). • When you must turn Anynet+(HDMI-CEC) On in the Setup Menu. 1 With the unit in Stop mode, press the MENU button. 2 Press the ›/‚ buttons to select Setup, then press the Š or ENTER button. 3 Press the ›/‚ buttons to operate this DVD Player...+ function on the TV remote control, the OSD to the right will appear. To operate Anynet+, you press Anynet+ button on your Samsung TV. (See your DVD Player., then press the Š or ENTER button. Language Setup Š Audio Setup Š Display Setup Š Parental Setup : &#...

User Manual (ENGLISH)
Page 60
... if the Video output is set to HDMI. • Check the connection between the TV and the HDMI jack of DVD player. • See if the TV supports this 480p/720p/1080i/1080p DVD player. • If snow noise appears on the screen, it means that TV does not support HDCP (High-bandwidth Digital... when frame rate is converted from 50Hz to 60Hz for 720P/1080i/1080p HDMI (High Definition Multimedia Interface) Output. • Please refer to the user's manual of your TV. REFERENCE Problem No HDMI output.
... if the Video output is set to HDMI. • Check the connection between the TV and the HDMI jack of DVD player. • See if the TV supports this 480p/720p/1080i/1080p DVD player. • If snow noise appears on the screen, it means that TV does not support HDCP (High-bandwidth Digital... when frame rate is converted from 50Hz to 60Hz for 720P/1080i/1080p HDMI (High Definition Multimedia Interface) Output. • Please refer to the user's manual of your TV. REFERENCE Problem No HDMI output.


