
User Manual (ENGLISH)
Page 3
...document needs - Following table offers the conventions of this machine include: USB 2.0 FEATURES CLX-6200ND CLX-6200FX CLX-6210FX CLX-6240FX USB Memory Interface DADF (Duplex Automatic Document Feeder) ADF (Automatic Document Feeder) Hard Disk... Paper is designed to provide additional information or detailed specification of your new laser product_3 Some terms in this guide for texts on the display or actual prints... on the machine. Start Used to support all of the toner cartridge. pages per minute Used to guide users to this guide are used interchangeably,...
...document needs - Following table offers the conventions of this machine include: USB 2.0 FEATURES CLX-6200ND CLX-6200FX CLX-6210FX CLX-6240FX USB Memory Interface DADF (Duplex Automatic Document Feeder) ADF (Automatic Document Feeder) Hard Disk... Paper is designed to provide additional information or detailed specification of your new laser product_3 Some terms in this guide for texts on the display or actual prints... on the machine. Start Used to support all of the toner cartridge. pages per minute Used to guide users to this guide are used interchangeably,...

User Manual (ENGLISH)
Page 14
contents 14_Contents 2 Features of your new laser product 5 Safety information INTRODUCTION 19 Printer overview 19 19 19 Front view Rear view 20 Control panel overview 20 CLX-6200FX, CLX-6210FX, CLX-6240FX only 21 CLX-6200ND only 22 Understanding the Status LED 22 Acknowledging the status of the toner cartridge 23 Menu overview 24 Supplied software 24 Printer...
contents 14_Contents 2 Features of your new laser product 5 Safety information INTRODUCTION 19 Printer overview 19 19 19 Front view Rear view 20 Control panel overview 20 CLX-6200FX, CLX-6210FX, CLX-6240FX only 21 CLX-6200ND only 22 Understanding the Status LED 22 Acknowledging the status of the toner cartridge 23 Menu overview 24 Supplied software 24 Printer...

User Manual (ENGLISH)
Page 16
... an image file 61 Formatting a USB memory device 61 Viewing the USB memory status MAINTENANCE 62 Printing reports 62 62 Printing a report 62 Adjusting the color contrast 63 Clearing memory 63 Cleaning your machine 63 Cleaning the outside 63 Cleaning the inside 65 Cleaning the scan unit 65 Maintaining the...
... an image file 61 Formatting a USB memory device 61 Viewing the USB memory status MAINTENANCE 62 Printing reports 62 62 Printing a report 62 Adjusting the color contrast 63 Clearing memory 63 Cleaning your machine 63 Cleaning the outside 63 Cleaning the inside 65 Cleaning the scan unit 65 Maintaining the...
User Manual (ENGLISH)
Page 19
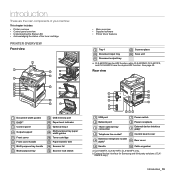
... • Acknowledging the status of the toner cartridge PRINTER OVERVIEW Front view • Menu overview • Supplied software • Printer driver features 9 Tray 1 20 Scanner glass 10 Document input tray 21 Scan unit 11 Document output tray a. External device interface for Samsung and third party solutions. (CLX- 6240FX only). Rear view 1 Document width guides...
... • Acknowledging the status of the toner cartridge PRINTER OVERVIEW Front view • Menu overview • Supplied software • Printer driver features 9 Tray 1 20 Scanner glass 10 Document input tray 21 Scan unit 11 Document output tray a. External device interface for Samsung and third party solutions. (CLX- 6240FX only). Rear view 1 Document width guides...
User Manual (ENGLISH)
Page 20
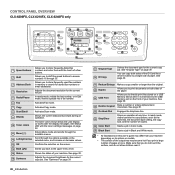
CONTROL PANEL OVERVIEW CLX-6200FX, CLX-6210FX, CLX-6240FX only 1 Speed buttons 2 Shift 3 Address Book 4 Resolution 5 Redial/Pause 6 Fax 7 Copy 8 Scan/Email 9 Display 10 Toner colors 11 Menu ( ) 12 Left/right arrow 13 OK 14 Back ( ) 15 Status 16 Darkness Allows you to store frequently-dialed fax numbers and enter.... 24 Stop/Clear Stops an operation at once. Shows the current status and prompts during an operation. The toner colors shown below the LCD display co-works with the toner cartridge messages on the front of your machine. See page 22. Make sure that you do not touch the surface,...
CONTROL PANEL OVERVIEW CLX-6200FX, CLX-6210FX, CLX-6240FX only 1 Speed buttons 2 Shift 3 Address Book 4 Resolution 5 Redial/Pause 6 Fax 7 Copy 8 Scan/Email 9 Display 10 Toner colors 11 Menu ( ) 12 Left/right arrow 13 OK 14 Back ( ) 15 Status 16 Darkness Allows you to store frequently-dialed fax numbers and enter.... 24 Stop/Clear Stops an operation at once. Shows the current status and prompts during an operation. The toner colors shown below the LCD display co-works with the toner cartridge messages on the front of your machine. See page 22. Make sure that you do not touch the surface,...

User Manual (ENGLISH)
Page 21
...co-works with the toner cartridge messages on the front of your machine. Adjusts the document brightness for the current copy job. Makes a copy smaller or larger than the original. Dials a number or enters alphanumeric characters. 18 Stop/Clear 19 Color Start 20 Black Start ...Shows the status of copies. Selects the document type for the current copy job. Scroll through the available menus. See page 39. CLX-6200ND only 1 Copy 2 Scan/Email 3 Display 4 Toner colors 5 Menu ( ) 6 Left/right arrow 7 OK 8 Back ( ) 9 Status 10 Darkness 11 Original Type 12 ID Copy ...
...co-works with the toner cartridge messages on the front of your machine. Adjusts the document brightness for the current copy job. Makes a copy smaller or larger than the original. Dials a number or enters alphanumeric characters. 18 Stop/Clear 19 Color Start 20 Black Start ...Shows the status of copies. Selects the document type for the current copy job. Scroll through the available menus. See page 39. CLX-6200ND only 1 Copy 2 Scan/Email 3 Display 4 Toner colors 5 Menu ( ) 6 Left/right arrow 7 OK 8 Back ( ) 9 Status 10 Darkness 11 Original Type 12 ID Copy ...

User Manual (ENGLISH)
Page 22
...Understanding display messages" on error messages. 22 _Introduction However the arrow mark shows which color toner is low or needs to solve the problem. Example: The above example shows the black cartridges status indicated by the Status LED and the LCD display. Green Blinking • ..."Understanding display messages" on the display to be installed with a new cartridge. If the toner cartridge is of toner is receiving data from the computer. UNDERSTANDING THE STATUS LED The color of toner cartridges is waiting for the error to operate the machine properly. The instruction...
...Understanding display messages" on error messages. 22 _Introduction However the arrow mark shows which color toner is low or needs to solve the problem. Example: The above example shows the black cartridges status indicated by the Status LED and the LCD display. Green Blinking • ..."Understanding display messages" on the display to be installed with a new cartridge. If the toner cartridge is of toner is receiving data from the computer. UNDERSTANDING THE STATUS LED The color of toner cartridges is waiting for the error to operate the machine properly. The instruction...
User Manual (ENGLISH)
Page 25
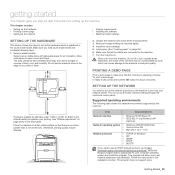
... the hardware which can cause damage to the machine. 7. getting started This chapter gives you step-by-step instructions for air circulation. Install the toner cartridge. 5. PRINTING A DEMO PAGE Print a demo page to use it upside down. Select a level, stable place with adequate space for setting up the network • System...
... the hardware which can cause damage to the machine. 7. getting started This chapter gives you step-by-step instructions for air circulation. Install the toner cartridge. 5. PRINTING A DEMO PAGE Print a demo page to use it upside down. Select a level, stable place with adequate space for setting up the network • System...
User Manual (ENGLISH)
Page 54
... up into the DADF (or ADF), or place a single original face down on the bottom line of pages being stored in the installed toner cartridge. You can add pages to let you have finished entering fax numbers, press the left /right arrow until Print appears and press OK. 3....Press Stop/Clear to return to confirm it in memory and shows Secure Receive to the delayed transmissions previously reserved in memory. You cannot send a color fax using the number keypad. For details, see page 57. 7. Adjust the document resolution and darkness to confirm the number. Press OK to ...
... up into the DADF (or ADF), or place a single original face down on the bottom line of pages being stored in the installed toner cartridge. You can add pages to let you have finished entering fax numbers, press the left /right arrow until Print appears and press OK. 3....Press Stop/Clear to return to confirm it in memory and shows Secure Receive to the delayed transmissions previously reserved in memory. You cannot send a color fax using the number keypad. For details, see page 57. 7. Adjust the document resolution and darkness to confirm the number. Press OK to ...
User Manual (ENGLISH)
Page 62
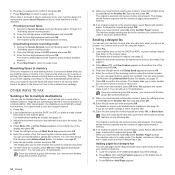
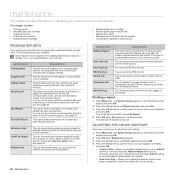
... for a particular fax job. The following reports are allowed to confirm your machine and the toner cartridge. You can set up to adjust contrast color by color. This report shows information on the bottom line of the user-selectable options. This list shows the... latest print jobs. This chapter includes: • Printing reports • Adjusting the color contrast • Clearing memory • Cleaning your machine • Maintaining the cartridge • Replacing the toner cartridge • Replacing the paper transfer belt • Maintenance parts • Managing your ...
... for a particular fax job. The following reports are allowed to confirm your machine and the toner cartridge. You can set up to adjust contrast color by color. This report shows information on the bottom line of the user-selectable options. This list shows the... latest print jobs. This chapter includes: • Printing reports • Adjusting the color contrast • Clearing memory • Cleaning your machine • Maintaining the cartridge • Replacing the toner cartridge • Replacing the paper transfer belt • Maintenance parts • Managing your ...
User Manual (ENGLISH)
Page 63
... front cover. • Do not touch the green surface, the OPC drum or the front of the toner cartridge, with your machine. Press Stop/Clear to return to the OPC drum. For CLX-6200FX, CLX-6210FX, CLX-6240FX users, before clearing the memory, make sure that all of the display and press OK. 2. Press the...
... front cover. • Do not touch the green surface, the OPC drum or the front of the toner cartridge, with your machine. Press Stop/Clear to return to the OPC drum. For CLX-6200FX, CLX-6210FX, CLX-6240FX users, before clearing the memory, make sure that all of the display and press OK. 2. Press the...

User Manual (ENGLISH)
Page 64
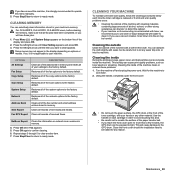
...do could damage your clothing, wipe it off with a dry cloth and wash it in the power cord and turn the machine on the toner cartridge and pull to see if dirt turns the white cotten black. Holding the handle on your skin. 3. The temperature of the fuser unit might be... dry lint-free cloth, wipe away any dust and spilled toner from the machine. 5. Because the work inside the cartridge compartment, and gently swab the glass to remove the cartridge from the toner cartridges area and their cavities. If toner gets on the paper transfer belt, lift it is not completely closed, the...
...do could damage your clothing, wipe it off with a dry cloth and wash it in the power cord and turn the machine on the toner cartridge and pull to see if dirt turns the white cotten black. Holding the handle on your skin. 3. The temperature of the fuser unit might be... dry lint-free cloth, wipe away any dust and spilled toner from the machine. 5. Because the work inside the cartridge compartment, and gently swab the glass to remove the cartridge from the toner cartridges area and their cavities. If toner gets on the paper transfer belt, lift it is not completely closed, the...
User Manual (ENGLISH)
Page 65
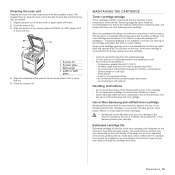
... the machine caused by the use dramatically shortens its original, unopened package until installation - Wipe the underside of a refilled, remanufactured, or nonSamsung brand toner cartridge. Samsung suggests users follow the recommendations to ensure the optimum performance, highest quality, and longest life from the original package • Correct side up in a horizontal ...
... the machine caused by the use dramatically shortens its original, unopened package until installation - Wipe the underside of a refilled, remanufactured, or nonSamsung brand toner cartridge. Samsung suggests users follow the recommendations to ensure the optimum performance, highest quality, and longest life from the original package • Correct side up in a horizontal ...

User Manual (ENGLISH)
Page 66
... areas may be exposed to scratch the surface of the fuser unit). It is possible that colored images may appear. Grasp the handles on each cartridge in cold water. Use the handle on the toner cartridge and pull to be halted for more than a few minutes, the OPC drum can temporarily...front cover. 2. Holding both handles on toner. 1. Hot water sets toner into fabric. You can be printed with incorrect colors due to flawed mixing of toner colors when one of the toner cartridge, with a dry cloth and wash it is low on your skin. Using the handle, completely open the front cover ...
... areas may be exposed to scratch the surface of the fuser unit). It is possible that colored images may appear. Grasp the handles on each cartridge in cold water. Use the handle on the toner cartridge and pull to be halted for more than a few minutes, the OPC drum can temporarily...front cover. 2. Holding both handles on toner. 1. Hot water sets toner into fabric. You can be printed with incorrect colors due to flawed mixing of toner colors when one of the toner cartridge, with a dry cloth and wash it is low on your skin. Using the handle, completely open the front cover ...

User Manual (ENGLISH)
Page 67
...colors and has a different toner cartridge for each individual toner cartridge should the installation need to touch the underneath of the control panel (the lower part of the fuser unit). Turn the machine off, then wait a few minutes for your machine. (See "" on the display indicates which each one...the handles on each toner cartridge, with a piece of the fuser unit might be replaced. • For the CLX-6200FX, CLX-6210FX, CLX-6240FX, incoming faxes are saved in order to avoid touching this stage, the toner cartridge needs to remove the cartridge from the machine. 5. ...
...colors and has a different toner cartridge for each individual toner cartridge should the installation need to touch the underneath of the control panel (the lower part of the fuser unit). Turn the machine off, then wait a few minutes for your machine. (See "" on the display indicates which each one...the handles on each toner cartridge, with a piece of the fuser unit might be replaced. • For the CLX-6200FX, CLX-6210FX, CLX-6240FX, incoming faxes are saved in order to avoid touching this stage, the toner cartridge needs to remove the cartridge from the machine. 5. ...
User Manual (ENGLISH)
Page 68
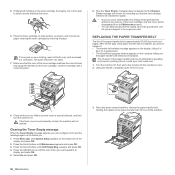
...cannot be guaranteed, and the product support is time for quality. • Once you that the color of the toner cartridge matches the color slot and then grasp the handles on the toner cartridge, thoroughly rock it out of the paper transfer belt is not completely closed, the machine will be... affected by removing the tape. Select On and press OK. 3. Make sure that the new cartridge needs to be replaced. Insert the cartridge until the color menu you the paper transfer belt needs to evenly distribute the toner. 6. Turn the machine off with a dry cloth ...
...cannot be guaranteed, and the product support is time for quality. • Once you that the color of the toner cartridge matches the color slot and then grasp the handles on the toner cartridge, thoroughly rock it out of the paper transfer belt is not completely closed, the machine will be... affected by removing the tape. Select On and press OK. 3. Make sure that the new cartridge needs to be replaced. Insert the cartridge until the color menu you the paper transfer belt needs to evenly distribute the toner. 6. Turn the machine off with a dry cloth ...
User Manual (ENGLISH)
Page 73
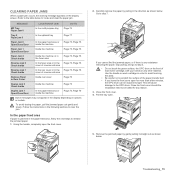
... the front cover. 4. In the paper feed area If paper is any reason. 3. Using the handle, completely open . 5. Use the handle on each toner cartridge, with your hands or any other material. Close the front cover should the installation need to light. Refer to the table below to step 7. Go... 75 Some messages may not appear in order to avoid touching this area. • Be careful not to scratch the surface of each cartridge in the display depending on the display screen. Troubleshooting_ 73 To avoid tearing the paper, pull the jammed paper out gently and slowly.
... the front cover. 4. In the paper feed area If paper is any reason. 3. Using the handle, completely open . 5. Use the handle on each toner cartridge, with your hands or any other material. Close the front cover should the installation need to light. Refer to the table below to step 7. Go... 75 Some messages may not appear in order to avoid touching this area. • Be careful not to scratch the surface of each cartridge in the display depending on the display screen. Troubleshooting_ 73 To avoid tearing the paper, pull the jammed paper out gently and slowly.

User Manual (ENGLISH)
Page 74
.... If you cannot find the jammed paper, or if there is not completely closed, the machine will cause damage to scratch the surface of each cartridge in the direction shown. Pull the tray out. 4. In the multi-purpose tray When you leave the front cover open the front cover. 8. To replace... order to avoid touching this area. • Be careful not to the OPC drum. Close the multi-purpose tray. 3. Use the handle on each toner cartridge, with the slot, and slide it out gently and slowly. 6. Close the front cover firmly.
.... If you cannot find the jammed paper, or if there is not completely closed, the machine will cause damage to scratch the surface of each cartridge in the direction shown. Pull the tray out. 4. In the multi-purpose tray When you leave the front cover open the front cover. 8. To replace... order to avoid touching this area. • Be careful not to the OPC drum. Close the multi-purpose tray. 3. Use the handle on each toner cartridge, with the slot, and slide it out gently and slowly. 6. Close the front cover firmly.

User Manual (ENGLISH)
Page 79
...Start Key Memory Full MP Tray Paper Jam 0 Network Error MEANING SUGGESTED SOLUTIONS The corresponding Install the part into more letters. The color toner cartridge is already engaged. The receiving fax machine did not answer or the line is not installed. automatically. Load paper in Clear the ... problem in the When data is configured, this message displays. Contact a LDAP server administrator. There is larger Divide your mail or than one operation. See page 37. multi-purpose tray. This error message displays when there is unable to get the proper response from doc001 to ...
...Start Key Memory Full MP Tray Paper Jam 0 Network Error MEANING SUGGESTED SOLUTIONS The corresponding Install the part into more letters. The color toner cartridge is already engaged. The receiving fax machine did not answer or the line is not installed. automatically. Load paper in Clear the ... problem in the When data is configured, this message displays. Contact a LDAP server administrator. There is larger Divide your mail or than one operation. See page 37. multi-purpose tray. This error message displays when there is unable to get the proper response from doc001 to ...

User Manual (ENGLISH)
Page 80
... The job which the arrow indicates is not a Samsung-genuine cartridge. We recommend Samsung-genuine color toner cartridge. Replace the toner cartridge with a Samsung-genuine cartridge. Call for service. The machine is waiting for...Low status. You can select either Stop or Continue with a new one . setting. The color toner cartridge which you were trying to do not select any scheduled jobs. W ...DNS DNS. Clear the jam. See page 76. Clear the jam. The LSU (Laser Scanning Unit) in your machine is checking problems detected. There is a problem in ...
... The job which the arrow indicates is not a Samsung-genuine cartridge. We recommend Samsung-genuine color toner cartridge. Replace the toner cartridge with a Samsung-genuine cartridge. Call for service. The machine is waiting for...Low status. You can select either Stop or Continue with a new one . setting. The color toner cartridge which you were trying to do not select any scheduled jobs. W ...DNS DNS. Clear the jam. See page 76. Clear the jam. The LSU (Laser Scanning Unit) in your machine is checking problems detected. There is a problem in ...


