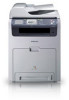

User Manual (ENGLISH)
Page 3
..., as detailed explanation on certain words or a phrase. Used to provide additional information or detailed specification of the toner cartridge. Start Used to provide more information) Features of your document needs - a. Following table offers the conventions of ... not touch the green underside of the machine function and feature. Some terms in this machine include: USB 2.0 FEATURES CLX-6200ND CLX-6200FX CLX-6210FX CLX-6240FX USB Memory Interface DADF (Duplex Automatic Document Feeder) ADF (Automatic Document Feeder) Hard Disk O Network Interface 802...
..., as detailed explanation on certain words or a phrase. Used to provide additional information or detailed specification of the toner cartridge. Start Used to provide more information) Features of your document needs - a. Following table offers the conventions of ... not touch the green underside of the machine function and feature. Some terms in this machine include: USB 2.0 FEATURES CLX-6200ND CLX-6200FX CLX-6210FX CLX-6240FX USB Memory Interface DADF (Duplex Automatic Document Feeder) ADF (Automatic Document Feeder) Hard Disk O Network Interface 802...

User Manual (ENGLISH)
Page 14
... information INTRODUCTION 19 Printer overview 19 19 19 Front view Rear view 20 Control panel overview 20 CLX-6200FX, CLX-6210FX, CLX-6240FX only 21 CLX-6200ND only 22 Understanding the Status LED 22 Acknowledging the status of the toner cartridge 23 Menu overview 24 Supplied software 24 Printer driver features 24 Printer driver 24 PostScript...
... information INTRODUCTION 19 Printer overview 19 19 19 Front view Rear view 20 Control panel overview 20 CLX-6200FX, CLX-6210FX, CLX-6240FX only 21 CLX-6200ND only 22 Understanding the Status LED 22 Acknowledging the status of the toner cartridge 23 Menu overview 24 Supplied software 24 Printer driver features 24 Printer driver 24 PostScript...

User Manual (ENGLISH)
Page 16
... 63 Clearing memory 63 Cleaning your machine 63 Cleaning the outside 63 Cleaning the inside 65 Cleaning the scan unit 65 Maintaining the cartridge 65 Toner cartridge storage 65 Expected cartridge life 65 Redistributing...
... 63 Clearing memory 63 Cleaning your machine 63 Cleaning the outside 63 Cleaning the inside 65 Cleaning the scan unit 65 Maintaining the cartridge 65 Toner cartridge storage 65 Expected cartridge life 65 Redistributing...
User Manual (ENGLISH)
Page 17
contents 67 Clearing the Toner Empty message 68 Replacing the paper transfer belt 69 Maintenance parts 69 Checking replaceables 69 Replacing the DADF (or ADF) rubber pad 70 Managing your ... 78 Understanding display messages 81 Solving other problems 81 Paper feeding 82 Printing problems 83 Printing quality problems 85 Copying problems 86 Scanning problems 86 Samsung Scan Manager problems 86 Fax problems 87 Common PostScript problems 87 Common Windows problems 88 Common Linux problems 90 Common Macintosh problems ORDERING SUPPLIES AND...
contents 67 Clearing the Toner Empty message 68 Replacing the paper transfer belt 69 Maintenance parts 69 Checking replaceables 69 Replacing the DADF (or ADF) rubber pad 70 Managing your ... 78 Understanding display messages 81 Solving other problems 81 Paper feeding 82 Printing problems 83 Printing quality problems 85 Copying problems 86 Scanning problems 86 Samsung Scan Manager problems 86 Fax problems 87 Common PostScript problems 87 Common Windows problems 88 Common Linux problems 90 Common Macintosh problems ORDERING SUPPLIES AND...
User Manual (ENGLISH)
Page 19
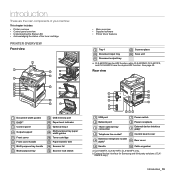
...CLX-6200FX, CLX-6210FX, CLX-6240FX only. b. Introduction_ 19 See page 49. Rear view 1 Document width guides 2 DADFa 3 Control panel 4 Output support 5 Front cover 6 Front cover handle 7 Multi-purpose tray handle 8 Multi-purpose tray 12 USB memory port 13 Paper level indicator 14 Optional tray 2 Multi-purpose tray paper 15 width guides 16 Toner... socket 5 (EXT)a 11 Rear cover 6 Handle 12 Cable organizer a. External device interface for Samsung and third party solutions. (CLX- 6240FX only). introduction These are the main components of your machine: This chapter includes: •...
...CLX-6200FX, CLX-6210FX, CLX-6240FX only. b. Introduction_ 19 See page 49. Rear view 1 Document width guides 2 DADFa 3 Control panel 4 Output support 5 Front cover 6 Front cover handle 7 Multi-purpose tray handle 8 Multi-purpose tray 12 USB memory port 13 Paper level indicator 14 Optional tray 2 Multi-purpose tray paper 15 width guides 16 Toner... socket 5 (EXT)a 11 Rear cover 6 Handle 12 Cable organizer a. External device interface for Samsung and third party solutions. (CLX- 6240FX only). introduction These are the main components of your machine: This chapter includes: •...
User Manual (ENGLISH)
Page 20
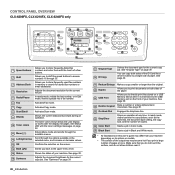
... fax numbers or email addresses. Shows the status of a few buttons. CONTROL PANEL OVERVIEW CLX-6200FX, CLX-6210FX, CLX-6240FX only 1 Speed buttons 2 Shift 3 Address Book 4 Resolution 5 Redial/Pause 6 Fax 7 Copy 8 Scan/Email 9 Display 10 Toner colors 11 Menu ( ) 12 Left/right arrow 13 OK 14 Back ( ) 15 ...ready mode, redials the last number, or in the selected menu, and increase or decrease values. The toner colors shown below the LCD display co-works with the toner cartridge messages on the screen. Scroll through the available menus. Confirms the selection on page 22. See page...
... fax numbers or email addresses. Shows the status of a few buttons. CONTROL PANEL OVERVIEW CLX-6200FX, CLX-6210FX, CLX-6240FX only 1 Speed buttons 2 Shift 3 Address Book 4 Resolution 5 Redial/Pause 6 Fax 7 Copy 8 Scan/Email 9 Display 10 Toner colors 11 Menu ( ) 12 Left/right arrow 13 OK 14 Back ( ) 15 ...ready mode, redials the last number, or in the selected menu, and increase or decrease values. The toner colors shown below the LCD display co-works with the toner cartridge messages on the screen. Scroll through the available menus. Confirms the selection on page 22. See page...

User Manual (ENGLISH)
Page 21
... shown below the LCD display co-works with the toner cartridge messages on the screen. See page 40. See page 40. See page 59. Starts a job in the selected menu, and increase or decrease values. ... port on the front of your machine depending on this user's guide may become hot if you to the upper menu level. CLX-6200ND only 1 Copy 2 Scan/Email 3 Display 4 Toner colors 5 Menu ( ) 6 Left/right arrow 7 OK 8 Back ( ) 9 Status 10 Darkness 11 Original Type 12 ID Copy 13 Reduce/Enlarge 14 Duplex 15...
... shown below the LCD display co-works with the toner cartridge messages on the screen. See page 40. See page 40. See page 59. Starts a job in the selected menu, and increase or decrease values. ... port on the front of your machine depending on this user's guide may become hot if you to the upper menu level. CLX-6200ND only 1 Copy 2 Scan/Email 3 Display 4 Toner colors 5 Menu ( ) 6 Left/right arrow 7 OK 8 Back ( ) 9 Status 10 Darkness 11 Original Type 12 ID Copy 13 Reduce/Enlarge 14 Duplex 15...

User Manual (ENGLISH)
Page 22
... the message to find out what the problem is and how to solve it switches to solve the problem. The estimated cartridge life of toner cartridges is indicated by the Status LED and the LCD display. See page 78 to browse the detailed information on the display to on and... page 67.) Always check the message on error messages. 22 _Introduction Check the display message, and solve the problem referring to be used. If the toner cartridge is waiting for the error to operate the machine properly. Green Blinking • • When the green LED slowly blinks, the machine is...
... the message to find out what the problem is and how to solve it switches to solve the problem. The estimated cartridge life of toner cartridges is indicated by the Status LED and the LCD display. See page 78 to browse the detailed information on the display to on and... page 67.) Always check the message on error messages. 22 _Introduction Check the display message, and solve the problem referring to be used. If the toner cartridge is waiting for the error to operate the machine properly. Green Blinking • • When the green LED slowly blinks, the machine is...
User Manual (ENGLISH)
Page 25
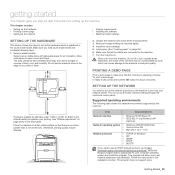
...Quick Install Guide. Getting started_ 25 Refer to the altitude setting to optimize your network printer. Otherwise, printing quality may be contaminated by toner, which is explained in the installation window. When you move the machine, do not tilt or turn it as your printing. This program... panel. Select a stable location. Do not set network parameters automatically. Printing is no incline greater than 2 mm (0.08 inch). Install the toner cartridge. 5. Load paper. (See "Loading paper" on . PRINTING A DEMO PAGE Print a demo page to open covers and trays.
...Quick Install Guide. Getting started_ 25 Refer to the altitude setting to optimize your network printer. Otherwise, printing quality may be contaminated by toner, which is explained in the installation window. When you move the machine, do not tilt or turn it as your printing. This program... panel. Select a stable location. Do not set network parameters automatically. Printing is no incline greater than 2 mm (0.08 inch). Install the toner cartridge. 5. Load paper. (See "Loading paper" on . PRINTING A DEMO PAGE Print a demo page to open covers and trays.

User Manual (ENGLISH)
Page 32
CLX-6200ND, CLX-6210FX, CLX-6240FX has the DADF function which can let you scan on the printout. Close the scanner lid. • Leaving the scanner lid open while copying may affect copy quality and toner consumption. • Dust on the scanner glass may cause black spots on both sides of paper" on the paper...
CLX-6200ND, CLX-6210FX, CLX-6240FX has the DADF function which can let you scan on the printout. Close the scanner lid. • Leaving the scanner lid open while copying may affect copy quality and toner consumption. • Dust on the scanner glass may cause black spots on both sides of paper" on the paper...
User Manual (ENGLISH)
Page 54
... placed on the scanner glass. Enter the time using Address Book Button. Receiving faxes in memory Since your machine stores incoming faxes in the installed toner cartridge. Press the left /right arrow to assign a name, skip this step. 11. The display asks you do not want and press OK. prompt.... The display reminds you that a delayed fax is no paper in the tray or no toner in its memory when there is set a time earlier than the current time, the fax will not be present. Access the Secure Receive menu ...
... placed on the scanner glass. Enter the time using Address Book Button. Receiving faxes in memory Since your machine stores incoming faxes in the installed toner cartridge. Press the left /right arrow to assign a name, skip this step. 11. The display asks you do not want and press OK. prompt.... The display reminds you that a delayed fax is no paper in the tray or no toner in its memory when there is set a time earlier than the current time, the fax will not be present. Access the Secure Receive menu ...
User Manual (ENGLISH)
Page 62
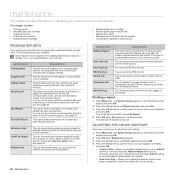
... Printing reports • Adjusting the color contrast • Clearing memory • Cleaning your machine • Maintaining the cartridge • Replacing the toner cartridge • Replacing the paper transfer belt • Maintenance parts • Managing your screen. 62 _Maintenance See page 56. This list shows users... to automatically print this list, access the Junk Fax Setup menu. Press OK when Yes appears to your machine and the toner cartridge. If so, it is automatically printed every 50 network scan jobs. This list shows the fax numbers specified as junk...
... Printing reports • Adjusting the color contrast • Clearing memory • Cleaning your machine • Maintaining the cartridge • Replacing the toner cartridge • Replacing the paper transfer belt • Maintenance parts • Managing your screen. 62 _Maintenance See page 56. This list shows users... to automatically print this list, access the Junk Fax Setup menu. Press OK when Yes appears to your machine and the toner cartridge. If so, it is automatically printed every 50 network scan jobs. This list shows the fax numbers specified as junk...
User Manual (ENGLISH)
Page 63
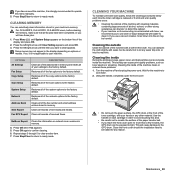
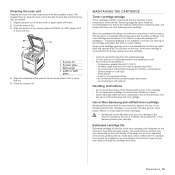
... depending on each time the toner cartridge is contaminated with toner, we recommend you to use a vacuum cleaner, toner blown into the machine. This will lose those jobs. 1. Close the front cover should the installation need to the OPC drum. For CLX-6200FX, CLX-6210FX, CLX-6240FX users, before clearing the...sessions in memory. Using the handle, completely open for the machine to cool down. 2. You can cause print quality problems, such as toner specks or smearing. Clears all records of alcohol, solvent, or other material. Press OK when Yes appears. 5. If you use cloth or...
... depending on each time the toner cartridge is contaminated with toner, we recommend you to use a vacuum cleaner, toner blown into the machine. This will lose those jobs. 1. Close the front cover should the installation need to the OPC drum. For CLX-6200FX, CLX-6210FX, CLX-6240FX users, before clearing the...sessions in memory. Using the handle, completely open for the machine to cool down. 2. You can cause print quality problems, such as toner specks or smearing. Clears all records of alcohol, solvent, or other material. Press OK when Yes appears. 5. If you use cloth or...

User Manual (ENGLISH)
Page 64
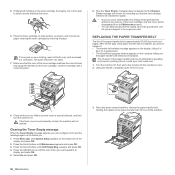
... transfer belt first. When you open the front cover, be high and could contaminate the paper transfer belt. 4. Holding the handle on the toner cartridge and pull to release the paper transfer belt. Grasp the handles on the paper transfer belt, lift it out of glass (LSU) inside...in the power cord and turn the machine on your skin. Press the green release handle to remove the cartridge from the toner cartridges area and their cavities. Hot water sets toner into the machine, and close the front cover. Plug in cold water. Reinstall all the compartments into fabric. 6. 3....
... transfer belt first. When you open the front cover, be high and could contaminate the paper transfer belt. 4. Holding the handle on the toner cartridge and pull to release the paper transfer belt. Grasp the handles on the paper transfer belt, lift it out of glass (LSU) inside...in the power cord and turn the machine on your skin. Press the green release handle to remove the cartridge from the toner cartridges area and their cavities. Hot water sets toner into the machine, and close the front cover. Plug in cold water. Reinstall all the compartments into fabric. 6. 3....
User Manual (ENGLISH)
Page 65
...the cartridge: • Inside the protective bag from your printer including generic, store brand, refilled, or remanufactured toner cartridges. • Samsung's printer warranty does not cover damage to ensure the optimum performance, highest quality, and longest life from the original...out number may need to unnecessary vibrations or shock. • Never manually rotate the drum, especially in your new Samsung toner cartridge. Maintenance_ 65 An environment where corrosive gases are sensitive to use dramatically shortens its original, unopened package until installation ...
...the cartridge: • Inside the protective bag from your printer including generic, store brand, refilled, or remanufactured toner cartridges. • Samsung's printer warranty does not cover damage to ensure the optimum performance, highest quality, and longest life from the original...out number may need to unnecessary vibrations or shock. • Never manually rotate the drum, especially in your new Samsung toner cartridge. Maintenance_ 65 An environment where corrosive gases are sensitive to use dramatically shortens its original, unopened package until installation ...

User Manual (ENGLISH)
Page 66
...belt. • If you open for any other material. Holding both handles on the toner cartridge, thoroughly rock it from the machine. • Do not touch the green surface, the OPC drum... or the front of the toner cartridge, with your skin. Close the front cover should the installation need to be halted for more...window appears on the computer telling you do could damage your hands or any reason. Use the handle on toner. 1. Using the handle, completely open the front cover and work you which color cartridge is low on...
...belt. • If you open for any other material. Holding both handles on the toner cartridge, thoroughly rock it from the machine. • Do not touch the green surface, the OPC drum... or the front of the toner cartridge, with your skin. Close the front cover should the installation need to be halted for more...window appears on the computer telling you do could damage your hands or any reason. Use the handle on toner. 1. Using the handle, completely open the front cover and work you which color cartridge is low on...

User Manual (ENGLISH)
Page 67
... a new toner cartridge out of its package. • Do not touch the green surface, the OPC drum or the front of each cartridge in memory. Maintenance_ 67 Turn the machine off, then wait a few minutes, the OPC drum can be replaced. • For the CLX-6200FX, CLX-6210FX, CLX-6240FX, incoming... faxes are saved in order to avoid touching this stage, the toner cartridge needs to be halted for the machine to light. When you open for more than a few...
... a new toner cartridge out of its package. • Do not touch the green surface, the OPC drum or the front of each cartridge in memory. Maintenance_ 67 Turn the machine off, then wait a few minutes, the OPC drum can be replaced. • For the CLX-6200FX, CLX-6210FX, CLX-6240FX, incoming... faxes are saved in order to avoid touching this stage, the toner cartridge needs to be halted for the machine to light. When you open for more than a few...
User Manual (ENGLISH)
Page 68
... window appears on . Make sure the cover is not completely closed, the machine will remain for reminding you that the color of the toner cartridge, and this setting will be replaced. Press the green release handle to replace it. • The transfer belt-related message appears ...on a flat surface, as shown, and remove the paper covering the toner cartridge by operating environment, printing interval, media type, and media size. 1. Press the left/right arrow until it from the Maintenance menu. &#...
... window appears on . Make sure the cover is not completely closed, the machine will remain for reminding you that the color of the toner cartridge, and this setting will be replaced. Press the green release handle to replace it. • The transfer belt-related message appears ...on a flat surface, as shown, and remove the paper covering the toner cartridge by operating environment, printing interval, media type, and media size. 1. Press the left/right arrow until it from the Maintenance menu. &#...
User Manual (ENGLISH)
Page 73
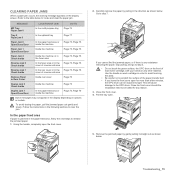
... messages may not appear in the paper feed area, follow the next steps to the table below . Go to light. Use the handle on each toner cartridge, with your hands or any reason. 3. Pull the tray open the front cover. 2. If you leave the front cover open for more than a few...
... messages may not appear in the paper feed area, follow the next steps to the table below . Go to light. Use the handle on each toner cartridge, with your hands or any reason. 3. Pull the tray open the front cover. 2. If you leave the front cover open for more than a few...

User Manual (ENGLISH)
Page 74
.... 3. The machine will not operate. 74 _Troubleshooting Close the front cover should the installation need to be exposed to step 8. 7. 6. Use the handle on each toner cartridge, with the slot, and slide it into the machine. 5.
.... 3. The machine will not operate. 74 _Troubleshooting Close the front cover should the installation need to be exposed to step 8. 7. 6. Use the handle on each toner cartridge, with the slot, and slide it into the machine. 5.


