User Manual Ver.1.0 (English)
Page 13
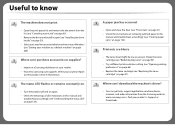
...(see "Understanding the status LED" on page 122). Where can I download the machine's driver? • You can I purchase accessories or supplies? • Inquire at a Samsung distributor or your product > Support or Downloads. A paper jam has occurred. • Open and close the door (see "Front view" ... The machine does not print. • Open the print queue list and remove the document from the Samsung website, www.samsung.com > find your retailer. • Visit www.samsung.com/supplies. Printouts are blurry. • The toner level might be low or uneven. Shake the toner cartridge ...
...(see "Understanding the status LED" on page 122). Where can I download the machine's driver? • You can I purchase accessories or supplies? • Inquire at a Samsung distributor or your product > Support or Downloads. A paper jam has occurred. • Open and close the door (see "Front view" ... The machine does not print. • Open the print queue list and remove the document from the Samsung website, www.samsung.com > find your retailer. • Visit www.samsung.com/supplies. Printouts are blurry. • The toner level might be low or uneven. Shake the toner cartridge ...

User Manual Ver.1.0 (English)
Page 17
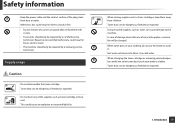
... reception device is the power cord. The machine could result in hazardous radiation exposure. Caution Before moving the machine, turn the power off the power supply, remove the power cord from lifting, do not lift the machine. If you have a medical condition that prevents you plug the power cord into the...
... reception device is the power cord. The machine could result in hazardous radiation exposure. Caution Before moving the machine, turn the power off the power supply, remove the power cord from lifting, do not lift the machine. If you have a medical condition that prevents you plug the power cord into the...
User Manual Ver.1.0 (English)
Page 18
... 2 meters (6 feet) with your machine for safe operation. Otherwise, you are working inside the machine replacing supplies or cleaning the inside of the machine. Keep cleaning supplies away from the wall outlet before cleaning the inside , do not spray water directly into the machine. do... Wire Gauge 7 Maintenance / Checking Caution Unplug this could result in electric shock or fire. Introduction 18 Safety information Use the power cord supplied with a 110V machine, then the gauge should be 16 AWG or larger. Do not overload wall outlets and extension cords. This can diminish...
... 2 meters (6 feet) with your machine for safe operation. Otherwise, you are working inside the machine replacing supplies or cleaning the inside of the machine. Keep cleaning supplies away from the wall outlet before cleaning the inside , do not spray water directly into the machine. do... Wire Gauge 7 Maintenance / Checking Caution Unplug this could result in electric shock or fire. Introduction 18 Safety information Use the power cord supplied with a 110V machine, then the gauge should be 16 AWG or larger. Do not overload wall outlets and extension cords. This can diminish...
User Manual Ver.1.0 (English)
Page 19
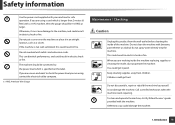
... Fuser units should only be dangerous if inhaled or ingested. When changing the toner cartridge or removing jammed paper, be repaired by a Samsung service technician. 8 Supply usage Caution Do not disassemble the toner cartridge. Toner dust can be repaired by a certified service technician. Hot water sets toner into ...dust or water. When toner gets on your body or clothes. Safety information Keep the power cable and the contact surface of the supplies such as toner cartridge or fuser unit. This could result in fire or electric shock. • The machine should only be ...
... Fuser units should only be dangerous if inhaled or ingested. When changing the toner cartridge or removing jammed paper, be repaired by a Samsung service technician. 8 Supply usage Caution Do not disassemble the toner cartridge. Toner dust can be repaired by a certified service technician. Hot water sets toner into ...dust or water. When toner gets on your body or clothes. Safety information Keep the power cable and the contact surface of the supplies such as toner cartridge or fuser unit. This could result in fire or electric shock. • The machine should only be ...
User Manual Ver.1.0 (English)
Page 29
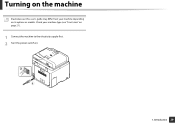
Introduction 29 Check your machine depending on . 2 1 1. Turning on the machine Illustrations on this user's guide may differ from your machine type (see "Front view" on page 21). 1 Connect the machine to the electricity supply first. 2 Turn the power switch on its options or models.
Introduction 29 Check your machine depending on . 2 1 1. Turning on the machine Illustrations on this user's guide may differ from your machine type (see "Front view" on page 21). 1 Connect the machine to the electricity supply first. 2 Turn the power switch on its options or models.
User Manual Ver.1.0 (English)
Page 30
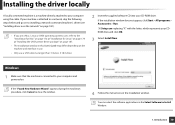
... to your computer and powered on the machine and interface in use. • Only use a USB cable no longer than 3 meters (118 inches). 2 Insert the supplied software CD into your CD-ROM drive. If the installation window does not appear, click Start > All programs > Accessories > Run. If the "Found New Hardware...
... to your computer and powered on the machine and interface in use. • Only use a USB cable no longer than 3 meters (118 inches). 2 Insert the supplied software CD into your CD-ROM drive. If the installation window does not appear, click Start > All programs > Accessories > Run. If the "Found New Hardware...
User Manual Ver.1.0 (English)
Page 37
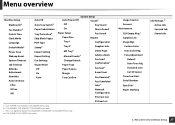
...Auto Tone Adj. Usage Counter Account Maintenance CLR Empty Msg.e Supplies Life Image Mgr. Menu Overview and Basic Setup 37 c. ID Sensor TonerLow Alert Serial Number Ram Diskc Paper Stacking Job Manage.bf Active Job Secured Job Stored Job 2. CLX-419xFN/ CLX-626xFD/ CLX-626xFR Series only. MP Trayb Manual Feederd Change Default Paper... Auto System Setup Auto Power Off Sounda Off Key Sound On Alarm Sound Paper Setup Fax Sound Paper Size Report Tray 1 Configuration Tray 2c Supplies Info. This is an optional feature.CLX-626xND/ CLX-626xFD/ CLX-626xFR Series only.
...Auto Tone Adj. Usage Counter Account Maintenance CLR Empty Msg.e Supplies Life Image Mgr. Menu Overview and Basic Setup 37 c. ID Sensor TonerLow Alert Serial Number Ram Diskc Paper Stacking Job Manage.bf Active Job Secured Job Stored Job 2. CLX-419xFN/ CLX-626xFD/ CLX-626xFR Series only. MP Trayb Manual Feederd Change Default Paper... Auto System Setup Auto Power Off Sounda Off Key Sound On Alarm Sound Paper Setup Fax Sound Paper Size Report Tray 1 Configuration Tray 2c Supplies Info. This is an optional feature.CLX-626xND/ CLX-626xFD/ CLX-626xFR Series only.

User Manual Ver.1.0 (English)
Page 44
... Tray2c MP Traya Manual Feederd Margin Tray Behaviour Auto Tray Switcha Auto Continue Paper Substitution Tray Protectiona Address Book PhoneBook Email Print Reset Reports Configuration Supplies Information Demo Page Help List Address Book Fax Send Confirmation Fax Sent Email Sent Fax Received Fax Schedule Jobs Network Configuration PCL Font List PS...
... Tray2c MP Traya Manual Feederd Margin Tray Behaviour Auto Tray Switcha Auto Continue Paper Substitution Tray Protectiona Address Book PhoneBook Email Print Reset Reports Configuration Supplies Information Demo Page Help List Address Book Fax Send Confirmation Fax Sent Email Sent Fax Received Fax Schedule Jobs Network Configuration PCL Font List PS...

User Manual Ver.1.0 (English)
Page 77
For more information ask your Internet service provider for CLX-419xN/CLX-626xND Series (see "Variety feature" on page 8). • For special faxing features, refer to the Advanced Guide (see "Fax features" on page 292). • Accessing ..." on page 33 or "Control panel overview" on page 24). 20 Preparing to fax Before you send or receive a fax, you need to connect the supplied line cord to make a connection. Refer to the Quick Installation Guide how to your fax needs (see "Adjusting the document settings" on the control panel...
For more information ask your Internet service provider for CLX-419xN/CLX-626xND Series (see "Variety feature" on page 8). • For special faxing features, refer to the Advanced Guide (see "Fax features" on page 292). • Accessing ..." on page 33 or "Control panel overview" on page 24). 20 Preparing to fax Before you send or receive a fax, you need to connect the supplied line cord to make a connection. Refer to the Quick Installation Guide how to your fax needs (see "Adjusting the document settings" on the control panel...

User Manual Ver.1.0 (English)
Page 87
... and maintenance parts available for your machine. • Ordering supplies and accessories 88 • Available consumables 89 • Available accessories 91 • Available maintenance parts 92 • Storing the toner cartridge 93 • ...Redistributing toner 95 • Replacing the toner cartridge 97 • Replacing the waste toner container 100 • Installing accessories 102 • Monitoring the supplies life 106 • Setting the toner low alert 107 • Cleaning the machine 108 • Tips for moving & storing your machine 114
... and maintenance parts available for your machine. • Ordering supplies and accessories 88 • Available consumables 89 • Available accessories 91 • Available maintenance parts 92 • Storing the toner cartridge 93 • ...Redistributing toner 95 • Replacing the toner cartridge 97 • Replacing the waste toner container 100 • Installing accessories 102 • Monitoring the supplies life 106 • Setting the toner low alert 107 • Cleaning the machine 108 • Tips for moving & storing your machine 114

User Manual Ver.1.0 (English)
Page 88
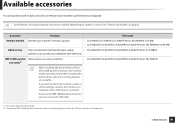
Contact your sales representatives to obtain the contact information for service. 3. To order Samsung-authorized supplies, accessories, and maintenance parts, contact your local Samsung dealer or the retailer where you purchased your country/region to obtain the list of available supplies, and maintenance parts. Maintenance 88 You can also visit www.samsung.com/supplies, and then select your machine. Ordering supplies and accessories Available accessories may differ from country to country.
Contact your sales representatives to obtain the contact information for service. 3. To order Samsung-authorized supplies, accessories, and maintenance parts, contact your local Samsung dealer or the retailer where you purchased your country/region to obtain the list of available supplies, and maintenance parts. Maintenance 88 You can also visit www.samsung.com/supplies, and then select your machine. Ordering supplies and accessories Available accessories may differ from country to country.

User Manual Ver.1.0 (English)
Page 89
.... 3. Declared yield value in accordance with ISO/IEC 19798. The number of supplies for your machine: Type Model Average yielda Part name Toner cartridge • CLX-419xN Series • Average continuous black cartridge yield: Apporx. 2,500 standard pages (Black) • CLX-419xFN Series • Average continuous color cartridge yield: Apporx. 1,800 standard pages...
.... 3. Declared yield value in accordance with ISO/IEC 19798. The number of supplies for your machine: Type Model Average yielda Part name Toner cartridge • CLX-419xN Series • Average continuous black cartridge yield: Apporx. 2,500 standard pages (Black) • CLX-419xFN Series • Average continuous color cartridge yield: Apporx. 1,800 standard pages...

User Manual Ver.1.0 (English)
Page 90
... as the machine you are using non-genuine Samsung toner cartridge such as refilled or remanufactured toner. Samsung cannot guarantee non-genuine Samsung toner cartridge's quality. Samsung does not recommend using . When purchasing new toner cartridges or other supplies according to different configurations of toner cartridges and other supplies, these must be covered under the machine...
... as the machine you are using non-genuine Samsung toner cartridge such as refilled or remanufactured toner. Samsung cannot guarantee non-genuine Samsung toner cartridge's quality. Samsung does not recommend using . When purchasing new toner cartridges or other supplies according to different configurations of toner cartridges and other supplies, these must be covered under the machine...
User Manual Ver.1.0 (English)
Page 91
...goods may not be found and after installing the printer driver, only basic printing features are experiencing frequent paper supply • CLX-626xND/CLX-626xFD/CLX-626xFR/CLX-626xFW Series: CLP-S680A problems, you can attach an additional 520a sheet tray. Available accessories You can purchase... and install accessories to enhance your machine's memory capacity. • CLX-419xN/CLX-419xFN/CLX-419xFW Series: ML-MEM370 (512 MB) • CLX-626xND/CLX-626xFD/CLX-626xFR/CLX-626xFW Series: ML-MEM380 (1,024 MB) Optional tray If you are available. • If...
...goods may not be found and after installing the printer driver, only basic printing features are experiencing frequent paper supply • CLX-626xND/CLX-626xFD/CLX-626xFR/CLX-626xFW Series: CLP-S680A problems, you can attach an additional 520a sheet tray. Available accessories You can purchase... and install accessories to enhance your machine's memory capacity. • CLX-419xN/CLX-419xFN/CLX-419xFW Series: ML-MEM370 (512 MB) • CLX-626xND/CLX-626xFD/CLX-626xFR/CLX-626xFW Series: ML-MEM380 (1,024 MB) Optional tray If you are available. • If...

User Manual Ver.1.0 (English)
Page 106
Maintenance 106 Or select Setup > Machine Setup > Next > Report > Supplies Information on the touch screen. 2 Select the option you experience frequent paper jams or printing problems, check the number of pages the machine has printed ...; It may be necessary to press OK to navigate to lower-level menus for some models. 1 Select (Menu) > System Setup > Maintenance > Supplies Life on options or models. Monitoring the supplies life If you want and press OK. 3 Press (Stop/Clear) button or home( ) icon to return to model (see "Accessing the menu...
Maintenance 106 Or select Setup > Machine Setup > Next > Report > Supplies Information on the touch screen. 2 Select the option you experience frequent paper jams or printing problems, check the number of pages the machine has printed ...; It may be necessary to press OK to navigate to lower-level menus for some models. 1 Select (Menu) > System Setup > Maintenance > Supplies Life on options or models. Monitoring the supplies life If you want and press OK. 3 Press (Stop/Clear) button or home( ) icon to return to model (see "Accessing the menu...
User Manual Ver.1.0 (English)
Page 172
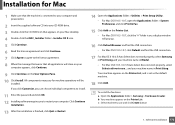
...machine. 18 Click Add. All components necessary for Mac 1 Make sure that the machine is connected to your computer and powered on. 2 Insert the supplied software CD into your CD-ROM drive. 3 Double-click the CD-ROM icon that appears on your Mac desktop. 4 Double-click the MAC_Installer folder >... applications will close on your machine name in Model. • For Mac OS X 10.5-10.7, if Auto Select does not work properly, select Samsung in Print Using. b Your machine appears on the Printer List c Select machine to restart your machine name in Print Using and your computer appears,...
...machine. 18 Click Add. All components necessary for Mac 1 Make sure that the machine is connected to your computer and powered on. 2 Insert the supplied software CD into your CD-ROM drive. 3 Double-click the CD-ROM icon that appears on your Mac desktop. 4 Double-click the MAC_Installer folder >... applications will close on your machine name in Model. • For Mac OS X 10.5-10.7, if Auto Select does not work properly, select Samsung in Print Using. b Your machine appears on the Printer List c Select machine to restart your machine name in Print Using and your computer appears,...
User Manual Ver.1.0 (English)
Page 173
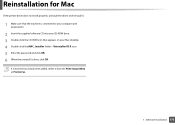
Reinstallation for Mac If the printer driver does not work properly, uninstall the driver and reinstall it from the Print Setup Utility or Print & Fax. 1. If a machine has already been added, delete it . 1 Make sure that the machine is connected to your computer and powered on. 2 Insert the supplied software CD into your CD-ROM drive. 3 Double-click the CD-ROM icon that appears on your Mac desktop. 4 Double-click the MAC_Installer folder > Uninstaller OS X icon. 5 Enter the password and click OK. 6 When the uninstall is done, click OK. Software Installation 173
Reinstallation for Mac If the printer driver does not work properly, uninstall the driver and reinstall it from the Print Setup Utility or Print & Fax. 1. If a machine has already been added, delete it . 1 Make sure that the machine is connected to your computer and powered on. 2 Insert the supplied software CD into your CD-ROM drive. 3 Double-click the CD-ROM icon that appears on your Mac desktop. 4 Double-click the MAC_Installer folder > Uninstaller OS X icon. 5 Enter the password and click OK. 6 When the uninstall is done, click OK. Software Installation 173
User Manual Ver.1.0 (English)
Page 177
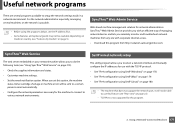
... server embedded on your network machine allows you to do the following tasks (see "Using SyncThru™ Web Service" on page 310). • Check the supplies information and status. • Customize machine settings. • Set the email notification option. For the network administrator especially, managing several programs available to setup the...
... server embedded on your network machine allows you to do the following tasks (see "Using SyncThru™ Web Service" on page 310). • Check the supplies information and status. • Customize machine settings. • Set the email notification option. For the network administrator especially, managing several programs available to setup the...
User Manual Ver.1.0 (English)
Page 178
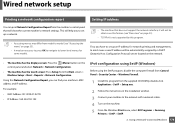
... will not be able to the network with a network cable. 4 Turn on the machine. 5 From the Windows Start menu, select All Programs > Samsung Printers > SetIP > SetIP. 2. Wired network setup 4 Printing a network configuration report 5 Setting IP address You can find your machine to use this feature...Menu) button on the control panel and select Network > Network Configuration. • The machine has the touch screen: Press Setup from the supplied CD-ROM by double-click Application > SetIP > Setup.exe. 2 Follow the instructions in the installation window. 3 Connect your machine's MAC ...
... will not be able to the network with a network cable. 4 Turn on the machine. 5 From the Windows Start menu, select All Programs > Samsung Printers > SetIP > SetIP. 2. Wired network setup 4 Printing a network configuration report 5 Setting IP address You can find your machine to use this feature...Menu) button on the control panel and select Network > Network Configuration. • The machine has the touch screen: Press Setup from the supplied CD-ROM by double-click Application > SetIP > Setup.exe. 2 Follow the instructions in the installation window. 3 Connect your machine's MAC ...
User Manual Ver.1.0 (English)
Page 181
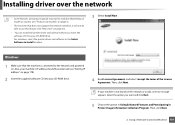
... that does not support the network interface, it will not be able to use this feature (see "Setting IP address" on page 178). 2 Insert the supplied software CD into your CD-ROM drive. 4 Read License Agreement, and select I accept the terms of the License Agreement. Select the option you insert the...
... that does not support the network interface, it will not be able to use this feature (see "Setting IP address" on page 178). 2 Insert the supplied software CD into your CD-ROM drive. 4 Read License Agreement, and select I accept the terms of the License Agreement. Select the option you insert the...

