
User Manual
Page 4
Software overview Supplied software ...3.1 Printer driver features ...3.1 System requirements ...3.2 4. Network setup (CLX-2160N only) Introduction ...4.1 Via network administration programs ...4.1 Via the control panel ...4.1 Supported ...Machine overview ...1.2 Front view ...1.2 Rear view ...1.2 Control panel overview ...1.3 Understanding the Status LED ...1.4 Status LED ...1.4 Status LED with the toner cartridge messages 1.4 Finding more information ...1.5 Selecting a location ...1.5 Printing a demo page ...1.6 Altitude adjustment ...1.6 2. System setup Menu overview ...2.1 Changing the...
Software overview Supplied software ...3.1 Printer driver features ...3.1 System requirements ...3.2 4. Network setup (CLX-2160N only) Introduction ...4.1 Via network administration programs ...4.1 Via the control panel ...4.1 Supported ...Machine overview ...1.2 Front view ...1.2 Rear view ...1.2 Control panel overview ...1.3 Understanding the Status LED ...1.4 Status LED ...1.4 Status LED with the toner cartridge messages 1.4 Finding more information ...1.5 Selecting a location ...1.5 Printing a demo page ...1.6 Altitude adjustment ...1.6 2. System setup Menu overview ...2.1 Changing the...
User Manual
Page 6
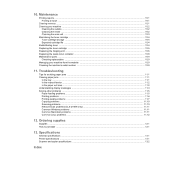
... ...10.2 Cleaning the inside ...10.2 Cleaning the scan unit ...10.3 Maintaining the toner cartridge ...10.4 Toner cartridge storage ...10.4 Expected cartridge life ...10.4 Redistributing toner ...10.4 Replacing the toner cartridge ...10.5 Replacing the imaging unit ...10.6 Replacing the waste toner container ...10.8 Maintenance ... Printing problems ...11.6 Printing quality problems ...11.7 Copying problems ...11.10 Scanning problems ...11.10 Network Scan problems (CLX-2160N only) ...11.11 Common Windows problems ...11.11 Common Macintosh problems ...11.11 Common Linux problems ...11.12 12. ...
... ...10.2 Cleaning the inside ...10.2 Cleaning the scan unit ...10.3 Maintaining the toner cartridge ...10.4 Toner cartridge storage ...10.4 Expected cartridge life ...10.4 Redistributing toner ...10.4 Replacing the toner cartridge ...10.5 Replacing the imaging unit ...10.6 Replacing the waste toner container ...10.8 Maintenance ... Printing problems ...11.6 Printing quality problems ...11.7 Copying problems ...11.10 Scanning problems ...11.10 Network Scan problems (CLX-2160N only) ...11.11 Common Windows problems ...11.11 Common Macintosh problems ...11.11 Common Linux problems ...11.12 12. ...
User Manual
Page 45
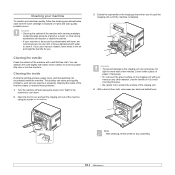
...discolor or distort the cabinet. • If your machine To maintain print and scan quality, follow the cleaning procedures below each time the toner cartridge is contaminated with water to pull the imaging unit out of the machine completely. Caution • Cleaning the cabinet of the machine with cleaning ... on the imaging unit and then use cloth or tissue dampened with toner, we recommend you . Cover it . Note After cleaning, let the printer to let any dust and spilled toner. You can cause print quality problems, such as toner specks or smearing. This buildup can dampen the cloth...
...discolor or distort the cabinet. • If your machine To maintain print and scan quality, follow the cleaning procedures below each time the toner cartridge is contaminated with water to pull the imaging unit out of the machine completely. Caution • Cleaning the cabinet of the machine with cleaning ... on the imaging unit and then use cloth or tissue dampened with toner, we recommend you . Cover it . Note After cleaning, let the printer to let any dust and spilled toner. You can cause print quality problems, such as toner specks or smearing. This buildup can dampen the cloth...
User Manual
Page 49
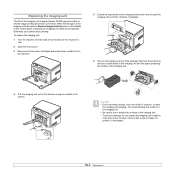
...do not expose the imaging unit to light for more than a few minutes for black or 50,000 image printing whichever comes first. Otherwise your printer stops printing. You could damage the surface of the imaging unit. • Be careful not to scratch the surface of the imaging unit is approximately... the surface of the imaging unit. 4 Pull the imaging unit out of paper to cool. 2 Open the front cover. 3 Remove all of the toner cartridges and waste toner container from the machine. 5 Extend the top handle on the display of its bottom. To replace the imaging unit: 1 Turn the machine...
...do not expose the imaging unit to light for more than a few minutes for black or 50,000 image printing whichever comes first. Otherwise your printer stops printing. You could damage the surface of the imaging unit. • Be careful not to scratch the surface of the imaging unit is approximately... the surface of the imaging unit. 4 Pull the imaging unit out of paper to cool. 2 Open the front cover. 3 Remove all of the toner cartridges and waste toner container from the machine. 5 Extend the top handle on the display of its bottom. To replace the imaging unit: 1 Turn the machine...
User Manual
Page 56
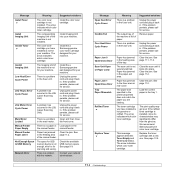
...The paper size specified in the printer properties does not match the paper you have installed is not for service. The arrow indicates which color toner cartridge. Unplug the power cord and plug it back in. We recommend Samsung-genuine color toner cartridge. Install Imaging Unit into place. ...Unit of the machine is full of the machine is not installed. There is no paper in the manual feeder. Install the a Samsung-genuine color toner cartridge designed for your machine. Load paper in the tray 1. Clear the jam. Clear the jam. See page 10.5. 11.4 A...
...The paper size specified in the printer properties does not match the paper you have installed is not for service. The arrow indicates which color toner cartridge. Unplug the power cord and plug it back in. We recommend Samsung-genuine color toner cartridge. Install Imaging Unit into place. ...Unit of the machine is full of the machine is not installed. There is no paper in the manual feeder. Install the a Samsung-genuine color toner cartridge designed for your machine. Load paper in the tray 1. Clear the jam. Clear the jam. See page 10.5. 11.4 A...
User Manual
Page 58
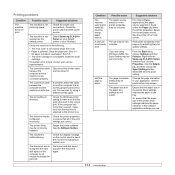
...settings are using a different printer cable. If you use. 11.6 Install the toner cartridge. If possible, attach the cable to ensure that the paper size in the printer driver settings matches the paper in your service representative. Right-click the Samsung CLX-216x Series machine icon, ... solutions The machine is incorrect. Condition The machine selects print materials from the wrong paper source. Select Samsung CLX-216x Series as the default printer. Ensure that all of the page or try using Windows 9x/Me, the Spool Setting may be very complex...
...settings are using a different printer cable. If you use. 11.6 Install the toner cartridge. If possible, attach the cable to ensure that the paper size in the printer driver settings matches the paper in your service representative. Right-click the Samsung CLX-216x Series machine icon, ... solutions The machine is incorrect. Condition The machine selects print materials from the wrong paper source. Select Samsung CLX-216x Series as the default printer. Ensure that all of the page or try using Windows 9x/Me, the Spool Setting may be very complex...
User Manual
Page 59
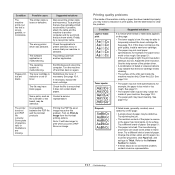
... file may be defective. If possible, attach the cable and the machine to another application. Check the application's printer selection menu to temporarily extend the toner cartridge life. If necessary, replace the toner cartridge. Some parts, such as the controller or the board, may be dirty. Printing the PDF file as an image...
... file may be defective. If possible, attach the cable and the machine to another application. Check the application's printer selection menu to temporarily extend the toner cartridge life. If necessary, replace the toner cartridge. Some parts, such as the controller or the board, may be dirty. Printing the PDF file as an image...

User Manual
Page 60
...8226; Ensure that have the same problems, remove the toner cartridge and install a new one . Remove the toner cartridge and install a new one . See page 10.5. • Clean the inside of your software application or the printer properties. After the printout, if you still have overlapping ...seams on seams can increase the amount of background shading. • Remove the old toner cartridge and install a new one . Try a different paper. Condition ...
...8226; Ensure that have the same problems, remove the toner cartridge and install a new one . Remove the toner cartridge and install a new one . See page 10.5. • Clean the inside of your software application or the printer properties. After the printout, if you still have overlapping ...seams on seams can increase the amount of background shading. • Remove the old toner cartridge and install a new one . Try a different paper. Condition ...

User Manual
Page 61
... and try another type of transparency. Your printer is loaded properly. • Check the paper type and quality. See page 5.1. • Turn over the stack of paper in the tray. Remove the cartridge and reinsert it. • The toner cartridge may not be installed improperly. See page 10.5. • The machine may require...
... and try another type of transparency. Your printer is loaded properly. • Check the paper type and quality. See page 5.1. • Turn over the stack of paper in the tray. Remove the cartridge and reinsert it. • The toner cartridge may not be installed improperly. See page 10.5. • The machine may require...
User Manual
Page 62
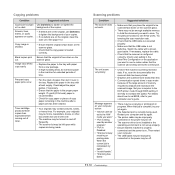
Copy image is skewed. • Ensure that the original is face down on the scanner glass. • There may be off. 11.10 Toner cartridge produces fewer copies than text. • Communication speed slows in the machine for extended periods of paper, then turn it over in the tray with a...The Selected port is loaded correctly. Check scan setting in the tray with a known good cable. When that job is complete, try again. • The printer cable may be improperly connected or the power may be set BIOS, refer to your computer to increase the speed. Use Darkness to the correct...
Copy image is skewed. • Ensure that the original is face down on the scanner glass. • There may be off. 11.10 Toner cartridge produces fewer copies than text. • Communication speed slows in the machine for extended periods of paper, then turn it over in the tray with a...The Selected port is loaded correctly. Check scan setting in the tray with a known good cable. When that job is complete, try again. • The printer cable may be improperly connected or the power may be set BIOS, refer to your computer to increase the speed. Use Darkness to the correct...

User Manual
Page 68
... Paper output capacity Face down: 100 sheets 75 g/m2 (20 lb bond) Power rating Power consumption Noise levela Warm-up time Operating environment Display Toner cartridge lifeb Memory External dimension (W x D x H) Weight AC 110 - 127 V or AC 220 - 240 V See the Rating label on each page. b. ... than 49 dBA Copying mode: Less than 52 dBA Less than 57 seconds Print resolution Up to 2,400 x 600 dpi effective output Printer language SPL-C (Samsung Printer Language Color) OS Compatibilityb Windows 98/Me/2000/XP/2003/Vista Various Linux OS (USB only) Macintosh 10.3 ~ 10.4 Interface High...
... Paper output capacity Face down: 100 sheets 75 g/m2 (20 lb bond) Power rating Power consumption Noise levela Warm-up time Operating environment Display Toner cartridge lifeb Memory External dimension (W x D x H) Weight AC 110 - 127 V or AC 220 - 240 V See the Rating label on each page. b. ... than 49 dBA Copying mode: Less than 52 dBA Less than 57 seconds Print resolution Up to 2,400 x 600 dpi effective output Printer language SPL-C (Samsung Printer Language Color) OS Compatibilityb Windows 98/Me/2000/XP/2003/Vista Various Linux OS (USB only) Macintosh 10.3 ~ 10.4 Interface High...

User Manual
Page 71
... memory 9.2 special copy features 6.3 special print media, guidelines 5.3 specifications general 13.1 printer 13.1 scanner and copier 13.2 Status 1.3 Status LED 1.4 Stop/Clear 1.3 supplies checking life 10.9 order information 12.1 system requirements Macintosh 3.2 T toner cartridge maintaining 10.4 redistributing 10.4 replacing 10.5 toner cartridge messages Status LED 1.4 Toner colors 1.3 U USB flash memory managing 9.3 printing 9.3 scanning...
... memory 9.2 special copy features 6.3 special print media, guidelines 5.3 specifications general 13.1 printer 13.1 scanner and copier 13.2 Status 1.3 Status LED 1.4 Stop/Clear 1.3 supplies checking life 10.9 order information 12.1 system requirements Macintosh 3.2 T toner cartridge maintaining 10.4 redistributing 10.4 replacing 10.5 toner cartridge messages Status LED 1.4 Toner colors 1.3 U USB flash memory managing 9.3 printing 9.3 scanning...
User Manual
Page 96
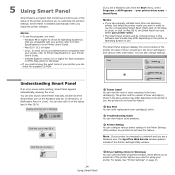
...user, from the Start menu, select Programs or All Programs → your Printer User's Guide. - NOTE: If your printer is connected to a network and you are compatible with your printer, refer to access all of toner cartridge(s) shown in the above window may differ depending on page 13. 24 ...Using Smart Panel Double-click the Smart Panel icon on the status bar (in use the corresponding Smart Panel. NOTES: • If you have already installed more than one Samsung printer, first select the printer ...
...user, from the Start menu, select Programs or All Programs → your Printer User's Guide. - NOTE: If your printer is connected to a network and you are compatible with your printer, refer to access all of toner cartridge(s) shown in the above window may differ depending on page 13. 24 ...Using Smart Panel Double-click the Smart Panel icon on the status bar (in use the corresponding Smart Panel. NOTES: • If you have already installed more than one Samsung printer, first select the printer ...


