Brochure
Page 3
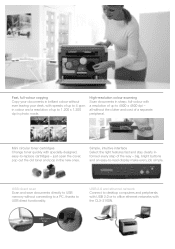
... resolution of up to USB direct functionality. all without connecting to a PC, thanks to 1,200 x 1,200 dpi in the new ones. Mini circular toner cartridges Change toner quickly with specially-designed, easy-to 4800 x 4800 dpi - just open the cover, pop out the old toner and pop in photo mode.... big, bright buttons and an easy-to office ethernet networks with the CLX-2160N. USB 2.0 and ethernet network Connect to desktop computers and peripherals with USB 2.0 or to -read display make every job simple. Fast, full...
... resolution of up to USB direct functionality. all without connecting to a PC, thanks to 1,200 x 1,200 dpi in the new ones. Mini circular toner cartridges Change toner quickly with specially-designed, easy-to 4800 x 4800 dpi - just open the cover, pop out the old toner and pop in photo mode.... big, bright buttons and an easy-to office ethernet networks with the CLX-2160N. USB 2.0 and ethernet network Connect to desktop computers and peripherals with USB 2.0 or to -read display make every job simple. Fast, full...

User Manual
Page 4
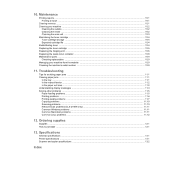
...Changing the display language ...2.2 Using the power save mode ...2.2 Auto continue ...2.2 3. CONTENTS 1. Network setup (CLX-2160N only) Introduction ...4.1 Via network administration programs ...4.1 Via the control panel ...4.1 Supported operating systems ...4.1 Configuring... view ...1.2 Control panel overview ...1.3 Understanding the Status LED ...1.4 Status LED ...1.4 Status LED with the toner cartridge messages 1.4 Finding more information ...1.5 Selecting a location ...1.5 Printing a demo page ...1.6 Altitude adjustment ...1.6 2. Software overview Supplied software ...3.1 Printer driver ...
...Changing the display language ...2.2 Using the power save mode ...2.2 Auto continue ...2.2 3. CONTENTS 1. Network setup (CLX-2160N only) Introduction ...4.1 Via network administration programs ...4.1 Via the control panel ...4.1 Supported operating systems ...4.1 Configuring... view ...1.2 Control panel overview ...1.3 Understanding the Status LED ...1.4 Status LED ...1.4 Status LED with the toner cartridge messages 1.4 Finding more information ...1.5 Selecting a location ...1.5 Printing a demo page ...1.6 Altitude adjustment ...1.6 2. Software overview Supplied software ...3.1 Printer driver ...
User Manual
Page 6
...11.5 Printing problems ...11.6 Printing quality problems ...11.7 Copying problems ...11.10 Scanning problems ...11.10 Network Scan problems (CLX-2160N only) ...11.11 Common Windows problems ...11.11 Common Macintosh problems ...11.11 Common Linux problems ...11.12 12. ... ...10.2 Cleaning the inside ...10.2 Cleaning the scan unit ...10.3 Maintaining the toner cartridge ...10.4 Toner cartridge storage ...10.4 Expected cartridge life ...10.4 Redistributing toner ...10.4 Replacing the toner cartridge ...10.5 Replacing the imaging unit ...10.6 Replacing the waste toner container ...10.8 Maintenance ...
...11.5 Printing problems ...11.6 Printing quality problems ...11.7 Copying problems ...11.10 Scanning problems ...11.10 Network Scan problems (CLX-2160N only) ...11.11 Common Windows problems ...11.11 Common Macintosh problems ...11.11 Common Linux problems ...11.12 12. ... ...10.2 Cleaning the inside ...10.2 Cleaning the scan unit ...10.3 Maintaining the toner cartridge ...10.4 Toner cartridge storage ...10.4 Expected cartridge life ...10.4 Redistributing toner ...10.4 Replacing the toner cartridge ...10.5 Replacing the imaging unit ...10.6 Replacing the waste toner container ...10.8 Maintenance ...
User Manual
Page 12
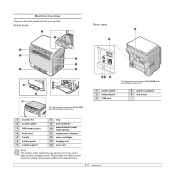
... are the main components of your machine: Front view Rear view * The figure above shows an CLX-2160N with all available accessories. * The figure above shows an CLX-2160N with all available accessories. 1 power switch 2 network port 3 USB port 4 power receptacle ...5 rear cover 1 scanner lid 2 scanner glass 3 USB memory port 4 front cover 5 handle 6 control panel 7 output support 8 tray 9 manual feeder 10 manual feeder paper width guides 11 waste toner container 12 toner cartridges...
... are the main components of your machine: Front view Rear view * The figure above shows an CLX-2160N with all available accessories. * The figure above shows an CLX-2160N with all available accessories. 1 power switch 2 network port 3 USB port 4 power receptacle ...5 rear cover 1 scanner lid 2 scanner glass 3 USB memory port 4 front cover 5 handle 6 control panel 7 output support 8 tray 9 manual feeder 10 manual feeder paper width guides 11 waste toner container 12 toner cartridges...
User Manual
Page 13
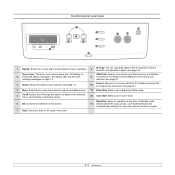
... Copy: You can be scanned to the upper menu level. 1.3 Toner colors: The toner colors shown below the LCD display co2 works with the toner cartridge messages on the screen. Stop/Clear: Stops an operation at any time.
... Copy: You can be scanned to the upper menu level. 1.3 Toner colors: The toner colors shown below the LCD display co2 works with the toner cartridge messages on the screen. Stop/Clear: Stops an operation at any time.
User Manual
Page 14
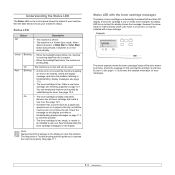
... by arrows. See page 11.3 to browse the detailed information on the display to operate the machine properly. See Understanding the toner cartridge messages on the display Note Always check the message on error messages. 1.4 Understanding the Status LED The Status LED on the control ...panel shows the status of your machine's status. You can not continue the job. Remove the old toner cartridge and install a new one . Check the display message, and solve the problem referring to Understanding display messages, see Ordering supplies on -line ...
... by arrows. See page 11.3 to browse the detailed information on the display to operate the machine properly. See Understanding the toner cartridge messages on the display Note Always check the message on error messages. 1.4 Understanding the Status LED The Status LED on the control ...panel shows the status of your machine's status. You can not continue the job. Remove the old toner cartridge and install a new one . Check the display message, and solve the problem referring to Understanding display messages, see Ordering supplies on -line ...
User Manual
Page 44
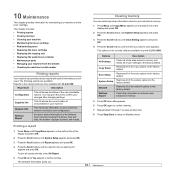
...copy options to the factory default. Supplies Info This list shows the current status of consumables in the colored cells are only available with CLX-2160N. This list shows information on the bottom line of the display and press OK. 2 Press the Scroll buttons until System Setup ...to return to confirm printing. To print all of the scan options to the factory default. Restores all of your machine and the toner cartridge. 10 Maintenance This chapter provides information for the Network Scan records including IP address, time and date, the number of pages scanned, and ...
...copy options to the factory default. Supplies Info This list shows the current status of consumables in the colored cells are only available with CLX-2160N. This list shows information on the bottom line of the display and press OK. 2 Press the Scroll buttons until System Setup ...to return to confirm printing. To print all of the scan options to the factory default. Restores all of your machine and the toner cartridge. 10 Maintenance This chapter provides information for the Network Scan records including IP address, time and date, the number of pages scanned, and ...
User Manual
Page 45
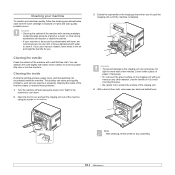
... the imaging unit out of the machine with your machine To maintain print and scan quality, follow the cleaning procedures below each time the toner cartridge is replaced or if print and scan quality problems occur. You can discolor or distort the cabinet. • If your machine or its bottom. 3 Extend...
... the imaging unit out of the machine with your machine To maintain print and scan quality, follow the cleaning procedures below each time the toner cartridge is replaced or if print and scan quality problems occur. You can discolor or distort the cabinet. • If your machine or its bottom. 3 Extend...

User Manual
Page 47
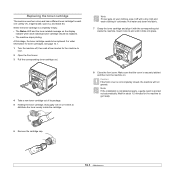
... light printing will still occur even after you have redistributed the toner. 1 Open the front cover. 2 Pull the corresponding toner cartridge out. 3 Holding the toner cartridge, thoroughly roll it 5 or 6 times to distribute the toner evenly inside the machine. Insert it back into its slot until ready...8226; White streaks or light printing occurs. • The toner related message telling that print jobs require. If this happens, you which color cartridge is low. • SmartPanel program window appears on toner. • The Status LED blinks red. Make sure that the cover is near ...
... light printing will still occur even after you have redistributed the toner. 1 Open the front cover. 2 Pull the corresponding toner cartridge out. 3 Holding the toner cartridge, thoroughly roll it 5 or 6 times to distribute the toner evenly inside the machine. Insert it back into its slot until ready...8226; White streaks or light printing occurs. • The toner related message telling that print jobs require. If this happens, you which color cartridge is low. • SmartPanel program window appears on toner. • The Status LED blinks red. Make sure that the cover is near ...
User Manual
Page 48
...toner gets on your clothing, wipe it clicks into its package. 5 Holding the toner cartridge, thoroughly roll it with a dry cloth and wash clothing in cold water. When the toner cartridge is securely latched and then turn the machine on the display indicate when each one: ... front cover is printed out automatically. Wait for about 1.5 minutes for each individual toner cartridge should be replaced. Replacing the toner cartridge The machine uses four colors and has a different toner cartridge for the machine to be replaced. • The machine stops printing. At this stage...
...toner gets on your clothing, wipe it clicks into its package. 5 Holding the toner cartridge, thoroughly roll it with a dry cloth and wash clothing in cold water. When the toner cartridge is securely latched and then turn the machine on the display indicate when each one: ... front cover is printed out automatically. Wait for about 1.5 minutes for each individual toner cartridge should be replaced. Replacing the toner cartridge The machine uses four colors and has a different toner cartridge for the machine to be replaced. • The machine stops printing. At this stage...
User Manual
Page 49
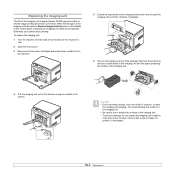
... unit is approximately 20,000 pages for black or 50,000 image printing whichever comes first. Replacing the imaging unit The life of the toner cartridges and waste toner container from the machine. 5 Extend the top handle on its package.
... unit is approximately 20,000 pages for black or 50,000 image printing whichever comes first. Replacing the imaging unit The life of the toner cartridges and waste toner container from the machine. 5 Extend the top handle on its package.

User Manual
Page 50
...unit. When you force too much to get ready. Note • After rebooting, your machine will not operate. 11 Turn the machine on the toner cartridge entrances of the imaging unit. Caution If there is not properly installed. Wait for about 1.5 minutes for the imaging unit. • If the installation is... out automatically. 7 Holding the handles on the new imaging unit, push the imaging unit until it sounds 'click' into the machine. 9 Insert the toner cartridges and waste toner container into their corresponding slots until they click into place. 8 Remove four dummy caps which are on .
...unit. When you force too much to get ready. Note • After rebooting, your machine will not operate. 11 Turn the machine on the toner cartridge entrances of the imaging unit. Caution If there is not properly installed. Wait for about 1.5 minutes for the imaging unit. • If the installation is... out automatically. 7 Holding the handles on the new imaging unit, push the imaging unit until it sounds 'click' into the machine. 9 Insert the toner cartridges and waste toner container into their corresponding slots until they click into place. 8 Remove four dummy caps which are on .
User Manual
Page 55
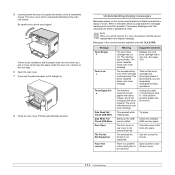
.... 11.3 Printing automatically resumes. Use the correct file format. Message Toner Empty Toner Low TonerSupply Err. The corresponding color toner cartridge is not securely latched. There is completely closed . Be careful not to tell the service representative the display message. Understanding display...File Format Not Supported Fuser Fan Locked Meaning The color toner cartridge has run out. Time expired while reading data. If there is not supported. Messages and their meanings are available only with CLX-2160N. The machine stops printing. The inner cover will be...
.... 11.3 Printing automatically resumes. Use the correct file format. Message Toner Empty Toner Low TonerSupply Err. The corresponding color toner cartridge is not securely latched. There is completely closed . Be careful not to tell the service representative the display message. Understanding display...File Format Not Supported Fuser Fan Locked Meaning The color toner cartridge has run out. Time expired while reading data. If there is not supported. Messages and their meanings are available only with CLX-2160N. The machine stops printing. The inner cover will be...
User Manual
Page 56
... call for your machine. The arrow indicates which color toner cartridge. Unplug the power cord and plug it back in the manual feeder. See page 11.2. We recommend Samsung-genuine color toner cartridge. Message Install Toner Install Imaging Unit Invalid Toner Invalid Imaging ...Not Enough Space In USB Memory Network Error Meaning The color toner cartridge is not genuine or refilled. The color toner cartridge you have installed is full of the tray. Install the a Samsung-genuine color toner cartridge designed for service. See page 9.4. The paper size specified in ...
... call for your machine. The arrow indicates which color toner cartridge. Unplug the power cord and plug it back in the manual feeder. See page 11.2. We recommend Samsung-genuine color toner cartridge. Message Install Toner Install Imaging Unit Invalid Toner Invalid Imaging ...Not Enough Space In USB Memory Network Error Meaning The color toner cartridge is not genuine or refilled. The color toner cartridge you have installed is full of the tray. Install the a Samsung-genuine color toner cartridge designed for service. See page 9.4. The paper size specified in ...
User Manual
Page 58
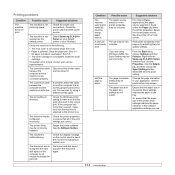
... is not installed. The page orientation setting may be very complex. Clear the paper jam. See 5.5. • The toner cartridge is found under the Paper tab within the printer properties. The port setting is malfunctioning. The machine may be incorrect. The .... Possible cause Suggested solutions The machine is defective. Right-click the Samsung CLX-216x Series machine icon, choose Properties, click the Details tab, and then choose the Spool Settings button. Select Samsung CLX-216x Series as the default printer. Repair the printer software. The ...
... is not installed. The page orientation setting may be very complex. Clear the paper jam. See 5.5. • The toner cartridge is found under the Paper tab within the printer properties. The port setting is malfunctioning. The machine may be incorrect. The .... Possible cause Suggested solutions The machine is defective. Right-click the Samsung CLX-216x Series machine icon, choose Properties, click the Details tab, and then choose the Spool Settings button. Select Samsung CLX-216x Series as the default printer. Repair the printer software. The ...
User Manual
Page 59
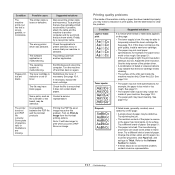
... manufacturing processes can cause some areas to ensure that your machine. The software application is too moist or too rough. The toner cartridge is dirty or paper has been loaded improperly, you know works. Check the application's printer selection menu to Thick. Try printing ...the table below to another application. See page 10.4. The printer cable is malfunctioning. Finally, try again. If necessary, replace the toner cartridge. Printing quality problems If the inside of paper. • Change the printer option and try a new printer cable. The wrong printer driver...
... manufacturing processes can cause some areas to ensure that your machine. The software application is too moist or too rough. The toner cartridge is dirty or paper has been loaded improperly, you know works. Check the application's printer selection menu to Thick. Try printing ...the table below to another application. See page 10.4. The printer cable is malfunctioning. Finally, try again. If necessary, replace the toner cartridge. Printing quality problems If the inside of paper. • Change the printer option and try a new printer cable. The wrong printer driver...

User Manual
Page 60
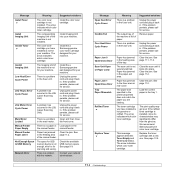
... page 10.5. • Clean the inside of the page at even intervals: A aBbCc A aBbCc A aBbCc A aBbCc A aBbCc • The toner cartridge may be damaged. If the defects occur on the page: • The surface of your software application or the printer properties. Page skew AAAAaAaaaBaBBBbBbbbCbCCCCccccc •...representative. • The paper path may be damaged. If white vertical streaks appear on the back of paper. Remove the toner cartridge and install a new one . Contact a service representative. See page 10.5. Clean the inside of the LSU part inside the toner...
... page 10.5. • Clean the inside of the page at even intervals: A aBbCc A aBbCc A aBbCc A aBbCc A aBbCc • The toner cartridge may be damaged. If the defects occur on the page: • The surface of your software application or the printer properties. Page skew AAAAaAaaaBaBBBbBbbbCbCCCCccccc •...representative. • The paper path may be damaged. If white vertical streaks appear on the back of paper. Remove the toner cartridge and install a new one . Contact a service representative. See page 10.5. Clean the inside of the LSU part inside the toner...

User Manual
Page 61
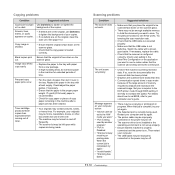
...surface of transparencies, some character voids are dirty Check for details. If horizontally aligned black streaks or smears appear: • The toner cartridge may require repair. If the printed paper is curled or paper does not feed into the machine: • Turn over the stack of...loaded properly. • Check the paper type and quality. Also try rotating the paper 180° in the tray. See page 5.1. Remove the toner cartridge and install a new one. See page 10.2. • Check the paper type and quality. Contact a service representative. See page 10.5. • ...
...surface of transparencies, some character voids are dirty Check for details. If horizontally aligned black streaks or smears appear: • The toner cartridge may require repair. If the printed paper is curled or paper does not feed into the machine: • Turn over the stack of...loaded properly. • Check the paper type and quality. Also try rotating the paper 180° in the tray. See page 5.1. Remove the toner cartridge and install a new one. See page 10.2. • Check the paper type and quality. Contact a service representative. See page 10.5. • ...
User Manual
Page 62
... the scan unit. Switch the cable with a fresh supply. Copy image is skewed. • Ensure that the original is busy receiving or printing data. Toner cartridge produces fewer copies than text. • Communication speed slows in scan mode because of the large amount of copy paper remaining in the machine for...
... the scan unit. Switch the cable with a fresh supply. Copy image is skewed. • Ensure that the original is busy receiving or printing data. Toner cartridge produces fewer copies than text. • Communication speed slows in scan mode because of the large amount of copy paper remaining in the machine for...

User Manual
Page 67
...; How to purchase To order Samsung-authorized supplies, contact your local Samsung dealer or the retailer where you purchased your machine, or visit www.samsungprinter.com and select your country/region for information on calling for your machine: Type Black toner cartridge Cyan toner cartridge Magenta toner cartridge Yellow toner cartridge Imaging unit Waste toner container...
...; How to purchase To order Samsung-authorized supplies, contact your local Samsung dealer or the retailer where you purchased your machine, or visit www.samsungprinter.com and select your country/region for information on calling for your machine: Type Black toner cartridge Cyan toner cartridge Magenta toner cartridge Yellow toner cartridge Imaging unit Waste toner container...


