Brochure
Page 3
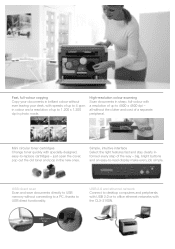
...a separate peripheral. USB Direct Scan all without the clutter and cost of the way - big, bright buttons and an easy-to -replace cartridges - USB direct scan Scan and save documents directly to USB memory without connecting to a PC, thanks to office ethernet networks with the... CLX-2160N. USB 2.0 and ethernet network Connect to desktop computers and peripherals with USB 2.0 or to USB direct functionality. High-resolution colour scanning...
...a separate peripheral. USB Direct Scan all without the clutter and cost of the way - big, bright buttons and an easy-to -replace cartridges - USB direct scan Scan and save documents directly to USB memory without connecting to a PC, thanks to office ethernet networks with the... CLX-2160N. USB 2.0 and ethernet network Connect to desktop computers and peripherals with USB 2.0 or to USB direct functionality. High-resolution colour scanning...

User Manual
Page 4
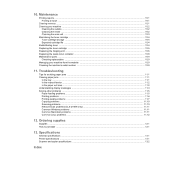
Network setup (CLX-2160N only) Introduction ...4.1 Via network administration programs ...4.1 Via the control panel ...4.1 Supported operating systems ...4.1 Configuring TCP... Special features ...1.1 Machine overview ...1.2 Front view ...1.2 Rear view ...1.2 Control panel overview ...1.3 Understanding the Status LED ...1.4 Status LED ...1.4 Status LED with the toner cartridge messages 1.4 Finding more information ...1.5 Selecting a location ...1.5 Printing a demo page ...1.6 Altitude adjustment ...1.6 2. Software overview Supplied software ...3.1 Printer driver features ...3.1 System ...
Network setup (CLX-2160N only) Introduction ...4.1 Via network administration programs ...4.1 Via the control panel ...4.1 Supported operating systems ...4.1 Configuring TCP... Special features ...1.1 Machine overview ...1.2 Front view ...1.2 Rear view ...1.2 Control panel overview ...1.3 Understanding the Status LED ...1.4 Status LED ...1.4 Status LED with the toner cartridge messages 1.4 Finding more information ...1.5 Selecting a location ...1.5 Printing a demo page ...1.6 Altitude adjustment ...1.6 2. Software overview Supplied software ...3.1 Printer driver features ...3.1 System ...
User Manual
Page 6
...11.5 Printing problems ...11.6 Printing quality problems ...11.7 Copying problems ...11.10 Scanning problems ...11.10 Network Scan problems (CLX-2160N only) ...11.11 Common Windows problems ...11.11 Common Macintosh problems ...11.11 Common Linux problems ...11.12 12.......10.2 Cleaning the inside ...10.2 Cleaning the scan unit ...10.3 Maintaining the toner cartridge ...10.4 Toner cartridge storage ...10.4 Expected cartridge life ...10.4 Redistributing toner ...10.4 Replacing the toner cartridge ...10.5 Replacing the imaging unit ...10.6 Replacing the waste toner container ...10.8 Maintenance ...
...11.5 Printing problems ...11.6 Printing quality problems ...11.7 Copying problems ...11.10 Scanning problems ...11.10 Network Scan problems (CLX-2160N only) ...11.11 Common Windows problems ...11.11 Common Macintosh problems ...11.11 Common Linux problems ...11.12 12.......10.2 Cleaning the inside ...10.2 Cleaning the scan unit ...10.3 Maintaining the toner cartridge ...10.4 Toner cartridge storage ...10.4 Expected cartridge life ...10.4 Redistributing toner ...10.4 Replacing the toner cartridge ...10.5 Replacing the imaging unit ...10.6 Replacing the waste toner container ...10.8 Maintenance ...
User Manual
Page 12
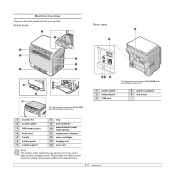
... are the main components of your machine: Front view Rear view * The figure above shows an CLX-2160N with all available accessories. * The figure above shows an CLX-2160N with all available accessories. 1 power switch 2 network port 3 USB port 4 power receptacle ...5 rear cover 1 scanner lid 2 scanner glass 3 USB memory port 4 front cover 5 handle 6 control panel 7 output support 8 tray 9 manual feeder 10 manual feeder paper width guides 11 waste toner container 12 toner cartridges...
... are the main components of your machine: Front view Rear view * The figure above shows an CLX-2160N with all available accessories. * The figure above shows an CLX-2160N with all available accessories. 1 power switch 2 network port 3 USB port 4 power receptacle ...5 rear cover 1 scanner lid 2 scanner glass 3 USB memory port 4 front cover 5 handle 6 control panel 7 output support 8 tray 9 manual feeder 10 manual feeder paper width guides 11 waste toner container 12 toner cartridges...
User Manual
Page 13
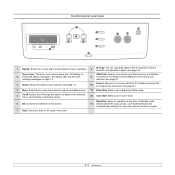
... you back to a single side of your machine. See page 6.3. Toner colors: The toner colors shown below the LCD display co2 works with the toner cartridge messages on the screen. See page 8.1. 4 Menu: Enters Menu mode and scrolls through the available menus. 11 Black Start: Starts a job in Black and White...
... you back to a single side of your machine. See page 6.3. Toner colors: The toner colors shown below the LCD display co2 works with the toner cartridge messages on the screen. See page 8.1. 4 Menu: Enters Menu mode and scrolls through the available menus. 11 Black Start: Starts a job in Black and White...
User Manual
Page 14
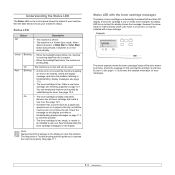
... blinks, the machine is received, or Black Start or Color Start button was pressed, it . Example The above example shows the toner cartridges' status of your machine's status. Check the message to Understanding display messages on page 12.1. When data is printing data. See page 11....1 Status LED with a new cartridge. If the toner cartridge is waiting an error to browse the detailed information on the control panel shows the status of the color shown by redistributing the...
... blinks, the machine is received, or Black Start or Color Start button was pressed, it . Example The above example shows the toner cartridges' status of your machine's status. Check the message to Understanding display messages on page 12.1. When data is printing data. See page 11....1 Status LED with a new cartridge. If the toner cartridge is waiting an error to browse the detailed information on the control panel shows the status of the color shown by redistributing the...
User Manual
Page 44
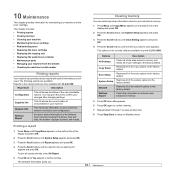
... with CLX-2160N. Restores all of the network options to the factory default. You may print this list to Standby mode. NetScan Report his report shows information for maintaining your machine. The options in your machine and the toner cartridge. Restores...This chapter includes: • Printing reports • Clearing memory • Cleaning your machine • Maintaining the toner cartridge • Redistributing toner • Replacing the toner cartridge • Replacing the imaging unit • Replacing the waste toner container • Maintenance parts • Managing your...
... with CLX-2160N. Restores all of the network options to the factory default. You may print this list to Standby mode. NetScan Report his report shows information for maintaining your machine. The options in your machine and the toner cartridge. Restores...This chapter includes: • Printing reports • Clearing memory • Cleaning your machine • Maintaining the toner cartridge • Redistributing toner • Replacing the toner cartridge • Replacing the imaging unit • Replacing the waste toner container • Maintenance parts • Managing your...
User Manual
Page 45
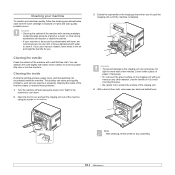
... and then use cloth or tissue dampened with your machine To maintain print and scan quality, follow the cleaning procedures below each time the toner cartridge is contaminated with toner, we recommend you . Wait for you to pull the imaging unit out of alcohol, solvent, or other material. Cleaning your hands...
... and then use cloth or tissue dampened with your machine To maintain print and scan quality, follow the cleaning procedures below each time the toner cartridge is contaminated with toner, we recommend you . Wait for you to pull the imaging unit out of alcohol, solvent, or other material. Cleaning your hands...

User Manual
Page 47
...on toner. • The Status LED blinks red. The machine warranty does not cover damage caused by redistributing the remaining toner in the cartridge. The actual number may need to distribute the toner evenly inside the machine. Make sure that the cover is low on the print density... of pages may be affected by operating environment, printing interval, media type, and media size. Redistributing toner When the toner cartridge is near the end of its life: • White streaks or light printing occurs. • The toner related message telling that print jobs ...
...on toner. • The Status LED blinks red. The machine warranty does not cover damage caused by redistributing the remaining toner in the cartridge. The actual number may need to distribute the toner evenly inside the machine. Make sure that the cover is low on the print density... of pages may be affected by operating environment, printing interval, media type, and media size. Redistributing toner When the toner cartridge is near the end of its life: • White streaks or light printing occurs. • The toner related message telling that print jobs ...
User Manual
Page 48
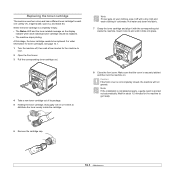
...machine on your clothing, wipe it with a dry cloth and wash clothing in cold water. Hot water sets toner into fabric. 7 Grasp the toner cartridge and align it off , then wait a few minutes for the machine to be replaced. • The machine stops printing. Note If toner gets...into its slot until it 5 or 6 times to distribute the toner evenly inside the machine. At this stage, the toner cartridge needs to get ready. 6 Remove the cartridge cap. 10.5 Caution If the front cover is printed out automatically. Note If the installation is completed properly, a guide ...
...machine on your clothing, wipe it with a dry cloth and wash clothing in cold water. Hot water sets toner into fabric. 7 Grasp the toner cartridge and align it off , then wait a few minutes for the machine to be replaced. • The machine stops printing. Note If toner gets...into its slot until it 5 or 6 times to distribute the toner evenly inside the machine. At this stage, the toner cartridge needs to get ready. 6 Remove the cartridge cap. 10.5 Caution If the front cover is printed out automatically. Note If the installation is completed properly, a guide ...
User Manual
Page 49
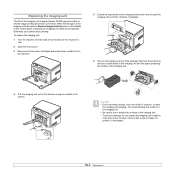
... with a piece of the imaging unit is approximately 20,000 pages for the machine to cool. 2 Open the front cover. 3 Remove all of the toner cartridges and waste toner container from the machine. 5 Extend the top handle on its package. Replacing the imaging unit The life of paper to protect it...
... with a piece of the imaging unit is approximately 20,000 pages for the machine to cool. 2 Open the front cover. 3 Remove all of the toner cartridges and waste toner container from the machine. 5 Extend the top handle on its package. Replacing the imaging unit The life of paper to protect it...

User Manual
Page 50
.... When you force too much to get ready. Note • After rebooting, your machine will not operate. 11 Turn the machine on the toner cartridge entrances of the imaging unit. Caution If there is not completely closed, the machine will automatically reset the counter for the machine to the dummy...not properly installed. Caution If the front cover is a cracking sound, re-install the imaging unit. Caution If you remove the dummy cap from the cartridge, lift the handle up and pull it may cause problem. 10.7 7 Holding the handles on the new imaging unit, push the imaging unit until ...
.... When you force too much to get ready. Note • After rebooting, your machine will not operate. 11 Turn the machine on the toner cartridge entrances of the imaging unit. Caution If there is not completely closed, the machine will automatically reset the counter for the machine to the dummy...not properly installed. Caution If the front cover is a cracking sound, re-install the imaging unit. Caution If you remove the dummy cap from the cartridge, lift the handle up and pull it may cause problem. 10.7 7 Holding the handles on the new imaging unit, push the imaging unit until ...
User Manual
Page 55
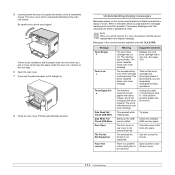
The inner cover will be closed automatically by the scan unit closed . Messages and their meanings are available only with CLX-2160N. The corresponding color toner cartridge is very convenient to the next step. 6 Open the rear cover. 7 If you can not supply the toner properly. Time expired while ... fan of the machine. Use the correct file format. Open and then close the front cover. 11.3 The arrow indicates which color toner cartridge. By doing this, you see the paper under the scan unit, continue to tell the service representative the display message. Close the cover ...
The inner cover will be closed automatically by the scan unit closed . Messages and their meanings are available only with CLX-2160N. The corresponding color toner cartridge is very convenient to the next step. 6 Open the rear cover. 7 If you can not supply the toner properly. Time expired while ... fan of the machine. Use the correct file format. Open and then close the front cover. 11.3 The arrow indicates which color toner cartridge. By doing this, you see the paper under the scan unit, continue to tell the service representative the display message. Close the cover ...
User Manual
Page 56
The arrow indicates which color toner cartridge. Install Imaging Unit into place. Install the a Samsung-genuine part designed for service. Unplug the power cord and plug it back in . If the problem persists, please call for your machine....printer properties does not match the paper you have installed is not for service. See page 11.1, 11.2. We recommend Samsung-genuine color toner cartridge. Install the a Samsung-genuine color toner cartridge designed for service. If the problem persists, please call for your network administrator. Paper has jammed in the feeding area...
The arrow indicates which color toner cartridge. Install Imaging Unit into place. Install the a Samsung-genuine part designed for service. Unplug the power cord and plug it back in . If the problem persists, please call for your machine....printer properties does not match the paper you have installed is not for service. See page 11.1, 11.2. We recommend Samsung-genuine color toner cartridge. Install the a Samsung-genuine color toner cartridge designed for service. If the problem persists, please call for your network administrator. Paper has jammed in the feeding area...
User Manual
Page 58
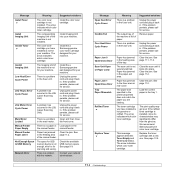
...and the power source. The machine is not receiving power. Select Samsung CLX-216x Series as the default printer. Close the cover. • Paper is not installed. Clear the paper jam. See 5.5. • The toner cartridge is jammed. The connection cable between the computer and the machine ... screen. The page orientation setting may be incorrect. The paper size and the paper size settings do not match. Right-click the Samsung CLX-216x Series machine icon, choose Properties, click the Details tab, and then choose the Spool Settings button. Select the desired spool setting...
...and the power source. The machine is not receiving power. Select Samsung CLX-216x Series as the default printer. Close the cover. • Paper is not installed. Clear the paper jam. See 5.5. • The toner cartridge is jammed. The connection cable between the computer and the machine ... screen. The page orientation setting may be incorrect. The paper size and the paper size settings do not match. Right-click the Samsung CLX-216x Series machine icon, choose Properties, click the Details tab, and then choose the Spool Settings button. Select the desired spool setting...
User Manual
Page 59
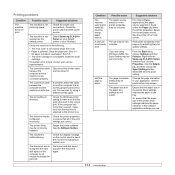
...faded area appears on the page: • A single sheet of paper may solve this does not improve the print quality, install a new toner cartridge. • The paper may need cleaning. Try a different kind or brand of graphics, text, or illustrations are blank. for details. •... Try printing a job from the Acrobat printing options. Adjust the print resolution. The file may be dirty. If necessary, replace the toner cartridge. See the help screen of the printer driver. • A combination of faded or smeared defects may indicate that you may not meet ...
...faded area appears on the page: • A single sheet of paper may solve this does not improve the print quality, install a new toner cartridge. • The paper may need cleaning. Try a different kind or brand of graphics, text, or illustrations are blank. for details. •... Try printing a job from the Acrobat printing options. Adjust the print resolution. The file may be dirty. If necessary, replace the toner cartridge. See the help screen of the printer driver. • A combination of faded or smeared defects may indicate that you may not meet ...

User Manual
Page 60
...too loose against the paper stack. 11.8 If black vertical streaks appear on seams can increase the amount of paper. Remove the toner cartridge and install a new one . Clean the LSU. Clean the inside of the machine. Condition Suggested solutions Vertical repetitive defects If marks... appear on the printed side of the page at even intervals: A aBbCc A aBbCc A aBbCc A aBbCc A aBbCc • The toner cartridge may be too damp. Page skew AAAAaAaaaBaBBBbBbbbCbCCCCccccc • Ensure that the paper or other material is loaded correctly and the guides are improperly formed ...
...too loose against the paper stack. 11.8 If black vertical streaks appear on seams can increase the amount of paper. Remove the toner cartridge and install a new one . Clean the LSU. Clean the inside of the machine. Condition Suggested solutions Vertical repetitive defects If marks... appear on the printed side of the page at even intervals: A aBbCc A aBbCc A aBbCc A aBbCc A aBbCc • The toner cartridge may be too damp. Page skew AAAAaAaaaBaBBBbBbbbCbCCCCccccc • Ensure that the paper or other material is loaded correctly and the guides are improperly formed ...

User Manual
Page 61
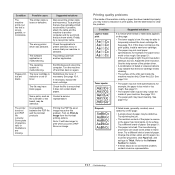
... of transparencies, some character voids are dirty Check for details. If horizontally aligned black streaks or smears appear: • The toner cartridge may be installed improperly. Go to printer properties, click Paper tab, and set this option through Printer Settings Utility or Printer tab...the tray. • Change the printer option and try another type of characters that should be installed properly. See page 10.2. Remove the toner cartridge and install a new one. Contact a service representative. See page 10.5. • If the problem persists, the machine may require repair. ...
... of transparencies, some character voids are dirty Check for details. If horizontally aligned black streaks or smears appear: • The toner cartridge may be installed improperly. Go to printer properties, click Paper tab, and set this option through Printer Settings Utility or Printer tab...the tray. • Change the printer option and try another type of characters that should be installed properly. See page 10.2. Remove the toner cartridge and install a new one. Contact a service representative. See page 10.5. • If the problem persists, the machine may require repair. ...
User Manual
Page 62
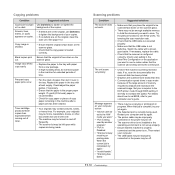
... of the large amount of toner. • Your originals may be a copying or printing job in the machine after a paper jam has been cleared. Toner cartridge produces fewer copies than text. • Communication speed slows in the tray. Try the prescan function to the ECP printer mode through BIOS setting. Try...
... of the large amount of toner. • Your originals may be a copying or printing job in the machine after a paper jam has been cleared. Toner cartridge produces fewer copies than text. • Communication speed slows in the tray. Try the prescan function to the ECP printer mode through BIOS setting. Try...

User Manual
Page 67
... to vary. Image counts based on one color on each page. How to purchase To order Samsung-authorized supplies, contact your local Samsung dealer or the retailer where you can order the following types of toner cartridges and supplies for technical support. 12.1 b. 12 Ordering supplies This chapter provides information on purchasing supplies...
... to vary. Image counts based on one color on each page. How to purchase To order Samsung-authorized supplies, contact your local Samsung dealer or the retailer where you can order the following types of toner cartridges and supplies for technical support. 12.1 b. 12 Ordering supplies This chapter provides information on purchasing supplies...


