User Manual (ENGLISH)
Page 4
...Using the Optional Tray ...4.2 Using the Multi-purpose Tray 4.2 Using the Manual Feed ...4.3 Printing on Special Print Materials 4.4 Printing on Envelopes ...4.4 Printing on Labels ...4.5 Printing on Preprinted Paper 4.5 Printing on Card Stock or Custom-sized Materials 4.6 5. Basic Printing Printing a Document ...5.1 Canceling a Print Job ...5.1 iii Setting Up Your Printer Unpacking ...2.1 Installing the Toner Cartridges 2.2 Loading Paper ...2.4 Changing the Size of Control Panel Menus 3.3 Information Menu ...3.3 Color Menu ...3.4 Printer Menu ...3.4 Setup Menu ...3.4 Network Menu...
...Using the Optional Tray ...4.2 Using the Multi-purpose Tray 4.2 Using the Manual Feed ...4.3 Printing on Special Print Materials 4.4 Printing on Envelopes ...4.4 Printing on Labels ...4.5 Printing on Preprinted Paper 4.5 Printing on Card Stock or Custom-sized Materials 4.6 5. Basic Printing Printing a Document ...5.1 Canceling a Print Job ...5.1 iii Setting Up Your Printer Unpacking ...2.1 Installing the Toner Cartridges 2.2 Loading Paper ...2.4 Changing the Size of Control Panel Menus 3.3 Information Menu ...3.3 Color Menu ...3.4 Printer Menu ...3.4 Setup Menu ...3.4 Network Menu...
User Manual (ENGLISH)
Page 5
...Optional Paper Tray 9.1 Installing a Network Interface Card (CLP-600N Only 9.2 10. Using Your Printer on a Network (CLP-600N only) About Sharing the Printer on a Network 8.1 Setting Up a Network-Connected Printer 8.1 Configuring Network Parameters on the Control Panel 8.1 9. Specifications Printer Specifications ...10.1 Paper Specifications ...10.1 Overview ...10.1 Supported Sizes of the Printer 6.8 Managing the Printer from the Website (CLP-600N Only 6.9 Your printer's embedded web page opens 6.9 7. Solving Problems Troubleshooting Checklist ...7.1 Solving General Printing Problems...
...Optional Paper Tray 9.1 Installing a Network Interface Card (CLP-600N Only 9.2 10. Using Your Printer on a Network (CLP-600N only) About Sharing the Printer on a Network 8.1 Setting Up a Network-Connected Printer 8.1 Configuring Network Parameters on the Control Panel 8.1 9. Specifications Printer Specifications ...10.1 Paper Specifications ...10.1 Overview ...10.1 Supported Sizes of the Printer 6.8 Managing the Printer from the Website (CLP-600N Only 6.9 Your printer's embedded web page opens 6.9 7. Solving Problems Troubleshooting Checklist ...7.1 Solving General Printing Problems...
User Manual (ENGLISH)
Page 10
... a book. Use multiple types of media easily • The Standard 250-sheet input tray (Tray1) and optional 500-sheet input tray (Tray2) supports A4/letter-sized paper. • The Multi-purpose Tray supports letterhead, envelopes, labels, custom-sized materials, postcards, and heavy paper. Print in various environments You can print in both sides of the paper to save paper. • You can use the CLP-600N in Windows 98SE/Me/NT 4.0/2000/2003/ XP. This feature enables you bought your printer! For...
... a book. Use multiple types of media easily • The Standard 250-sheet input tray (Tray1) and optional 500-sheet input tray (Tray2) supports A4/letter-sized paper. • The Multi-purpose Tray supports letterhead, envelopes, labels, custom-sized materials, postcards, and heavy paper. Print in various environments You can print in both sides of the paper to save paper. • You can use the CLP-600N in Windows 98SE/Me/NT 4.0/2000/2003/ XP. This feature enables you bought your printer! For...

User Manual (ENGLISH)
Page 12
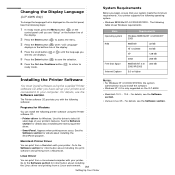
... -step instructions for setting up your country's specifications. Use the lifting handles, as shown in the diagram (see page 1.2). This chapter includes: • Unpacking • Installing the Toner Cartridges • Loading Paper • Connecting a Printer Cable • Turning the Printer On • Printing a Demo Page • Changing the Display Language (CLP-600N Only) • Installing the Printer Software Unpacking 1 Remove the printer and all of the accessories from one country to another. • The Printer software CD contains the printer driver, the User's Guide...
... -step instructions for setting up your country's specifications. Use the lifting handles, as shown in the diagram (see page 1.2). This chapter includes: • Unpacking • Installing the Toner Cartridges • Loading Paper • Connecting a Printer Cable • Turning the Printer On • Printing a Demo Page • Changing the Display Language (CLP-600N Only) • Installing the Printer Software Unpacking 1 Remove the printer and all of the accessories from one country to another. • The Printer software CD contains the printer driver, the User's Guide...
User Manual (ENGLISH)
Page 19
... the bottom line of the display. 2 Press the Enter button ( ) to the Software section for information about installing the print software and printing from a Linux environment. 2.8 Setting Up Your Printer Go to access the menu. 3 Press the Enter button ( ) when "LCD Language" displays on the CLP-600N. • Macintosh 10.3 ~ 10.4 - Your printer supports the following table shows Windows requirements. Macintosh Printer Driver You can print from a Macintosh with the following printer software using the supplied Printer software CD after...
... the bottom line of the display. 2 Press the Enter button ( ) to the Software section for information about installing the print software and printing from a Linux environment. 2.8 Setting Up Your Printer Go to access the menu. 3 Press the Enter button ( ) when "LCD Language" displays on the CLP-600N. • Macintosh 10.3 ~ 10.4 - Your printer supports the following table shows Windows requirements. Macintosh Printer Driver You can print from a Macintosh with the following printer software using the supplied Printer software CD after...
User Manual (ENGLISH)
Page 22
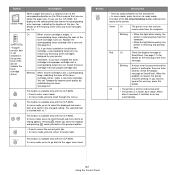
... the displayed sub menu item or to ready mode. See page 6.4. Green On The printer is empty, a corresponding lamp, indicating the color of the toner cartridge, turns on. Button Description (status map) When a paper jam occurs, a lamp turns on at the corresponding location on the Status map so that you use the CLP-600N, the display on the control panel also shows the corresponding error message, indicating the location of the jam. On When a toner cartridge is on-line...
... the displayed sub menu item or to ready mode. See page 6.4. Green On The printer is empty, a corresponding lamp, indicating the color of the toner cartridge, turns on. Button Description (status map) When a paper jam occurs, a lamp turns on at the corresponding location on the Status map so that you use the CLP-600N, the display on the control panel also shows the corresponding error message, indicating the location of the jam. On When a toner cartridge is on-line...
User Manual (ENGLISH)
Page 23
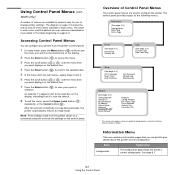
... returns to ready mode. Maintenance Network (See page 3.5.) Config Network Config TCP IP Get Method IP Address Subnet Mask Gateway Config WLAN* WLAN Default* Netware Config Netware IPX Frame Type Reset Network Default Set Print Net CFG * This menu only appears when an optional wired/wireless network interface card has been installed. Information Menu This menu contains information pages that it easy for you can print to give details about the printer and its configuration. Using Control Panel Menus (CLP- 600N Only) A number of menus are...
... returns to ready mode. Maintenance Network (See page 3.5.) Config Network Config TCP IP Get Method IP Address Subnet Mask Gateway Config WLAN* WLAN Default* Netware Config Netware IPX Frame Type Reset Network Default Set Print Net CFG * This menu only appears when an optional wired/wireless network interface card has been installed. Information Menu This menu contains information pages that it easy for you can print to give details about the printer and its configuration. Using Control Panel Menus (CLP- 600N Only) A number of menus are...

User Manual (ENGLISH)
Page 35
... should be installed by a trained service professional, except for black and each color. See below. M600A, Yellow: CLP-Y600A) Replace [Color] Toner Approx. 6.4 4,000 pages* Paper transfer belt Replace Transfer Approx. 6.5 (CLP-T600A) Belt 35,000 pages** Fuser unit (110V: CLP-F600A, 220V: CLP-F600B) Pick-up roller*** Replace Fuser Approx. 6.7 50,000 pages Replace MP Pickroller OR Replace Tray1 Pick-roller OR Replace Tray2 Pick-roller Approx. 50,000 pages * Average A4-/letter-sized page count based on the control panel will stop printing until you...
... should be installed by a trained service professional, except for black and each color. See below. M600A, Yellow: CLP-Y600A) Replace [Color] Toner Approx. 6.4 4,000 pages* Paper transfer belt Replace Transfer Approx. 6.5 (CLP-T600A) Belt 35,000 pages** Fuser unit (110V: CLP-F600A, 220V: CLP-F600B) Pick-up roller*** Replace Fuser Approx. 6.7 50,000 pages Replace MP Pickroller OR Replace Tray1 Pick-roller OR Replace Tray2 Pick-roller Approx. 50,000 pages * Average A4-/letter-sized page count based on the control panel will stop printing until you...

User Manual (ENGLISH)
Page 44
... to print a document. Remove paper from the tray and reload it . Use only paper that the paper size adjusters are correct. Reduce the complexity of the print settings are set correctly. Check the message on the SmartPanel program window or the control panel display (CLP-600N only), add paper to the Multi-purpose Tray, and press the On Line/ Continue button on the control panel to improve print speed. see the Software section. From the Start menu, choose Settings and Printers. The connection cable...
... to print a document. Remove paper from the tray and reload it . Use only paper that the paper size adjusters are correct. Reduce the complexity of the print settings are set correctly. Check the message on the SmartPanel program window or the control panel display (CLP-600N only), add paper to the Multi-purpose Tray, and press the On Line/ Continue button on the control panel to improve print speed. see the Software section. From the Start menu, choose Settings and Printers. The connection cable...

User Manual (ENGLISH)
Page 55
... Printer" on page 6.5. Contact a service representative. Verify that the paper is loaded properly. • Check the paper type and quality. Both high temperature and high humidity can increase the amount of background shading. • Remove one of the old toner cartridges and install a new one . See "Paper Specifications" on page 6.4. • Parts of the printer may have the same problems, replace the toner cartridge with a different batch of paper. See page 6.4. See "Replacing Toner Cartridges" on page 10.1. • Turn...
... Printer" on page 6.5. Contact a service representative. Verify that the paper is loaded properly. • Check the paper type and quality. Both high temperature and high humidity can increase the amount of background shading. • Remove one of the old toner cartridges and install a new one . See "Paper Specifications" on page 6.4. • Parts of the printer may have the same problems, replace the toner cartridge with a different batch of paper. See page 6.4. See "Replacing Toner Cartridges" on page 10.1. • Turn...

User Manual (ENGLISH)
Page 56
... paper specifications. Remove the paper and turn it in the printer. Understanding Display Messages Messages appear on the SmartPanel program window or the control panel display (CLP-600N only) to understand the messages' meanings and correct the problem if necessary. Till the message is put into the printer: • Turn the stack of the printer. • Check the paper type and quality. Close the top cover or access door firmly. Replace the corresponding toner cartridge with a new one. Contact a service representative. Contact a service representative. Adjusting...
... paper specifications. Remove the paper and turn it in the printer. Understanding Display Messages Messages appear on the SmartPanel program window or the control panel display (CLP-600N only) to understand the messages' meanings and correct the problem if necessary. Till the message is put into the printer: • Turn the stack of the printer. • Check the paper type and quality. Close the top cover or access door firmly. Replace the corresponding toner cartridge with a new one. Contact a service representative. Contact a service representative. Adjusting...
User Manual (ENGLISH)
Page 58
... message persists, contact a service representative. Unplug the power cord and plug it in the Rear Fan of the paper transfer belt has expired and the printer will stop printing. If the problem persists, call for the user's action before printing from the Multi-purpose Tray using the manual feed mode. Tray2 Error The optional Tray2 is low on the network. Ready [Color] Low Toner The corresponding toner cartridge in your printer is not properly installed or connected to page 6.2. Replace [Color] Toner...
... message persists, contact a service representative. Unplug the power cord and plug it in the Rear Fan of the paper transfer belt has expired and the printer will stop printing. If the problem persists, call for the user's action before printing from the Multi-purpose Tray using the manual feed mode. Tray2 Error The optional Tray2 is low on the network. Ready [Color] Low Toner The corresponding toner cartridge in your printer is not properly installed or connected to page 6.2. Replace [Color] Toner...

User Manual (ENGLISH)
Page 59
..." error message while editing the printer settings. I get a "Some options are connected correctly and the printer is on recent RedHat systems that came with some conditions, it by this , you change global settings. In some variants of LPRng, especially on . • If bi-directional communication is changed to install them manually. Common Windows Problems Common Linux Problems Problem Possible Cause and Solution "File in standby mode or after printing has...
..." error message while editing the printer settings. I get a "Some options are connected correctly and the printer is on recent RedHat systems that came with some conditions, it by this , you change global settings. In some variants of LPRng, especially on . • If bi-directional communication is changed to install them manually. Common Windows Problems Common Linux Problems Problem Possible Cause and Solution "File in standby mode or after printing has...

User Manual (ENGLISH)
Page 61
... supported by the network card may be installed by the printer. Setting Up a NetworkConnected Printer You have to use via a single computer. The printer can only connect your printer to the Network Printer User's Guide. Setting protocols can configure the basic network parameters through a Windows 98SE/Me/XP/NT 4.0/2000/2003 network printer connection. Item Network Interface Network Operating System Network Protocols Dynamic Addressing Server Requirements 10/100 Base-TX (standard) or 802.11a/b/g Wireless LAN • Novell NetWare 4.x, 5.x, 6.x • Windows...
... supported by the network card may be installed by the printer. Setting Up a NetworkConnected Printer You have to use via a single computer. The printer can only connect your printer to the Network Printer User's Guide. Setting protocols can configure the basic network parameters through a Windows 98SE/Me/XP/NT 4.0/2000/2003 network printer connection. Item Network Interface Network Operating System Network Protocols Dynamic Addressing Server Requirements 10/100 Base-TX (standard) or 802.11a/b/g Wireless LAN • Novell NetWare 4.x, 5.x, 6.x • Windows...

User Manual (ENGLISH)
Page 62
... button ( ). 8.2 Using Your Printer on a Network (CLP-600N only) Configuring TCP/IP Your printer can be set up on a variety of 4 bytes. Static Addressing To enter the TCP/IP address from your printer's control panel, take the following steps: 1 In ready mode, press the Menu button ( ) until "Print Net CFG" displays on the bottom line. 4 Press the Enter button ( ). If you see "Network" on the bottom line of the display. 2 Press the Enter button ( ) to access the menu...
... button ( ). 8.2 Using Your Printer on a Network (CLP-600N only) Configuring TCP/IP Your printer can be set up on a variety of 4 bytes. Static Addressing To enter the TCP/IP address from your printer's control panel, take the following steps: 1 In ready mode, press the Menu button ( ) until "Print Net CFG" displays on the bottom line. 4 Press the Enter button ( ). If you see "Network" on the bottom line of the display. 2 Press the Enter button ( ) to access the menu...

User Manual (ENGLISH)
Page 66
... When Installing Printer Options • Installing an Optional Paper Tray • Installing a Network Interface Card (CLP-600N Only) Precautions When Installing Printer Options DISCONNECT THE POWER CORD: Never remove the printer control board while the printer is a full-featured laser printer that each user may have different requirements, however, Samsung makes several options available to enhance the printer's capabilities. Recognizing that has been optimized to static electricity. DISCHARGE STATIC ELECTRICITY: The control board and internal printer option, Network Interface Cards...
... When Installing Printer Options • Installing an Optional Paper Tray • Installing a Network Interface Card (CLP-600N Only) Precautions When Installing Printer Options DISCONNECT THE POWER CORD: Never remove the printer control board while the printer is a full-featured laser printer that each user may have different requirements, however, Samsung makes several options available to enhance the printer's capabilities. Recognizing that has been optimized to static electricity. DISCHARGE STATIC ELECTRICITY: The control board and internal printer option, Network Interface Cards...

User Manual (ENGLISH)
Page 74
... page, print 6.1 connecting, USB 2.6 control panel 3.1 buttons 3.1 display 3.1 menus 3.3 custom-sized materials, print 4.6 E envelopes, print 4.4 error messages 7.14 Ethernet cable, connect 2.7 F features printer 1.1 L labels, print 4.5 Linux common problems 7.17 driver, install 2.8 loading, paper in the Multi-purpose Tray 4.2 in the optional tray 4.2 in the standard tray 4.2 using the manual feed 4.3 M Macintosh common problems 7.17 driver, install 2.8 manual feed mode, use 4.3 Multi-purpose Tray, use 4.2 N network printing cable, connect 2.7 card, install 9.2 network-connected printer, set...
... page, print 6.1 connecting, USB 2.6 control panel 3.1 buttons 3.1 display 3.1 menus 3.3 custom-sized materials, print 4.6 E envelopes, print 4.4 error messages 7.14 Ethernet cable, connect 2.7 F features printer 1.1 L labels, print 4.5 Linux common problems 7.17 driver, install 2.8 loading, paper in the Multi-purpose Tray 4.2 in the optional tray 4.2 in the standard tray 4.2 using the manual feed 4.3 M Macintosh common problems 7.17 driver, install 2.8 manual feed mode, use 4.3 Multi-purpose Tray, use 4.2 N network printing cable, connect 2.7 card, install 9.2 network-connected printer, set...
User Manual (ENGLISH)
Page 77
... a New Page Overlay 23 Using a Page Overlay ...24 Deleting a Page Overlay 25 Chapter 4: SHARING THE PRINTER LOCALLY Setting Up a Host Computer 26 Setting Up a Client Computer 26 Chapter 5: USING SMART PANEL Understanding Smart Panel ...27 Opening the Troubleshooting Guide 27 Using Printer Settings Utility 28 Using Onscreen Help ...28 Changing the Smart Panel Program Settings 28 Chapter 6: USING YOUR PRINTER IN LINUX System Requirements ...29 Installing the Printer Driver ...30 Changing the Printer Connection Method 31 Uninstalling the Printer Driver 32 Using the Configuration...
... a New Page Overlay 23 Using a Page Overlay ...24 Deleting a Page Overlay 25 Chapter 4: SHARING THE PRINTER LOCALLY Setting Up a Host Computer 26 Setting Up a Client Computer 26 Chapter 5: USING SMART PANEL Understanding Smart Panel ...27 Opening the Troubleshooting Guide 27 Using Printer Settings Utility 28 Using Onscreen Help ...28 Changing the Smart Panel Program Settings 28 Chapter 6: USING YOUR PRINTER IN LINUX System Requirements ...29 Installing the Printer Driver ...30 Changing the Printer Connection Method 31 Uninstalling the Printer Driver 32 Using the Configuration...
User Manual (ENGLISH)
Page 105
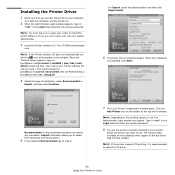
..., type in Linux Expert installation allows you to step 6. 7 The Linux Printer Configuration window opens. The function tabs available for the selected printer appear at the bottom of the window. NOTE: You must log in your system. For Expert, select the desired option and then click Begin Install. 6 The printer driver installation begins. Select the printer you connect the printer to install the printer software. Recommended is completed, click Start. Installing the Printer Driver 1 Make...
..., type in Linux Expert installation allows you to step 6. 7 The Linux Printer Configuration window opens. The function tabs available for the selected printer appear at the bottom of the window. NOTE: You must log in your system. For Expert, select the desired option and then click Begin Install. 6 The printer driver installation begins. Select the printer you connect the printer to install the printer software. Recommended is completed, click Start. Installing the Printer Driver 1 Make...
User Manual (ENGLISH)
Page 109
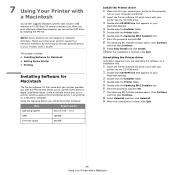
... Printer Specifications in USB interface or 10/100 Base-TX network interface card. When you print a file from a Macintosh computer, you install the printer software: Item Requirements Operating System Mac OS 10.3 ~ 10.4 RAM 128 MB Free Disk Space 200 MB Install the Printer driver 1 Make sure that appears on your computer and printer. 2 Insert the Printer software CD which supports the PostScript driver), for Macintosh The Printer software CD that came with your printer provides you connect...
... Printer Specifications in USB interface or 10/100 Base-TX network interface card. When you print a file from a Macintosh computer, you install the printer software: Item Requirements Operating System Mac OS 10.3 ~ 10.4 RAM 128 MB Free Disk Space 200 MB Install the Printer driver 1 Make sure that appears on your computer and printer. 2 Insert the Printer software CD which supports the PostScript driver), for Macintosh The Printer software CD that came with your printer provides you connect...


