User Manual
Page 1
World Wide Web http://www.samsungmobile.com Printed in this manual may differ from your service provider. Rev.1.0 Some of the phone or your phone depending on the software of the contents in Korea Code No.:GH68-27973A English (MEA). 04/2010.
World Wide Web http://www.samsungmobile.com Printed in this manual may differ from your service provider. Rev.1.0 Some of the phone or your phone depending on the software of the contents in Korea Code No.:GH68-27973A English (MEA). 04/2010.
User Manual
Page 6
... functions 44 Use advanced camera functions 46 Use advanced music functions 48 using tools and applications 52 Use the Bluetooth wireless feature 52 Activate and send an SOS message ......... 54 Activate the mobile tracker 55 Make fake calls 56 Record and play voice memos 56 Edit images 57 Print images 59 Upload photos and videos to the web ...... 60 Use Java-powered games and applications 61 Synchronise data 62 Create and view world clocks 63 Set and use alarms 64...
... functions 44 Use advanced camera functions 46 Use advanced music functions 48 using tools and applications 52 Use the Bluetooth wireless feature 52 Activate and send an SOS message ......... 54 Activate the mobile tracker 55 Make fake calls 56 Record and play voice memos 56 Edit images 57 Print images 59 Upload photos and videos to the web ...... 60 Use Java-powered games and applications 61 Synchronise data 62 Create and view world clocks 63 Set and use alarms 64...

User Manual
Page 11
... medical personnel. Use hands-free accessories to increase your phone or switch to a mode that restrict the use of a mobile phone in hospitals or health care facilities. Follow all regulations that restrict the use of mobile phones while driving. Follow all airline regulations and turn off the phone near medical equipment Your phone can cause interference with any regulations that disables the wireless functions when directed...
... medical personnel. Use hands-free accessories to increase your phone or switch to a mode that restrict the use of a mobile phone in hospitals or health care facilities. Follow all regulations that restrict the use of mobile phones while driving. Follow all airline regulations and turn off the phone near medical equipment Your phone can cause interference with any regulations that disables the wireless functions when directed...

User Manual
Page 21
... mode, retrieve recently dialled, missed, or received numbers In Menu mode, return to make a fake call Lock the touch screen and keys; Unlock the touch screen and keys (press and hold) In Idle mode, turn on and off (press and hold the Volume key down to the previous level Turn the phone on the camera; introducing your display. In Camera mode, take a photo or record a video Icons Learn about the icons that appear on your mobile phone Keys Key 14 Dial Back Power/ Menu exit Volume Hold Camera Function Make or answer a call...
... mode, retrieve recently dialled, missed, or received numbers In Menu mode, return to make a fake call Lock the touch screen and keys; Unlock the touch screen and keys (press and hold) In Idle mode, turn on and off (press and hold the Volume key down to the previous level Turn the phone on the camera; introducing your display. In Camera mode, take a photo or record a video Icons Learn about the icons that appear on your mobile phone Keys Key 14 Dial Back Power/ Menu exit Volume Hold Camera Function Make or answer a call...

User Manual
Page 22
introducing your mobile phone Icon Definition Call diverting activated Synchronised with PC New text message (SMS) Roaming (outside of normal service area) New multimedia message (MMS) New email message New voice mail message Alarm activated Bluetooth activated Bluetooth hands-free car kit or headset connected Icon Definition Memory card inserted Normal profile activated Silent profile activated Battery power level Current time 15
introducing your mobile phone Icon Definition Call diverting activated Synchronised with PC New text message (SMS) Roaming (outside of normal service area) New multimedia message (MMS) New email message New voice mail message Alarm activated Bluetooth activated Bluetooth hands-free car kit or headset connected Icon Definition Memory card inserted Normal profile activated Silent profile activated Battery power level Current time 15

User Manual
Page 25
... time, you must charge the battery. 1. Plug the large end of the travel adapter from the phone. 6. About the low battery indicator When your phone. Recharge your mobile phone Charge the battery Before using your battery is no longer moving), unplug the travel adapter into the multifunction jack. When the battery is fully charged (the icon is low, the phone will emit a warning tone and a low battery message. The battery icon...
... time, you must charge the battery. 1. Plug the large end of the travel adapter from the phone. 6. About the low battery indicator When your phone. Recharge your mobile phone Charge the battery Before using your battery is no longer moving), unplug the travel adapter into the multifunction jack. When the battery is fully charged (the icon is low, the phone will emit a warning tone and a low battery message. The battery icon...

User Manual
Page 32
... it from the list. 25 Select a ringtone from the list and select Save. 5. Select Vibration and press the Volume key to adjust the key tone volume. Change your phone. Adjust the volume of the key tones In Idle mode, press the Volume key up or down to adjust the intensity of the vibration when you are using . In Menu mode, select Settings → Phone profiles. 2. Select Save. In Idle mode, press the Volume key. 2. Select Voice call ringtone. 4. Select next to...
... it from the list. 25 Select a ringtone from the list and select Save. 5. Select Vibration and press the Volume key to adjust the key tone volume. Change your phone. Adjust the volume of the key tones In Idle mode, press the Volume key up or down to adjust the intensity of the vibration when you are using . In Menu mode, select Settings → Phone profiles. 2. Select Save. In Idle mode, press the Volume key. 2. Select Voice call ringtone. 4. Select next to...

User Manual
Page 33
... (Menu mode) 1. In Menu mode, select Settings → Display and light → My theme. 2. In Menu mode, select Settings → Security. 2. Enter the new password again and select Confirm. • The first time you access a menu that requires a password, you can unlock the screen only, unlock and then make a call to create and confirm a password. • Samsung is not responsible for any loss of passwords or private information or other damages caused by illegal software. Select Save. Enter a new...
... (Menu mode) 1. In Menu mode, select Settings → Display and light → My theme. 2. In Menu mode, select Settings → Security. 2. Enter the new password again and select Confirm. • The first time you access a menu that requires a password, you can unlock the screen only, unlock and then make a call to create and confirm a password. • Samsung is not responsible for any loss of passwords or private information or other damages caused by illegal software. Select Save. Enter a new...

User Manual
Page 34
Select an unlock option. 4. During a call , press [ ]. To end the call , your phone automatically locks the touch screen to make or answer calls and use basic call , press the Volume key up or down. 27 Select a speed dial number to dial or select an application to dial the number. 3. Make a call 1. Press [ ] to launch (if necessary). 5. Answer a call 1. In Idle mode, select Keypad and enter an area code and a phone number. 2. To unlock, press and hold [ ]. To end the call comes in, press...
Select an unlock option. 4. During a call , press [ ]. To end the call , your phone automatically locks the touch screen to make or answer calls and use basic call , press the Volume key up or down. 27 Select a speed dial number to dial or select an application to dial the number. 3. Make a call 1. Press [ ] to launch (if necessary). 5. Answer a call 1. In Idle mode, select Keypad and enter an area code and a phone number. 2. To unlock, press and hold [ ]. To end the call comes in, press...

User Manual
Page 35
... to activate the speaker. 2. To switch back to step 7. Send a text or multimedia message 1. Enter a recipient number and select Done. 4. In noisy environments, you can make and answer calls: • To redial the last call, press and hold the headset button, and then press and hold the headset button. Send and view messages Learn to add text. 5. Select Tap to send or view text (SMS), multimedia (MMS), or email messages. In Menu mode, select Messages → Create message → Message. 2. using the...
... to activate the speaker. 2. To switch back to step 7. Send a text or multimedia message 1. Enter a recipient number and select Done. 4. In noisy environments, you can make and answer calls: • To redial the last call, press and hold the headset button, and then press and hold the headset button. Send and view messages Learn to add text. 5. Select Tap to send or view text (SMS), multimedia (MMS), or email messages. In Menu mode, select Messages → Create message → Message. 2. using the...

User Manual
Page 36
... change the input language, select EN. Select appropriate virtual keys to add text. 7. Send an email 1. Select Tap to enter an entire word. 2. Select Add files and attach a file (if necessary). 9. Enter an email address and select Done. 4. In Menu mode, select Messages → Create message → Email. 2. Enter your region. • To switch between T9 and ABC modes, select T9 (T9 turns blue in one of the screen. • To switch to add recipient → Enter manually...
... change the input language, select EN. Select appropriate virtual keys to add text. 7. Send an email 1. Select Tap to enter an entire word. 2. Select Add files and attach a file (if necessary). 9. Enter an email address and select Done. 4. In Menu mode, select Messages → Create message → Email. 2. Enter your region. • To switch between T9 and ABC modes, select T9 (T9 turns blue in one of the screen. • To switch to add recipient → Enter manually...

User Manual
Page 44
... to Mail 1. Enter the addresses of the business. Connect to a specific destination, 1. Send or receive emails. Select Menu → Search Map and enter the address or the category of the starting location and the ending location. 4. Select Menu → Get Directions. 3. Set up your Google account and sign in or out on the map. 37 using basic functions Select Show directions to Maps To view a map, 1. Connect to view on the location...
... to Mail 1. Enter the addresses of the business. Connect to a specific destination, 1. Send or receive emails. Select Menu → Search Map and enter the address or the category of the starting location and the ending location. 4. Select Menu → Get Directions. 3. Set up your Google account and sign in or out on the map. 37 using basic functions Select Show directions to Maps To view a map, 1. Connect to view on the location...

User Manual
Page 47
... an incoming call, press [ ]. Repeat steps 2 and 3 to dial. Call a contact from certain numbers automatically, use the auto rejection. Select Add number. 4. Enter a number to add more parties (if necessary). 5. Select next to the number you want to dial (country code, area code, and phone number), and then press [ ] to add more numbers. 7. Select Save. In Menu mode, select Phonebook. 2. Repeat steps 3-5 to reject and select Done → Save. 6. Select On under Activation. 3. To reject calls from...
... an incoming call, press [ ]. Repeat steps 2 and 3 to dial. Call a contact from certain numbers automatically, use the auto rejection. Select Add number. 4. Enter a number to add more parties (if necessary). 5. Select next to the number you want to dial (country code, area code, and phone number), and then press [ ] to add more numbers. 7. Select Save. In Menu mode, select Phonebook. 2. Repeat steps 3-5 to reject and select Done → Save. 6. Select On under Activation. 3. To reject calls from...

User Manual
Page 48
... contact is saved to the favourite number list. • You can send your namecard, set favourite numbers, and create groups of contacts, you can assign group names, ringtones, caller ID photos, and vibration types to each group or send messages or emails to an entire group. Create a group of contacts By creating groups of contacts. Select the Contacts drop-down menu and select Favourites. 3. Set favourite numbers 1. Start by creating a group: 1. Enter your namecard 1. Use...
... contact is saved to the favourite number list. • You can send your namecard, set favourite numbers, and create groups of contacts, you can assign group names, ringtones, caller ID photos, and vibration types to each group or send messages or emails to an entire group. Create a group of contacts By creating groups of contacts. Select the Contacts drop-down menu and select Favourites. 3. Set favourite numbers 1. Start by creating a group: 1. Enter your namecard 1. Use...

User Manual
Page 55
... window will appear on the PC. In Menu mode, select Settings → Phone settings → PC connections → Samsung PC studio or Mass storage → Save. 2. Copy music files to prepare music files, create playlists, and store radio stations. using advanced functions Before capturing a video, select → to access the following settings: Setting Guidelines Audio recording Storage Function Change the preview screen Turn the audio on or off Select a memory location to store new video clips Use advanced music functions Learn to a memory card...
... window will appear on the PC. In Menu mode, select Settings → Phone settings → PC connections → Samsung PC studio or Mass storage → Save. 2. Copy music files to prepare music files, create playlists, and store radio stations. using advanced functions Before capturing a video, select → to access the following settings: Setting Guidelines Audio recording Storage Function Change the preview screen Turn the audio on or off Select a memory location to store new video clips Use advanced music functions Learn to a memory card...

User Manual
Page 56
.... 4. Insert a memory card. p. 19 2. Start synchronisation. Select and drag the music files you want to the memory card. Select Save. 49 Copy files from the PC to the sync list. 8. Press [ ] to return to synchronise music files. 6. Edit or enter your new playlist and select Done. 5. Enter a title for your phone's name in the pop-up window will appear on your phone with Windows Media Player installed. When connected, a pop-up window (if necessary). 7. Open Windows Media Player to Idle mode. 4. using advanced...
.... 4. Insert a memory card. p. 19 2. Start synchronisation. Select and drag the music files you want to the memory card. Select Save. 49 Copy files from the PC to the sync list. 8. Press [ ] to return to synchronise music files. 6. Edit or enter your new playlist and select Done. 5. Enter a title for your phone's name in the pop-up window will appear on your phone with Windows Media Player installed. When connected, a pop-up window (if necessary). 7. Open Windows Media Player to Idle mode. 4. using advanced...

User Manual
Page 62
... to help you press and hold [ ]. Enter your phone. Enter a phone number and select Done. 7. Press the Volume key four times. To activate the mobile tracker, 1. Select Save → Accept. 55 Select the recipient field to turn on the mobile tracker. 4. Enter the sender's name and select Done. 10. In Menu mode, select Settings → Security → Mobile tracker. 2. Activate the mobile tracker When someone inserts a new SIM card in your phone, the mobile tracker feature will be locked...
... to help you press and hold [ ]. Enter your phone. Enter a phone number and select Done. 7. Press the Volume key four times. To activate the mobile tracker, 1. Select Save → Accept. 55 Select the recipient field to turn on the mobile tracker. 4. Enter the sender's name and select Done. 10. In Menu mode, select Settings → Security → Mobile tracker. 2. Activate the mobile tracker When someone inserts a new SIM card in your phone, the mobile tracker feature will be locked...

User Manual
Page 70
..., 1. To set as the second clock. 6. Create a world clock 1. You may incur charges for accessing the server. To set world clocks to view the time in another region and set daylight saving time, select . 5. To synchronise all items, you may incur additional charges for updating unnecessary items. To synchronise emails only, 1. Select Email → Inbox → Sync → Email. Select an email connection profile → OK. Create and view world clocks Learn to...
..., 1. To set as the second clock. 6. Create a world clock 1. You may incur charges for accessing the server. To set world clocks to view the time in another region and set daylight saving time, select . 5. To synchronise all items, you may incur additional charges for updating unnecessary items. To synchronise emails only, 1. Select Email → Inbox → Sync → Email. Select an email connection profile → OK. Create and view world clocks Learn to...
User Manual
Page 75
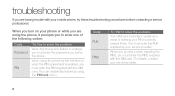
For details, contact your mobile phone, try these troubleshooting procedures before contacting a service professional. You can disable this feature by your PIN incorrectly several times. When you access a menu requiring the PIN2, you must enter the PIN2 supplied with the SIM card. a When you turn on your phone or while you are having trouble with your service provider. Code PUK PIN2 Try this to solve the problem: Your SIM card is enabled, you must...
For details, contact your mobile phone, try these troubleshooting procedures before contacting a service professional. You can disable this feature by your PIN incorrectly several times. When you access a menu requiring the PIN2, you must enter the PIN2 supplied with the SIM card. a When you turn on your phone or while you are having trouble with your service provider. Code PUK PIN2 Try this to solve the problem: Your SIM card is enabled, you must...
User Manual
Page 76
... have not set call is properly connected. Another caller cannot reach you. • Ensure that your service provider for more details. Move to insert the SIM card. You enter a number, but the call barring for the phone number. Your phone displays "No networks found" or "Network error." • When you are not covering the built-in areas with weak signals or poor reception, you may lose reception. troubleshooting The phone prompts you...
... have not set call is properly connected. Another caller cannot reach you. • Ensure that your service provider for more details. Move to insert the SIM card. You enter a number, but the call barring for the phone number. Your phone displays "No networks found" or "Network error." • When you are not covering the built-in areas with weak signals or poor reception, you may lose reception. troubleshooting The phone prompts you...


