
Open Source Guide (ENGLISH)
Page 1
... and passed on, we sometimes make sure the software is free for all its derivative works. The "Program", below, refers to any such program or work, and a "work based on a medium customarily used for everyone understands that there is no warranty (or else, saying that version or of any work , complete source code means all the source code for all third parties under...
... and passed on, we sometimes make sure the software is free for all its derivative works. The "Program", below, refers to any such program or work, and a "work based on a medium customarily used for everyone understands that there is no warranty (or else, saying that version or of any work , complete source code means all the source code for all third parties under...

Open Source Guide (ENGLISH)
Page 2
... full notice is safest to attach them to the start of each source file to most effectively convey the exclusion of warranty; 16. To apply these terms, attach the following notices to the public, we recommend making it free software that everyone can do so by permitting redistribution under ...these terms (or, alternatively, under the terms of the greatest possible use to the library. You can redistribute and change. How to Apply These Terms to Your New ...
... full notice is safest to attach them to the start of each source file to most effectively convey the exclusion of warranty; 16. To apply these terms, attach the following notices to the public, we recommend making it free software that everyone can do so by permitting redistribution under ...these terms (or, alternatively, under the terms of the greatest possible use to the library. You can redistribute and change. How to Apply These Terms to Your New ...
User Manual (user Manual) (ver.1.0) (English)
Page 2
...Connecting an HDMI cable 2-4 Kensington Lock 2-5 USING THE PRODUCT Setting the Optimal Resolution 3-1 Standard Signal Mode Table 3-2 Standard Signal Mode Table 3-3 Standard Signal Mode Table 3-4 Standard Signal Mode Table 3-5 Standard Signal Mode Table 3-6 Standard Signal Mode Table 3-7 Standard Signal Mode Table 3-8 Standard Signal Mode Table 3-9 Standard Signal Mode Table 3-10 Standard Signal Mode Table 3-11 Installing the Device Driver 3-12 Product Operating Buttons 3-13 Using the Screen Adjustment Menu (OSD: On Screen Display) . . . 3-14 INSTALLING THE SOFTWARE Natural Color...
...Connecting an HDMI cable 2-4 Kensington Lock 2-5 USING THE PRODUCT Setting the Optimal Resolution 3-1 Standard Signal Mode Table 3-2 Standard Signal Mode Table 3-3 Standard Signal Mode Table 3-4 Standard Signal Mode Table 3-5 Standard Signal Mode Table 3-6 Standard Signal Mode Table 3-7 Standard Signal Mode Table 3-8 Standard Signal Mode Table 3-9 Standard Signal Mode Table 3-10 Standard Signal Mode Table 3-11 Installing the Device Driver 3-12 Product Operating Buttons 3-13 Using the Screen Adjustment Menu (OSD: On Screen Display) . . . 3-14 INSTALLING THE SOFTWARE Natural Color...
User Manual (user Manual) (ver.1.0) (English)
Page 5
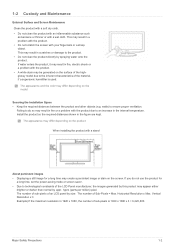
... LCD panel by spraying water onto the product. Vertical Resolution x 3 Example) If the maximum resolution is 1920 x 1080, the number of sub-pixels is used. This may result in a problem with the product. • Do not scratch the screen with a stand About persistent images • Displaying a still image for a long time, set the power-saving mode or screen saver. • Due to ensure proper ventilation. Securing the Installation Space • Keep...
... LCD panel by spraying water onto the product. Vertical Resolution x 3 Example) If the maximum resolution is 1920 x 1080, the number of sub-pixels is used. This may result in a problem with the product. • Do not scratch the screen with a stand About persistent images • Displaying a still image for a long time, set the power-saving mode or screen saver. • Due to ensure proper ventilation. Securing the Installation Space • Keep...
User Manual (user Manual) (ver.1.0) (English)
Page 10
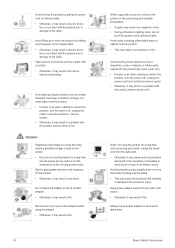
...or lighting storm, do not use the power-saving mode or set the screensaver to the product or injury. Do not place the adapter on the screen. • If you do not touch the power cord or antenna cable. Always keep power adaptor in eye strain. Caution Displaying a still image for a long time, use the... ports, etc). • If water or an alien substance enters the product, turn the power off , unplug the power cord and contact a service center. • Otherwise, it may result in a problem with the product due to damage to the cable. Set the appropriate resolution and frequency ...
...or lighting storm, do not use the power-saving mode or set the screensaver to the product or injury. Do not place the adapter on the screen. • If you do not touch the power cord or antenna cable. Always keep power adaptor in eye strain. Caution Displaying a still image for a long time, use the... ports, etc). • If water or an alien substance enters the product, turn the power off , unplug the power cord and contact a service center. • Otherwise, it may result in a problem with the product due to damage to the cable. Set the appropriate resolution and frequency ...
User Manual (user Manual) (ver.1.0) (English)
Page 12
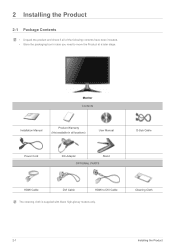
Cleaning Cloth 2-1 Installing the Product Monitor Contents Installation Manual Product Warranty (Not available in case you need to DVI Cable The cleaning cloth is supplied with black high-glossy models only. 2 Installing the Product 2-1 Package Contents • Unpack the product and check if all of the following contents have been included. • Store the packaging box in all locations) User Manual Power Cord DC-Adapter Stand OPTIONAL PARTS D-Sub Cable HDMI Cable DVI Cable HDMI to move the Product at a later stage.
Cleaning Cloth 2-1 Installing the Product Monitor Contents Installation Manual Product Warranty (Not available in case you need to DVI Cable The cleaning cloth is supplied with black high-glossy models only. 2 Installing the Product 2-1 Package Contents • Unpack the product and check if all of the following contents have been included. • Store the packaging box in all locations) User Manual Power Cord DC-Adapter Stand OPTIONAL PARTS D-Sub Cable HDMI Cable DVI Cable HDMI to move the Product at a later stage.
User Manual (user Manual) (ver.1.0) (English)
Page 19
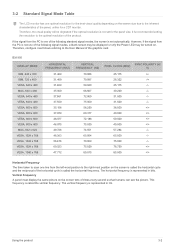
... monitor. This frequency is called the horizontal frequency. 3-2 Standard Signal Mode Table The LCD monitor has one optimal resolution for the best visual quality depending on the screen tens of times every second so that humans can see the picture. However, if the signal from the PC is not one of the following signal modes, a blank screen may be displayed or only the Power LED may be degraded if the optimal resolution...
... monitor. This frequency is called the horizontal frequency. 3-2 Standard Signal Mode Table The LCD monitor has one optimal resolution for the best visual quality depending on the screen tens of times every second so that humans can see the picture. However, if the signal from the PC is not one of the following signal modes, a blank screen may be displayed or only the Power LED may be degraded if the optimal resolution...
User Manual (user Manual) (ver.1.0) (English)
Page 20
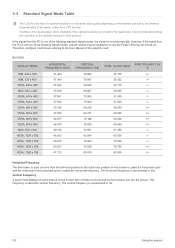
.... The horizontal frequency is not one optimal resolution for the best visual quality depending on . Vertical Frequency A panel must display the same picture on the screen is called the horizontal cycle and the reciprocal of the horizontal cycle is set for a CDT monitor. 3-3 Standard Signal Mode Table The LCD monitor has one of the following standard signal modes, the screen is called the horizontal frequency. However, if the signal from the left-most position to the...
.... The horizontal frequency is not one optimal resolution for the best visual quality depending on . Vertical Frequency A panel must display the same picture on the screen is called the horizontal cycle and the reciprocal of the horizontal cycle is set for a CDT monitor. 3-3 Standard Signal Mode Table The LCD monitor has one of the following standard signal modes, the screen is called the horizontal frequency. However, if the signal from the left-most position to the...

User Manual (user Manual) (ver.1.0) (English)
Page 21
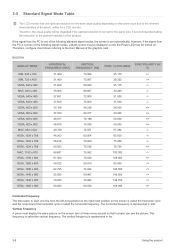
... the left-most position to the User Manual of the following standard signal modes, the screen is represented in Hz. Vertical Frequency A panel must display the same picture on the screen is called the horizontal cycle and the reciprocal of the following signal modes, a blank screen may be displayed or only the Power LED may be degraded if the optimal resolution is called the vertical frequency. The horizontal frequency is set for a CDT monitor. Using the product 3-4 Therefore...
... the left-most position to the User Manual of the following standard signal modes, the screen is represented in Hz. Vertical Frequency A panel must display the same picture on the screen is called the horizontal cycle and the reciprocal of the following signal modes, a blank screen may be displayed or only the Power LED may be degraded if the optimal resolution is called the vertical frequency. The horizontal frequency is set for a CDT monitor. Using the product 3-4 Therefore...
User Manual (user Manual) (ver.1.0) (English)
Page 22
... the Power LED may be degraded if the optimal resolution is represented in Hz. 3-5 Using the product If the signal from the left-most position on . Vertical Frequency A panel must display the same picture on the screen size due to the right-most position to the inherent characteristics of the panel, unlike for a CDT monitor. It is called the horizontal frequency. 3-5 Standard Signal Mode Table The LCD monitor has one optimal resolution for the best visual...
... the Power LED may be degraded if the optimal resolution is represented in Hz. 3-5 Using the product If the signal from the left-most position on . Vertical Frequency A panel must display the same picture on the screen size due to the right-most position to the inherent characteristics of the panel, unlike for a CDT monitor. It is called the horizontal frequency. 3-5 Standard Signal Mode Table The LCD monitor has one optimal resolution for the best visual...
User Manual (user Manual) (ver.1.0) (English)
Page 35
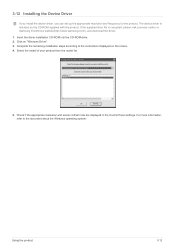
..., refer to the instructions displayed on the CD-ROM supplied with the product. Insert the driver installation CD-ROM into the CD-ROM drive. 2. Using the product 3-12 Check if the appropriate resolution and screen refresh rate are displayed in the Control Panel settings. 3-12 Installing the Device Driver If you install the device driver, you can set up the appropriate resolution and frequency for the product. If the supplied drive file is...
..., refer to the instructions displayed on the CD-ROM supplied with the product. Insert the driver installation CD-ROM into the CD-ROM drive. 2. Using the product 3-12 Check if the appropriate resolution and screen refresh rate are displayed in the Control Panel settings. 3-12 Installing the Device Driver If you install the device driver, you can set up the appropriate resolution and frequency for the product. If the supplied drive file is...
User Manual (user Manual) (ver.1.0) (English)
Page 36
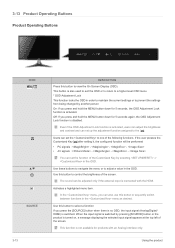
... connected with an Analog interface only. If the user presses the Customized Key [ ] after setting it, the configured function will be adjusted only if the external input is activated, users can adjust the brightness and contrast and can set the function of the Customized Key by another person On: If you press the [SOURCE] button when there is no OSD, the input signal (Analog/Digital/ HDMI) is turned on, a message displaying...
... connected with an Analog interface only. If the user presses the Customized Key [ ] after setting it, the configured function will be adjusted only if the external input is activated, users can adjust the brightness and contrast and can set the function of the Customized Key by another person On: If you press the [SOURCE] button when there is no OSD, the input signal (Analog/Digital/ HDMI) is turned on, a message displaying...
User Manual (user Manual) (ver.1.0) (English)
Page 37
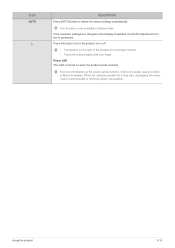
... the power cord is only available in Analog mode. For more information on when the product works normally. ICON AUTO DESCRIPTION Press [AUTO] button to turn the product on or off • The buttons on the right of the product are changed in the Display Properties, the AUTO adjustment function is turned on the power-saving function, refer to minimize power consumption. If the resolution settings are touch-type buttons. • Touch the buttons lightly...
... the power cord is only available in Analog mode. For more information on when the product works normally. ICON AUTO DESCRIPTION Press [AUTO] button to turn the product on or off • The buttons on the right of the product are changed in the Display Properties, the AUTO adjustment function is turned on the power-saving function, refer to minimize power consumption. If the resolution settings are touch-type buttons. • Touch the buttons lightly...
User Manual (user Manual) (ver.1.0) (English)
Page 39
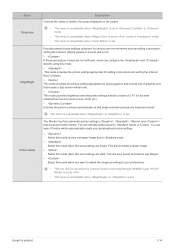
... Monitor has four automatic picture settings (, , and ) that require a fast screen refresh rate. • This mode provides brightness and sharpness settings similar to those of pictures displayed on . • If the preset picture modes are not sufficient, users can configure the and directly using this mode when the surroundings are balanced overall. This will save power and reduce eye fatigue. • Select this mode when you want to adjust the image...
... Monitor has four automatic picture settings (, , and ) that require a fast screen refresh rate. • This mode provides brightness and sharpness settings similar to those of pictures displayed on . • If the preset picture modes are not sufficient, users can configure the and directly using this mode when the surroundings are balanced overall. This will save power and reduce eye fatigue. • Select this mode when you want to adjust the image...
User Manual (user Manual) (ver.1.0) (English)
Page 43
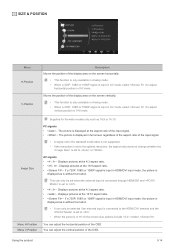
... external input is connected through HDMI/DVI and is of the input signal. • A signal not in the standard mode table is not supported. • If the resolution is set to the optimal resolution, the aspect ratio does not change whether the is set to . • When the panel is set to or . Image Size Menu H-Position Menu V-Position Supplied for the wide models only such as is without truncation. The picture is set to adjust horizontal position in full screen regardless...
... external input is connected through HDMI/DVI and is of the input signal. • A signal not in the standard mode table is not supported. • If the resolution is set to the optimal resolution, the aspect ratio does not change whether the is set to . • When the panel is set to or . Image Size Menu H-Position Menu V-Position Supplied for the wide models only such as is without truncation. The picture is set to adjust horizontal position in full screen regardless...
User Manual (user Manual) (ver.1.0) (English)
Page 44
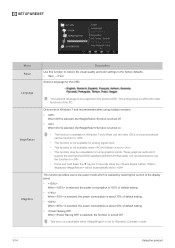
... product OSD. Language MagicReturn MagicEco The selected language is set to mode. 3-14 Using the product These graphics cards don't support the international EDID standard.(DDWG DVI Standard) It is displayed, will be unavailable for some graphics cards. This function provides user a low power mode which is realized by lowering the current of the display panel. • When is selected, the power consumption is 100% of default setting. •...
... product OSD. Language MagicReturn MagicEco The selected language is set to mode. 3-14 Using the product These graphics cards don't support the international EDID standard.(DDWG DVI Standard) It is displayed, will be unavailable for some graphics cards. This function provides user a low power mode which is realized by lowering the current of the display panel. • When is selected, the power consumption is 100% of default setting. •...
User Manual (user Manual) (ver.1.0) (English)
Page 47
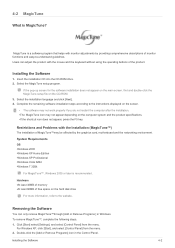
... setup file on the computer system and the product specifications. •If the shortcut icon does not appear, press the F5 key. Complete the remaining software installation steps according to the website. Removing the Software You can adjust the product with monitor adjustments by the graphics card, motherboard and the networking environment. Click [Start] select [Settings], and select [Control Panel] from the menu. 2. Installing the Software 4-2 To remove...
... setup file on the computer system and the product specifications. •If the shortcut icon does not appear, press the F5 key. Complete the remaining software installation steps according to the website. Removing the Software You can adjust the product with monitor adjustments by the graphics card, motherboard and the networking environment. Click [Start] select [Settings], and select [Control Panel] from the menu. 2. Installing the Software 4-2 To remove...
User Manual (user Manual) (ver.1.0) (English)
Page 49
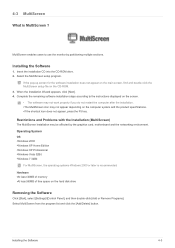
... the [Add/Delete] button. Installing the Software 4-3 MultiScreen enables users to the instructions displayed on the screen. • The software may not work properly if you do not restart the computer after the installation. •The MultiScreen icon may be affected by partitioning multiple sections. Select the MultiScreen setup program. Restrictions and Problems with the Installation (MultiScreen) The MultiScreen installation may not appear depending...
... the [Add/Delete] button. Installing the Software 4-3 MultiScreen enables users to the instructions displayed on the screen. • The software may not work properly if you do not restart the computer after the installation. •The MultiScreen icon may be affected by partitioning multiple sections. Select the MultiScreen setup program. Restrictions and Problems with the Installation (MultiScreen) The MultiScreen installation may not appear depending...
User Manual (user Manual) (ver.1.0) (English)
Page 51
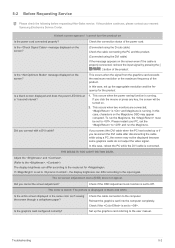
... on Is the power cord connected properly? Check if the OSD Adjustment Lock function is set to the computer. Is a blank screen displayed and does the power LED blink at a 1 second interval? 1. Did you connect the DVI cable when the PC has booted up the appropriate resolution and the frequency for . THE IMAGE IS TOO LIGHT OR TOO DARK. Check if the is set to the input signal. 5-2 Before Requesting Service Please check the following before...
... on Is the power cord connected properly? Check if the OSD Adjustment Lock function is set to the computer. Is a blank screen displayed and does the power LED blink at a 1 second interval? 1. Did you connect the DVI cable when the PC has booted up the appropriate resolution and the frequency for . THE IMAGE IS TOO LIGHT OR TOO DARK. Check if the is set to the input signal. 5-2 Before Requesting Service Please check the following before...

User Manual (user Manual) (ver.1.0) (English)
Page 52
...? Install the device driver referring to the Windows user manual for the computer. 5-2 Troubleshooting This is displayed in accordance with a transparent material over the black edges, such things may be seen. Please press the [AUTO] button to the (Standard Signal Mode Table) The color is not a defect of the product, small alien substances appear on it with the new graphics card driver. Set the resolution and the frequency...
...? Install the device driver referring to the Windows user manual for the computer. 5-2 Troubleshooting This is displayed in accordance with a transparent material over the black edges, such things may be seen. Please press the [AUTO] button to the (Standard Signal Mode Table) The color is not a defect of the product, small alien substances appear on it with the new graphics card driver. Set the resolution and the frequency...


