User Manual
Page 2
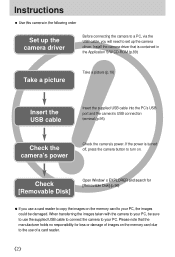
Check [Removable Disk] Open Window's EXPLORER and search for loss or damage of a card reader. 《2》 When transferring the images taken with the camera to your PC, be damaged. Instructions ■ Use this camera in the Application S/W CD-ROM.(p.89) Take a picture Take a picture (p.19) Insert the USB cable Insert the supplied USB cable into the PC's USB port and the camera's USB connection terminal.(p.95) Check the camera's power Check the camera's power. If the power is...
Check [Removable Disk] Open Window's EXPLORER and search for loss or damage of a card reader. 《2》 When transferring the images taken with the camera to your PC, be damaged. Instructions ■ Use this camera in the Application S/W CD-ROM.(p.89) Take a picture Take a picture (p.19) Insert the USB cable Insert the supplied USB cable into the PC's USB port and the camera's USB connection terminal.(p.95) Check the camera's power Check the camera's power. If the power is...

User Manual
Page 3
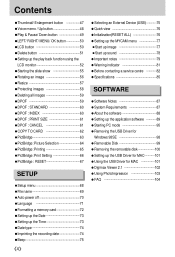
...;Using the batteries ●Connecting to a Power Source ■Using the batteries ●Instructions on how to use the VOICE RECORDING ■Playing back a movie clip 46 mode 21 ■Playing back a recorded voice 46 ■Pausing while recording a ●Using the camera buttons to adjust the 5 camera 23 6 ■POWER button 23 6 ■SHUTTER button 23 7 ●ZOOM W/T button 24 7 ●Voice memo/ UP button 25 8 ●Down button 25 10 ●Flash/ Left button 26 10 ●Self-timer/ Right button...
...;Using the batteries ●Connecting to a Power Source ■Using the batteries ●Instructions on how to use the VOICE RECORDING ■Playing back a movie clip 46 mode 21 ■Playing back a recorded voice 46 ■Pausing while recording a ●Using the camera buttons to adjust the 5 camera 23 6 ■POWER button 23 6 ■SHUTTER button 23 7 ●ZOOM W/T button 24 7 ●Voice memo/ UP button 25 8 ●Down button 25 10 ●Flash/ Left button 26 10 ●Self-timer/ Right button...
User Manual
Page 4
...;Removable Disk 99 ●PictBridge: Printing 65 ●Removing the removable disk 100 ●PictBridge: Print Setting 66 ●Setting up the USB Driver for MAC 101 ●PictBridge : RESET 67 ●Using the USB Driver for MAC 101 ●Digimax Viewer 2.1 102 SETUP ●Using PhotoImpression 103 ●FAQ 104 ●Setup menu 68 ●File name 69 ●Auto power off 70 ●Language 71 ●Formatting a memory card 72 ●Setting up the Date 73 ●Setting up the Time...
...;Removable Disk 99 ●PictBridge: Printing 65 ●Removing the removable disk 100 ●PictBridge: Print Setting 66 ●Setting up the USB Driver for MAC 101 ●PictBridge : RESET 67 ●Using the USB Driver for MAC 101 ●Digimax Viewer 2.1 102 SETUP ●Using PhotoImpression 103 ●FAQ 104 ●Setup menu 68 ●File name 69 ●Auto power off 70 ●Language 71 ●Formatting a memory card 72 ●Setting up the Date 73 ●Setting up the Time...
User Manual
Page 6
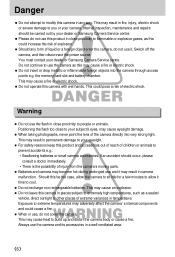
... subject's eyes, may cause eyesight damage. ■ When taking photographs, never point the lens of the camera directly into the camera through access points e.g. the memory card slot and battery chamber. Internal inspection, maintenance and repairs should occur, please consult a doctor immediately. •There is the possibility of injury from the camera's moving parts. ■ Batteries and camera may become hot during prolonged use and it...
... subject's eyes, may cause eyesight damage. ■ When taking photographs, never point the lens of the camera directly into the camera through access points e.g. the memory card slot and battery chamber. Internal inspection, maintenance and repairs should occur, please consult a doctor immediately. •There is the possibility of injury from the camera's moving parts. ■ Batteries and camera may become hot during prolonged use and it...
User Manual
Page 15
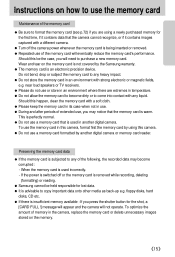
.... This is perfectly normal. ● Do not use , you are extremes in this camera, format first the memory card by using a newly purchased memory for the first time, if it contains images captured with a different camera. ● Turn off or the memory card is removed while recording, deleting (formatting) or reading. ● Samsung cannot be the case, you press the shutter button for lost data. ● It is warm. To optimize...
.... This is perfectly normal. ● Do not use , you are extremes in this camera, format first the memory card by using a newly purchased memory for the first time, if it contains images captured with a different camera. ● Turn off or the memory card is removed while recording, deleting (formatting) or reading. ● Samsung cannot be the case, you press the shutter button for lost data. ● It is warm. To optimize...

User Manual
Page 19
... camera has a 16MB internal memory, you do not need to capture an image. 《19》 Press the shutter button to insert the memory card. Insert the batteries taking note of available shots remaining 17 Remaining time (Movie clip/ Voice recording) 20 00:01:11/ 00:25:50 18 Voice memo p.25 19 Digital Zoom rate Starting the recording mode ■ If the memory card is not inserted in the camera, all the camera functions...
... camera has a 16MB internal memory, you do not need to capture an image. 《19》 Press the shutter button to insert the memory card. Insert the batteries taking note of available shots remaining 17 Remaining time (Movie clip/ Voice recording) 20 00:01:11/ 00:25:50 18 Voice memo p.25 19 Digital Zoom rate Starting the recording mode ■ If the memory card is not inserted in the camera, all the camera functions...

User Manual
Page 22
... flash shot mode. ■ Backlight compensated shots : When taking pictures ■ When the Flash Off or Slow synchro mode is selected in flash(p.26), Spot metering(p.39) or Exposure compensation(p.32). ■ Avoid obstructing the lens or the flash when you capture an image. 《22》 In backlight conditions, please use a tripod, support the camera on a solid surface or change the flash mode to watch out for when taking...
... flash shot mode. ■ Backlight compensated shots : When taking pictures ■ When the Flash Off or Slow synchro mode is selected in flash(p.26), Spot metering(p.39) or Exposure compensation(p.32). ■ Avoid obstructing the lens or the flash when you capture an image. 《22》 In backlight conditions, please use a tripod, support the camera on a solid surface or change the flash mode to watch out for when taking...

User Manual
Page 23
... idle mode, the camera power will start after the camera has finished storing the image data. 《23》 POWER button ● Used for taking an image or recording voice in the memory allows. If there is recorded for as long as the available recording time in the RECORDING mode. ● In MOVIE CLIP mode Pressing the shutter button down fully takes the image and stores the relevant data regarding the shot. Using the camera buttons to adjust the camera ■ The RECORDING mode function...
... idle mode, the camera power will start after the camera has finished storing the image data. 《23》 POWER button ● Used for taking an image or recording voice in the memory allows. If there is recorded for as long as the available recording time in the RECORDING mode. ● In MOVIE CLIP mode Pressing the shutter button down fully takes the image and stores the relevant data regarding the shot. Using the camera buttons to adjust the camera ■ The RECORDING mode function...

User Manual
Page 30
... white balance settings, depending on your images. 3. DAYLIGHT : For taking images outside. button, and then use the +/- TUNGSTEN : For shooting under white fluorescent lighting. Aperture value : F 3.5 / F 7.0 ■ White balance : The white balance control allows you set will be saved and White Balance setup mode will end. 《30》 CUSTOM : Allows the user to set the white balance to select the white balance icon ( ). +/- Exposure compensation ISO -2.0 ~ 0.0 ~ +2.0 (0.5EV steps) AUTO, 100, 200, 400 Aperture value Shutter speed Shutter speed...
... white balance settings, depending on your images. 3. DAYLIGHT : For taking images outside. button, and then use the +/- TUNGSTEN : For shooting under white fluorescent lighting. Aperture value : F 3.5 / F 7.0 ■ White balance : The white balance control allows you set will be saved and White Balance setup mode will end. 《30》 CUSTOM : Allows the user to set the white balance to select the white balance icon ( ). +/- Exposure compensation ISO -2.0 ~ 0.0 ~ +2.0 (0.5EV steps) AUTO, 100, 200, 400 Aperture value Shutter speed Shutter speed...

User Manual
Page 59
... many prints to make. ■ The DPOF indicator will display on the memory card. ● Deleting all images 1. Press the play mode button and press the menu button. 2. Select a desired sub menu by pressing the UP/ DOWN NO button and press the OK button. DELETE ALL 3. Important shots should be stored on DPOF printers, or at an increasing number of photo labs. ■ This function is not available for Movie clips and Voice recording files. ■...
... many prints to make. ■ The DPOF indicator will display on the memory card. ● Deleting all images 1. Press the play mode button and press the menu button. 2. Select a desired sub menu by pressing the UP/ DOWN NO button and press the OK button. DELETE ALL 3. Important shots should be stored on DPOF printers, or at an increasing number of photo labs. ■ This function is not available for Movie clips and Voice recording files. ■...

User Manual
Page 60
... PIC:◀▶ SET:OK DPOF : INDEX ■ Images (except for each picture, excluding movie clips and voice recordings. 5. Select the [STANDARD] menu by pressing the UP/ DOWN button and press the RIGHT button. 4. DPOF 3. DPOF : STANDARD ■ This function allows you to confirm the setting. 《60》 Press the play mode button and press the menu button. ◀ ▶ 2. The DPOF icon ( ) will not be printed...
... PIC:◀▶ SET:OK DPOF : INDEX ■ Images (except for each picture, excluding movie clips and voice recordings. 5. Select the [STANDARD] menu by pressing the UP/ DOWN button and press the RIGHT button. 4. DPOF 3. DPOF : STANDARD ■ This function allows you to confirm the setting. 《60》 Press the play mode button and press the menu button. ◀ ▶ 2. The DPOF icon ( ) will not be printed...
User Manual
Page 63
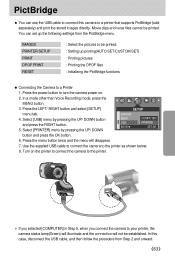
... RIGHT button. 5. IMAGES PRINTER SETUP PRINT DPOF PRINT RESET : Select the pictures to be printed. Select [USB] menu by pressing the UP/ DOWN IMPRINT BEEP USB BACK:◀ COMPUTER PRINTER SET:OK button and press the OK button. 6. Use the supplied USB cable to connect the camera to turn the camera power on the printer to connect the camera to the printer. ※ If you selected [COMPUTER] in Step 5, when you connect the camera to your printer, the camera status lamp(Green) will...
... RIGHT button. 5. IMAGES PRINTER SETUP PRINT DPOF PRINT RESET : Select the pictures to be printed. Select [USB] menu by pressing the UP/ DOWN IMPRINT BEEP USB BACK:◀ COMPUTER PRINTER SET:OK button and press the OK button. 6. Use the supplied USB cable to connect the camera to turn the camera power on the printer to connect the camera to the printer. ※ If you selected [COMPUTER] in Step 5, when you connect the camera to your printer, the camera status lamp(Green) will...

User Manual
Page 83
...; Take a picture within the flash range ㆍThe lens is smudged or dirty → Clean the lens The flash does not fire ㆍFlash off mode has been selected → Dis-engage flash off mode ㆍThe camera mode can't use the flash → Refer to the FLASH instruction (p.26) Incorrect date and time is displayed ㆍThe date and time have been set incorrectly or the camera has adopted the default settings → Reset the date...
...; Take a picture within the flash range ㆍThe lens is smudged or dirty → Clean the lens The flash does not fire ㆍFlash off mode has been selected → Dis-engage flash off mode ㆍThe camera mode can't use the flash → Refer to the FLASH instruction (p.26) Incorrect date and time is displayed ㆍThe date and time have been set incorrectly or the camera has adopted the default settings → Reset the date...

User Manual
Page 85
...0.2m ~ 2.5m Approx. 5 sec. Specifications Type Image Sensor Effective Pixels Total Pixels Focal Length Lens F No. eye reduction, Fill-in Night Mode) Programmed AE Metering: Multi, Spot ±2.0EV (0.5EV steps) Auto,100,200,400 Auto, Auto & Red - Digital Zoom LCD Focusing Type Range Shutter Type Speed Control Exposure Compensation ISO Equivalent Modes Flash Range Recharging Time Sharpness Effect White Balance Photo Frame Voice Recording Date Imprinting Shooting Self-timer Still Image Movie Clip Storage Media File Format 1/2.5" CCD Approx. 4.0 Mega-pixel...
...0.2m ~ 2.5m Approx. 5 sec. Specifications Type Image Sensor Effective Pixels Total Pixels Focal Length Lens F No. eye reduction, Fill-in Night Mode) Programmed AE Metering: Multi, Spot ±2.0EV (0.5EV steps) Auto,100,200,400 Auto, Auto & Red - Digital Zoom LCD Focusing Type Range Shutter Type Speed Control Exposure Compensation ISO Equivalent Modes Flash Range Recharging Time Sharpness Effect White Balance Photo Frame Voice Recording Date Imprinting Shooting Self-timer Still Image Movie Clip Storage Media File Format 1/2.5" CCD Approx. 4.0 Mega-pixel...
User Manual
Page 88
... Windows. This camera uses the USB Storage Driver as a USB card reader. You can use the camera with Mac OS 9.2~10.3. ■ Digimax Viewer : This is a program for MAC is only compatible with Windows. ■ PhotoImpression : Image editing program. A USB Driver for viewing stored images. You can use the camera as the camera driver. This software is not included with the Application CD. If the frame does not show, run . After installing the driver and connecting this camera...
... Windows. This camera uses the USB Storage Driver as a USB card reader. You can use the camera with Mac OS 9.2~10.3. ■ Digimax Viewer : This is a program for MAC is only compatible with Windows. ■ PhotoImpression : Image editing program. A USB Driver for viewing stored images. You can use the camera as the camera driver. This software is not included with the Application CD. If the frame does not show, run . After installing the driver and connecting this camera...
User Manual
Page 89
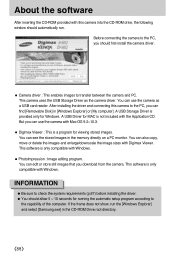
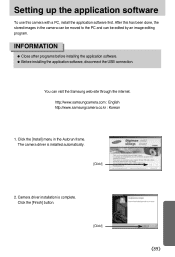
... software To use this has been done, the stored images in the Autorun frame. INFORMATION ● Close other programs before installing the application software. ● Before installing the application software, disconnect the USB connection. http://www.samsungcamera.com : English http://www.samsungcamera.co.kr : Korean 1. Camera driver installation is installed automatically. [Click!] 2. You can be edited by an image editing program. Click the [Install] menu in the camera...
... software To use this has been done, the stored images in the Autorun frame. INFORMATION ● Close other programs before installing the application software. ● Before installing the application software, disconnect the USB connection. http://www.samsungcamera.com : English http://www.samsungcamera.co.kr : Korean 1. Camera driver installation is installed automatically. [Click!] 2. You can be edited by an image editing program. Click the [Install] menu in the camera...
User Manual
Page 93
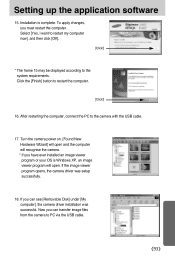
.... Turn the camera power on. [Found New Hardware Wizard] will open and the computer will open. If you can see [Removable Disk] under [My computer], the camera driver installation was setup successfully. 18. Click the [Finish] button to PC via the USB cable. 《93》 Setting up the application software 15. To apply changes, you have ever installed an image viewer program or your OS is complete. Installation is Windows...
.... Turn the camera power on. [Found New Hardware Wizard] will open and the computer will open. If you can see [Removable Disk] under [My computer], the camera driver installation was setup successfully. 18. Click the [Finish] button to PC via the USB cable. 《93》 Setting up the application software 15. To apply changes, you have ever installed an image viewer program or your OS is complete. Installation is Windows...

User Manual
Page 99
... USB cable. 2. Image files stored in Windows 2000/ME/XP, use this camera to Removable Disk, the [FILE ERROR!] message will blink, when a file is transferred (copy or deletion) between the PC and the camera. Opening images directly from the removable disk may be displayed on the LCD monitor in the PLAY mode, and nothing is displayed in THUMBNAIL mode. ● The camera status lamp will be subject to unexpected disconnection. ● When uploading images from the PC to view them. Do not remove...
... USB cable. 2. Image files stored in Windows 2000/ME/XP, use this camera to Removable Disk, the [FILE ERROR!] message will blink, when a file is transferred (copy or deletion) between the PC and the camera. Opening images directly from the removable disk may be displayed on the LCD monitor in the PLAY mode, and nothing is displayed in THUMBNAIL mode. ● The camera status lamp will be subject to unexpected disconnection. ● When uploading images from the PC to view them. Do not remove...

User Manual
Page 105
... an unexpected error during file transfer → Turn the camera power off the camera, remove the USB cable, plug in connecting the camera to the camera. 《105》 Win 98/ME : Trace [Start → Settings → Control Panel → System → Device Manager → Universal Serial Bus controllers]. There must be a problem in the USB cable again, and then turn on the camera. [Case 5] There is available in Windows 98, 98SE, 2000...
... an unexpected error during file transfer → Turn the camera power off the camera, remove the USB cable, plug in connecting the camera to the camera. 《105》 Win 98/ME : Trace [Start → Settings → Control Panel → System → Device Manager → Universal Serial Bus controllers]. There must be a problem in the USB cable again, and then turn on the camera. [Case 5] There is available in Windows 98, 98SE, 2000...
User Manual
Page 106
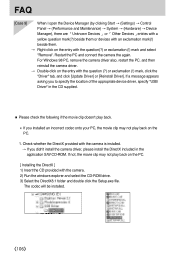
... the Setup.exe file. If not, the movie clip may not play back. ※ If you to specify the location of the appropriate device driver, specify "USB Driver" in the application S/W CD-ROM. The codec will be installed. 《106》 Restart the PC and connect the camera the again. FAQ [Case 9] When I open the Device Manager (by clicking Start → (Settings) → Control Panel...
... the Setup.exe file. If not, the movie clip may not play back. ※ If you to specify the location of the appropriate device driver, specify "USB Driver" in the application S/W CD-ROM. The codec will be installed. 《106》 Restart the PC and connect the camera the again. FAQ [Case 9] When I open the Device Manager (by clicking Start → (Settings) → Control Panel...


