
User Manual (KOREAN)
Page 1
LCD Monitor
LCD Monitor
User Manual (KOREAN)
Page 31
"Enter" X-Window X-Window F1) http://www.samsung.com/sec/consumer/learningresources/monitor/naturalcolorexpert/NC_download.html 30 2. 3. Natural Color Natural Color S/W) Natural Color S/W) X86Config X86Con- X86Config 2. 3. 4. 5. 6. 7. 8. 9. Linux X-Window fig 1.
"Enter" X-Window X-Window F1) http://www.samsung.com/sec/consumer/learningresources/monitor/naturalcolorexpert/NC_download.html 30 2. 3. Natural Color Natural Color S/W) Natural Color S/W) X86Config X86Con- X86Config 2. 3. 4. 5. 6. 7. 8. 9. Linux X-Window fig 1.

User Manual (ENGLISH)
Page 1
LCD Monitor User Manual
LCD Monitor User Manual
User Manual (ENGLISH)
Page 3
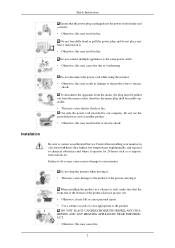
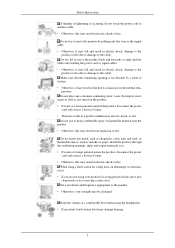
...Do not forcefully bend or pull the power plug and do so may cause serious damage to your monitor in fire. Installation Be sure to contact an authorized Service Center when installing your monitor. RETTES AND ANY HEATING APPLIANCES NEAR THE PRODUCT. • Otherwise, this may cause fire due... to overheating. DO NOT PLACE CANDLES,MOSQUITO REPELLANT,CIGA- Do not disconnect the power cord while using the monitor. • Otherwise, this may result in fire. When installing the product in fire or electric shock. Failure to do not place any ...
...Do not forcefully bend or pull the power plug and do so may cause serious damage to your monitor in fire. Installation Be sure to contact an authorized Service Center when installing your monitor. RETTES AND ANY HEATING APPLIANCES NEAR THE PRODUCT. • Otherwise, this may cause fire due... to overheating. DO NOT PLACE CANDLES,MOSQUITO REPELLANT,CIGA- Do not disconnect the power cord while using the monitor. • Otherwise, this may result in fire. When installing the product in fire or electric shock. Failure to do not place any ...
User Manual (ENGLISH)
Page 4
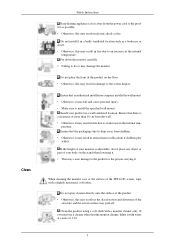
... result in electric shock or fire. Ensure that there is adjustable, do so may damage the monitor. Do not place the front of the product on the floor. • Otherwise, this may.... • Otherwise, this may result in damage to install the specified wall mount. Put down the monitor carefully. • Failing to an increase in the internal temperature. Do not install it . •... cause damage to an increase in a well ventilated location. When cleaning the monitor case or the surface of more than the monitor cleaner, dilute it with it may fall and cause personal injury. •...
... result in electric shock or fire. Ensure that there is adjustable, do so may damage the monitor. Do not place the front of the product on the floor. • Otherwise, this may.... • Otherwise, this may result in damage to install the specified wall mount. Put down the monitor carefully. • Failing to an increase in the internal temperature. Do not install it . •... cause damage to an increase in a well ventilated location. When cleaning the monitor case or the surface of more than the monitor cleaner, dilute it with it may fall and cause personal injury. •...
User Manual (ENGLISH)
Page 6
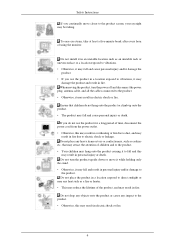
... the power cord and contact a Service Center. • Otherwise, this may result in a product malfunction, electric shock, or fire. Do not lift or move the monitor by a table or curtain. • Otherwise, it may result in fire due to an increase in electric shock or fire. Make sure that the ventilating...
... the power cord and contact a Service Center. • Otherwise, this may result in a product malfunction, electric shock, or fire. Do not lift or move the monitor by a table or curtain. • Otherwise, it may result in fire due to an increase in electric shock or fire. Make sure that the ventilating...
User Manual (ENGLISH)
Page 7
...; Otherwise, it may fall and cause personal injury and/or damage the product. • If you use the product for a long period of using the monitor. Do not place the product in a location exposed to vibrations, it may damage the product and result in fire. To ease eye strain, take at...
...; Otherwise, it may fall and cause personal injury and/or damage the product. • If you use the product for a long period of using the monitor. Do not place the product in a location exposed to vibrations, it may damage the product and result in fire. To ease eye strain, take at...

User Manual (ENGLISH)
Page 8
... between your heart. 7 Do not install the product in a location low enough for a long time, the display panel becomes hot. Good Postures When Using the Monitor When using the product, use it may result in personal injury and/or damage to reach. • Otherwise, it in electric shock or fire. Do...
... between your heart. 7 Do not install the product in a location low enough for a long time, the display panel becomes hot. Good Postures When Using the Monitor When using the product, use it may result in personal injury and/or damage to reach. • Otherwise, it in electric shock or fire. Do...
User Manual (ENGLISH)
Page 9
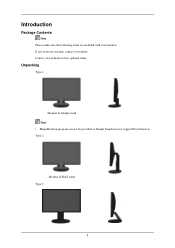
If any items are included with your dealer. Type 2 Monitor & HAS stand Type 3 8 Contact a local dealer to buy optional items. Unpacking Type 1 Monitor & Simple stand Note • MagicRotation program can not be provided as Simple Stand does not support Pivot function. Introduction Package Contents Note Please make sure the following items are missing, contact your monitor.
If any items are included with your dealer. Type 2 Monitor & HAS stand Type 3 8 Contact a local dealer to buy optional items. Unpacking Type 1 Monitor & Simple stand Note • MagicRotation program can not be provided as Simple Stand does not support Pivot function. Introduction Package Contents Note Please make sure the following items are missing, contact your monitor.
User Manual (ENGLISH)
Page 10
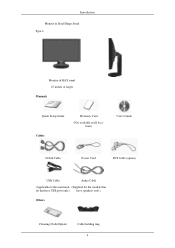
Introduction Monitor & Dual Hinge Stand Type 4 Monitor & HAS stand 23 inches or larger Manuals Quick Setup Guide Cables Warranty Card (Not available in all locations) User's Guide D-Sub Cable Power Cord DVI Cable (option) USB Cable Audio Cable (Applicable to the stand mod- (Supplied for the models that els that have USB ports only.) have speakers only.) Others Cleaning Cloth(Option) Cable holding ring 9
Introduction Monitor & Dual Hinge Stand Type 4 Monitor & HAS stand 23 inches or larger Manuals Quick Setup Guide Cables Warranty Card (Not available in all locations) User's Guide D-Sub Cable Power Cord DVI Cable (option) USB Cable Audio Cable (Applicable to the stand mod- (Supplied for the models that els that have USB ports only.) have speakers only.) Others Cleaning Cloth(Option) Cable holding ring 9
User Manual (ENGLISH)
Page 11
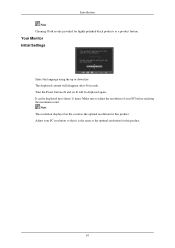
... and on the screen is the same as the optimal resolution for highly polished black products as a product feature. Make sure to three (1) times. Your Monitor Initial Settings Select the language using the up to adjust the resolution of your PC resolution so that it is the optimal resolution for this...
... and on the screen is the same as the optimal resolution for highly polished black products as a product feature. Make sure to three (1) times. Your Monitor Initial Settings Select the language using the up to adjust the resolution of your PC resolution so that it is the optimal resolution for this...
User Manual (ENGLISH)
Page 13
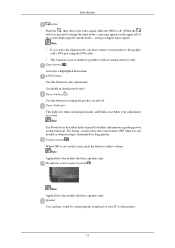
Headphone sound output terminal[ ] Note Applicable to adjust volume. Speaker You can hear sound by connecting the soundcard of your monitor to change the input mode, a message appears in the upper left of the screen displaying the current mode -- AUTO button... DVI cable. • This function is lit when operating normally, and blinks once when your monitor OFF when it unattended for further information regarding power saving functions. Note Applicable to the monitor. 12 For energy conservation, turn your adjustments are saved. Introduction button Push the ' ', then...
Headphone sound output terminal[ ] Note Applicable to adjust volume. Speaker You can hear sound by connecting the soundcard of your monitor to change the input mode, a message appears in the upper left of the screen displaying the current mode -- AUTO button... DVI cable. • This function is lit when operating normally, and blinks once when your monitor OFF when it unattended for further information regarding power saving functions. Note Applicable to the monitor. 12 For energy conservation, turn your adjustments are saved. Introduction button Push the ' ', then...
User Manual (ENGLISH)
Page 14
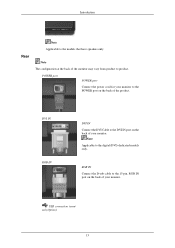
Introduction Rear Note Applicable to the digital (DVI)-dedicated models only. Note The configuration at the back of the product. Note Applicable to the models that have speakers only. POWER port POWER port Connect the power cord for your monitor to the POWER port on the back of the monitor may vary from product to product. RGB IN Connect the D-sub cable to the DVI IN port on the back of your monitor. DVI IN RGB IN DVI IN Connect the DVI Cable to the 15-pin, RGB IN port on the back of your monitor. USB connection terminal (Option) 13
Introduction Rear Note Applicable to the digital (DVI)-dedicated models only. Note The configuration at the back of the product. Note Applicable to the models that have speakers only. POWER port POWER port Connect the power cord for your monitor to the POWER port on the back of the monitor may vary from product to product. RGB IN Connect the D-sub cable to the DVI IN port on the back of your monitor. DVI IN RGB IN DVI IN Connect the DVI Cable to the 15-pin, RGB IN port on the back of your monitor. USB connection terminal (Option) 13
User Manual (ENGLISH)
Page 15
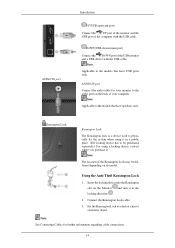
... the Anti-Theft Kensington Lock 1. Fix the Kensington Lock to be different depending on its model. Note Applicable to the audio port on the Monitor and turn it . Note The location of the computer with the USB cable. AUDIO IN port Connect the audio cable for further information regarding .... 14 Insert the locking device into the Kensington slot on the back of the USB monitor and a USB device with the USB cable. DOWN(USB downstream port) Connect the DOWN port of your monitor to the models that have USB ports only. Kensington Lock Kensington Lock The Kensington lock ...
... the Anti-Theft Kensington Lock 1. Fix the Kensington Lock to be different depending on its model. Note Applicable to the audio port on the Monitor and turn it . Note The location of the computer with the USB cable. AUDIO IN port Connect the audio cable for further information regarding .... 14 Insert the locking device into the Kensington slot on the back of the USB monitor and a USB device with the USB cable. DOWN(USB downstream port) Connect the DOWN port of your monitor to the models that have USB ports only. Kensington Lock Kensington Lock The Kensington lock ...
User Manual (ENGLISH)
Page 17
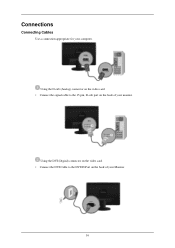
Using the D-sub (Analog) connector on the video card. • Connect the signal cable to the DVI IN Port on the back of your Monitor. 16 Connections Connecting Cables Use a connection appropriate for your monitor. Using the DVI (Digital) connector on the video card. • Connect the DVI Cable to the 15-pin, D-sub port on the back of your computer.
Using the D-sub (Analog) connector on the video card. • Connect the signal cable to the DVI IN Port on the back of your Monitor. 16 Connections Connecting Cables Use a connection appropriate for your monitor. Using the DVI (Digital) connector on the video card. • Connect the DVI Cable to the 15-pin, D-sub port on the back of your computer.
User Manual (ENGLISH)
Page 18
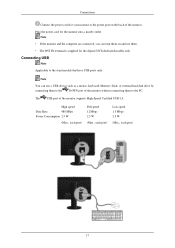
... the computer are connected, you can use them. • The DVI IN terminal is supplied for your monitor to the PC. Connecting USB Note Applicable to the DOWN port of the monitor supports High-Speed Certified USB 2.0. Note You can turn them on and use a USB device such as a mouse, ...keyboard, Memory Stick, or external hard disk drive by connecting them to the power port on the back of the monitor. The USB port of the monitor without connecting them to the stand models that have USB ports only. Connections Connect the power cord for the digital (DVI)-dedicated models...
... the computer are connected, you can use them. • The DVI IN terminal is supplied for your monitor to the PC. Connecting USB Note Applicable to the DOWN port of the monitor supports High-Speed Certified USB 2.0. Note You can turn them on and use a USB device such as a mouse, ...keyboard, Memory Stick, or external hard disk drive by connecting them to the power port on the back of the monitor. The USB port of the monitor without connecting them to the stand models that have USB ports only. Connections Connect the power cord for the digital (DVI)-dedicated models...
User Manual (ENGLISH)
Page 19
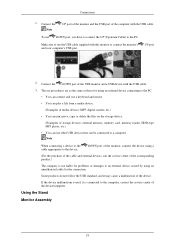
...the service center of the device/computer. UP port 2. Note When connecting a device to the cable appropriate to the PC. Using the Stand Monitor Assembly 18 If the device malfunctions even if it may cause a malfunction of the computer with the USB cable. 3. Connections 1. Connect the ...Note UP port of the monitor and the USB port of the device. Connect the DOWN port of storage devices: external memory, memory card, memory reader, HDD-type MP3 ...
...the service center of the device/computer. UP port 2. Note When connecting a device to the cable appropriate to the PC. Using the Stand Monitor Assembly 18 If the device malfunctions even if it may cause a malfunction of the computer with the USB cable. 3. Connections 1. Connect the ...Note UP port of the monitor and the USB port of the device. Connect the DOWN port of storage devices: external memory, memory card, memory reader, HDD-type MP3 ...

User Manual (ENGLISH)
Page 22
Simple Stand HAS Stand 21 Stand Stopper Attaching a Base This monitor accepts a 100 mm x 100 mm VESA-compliant mounting interface pad. Note The VESA dimensions given above are an example. The VESA dimensions may differ depending on the product. Dual Hinge Stand Connections A.
Simple Stand HAS Stand 21 Stand Stopper Attaching a Base This monitor accepts a 100 mm x 100 mm VESA-compliant mounting interface pad. Note The VESA dimensions given above are an example. The VESA dimensions may differ depending on the product. Dual Hinge Stand Connections A.
User Manual (ENGLISH)
Page 23
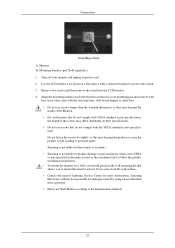
.... Do not fasten the screws too tightly, as they may damage the inside of the Monitor. • For wall mounts that do not comply with VESA standard screw specifications, the length of accidents. • Samsung is not liable for product damage or personal injury when a non-VESA or non-specified ...wall mount is not liable for these kinds of the screws may damage the product or cause the product to fall, leading to protect the screen. 3. Lay the LCD monitor face-down on a ...
.... Do not fasten the screws too tightly, as they may damage the inside of the Monitor. • For wall mounts that do not comply with VESA standard screw specifications, the length of accidents. • Samsung is not liable for product damage or personal injury when a non-VESA or non-specified ...wall mount is not liable for these kinds of the screws may damage the product or cause the product to fall, leading to protect the screen. 3. Lay the LCD monitor face-down on a ...
User Manual (ENGLISH)
Page 24
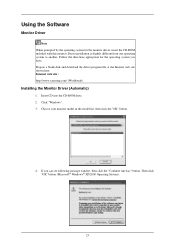
...the operating system you can see following message window, then click the "Continue Anyway" button. Internet web site : http://www.samsung.com/ (Worldwide) Installing the Monitor Driver (Automatic) 1. If you have. Click "Windows". 3. Driver installation is slightly different from one operating system to another.... Follow the directions appropriate for the monitor driver, insert the CD-ROM included with this monitor. Prepare a blank disk and download the driver program file at the Internet web site shown here. Choose your monitor model in the model list, then click the "...
...the operating system you can see following message window, then click the "Continue Anyway" button. Internet web site : http://www.samsung.com/ (Worldwide) Installing the Monitor Driver (Automatic) 1. If you have. Click "Windows". 3. Driver installation is slightly different from one operating system to another.... Follow the directions appropriate for the monitor driver, insert the CD-ROM included with this monitor. Prepare a blank disk and download the driver program file at the Internet web site shown here. Choose your monitor model in the model list, then click the "...


