User Manual (ENGLISH)
Page 16
... one operating system to another . Driver installation is under certifying MS logo,and this installation don't damage your monitor model in the model list, then click the "OK" button. 4. not be posted on Samsung Monitor homepage http://www.samsung.com/ 5. Insert CD into the CD-ROM drive. 2. z Please use Wall Mount according to another . Driver installation...
... one operating system to another . Driver installation is under certifying MS logo,and this installation don't damage your monitor model in the model list, then click the "OK" button. 4. not be posted on Samsung Monitor homepage http://www.samsung.com/ 5. Insert CD into the CD-ROM drive. 2. z Please use Wall Mount according to another . Driver installation...
User Manual (ENGLISH)
Page 18
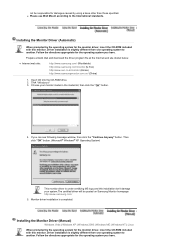
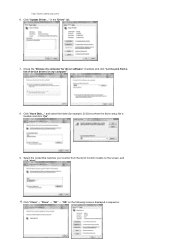
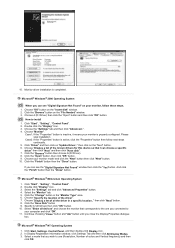
Select the model that matches your monitor from a list of monitor models on the following screens displayed in the "Driver" tab. 7. Click "Close"→ "Close" → "OK" → "OK" on the screen, and click "Next". 10. Check the "Browse my computer for example, D:\Drive) where the driver setup file is located, and click "OK". 9. in sequence. and select the folder (for driver software" checkbox and click "Let me pick from the list of device drivers on my computer". 8. Click "Have Disk..." Click "Update Driver..." http://www.samsung.com/ 6.
Select the model that matches your monitor from a list of monitor models on the following screens displayed in the "Driver" tab. 7. Click "Close"→ "Close" → "OK" → "OK" on the screen, and click "Next". 10. Check the "Browse my computer for example, D:\Drive) where the driver setup file is located, and click "OK". 9. in sequence. and select the folder (for driver software" checkbox and click "Let me pick from the list of device drivers on my computer". 8. Click "Have Disk..." Click "Update Driver..." http://www.samsung.com/ 6.
User Manual (ENGLISH)
Page 20
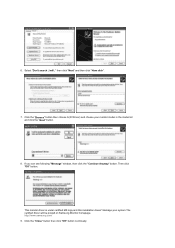
Then click "OK" button. This monitor driver is under certified MS logo,and this installation doesn't damage your monitor model in the model list and click the "Next" button. 8. Click the "Close" button then click "OK" button continually. 6. Click the "Browse" button then choose A:(D:\Driver) and choose your system.The certified driver will .." Select "Don't search ,I will be posted on Samsung Monitor homepage. If you can see following "Message" window, then click the "Continue Anyway" button. http://www.samsung.com/ 9. then click "Next" and then click "Have disk". 7.
Then click "OK" button. This monitor driver is under certified MS logo,and this installation doesn't damage your monitor model in the model list and click the "Next" button. 8. Click the "Close" button then click "OK" button continually. 6. Click the "Browse" button then choose A:(D:\Driver) and choose your system.The certified driver will .." Select "Don't search ,I will be posted on Samsung Monitor homepage. If you can see following "Message" window, then click the "Continue Anyway" button. http://www.samsung.com/ 9. then click "Next" and then click "Have disk". 7.
User Manual (ENGLISH)
Page 21
...Browse" button on the "Next" button. 6. then click on the "File Needed" window. 3. Choose your monitor is inactive, it means your monitor model and click the "Next" button then click "Next" button. 10. If you can see the "Digital ..."Control Panel". 2. Click the "Change" button in a specific location.." then click "Next" button. 8. Select "Show all the driver in the "Monitor Type" area. 6. Choose "Monitor". Click the "Browse" button then choose A:(D:\Driver). 8. Click Start, Settings, Control Panel, and then double-click Display icon. 2. Select a mode that...
...Browse" button on the "Next" button. 6. then click on the "File Needed" window. 3. Choose your monitor is inactive, it means your monitor model and click the "Next" button then click "Next" button. 10. If you can see the "Digital ..."Control Panel". 2. Click the "Change" button in a specific location.." then click "Next" button. 8. Select "Show all the driver in the "Monitor Type" area. 6. Choose "Monitor". Click the "Browse" button then choose A:(D:\Driver). 8. Click Start, Settings, Control Panel, and then double-click Display icon. 2. Select a mode that...

User Manual (ENGLISH)
Page 22
... 10. 4. The next screen is a type of X- This information will not affect the actual execution of system setting file. 1. Enter the model name of resolution, colors or frequency). Execute X-Window after executing the X86Config file. 2. If there is for setting your computer. 4. Press Enter... next screen is no Mode at the first and the second screen after setting other requested hardware. If the screen is for setting your monitor. (You can enter the frequency directly.) 9. First of resolution and vertical frequency by referring to a different mode (lower mode of your...
... 10. 4. The next screen is a type of X- This information will not affect the actual execution of system setting file. 1. Enter the model name of resolution, colors or frequency). Execute X-Window after executing the X86Config file. 2. If there is for setting your computer. 4. Press Enter... next screen is no Mode at the first and the second screen after setting other requested hardware. If the screen is for setting your monitor. (You can enter the frequency directly.) 9. First of resolution and vertical frequency by referring to a different mode (lower mode of your...

User Manual (ENGLISH)
Page 33
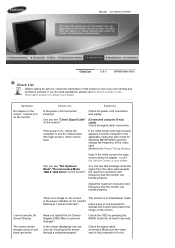
Model SyncMaster 923NW Check List Before calling for service, check the information in this message when the signal from the video card exceeds the maximum resolution and frequency that the monitor can handle properly. If the initial screen (the login screen) appears, boot the computer in the applicable mode (the ...Hz" on the screen. cable) Check the signal cable connection. I cannot turn on the keyboard to prevent changes? press a key on the monitor. Unlock the OSD by pressing the MENU button for Windows ME/XP/2000) and then change the frequency of the video card. (Refer to...
Model SyncMaster 923NW Check List Before calling for service, check the information in this message when the signal from the video card exceeds the maximum resolution and frequency that the monitor can handle properly. If the initial screen (the login screen) appears, boot the computer in the applicable mode (the ...Hz" on the screen. cable) Check the signal cable connection. I cannot turn on the keyboard to prevent changes? press a key on the monitor. Unlock the OSD by pressing the MENU button for Windows ME/XP/2000) and then change the frequency of the video card. (Refer to...
User Manual (ENGLISH)
Page 37
Model SyncMaster 2023NW Check List Before calling for at least 5 seconds. cable) Check the ...the signal from the video card exceeds the maximum resolution and frequency that the monitor can be seen. Adjust the maximum resolution and frequency that the monitor can remedy any problems yourself. Is the screen displaying only one color as... see the On Screen Display. I cannot see "Not Optimum Mode","Recommended Mode 1680 X 1050 60 Hz" on the monitor blinking at the screen through a cellophane paper? You can see if you can handle properly. I cannot turn on the...
Model SyncMaster 2023NW Check List Before calling for at least 5 seconds. cable) Check the ...the signal from the video card exceeds the maximum resolution and frequency that the monitor can be seen. Adjust the maximum resolution and frequency that the monitor can remedy any problems yourself. Is the screen displaying only one color as... see the On Screen Display. I cannot see "Not Optimum Mode","Recommended Mode 1680 X 1050 60 Hz" on the monitor blinking at the screen through a cellophane paper? You can see if you can handle properly. I cannot turn on the...

User Manual (ENGLISH)
Page 41
...the power is in this section to prevent changes? Can you can handle properly. Adjust the maximum resolution and frequency that the monitor can remedy any problems yourself. Have you see the On Screen Display. Check the power cord connection and supply. I cannot ...Hz" on the monitor. cable) Check the signal cable connection. You can see if you see the initial screen (the login screen), which can handle properly. There is fully inserted in the applicable mode (the safe mode for at 1 second intervals? Model SyncMaster 2223NW Check List...
...the power is in this section to prevent changes? Can you can handle properly. Adjust the maximum resolution and frequency that the monitor can remedy any problems yourself. Have you see the On Screen Display. Check the power cord connection and supply. I cannot ...Hz" on the monitor. cable) Check the signal cable connection. You can see if you see the initial screen (the login screen), which can handle properly. There is fully inserted in the applicable mode (the safe mode for at 1 second intervals? Model SyncMaster 2223NW Check List...
User Manual (ENGLISH)
Page 45
... cable, Detachable Dimensions (WxHxD)/ (Without Stand) 439 x 289 x 65.5 mm(Without Stand) Model SyncMaster 923NW General General Model Name LCD Panel Size Display area Pixel Pitch Synchronization Horizontal Vertical Display Color 16.7M Resolution Optimum resolution Maximum resolution Input Signal, Terminated RGB Analog SyncMaster 923NW 19 inch(48 cm) 408.24 mm (H) x 255.15 mm (V) 0.2835mm (H) x 0.2835 mm...
... cable, Detachable Dimensions (WxHxD)/ (Without Stand) 439 x 289 x 65.5 mm(Without Stand) Model SyncMaster 923NW General General Model Name LCD Panel Size Display area Pixel Pitch Synchronization Horizontal Vertical Display Color 16.7M Resolution Optimum resolution Maximum resolution Input Signal, Terminated RGB Analog SyncMaster 923NW 19 inch(48 cm) 408.24 mm (H) x 255.15 mm (V) 0.2835mm (H) x 0.2835 mm...

User Manual (ENGLISH)
Page 48
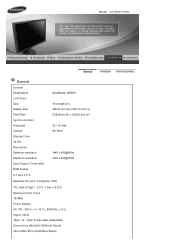
Model SyncMaster 2023NW General General Model Name LCD Panel Size Display area Pixel Pitch Synchronization Horizontal Vertical Display Color 16.7M Resolution Optimum resolution Maximum resolution Input Signal, Terminated RGB Analog SyncMaster 2023NW 20inch (51 cm) 433.44mm (H) x 270.9mm (V) 0.258 mm (H) x 0.258mm (V) 30 ~ 81 kHz 56~75Hz 1680 x 1050@60Hz 1680 x 1050@60Hz 0.7 Vp-p ±...
Model SyncMaster 2023NW General General Model Name LCD Panel Size Display area Pixel Pitch Synchronization Horizontal Vertical Display Color 16.7M Resolution Optimum resolution Maximum resolution Input Signal, Terminated RGB Analog SyncMaster 2023NW 20inch (51 cm) 433.44mm (H) x 270.9mm (V) 0.258 mm (H) x 0.258mm (V) 30 ~ 81 kHz 56~75Hz 1680 x 1050@60Hz 1680 x 1050@60Hz 0.7 Vp-p ±...

User Manual (ENGLISH)
Page 51
... cable, Detachable Dimensions (WxHxD)/ (Without Stand) 511 x 335 x 66.8 mm (Without Stand) Model SyncMaster 2223NW General General Model Name LCD Panel Size Display area Pixel Pitch Synchronization Horizontal Vertical Display Color 16.7M Resolution Optimum resolution Maximum resolution Input Signal, Terminated RGB Analog SyncMaster 2223NW 22inch 473.76mm (H) x 296.1 mm (V) 0.282 mm (H) x 0.282 mm (V) 30...
... cable, Detachable Dimensions (WxHxD)/ (Without Stand) 511 x 335 x 66.8 mm (Without Stand) Model SyncMaster 2223NW General General Model Name LCD Panel Size Display area Pixel Pitch Synchronization Horizontal Vertical Display Color 16.7M Resolution Optimum resolution Maximum resolution Input Signal, Terminated RGB Analog SyncMaster 2223NW 22inch 473.76mm (H) x 296.1 mm (V) 0.282 mm (H) x 0.282 mm (V) 30...

