Service Manual
Page 12
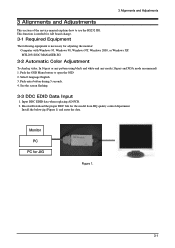
Selectl language English 3. Push the OSD Menu button to use the RS232 JIG. MTI-2031 DDC MANAGER JIG 3-2 Automatic Color Adjustment To Analog video, In 16gray or any pattern using black and white ... 1. 3-1 Input DDC EDID data when replacing AD PCB. 2. Install the below jig (Figure 1) and enter the data. See the screen flashing 3-3 DDC EDID Data Input 1. Monitor PC PC for the model from HQ quality control department. 3 Alignments and Adjustments 3 Alignments and Adjustments This section of the service manual explains how to...
Selectl language English 3. Push the OSD Menu button to use the RS232 JIG. MTI-2031 DDC MANAGER JIG 3-2 Automatic Color Adjustment To Analog video, In 16gray or any pattern using black and white ... 1. 3-1 Input DDC EDID data when replacing AD PCB. 2. Install the below jig (Figure 1) and enter the data. See the screen flashing 3-3 DDC EDID Data Input 1. Monitor PC PC for the model from HQ quality control department. 3 Alignments and Adjustments 3 Alignments and Adjustments This section of the service manual explains how to...

Service Manual
Page 16
External Memory: PM25LV010E 2. Click 'Connect File' button, and select the MCU code. 3. Communication Port: DSUB15 (Analog) -. Device Type: TSUM16_ROM128K_ext_flash -. 3 Alignments and Adjustments 6. Write DDC ok. 3-5 How to execute MCU Code 1. Click 'Read File' button, and select the MCU code. 3-5 Set the options. -. Manufacture: MSTAR -.
External Memory: PM25LV010E 2. Click 'Connect File' button, and select the MCU code. 3. Communication Port: DSUB15 (Analog) -. Device Type: TSUM16_ROM128K_ext_flash -. 3 Alignments and Adjustments 6. Write DDC ok. 3-5 How to execute MCU Code 1. Click 'Read File' button, and select the MCU code. 3-5 Set the options. -. Manufacture: MSTAR -.

Service Manual
Page 17
If Program and Verify is OK, turn off the hard power and than turn on again. 3-6 Click 'Auto Program' button. 5. 3 Alignments and Adjustments 4.
If Program and Verify is OK, turn off the hard power and than turn on again. 3-6 Click 'Auto Program' button. 5. 3 Alignments and Adjustments 4.
Service Manual
Page 28
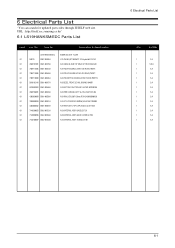
... Specification LS19HANKSM/EDC 920NW SILVER, TCO99 0.1 M0215 BN07-00406A LCD-PANEL;MT190AWO1 V2... ROHS,7909715 0.1 5010102104 BN81-00547A A/S-BEZEL FRONT;LE1961,501010210400R 0.1 5010302063 BN81-00548A A/S-BUTTON FUNCTION KEY;LE1961,501030206 0.1 4530708001 BN81-00549A A/S-PWR CORD;BLK 6FT UL/CSA,10A... 1 S.A 1 S.A 1 S.A 1 S.A 1 S.A 1 S.A 1 S.A 1 S.A 1 S.A 1 S.A 1 S.A 6-1 Code No. No. URL : http://itself.sec.samsung.co.kr/ 6-1 LS19HANKSM/EDC Parts List Level Loc. 6 Electrical Parts List You can search for updated part codes through ITSELF web site.
... Specification LS19HANKSM/EDC 920NW SILVER, TCO99 0.1 M0215 BN07-00406A LCD-PANEL;MT190AWO1 V2... ROHS,7909715 0.1 5010102104 BN81-00547A A/S-BEZEL FRONT;LE1961,501010210400R 0.1 5010302063 BN81-00548A A/S-BUTTON FUNCTION KEY;LE1961,501030206 0.1 4530708001 BN81-00549A A/S-PWR CORD;BLK 6FT UL/CSA,10A... 1 S.A 1 S.A 1 S.A 1 S.A 1 S.A 1 S.A 1 S.A 1 S.A 1 S.A 1 S.A 1 S.A 6-1 Code No. No. URL : http://itself.sec.samsung.co.kr/ 6-1 LS19HANKSM/EDC Parts List Level Loc. 6 Electrical Parts List You can search for updated part codes through ITSELF web site.
Service Manual
Page 42
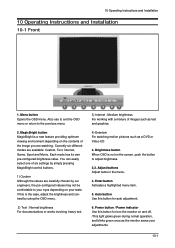
... easily select one of images such as text and graphics. 4) Entertain For watching motion pictures such as the monitor saves your taste. Auto button Use this button for turn the monitor on your adjustments. 10-1 Power button / Power indicator Use this is the case, adjust the brightness and contrast by our engineers, the pre-configured...
... easily select one of images such as text and graphics. 4) Entertain For watching motion pictures such as the monitor saves your taste. Auto button Use this button for turn the monitor on your adjustments. 10-1 Power button / Power indicator Use this is the case, adjust the brightness and contrast by our engineers, the pre-configured...
Service Manual
Page 43
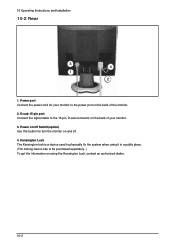
... fix the system when using it in a public place. (The locking device has to the power port on and off Switch(option) Use this button for your monitor. 3. Power on using the Kensington Lock, contact an aurhorized dealer. 10-2 D-sub 15-pin port Connect the signal cable to the 15-pin, D-sub...
... fix the system when using it in a public place. (The locking device has to the power port on and off Switch(option) Use this button for your monitor. 3. Power on using the Kensington Lock, contact an aurhorized dealer. 10-2 D-sub 15-pin port Connect the signal cable to the 15-pin, D-sub...
Service Manual
Page 48
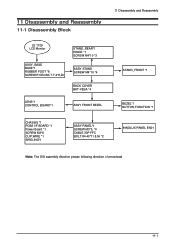
11 Disassembly and Reassembly 11-1 Disassembly Block 11 Disassembly and Reassembly LE 1729 LCD Monitor ASSY, BASE BASE*1 RUBBER FOOT *6 SCREW.P.CROSS,T.T-4*8,Zn STAND_REAR*1 HINGE *1 SCREW M4*10 *3 ASSY STAND SCREW M4*10 *4 BACK COVER BKT-VESA *4 LENS*1 CONTROL BOARD*1 ASSY FRONT BEZEL STAND_FRONT *1 BEZEL*1 BUTTON,FUNCTION *1 CHASSIS *1 PCBA I/F BOARD *1 Power Board *1 SCREW M3*6 CLIP,WIRE *1 SHIELING*1 ASSY PANEL*1 SCREW M3*5, *4 CABLE 30P FFC BOLT,#4-40*11.8,Ni *2 INNOLUX PANEL EN01 Note: The DIS assembly direction please following direction of arrowhead 11-1
11 Disassembly and Reassembly 11-1 Disassembly Block 11 Disassembly and Reassembly LE 1729 LCD Monitor ASSY, BASE BASE*1 RUBBER FOOT *6 SCREW.P.CROSS,T.T-4*8,Zn STAND_REAR*1 HINGE *1 SCREW M4*10 *3 ASSY STAND SCREW M4*10 *4 BACK COVER BKT-VESA *4 LENS*1 CONTROL BOARD*1 ASSY FRONT BEZEL STAND_FRONT *1 BEZEL*1 BUTTON,FUNCTION *1 CHASSIS *1 PCBA I/F BOARD *1 Power Board *1 SCREW M3*6 CLIP,WIRE *1 SHIELING*1 ASSY PANEL*1 SCREW M3*5, *4 CABLE 30P FFC BOLT,#4-40*11.8,Ni *2 INNOLUX PANEL EN01 Note: The DIS assembly direction please following direction of arrowhead 11-1
User Guide
Page 11
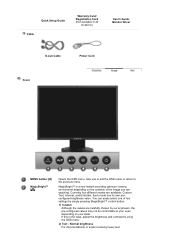
...this is a new feature providing optimum viewing environment depending on your eyes depending on the contents of four settings by simply pressing MagicBright™ control button. 1) Custom Although the values are available: Custom, Text, Internet, and Entertain. Each mode has its own preconfigured brightness value. MagicBright™ ... be comfortable to the previous menu. Quick Setup Guide Cable Warranty Card/ Registration Card (Not available in all locations) User's Guide, Monitor Driver D-sub Cable Power Cord Front MENU button [ ] MagicBright™ [] Opens the OSD menu.
...this is a new feature providing optimum viewing environment depending on your eyes depending on the contents of four settings by simply pressing MagicBright™ control button. 1) Custom Although the values are available: Custom, Text, Internet, and Entertain. Each mode has its own preconfigured brightness value. MagicBright™ ... be comfortable to the previous menu. Quick Setup Guide Cable Warranty Card/ Registration Card (Not available in all locations) User's Guide, Monitor Driver D-sub Cable Power Cord Front MENU button [ ] MagicBright™ [] Opens the OSD menu.
User Guide
Page 12
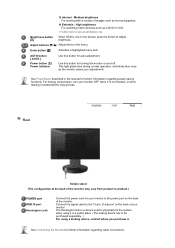
... POWER port RGB IN port Kensington Lock Connect the power cord for turning the monitor on the screen, push the button to the 15-pin, D-sub port on the back of the monitor. Connect the signal cable to adjust brightness. This light glows blue during normal ...leaving it . For energy conservation, turn your monitor OFF when it is a device used to the power port on the back of your adjustments. Enter button [ ] Activates a highlighted menu item. AUTO button [ AUTO ] Power button [ ]/ Power indicator Use this button for your monitor to physically fix the system when using a...
... POWER port RGB IN port Kensington Lock Connect the power cord for turning the monitor on the screen, push the button to the 15-pin, D-sub port on the back of the monitor. Connect the signal cable to adjust brightness. This light glows blue during normal ...leaving it . For energy conservation, turn your monitor OFF when it is a device used to the power port on the back of your adjustments. Enter button [ ] Activates a highlighted menu item. AUTO button [ AUTO ] Power button [ ]/ Power indicator Use this button for your monitor to physically fix the system when using a...
User Guide
Page 15
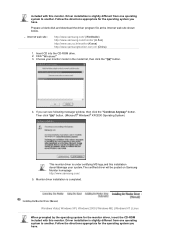
...driver program file at the Internet web site shown below. Choose your system.The certified driver will be posted on Samsung Monitor homepage http://www.samsung.com/. 5. Installing the Monitor Driver (Manual) Windows Vista | Windows XP | Windows 2000 | Windows ME | Windows NT | Linux When ...prompted by the operating system for the operating system you can see following message window, then click the "Continue Anyway" button. Driver ...
...driver program file at the Internet web site shown below. Choose your system.The certified driver will be posted on Samsung Monitor homepage http://www.samsung.com/. 5. Installing the Monitor Driver (Manual) Windows Vista | Windows XP | Windows 2000 | Windows ME | Windows NT | Linux When ...prompted by the operating system for the operating system you can see following message window, then click the "Continue Anyway" button. Driver ...
User Guide
Page 16
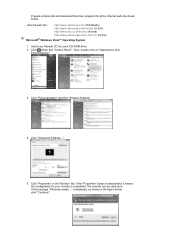
... be used as shown in the "Monitor" tab. Click "Personalization" and then "Display Settings". 4. Then, double-click on "Appearance and Personalization". 3. If the "Properties" button is deactivated, it means the configuration for your CD-ROM drive. 2. Click "Advanced Settings...". 5. is...below , click "Continue". If the message "Windows needs..." z Internet web site : http://www.samsung.com/ (Worldwide) http://www.samsung.com/monitor (U.S.A) http://www.sec.co.kr/monitor (Korea) http://www.samsungmonitor.com.cn/ (China) Microsoft® Windows Vista™ Operating System 1....
... be used as shown in the "Monitor" tab. Click "Personalization" and then "Display Settings". 4. Then, double-click on "Appearance and Personalization". 3. If the "Properties" button is deactivated, it means the configuration for your CD-ROM drive. 2. Click "Advanced Settings...". 5. is...below , click "Continue". If the message "Windows needs..." z Internet web site : http://www.samsung.com/ (Worldwide) http://www.samsung.com/monitor (U.S.A) http://www.sec.co.kr/monitor (Korea) http://www.samsungmonitor.com.cn/ (China) Microsoft® Windows Vista™ Operating System 1....
User Guide
Page 19
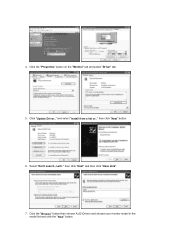
and select "Install from a list or.." Click "Update Driver.." Click the "Browse" button then choose A:(D:\Driver) and choose your monitor model in the model list and click the "Next" button. 4. then click "Next" and then click "Have disk". 7. Select "Don't search ,I will.." then click "Next" button. 6. Click the "Properties" button on the "Monitor" tab and select "Driver" tab. 5.
and select "Install from a list or.." Click "Update Driver.." Click the "Browse" button then choose A:(D:\Driver) and choose your monitor model in the model list and click the "Next" button. 4. then click "Next" and then click "Have disk". 7. Select "Don't search ,I will.." then click "Next" button. 6. Click the "Properties" button on the "Monitor" tab and select "Driver" tab. 5.
User Guide
Page 20
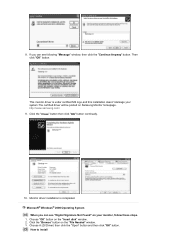
... this installation doesn't damage your monitor, follow these steps. 1. http://www.samsung.com/ 9. Click the "Browse" button on your system.The certified driver will be posted on the "Insert disk" window. 2. Choose "OK" button on Samsung Monitor homepage. This monitor driver is completed. Choose A:(D:\Driver) then click the "Open" button and then click "OK" button. If you can see...
... this installation doesn't damage your monitor, follow these steps. 1. http://www.samsung.com/ 9. Click the "Browse" button on your system.The certified driver will be posted on the "Insert disk" window. 2. Choose "OK" button on Samsung Monitor homepage. This monitor driver is completed. Choose A:(D:\Driver) then click the "Open" button and then click "OK" button. If you can see...
User Guide
Page 21
.... 1. Enter the model name of the known drivers for selecting a keyboard. 5. Choose "Display a list of your monitor. Click the "Finish" button then the "Close" button. Select the "Settings" tab and click "Advanced Properties" button. 4. Click the "Change" button in a specific location.." Select a mode that I can enter the frequency directly.) 8. Linux Operating System To execute X-Window...
.... 1. Enter the model name of the known drivers for selecting a keyboard. 5. Choose "Display a list of your monitor. Click the "Finish" button then the "Close" button. Select the "Settings" tab and click "Advanced Properties" button. 4. Click the "Change" button in a specific location.." Select a mode that I can enter the frequency directly.) 8. Linux Operating System To execute X-Window...

User Guide
Page 22
1. [ ]Use this button to open the on-screen menu and exit from the menu screen or close screen adjustment menu. 2. [ ]These buttons allow you to adjust items in the menu. 3. [ ]Press this button to activate a highlighted menu item. 4. [AUTO]Press to self-adjust to the incoming PC signal. AUTO The values of fine,coarse and position are adjusted automatically.
1. [ ]Use this button to open the on-screen menu and exit from the menu screen or close screen adjustment menu. 2. [ ]These buttons allow you to adjust items in the menu. 3. [ ]Press this button to activate a highlighted menu item. 4. [AUTO]Press to self-adjust to the incoming PC signal. AUTO The values of fine,coarse and position are adjusted automatically.
User Guide
Page 23
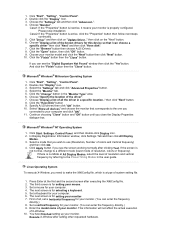
Auto adjustment allows the monitor to self-adjust to adjust picture with more accuracy. - OSD Lock & Unlock When pressing the AUTO button after locking the OSD The values of fine, coarse and position are adjusted automatically. (Available in the animated screen on . - Menu AUTO Description When the 'AUTO' button is pressed, the Auto Adjustment... the center. If you change resolution in the control panel, auto function will be executed automatically. If auto adjustment does not work properly, press AUTO button again to the incoming video signal.
Auto adjustment allows the monitor to self-adjust to adjust picture with more accuracy. - OSD Lock & Unlock When pressing the AUTO button after locking the OSD The values of fine, coarse and position are adjusted automatically. (Available in the animated screen on . - Menu AUTO Description When the 'AUTO' button is pressed, the Auto Adjustment... the center. If you change resolution in the control panel, auto function will be executed automatically. If auto adjustment does not work properly, press AUTO button again to the incoming video signal.
User Guide
Page 24
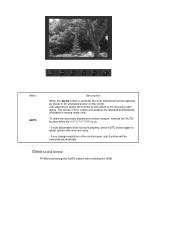
... more than five seconds to activate the OSD adjustment lock function. Unlock : Hold down the menu button for more than five seconds to keep the current states of settings or prevent others from adjusting the current settings. Though the OSD adjustment lock ...function is the function that locks the OSD in order to deactivate the OSD adjustment lock function. When pressing the MENU button after locking the OSD Menu Locked Description This is activated, you can still adjust the brightness and contrast, and adjust MagicBright ( ) using the Direct...
... more than five seconds to activate the OSD adjustment lock function. Unlock : Hold down the menu button for more than five seconds to keep the current states of settings or prevent others from adjusting the current settings. Though the OSD adjustment lock ...function is the function that locks the OSD in order to deactivate the OSD adjustment lock function. When pressing the MENU button after locking the OSD Menu Locked Description This is activated, you can still adjust the brightness and contrast, and adjust MagicBright ( ) using the Direct...
User Guide
Page 25
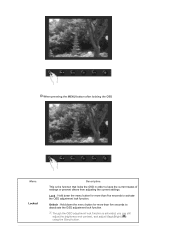
MagicBright™ Menu Description Then push the MagicBright button again to adjust brightness. Four different modes(Custom/Text/Internet/Entertain) Brightness Menu Brightness Description When OSD is not on the screen, push the button to circle through available MagicBright™ preconfigured modes. -
MagicBright™ Menu Description Then push the MagicBright button again to adjust brightness. Four different modes(Custom/Text/Internet/Entertain) Brightness Menu Brightness Description When OSD is not on the screen, push the button to circle through available MagicBright™ preconfigured modes. -

User Guide
Page 26
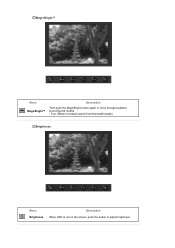
... to change the brightness according to personal preference. [MENU MENU] Play/Stop Color Direct Access Feature : When OSD is not on the screen, push the [ ] button to adjust brightness. [MENU MENU] You can use the on -screen menus to change the contrast according to personal preference.
... to change the brightness according to personal preference. [MENU MENU] Play/Stop Color Direct Access Feature : When OSD is not on the screen, push the [ ] button to adjust brightness. [MENU MENU] You can use the on -screen menus to change the contrast according to personal preference.
User Guide
Page 32
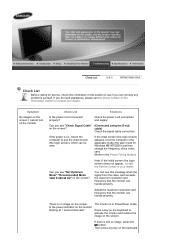
... handle properly. Can you see if you do need assistance, please call the phone number on the screen. The monitor is no image, press the ' ' button. If there is on the screen. If the power is still no image on , reboot the computer to see "Not Optimum Mode","Recommended ...Mode 1440 X 900 60 Hz" on the monitor blinking at 1 second intervals? Then press any problems yourself. Adjust the maximum resolution...
... handle properly. Can you see if you do need assistance, please call the phone number on the screen. The monitor is no image, press the ' ' button. If there is on the screen. If the power is still no image on , reboot the computer to see "Not Optimum Mode","Recommended ...Mode 1440 X 900 60 Hz" on the monitor blinking at 1 second intervals? Then press any problems yourself. Adjust the maximum resolution...


