User Manual (ENGLISH)
Page 9
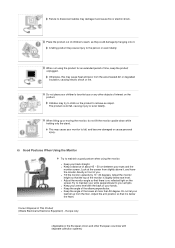
...- Correct Disposal of the elbow perpendicular. z Keep the angle of your eyes and the monitor screen. Failure to fall up or moving the monitor, do not lift the monitor upside down while holding only the stand. When lifting up from slightly above it and cause fire or electric shock. z Adjust ...the monitor angle so that it . z Keep a distance of interest on the product to ...
...- Correct Disposal of the elbow perpendicular. z Keep the angle of your eyes and the monitor screen. Failure to fall up or moving the monitor, do not lift the monitor upside down while holding only the stand. When lifting up from slightly above it and cause fire or electric shock. z Adjust ...the monitor angle so that it . z Keep a distance of interest on the product to ...
User Manual (ENGLISH)
Page 13
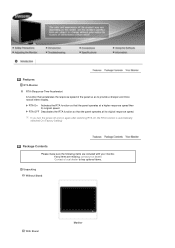
... (Response Time Accelerator) A function that accelerates the response speed of the panel so as to buy optional items. Unpacking Without Stand With Stand Monitor If any items are included with your dealer. Contact a local dealer to provide a sharper and more natural video display. If you turn the power off ... after switching RTA off, the RTA function is automatically switched On (Factory Setting) Package Contents Please make sure the following items are missing, contact your monitor.
... (Response Time Accelerator) A function that accelerates the response speed of the panel so as to buy optional items. Unpacking Without Stand With Stand Monitor If any items are included with your dealer. Contact a local dealer to provide a sharper and more natural video display. If you turn the power off ... after switching RTA off, the RTA function is automatically switched On (Factory Setting) Package Contents Please make sure the following items are missing, contact your monitor.
User Manual (ENGLISH)
Page 14
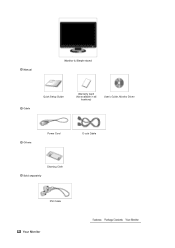
Manual Monitor & Simple stand Cable Quick Setup Guide Warranty Card (Not available in all locations) User's Guide, Monitor Driver Others Power Cord D-sub Cable Cleaning Cloth Sold separately DVI Cable Your Monitor
Manual Monitor & Simple stand Cable Quick Setup Guide Warranty Card (Not available in all locations) User's Guide, Monitor Driver Others Power Cord D-sub Cable Cleaning Cloth Sold separately DVI Cable Your Monitor
User Manual (ENGLISH)
Page 17
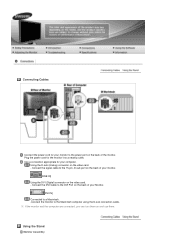
...Connect the signal cable to the 15-pin, D-sub port on the back of your monitor. [RGB IN] Using the DVI (Digital) connector on the video card. - Using the Stand Monitor Assembly Plug the power cord for your monitor to the power port on the back of your computer. Using the D-sub (Analog)... connector on the video card. - If the monitor and the computer are connected, you can turn them . Connect the...
...Connect the signal cable to the 15-pin, D-sub port on the back of your monitor. [RGB IN] Using the DVI (Digital) connector on the video card. - Using the Stand Monitor Assembly Plug the power cord for your monitor to the power port on the back of your computer. Using the D-sub (Analog)... connector on the video card. - If the monitor and the computer are connected, you can turn them . Connect the...
User Manual (ENGLISH)
Page 18
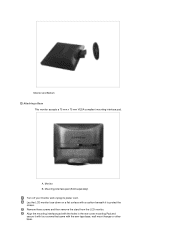
Monitor B. Mounting interface pad (Sold separately) Turn off your monitor and unplug its power cord. A. Lay the LCD monitor face-down on a flat surface with a cushion beneath it with four screws that came with the holes in the rear cover mounting Pad and secure it to protect the screen. Align the mounting interface pad with the arm-type base, wall mount hanger or other base. Remove three screws and then remove the stand from the LCD monitor. Monitor and Bottom Attaching a Base This monitor accepts a 75 mm x 75 mm VESA-compliant mounting interface pad.
Monitor B. Mounting interface pad (Sold separately) Turn off your monitor and unplug its power cord. A. Lay the LCD monitor face-down on a flat surface with a cushion beneath it with four screws that came with the holes in the rear cover mounting Pad and secure it to protect the screen. Align the mounting interface pad with the arm-type base, wall mount hanger or other base. Remove three screws and then remove the stand from the LCD monitor. Monitor and Bottom Attaching a Base This monitor accepts a 75 mm x 75 mm VESA-compliant mounting interface pad.
User Manual (ENGLISH)
Page 41
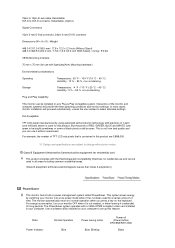
...connector Dimensions (W x H x D) / Weight 448.0 X 311.0 X 58.5 mm / 17.6 x 12.2 x 2.3 inch (Without Stand) 448.0 X 363.9 X 202.2 mm / 17.6 x 14.3 x 8.0 inch (With Stand) / 4.2 kg / 9.3 lbs VESA Mounting Interface 75 mm x 75 mm (for use with Specialty(Arm) Mounting hardware.) Environmental considerations ...are subject to select alternate settings. Dot Acceptable TFT LCD panel manufactured by switching your computer. In most cases, monitor installation will provide the best operating conditions and monitor settings. State Power Indicator Normal Operation Blue Power saving...
...connector Dimensions (W x H x D) / Weight 448.0 X 311.0 X 58.5 mm / 17.6 x 12.2 x 2.3 inch (Without Stand) 448.0 X 363.9 X 202.2 mm / 17.6 x 14.3 x 8.0 inch (With Stand) / 4.2 kg / 9.3 lbs VESA Mounting Interface 75 mm x 75 mm (for use with Specialty(Arm) Mounting hardware.) Environmental considerations ...are subject to select alternate settings. Dot Acceptable TFT LCD panel manufactured by switching your computer. In most cases, monitor installation will provide the best operating conditions and monitor settings. State Power Indicator Normal Operation Blue Power saving...


