

User Manual (ENGLISH)
Page 4
... wall. • Otherwise, it may result in fire due to install the specified wall mount. Put down the monitor carefully. • Failing to the screen display. When cleaning the monitor case or the surface of your monitor is kept away from the power cord or the product as possible. • Otherwise...
... wall. • Otherwise, it may result in fire due to install the specified wall mount. Put down the monitor carefully. • Failing to the screen display. When cleaning the monitor case or the surface of your monitor is kept away from the power cord or the product as possible. • Otherwise...

User Manual (ENGLISH)
Page 8
... angle of the product or the height of the screen. • When using the product, use it in a location low enough for a long time, the display panel becomes hot.
... angle of the product or the height of the screen. • When using the product, use it in a location low enough for a long time, the display panel becomes hot.

User Manual (ENGLISH)
Page 10
It can be displayed again. Turn the Power button off and on -screen menu and exits from the menu. Make sure to three (3) times. Brightness button [ ] When OSD is ... Key[ ] 9 It will disappear after 40 seconds. Also use to exit the OSD menu or return to adjust brightness. The displayed content will be displayed up or down key. Note The resolution displayed on the screen, push the button to the previous menu. Introduction Note Cleaning Cloth is only provided for this product...
It can be displayed again. Turn the Power button off and on -screen menu and exits from the menu. Make sure to three (3) times. Brightness button [ ] When OSD is ... Key[ ] 9 It will disappear after 40 seconds. Also use to exit the OSD menu or return to adjust brightness. The displayed content will be displayed up or down key. Note The resolution displayed on the screen, push the button to the previous menu. Introduction Note Cleaning Cloth is only provided for this product...

User Manual (ENGLISH)
Page 11
... assignment for the Custom button according to change the input mode, a message appears in the menu. Note The configuration at the back of the screen displaying the current mode --
... assignment for the Custom button according to change the input mode, a message appears in the menu. Note The configuration at the back of the screen displaying the current mode --
User Manual (ENGLISH)
Page 18
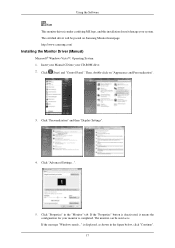
Insert your Manual CD into your system. http://www.samsung.com/ Installing the Monitor Driver (Manual) Microsoft® Windows Vista™, Operating System 1. If the message "Windows needs..." Using the Software ...". Click "Advanced Settings...". 5. Click "Properties" in the figure below, click "Continue". 17 Then, double-click on Samsung Monitor homepage. The monitor can be posted on "Appearance and Personalization". 3. Click "Personalization" and then "Display Settings". 4. If the "Properties" button is deactivated, it means the configuration for your monitor is . is...
Insert your Manual CD into your system. http://www.samsung.com/ Installing the Monitor Driver (Manual) Microsoft® Windows Vista™, Operating System 1. If the message "Windows needs..." Using the Software ...". Click "Advanced Settings...". 5. Click "Properties" in the figure below, click "Continue". 17 Then, double-click on Samsung Monitor homepage. The monitor can be posted on "Appearance and Personalization". 3. Click "Personalization" and then "Display Settings". 4. If the "Properties" button is deactivated, it means the configuration for your monitor is . is...
User Manual (ENGLISH)
Page 20
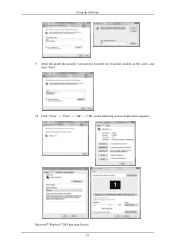
Microsoft® Windows® XP Operating System 19 Using the Software 9. Click "Close" → "Close" → "OK" → "OK" on the screen, and click "Next". 10. Select the model that matches your monitor from the list of monitor models on the following screens displayed in sequence.
Microsoft® Windows® XP Operating System 19 Using the Software 9. Click "Close" → "Close" → "OK" → "OK" on the screen, and click "Next". 10. Select the model that matches your monitor from the list of monitor models on the following screens displayed in sequence.
User Manual (ENGLISH)
Page 21
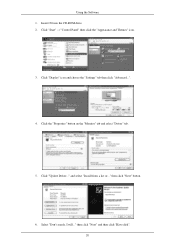
Click "Update Driver..." Select "Don't search, I will..." then click "Next" button. 6. and select "Install from a list or..." Using the Software 1. Click the "Properties" button on the "Monitor" tab and select "Driver" tab. 5. Insert CD into the CD-ROM drive. 2. then click "Next" and then click "Have disk". 20 Click "Start" → "Control Panel" then click the "Appearance and Themes" icon. 3. Click "Display" icon and choose the "Settings" tab then click "Advanced...". 4.
Click "Update Driver..." Select "Don't search, I will..." then click "Next" button. 6. and select "Install from a list or..." Using the Software 1. Click the "Properties" button on the "Monitor" tab and select "Driver" tab. 5. Insert CD into the CD-ROM drive. 2. then click "Next" and then click "Have disk". 20 Click "Start" → "Control Panel" then click the "Appearance and Themes" icon. 3. Click "Display" icon and choose the "Settings" tab then click "Advanced...". 4.
User Manual (ENGLISH)
Page 23
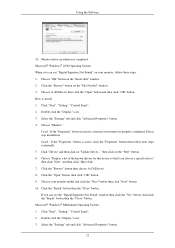
... the "Next" button then click "Next" button. 10. Click "Driver" and then click on the "Next" button. 6. Choose "Display a list of the known drivers for this device so that I can see "Digital Signature Not Found" on your monitor, follow next steps... continually. 5. Click the "Open" button, then click "OK" button. 9. Click "Start", "Setting", "Control Panel". 2. Double click the "Display" icon. 3. Choose "Monitor". Click the "Browse" button then choose A:(D:\Driver). 8. Microsoft® Windows® Millennium Operating System 1. Choose A:(D:\Driver) then click...
... the "Next" button then click "Next" button. 10. Click "Driver" and then click on the "Next" button. 6. Choose "Display a list of the known drivers for this device so that I can see "Digital Signature Not Found" on your monitor, follow next steps... continually. 5. Click the "Open" button, then click "OK" button. 9. Click "Start", "Setting", "Control Panel". 2. Double click the "Display" icon. 3. Choose "Monitor". Click the "Browse" button then choose A:(D:\Driver). 8. Microsoft® Windows® Millennium Operating System 1. Choose A:(D:\Driver) then click...
User Manual (ENGLISH)
Page 24
...the driver in the "Monitor Type" area. 6. Click the "Have Disk" button. 9. Click "Apply" button if you close the Display Properties dia- Linux Operating System To execute X-Window, you need to make the X86Config file, which is not normal, change to a different... frequency by referring to your monitor. 7. Specify A:\(D:\driver) then click "OK" button. 10. In Display Registration Information window, click Settings Tab and then click "All Display Modes". 3. Press "Enter" at All Display Modes, select the level of your computer. 6. Set a Keyboard for setting your computer and click "...
...the driver in the "Monitor Type" area. 6. Click the "Have Disk" button. 9. Click "Apply" button if you close the Display Properties dia- Linux Operating System To execute X-Window, you need to make the X86Config file, which is not normal, change to a different... frequency by referring to your monitor. 7. Specify A:\(D:\driver) then click "OK" button. 10. In Display Registration Information window, click Settings Tab and then click "All Display Modes". 3. Press "Enter" at All Display Modes, select the level of your computer. 6. Set a Keyboard for setting your computer and click "...

User Manual (ENGLISH)
Page 25
... installation file. Note If the popup window to accept the terms of the images printed out by a printer or other images scanned by Samsung Electronics in association with the installation using a computer is that the color of use. 6. When the Installation Shield Wizard window appears, click... "Next". 5. Select "I agree to the terms of the license agreement" to install the software for the main screen is not displayed, proceed with Korea Electronics & Telecommunications Research Institute (ETRI). Click "Install". 8. It is available only for this problem. The Natural Color ...
... installation file. Note If the popup window to accept the terms of the images printed out by a printer or other images scanned by Samsung Electronics in association with the installation using a computer is that the color of use. 6. When the Installation Shield Wizard window appears, click... "Next". 5. Select "I agree to the terms of the license agreement" to install the software for the main screen is not displayed, proceed with Korea Electronics & Telecommunications Research Institute (ETRI). Click "Install". 8. It is available only for this problem. The Natural Color ...
User Manual (ENGLISH)
Page 27
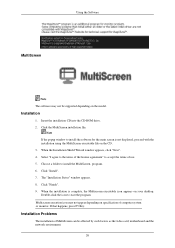
Installation 1. When the Installation Shield Wizard window appears, click "Next". 4. When the installation is not displayed, proceed with the installation using the MultiScreen executable file on specification of the license agreement" to install the MultiScreen, program. 6. Click the MultiScreen installation file. ...
Installation 1. When the Installation Shield Wizard window appears, click "Next". 4. When the installation is not displayed, proceed with the installation using the MultiScreen executable file on specification of the license agreement" to install the MultiScreen, program. 6. Click the MultiScreen installation file. ...
User Manual (ENGLISH)
Page 30
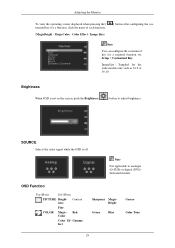
... the cus- MagicColor - OSD Function Top Menus Sub Menus PICTURE Bright- Note Not applicable to adjust brightness. Adjusting the Monitor To view the operating screen displayed when pressing the [ tomized key for a required function via Setup > Customized Key. ImageSize : Supplied for the wide models only such as 16:9 or 16...
... the cus- MagicColor - OSD Function Top Menus Sub Menus PICTURE Bright- Note Not applicable to adjust brightness. Adjusting the Monitor To view the operating screen displayed when pressing the [ tomized key for a required function via Setup > Customized Key. ImageSize : Supplied for the wide models only such as 16:9 or 16...
User Manual (ENGLISH)
Page 31
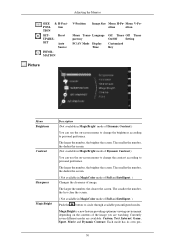
... Trans- The larger the number, the clearer the screen. Adjusting the Monitor SIZE & H-PosiPOSI- Currently seven different modes are watching. Language parency PC/AV Mode Display Time Off Timer Off Timer On/Off Setting Customized Key Picture Menu Brightness Contrast Sharpness MagicBright Description (Not available in MagicBright mode of image. Menu...
... Trans- The larger the number, the clearer the screen. Adjusting the Monitor SIZE & H-PosiPOSI- Currently seven different modes are watching. Language parency PC/AV Mode Display Time Off Timer Off Timer On/Off Setting Customized Key Picture Menu Brightness Contrast Sharpness MagicBright Description (Not available in MagicBright mode of image. Menu...
User Manual (ENGLISH)
Page 33
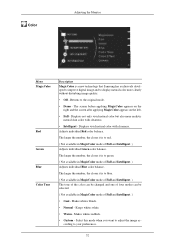
...screen before applying MagicColor appears on the right and the screen after applying MagicColor appears on the left. • Full - Displays not only vivid natural color but also more clearly without disturbing image quality. • Off - Adjusts individual Red color balance....Menu MagicColor Red Green Blue Color Tone Description MagicColor is a new technology that Samsung has exclusively developed to improve digital image and to display natural color more realistic natural skin color with clearness. Displays vivid natural color with clearness. • Intelligent - The larger the number...
...screen before applying MagicColor appears on the right and the screen after applying MagicColor appears on the left. • Full - Displays not only vivid natural color but also more clearly without disturbing image quality. • Off - Adjusts individual Red color balance....Menu MagicColor Red Green Blue Color Tone Description MagicColor is a new technology that Samsung has exclusively developed to improve digital image and to display natural color more realistic natural skin color with clearness. Displays vivid natural color with clearness. • Intelligent - The larger the number...
User Manual (ENGLISH)
Page 34
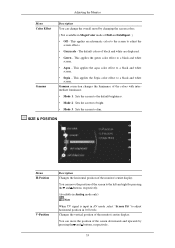
...; Off - SIZE & POSITION Menu H-Position V-Position Description Changes the horizontal position of black and white are displayed. • Green - You can move the position of the monitor's entire display. The default colors of the monitor's entire display. Adjusting the Monitor Menu Color Effect Gamma Description You can change the overall mood by pressing...
...; Off - SIZE & POSITION Menu H-Position V-Position Description Changes the horizontal position of black and white are displayed. • Green - You can move the position of the monitor's entire display. The default colors of the monitor's entire display. Adjusting the Monitor Menu Color Effect Gamma Description You can change the overall mood by pressing...

User Manual (ENGLISH)
Page 35
... external input is connected to the DVI terminal and the 'PC/AV Mode' is set to 'AV'. • When the panel is of the screen displayed on your monitor. Sets the picture to 4:3 normal mode. • Wide-Sets the picture to 4:3 normal mode. • 16 : 9- Note • It can change the... "4:3","wide ","Screen fit". 34 You can only be selected if an external input is connected to the DVI terminal and the 'PC/AV Mode' is displayed regardless of the screen aspect ratio of the input signals. • Wide - AV signals • 4 : 3 - Sets the picture to see the full image without any...
... external input is connected to the DVI terminal and the 'PC/AV Mode' is set to 'AV'. • When the panel is of the screen displayed on your monitor. Sets the picture to 4:3 normal mode. • Wide-Sets the picture to 4:3 normal mode. • 16 : 9- Note • It can change the... "4:3","wide ","Screen fit". 34 You can only be selected if an external input is connected to the DVI terminal and the 'PC/AV Mode' is displayed regardless of the screen aspect ratio of the input signals. • Wide - AV signals • 4 : 3 - Sets the picture to see the full image without any...

User Manual (ENGLISH)
Page 36
... No Menu Transpar- You can enable or disable the Off Time function. ency • Off : The menus are displayed transparently. Off Timer On/ You can select the language used to display the menus. SETUP&RESET Adjusting the Monitor Menu Reset Description Reverts the product settings to analogue (D-SUB)-or-digital (DVI...)-dedicated models. 35 Note The language chosen affects only the language of the OSD. Language • On : The menus are displayed in the normal way (non-transparently). It has no effect on any software running on the computer.
... No Menu Transpar- You can enable or disable the Off Time function. ency • Off : The menus are displayed transparently. Off Timer On/ You can select the language used to display the menus. SETUP&RESET Adjusting the Monitor Menu Reset Description Reverts the product settings to analogue (D-SUB)-or-digital (DVI...)-dedicated models. 35 Note The language chosen affects only the language of the OSD. Language • On : The menus are displayed in the normal way (non-transparently). It has no effect on any software running on the computer.
User Manual (ENGLISH)
Page 37
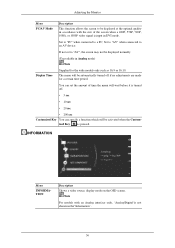
...adjustments are made for the wide models only such as 16:9 or 16:10. ized Key ( )is pressed. INFORMATION Menu INFORMATION Description Shows a video source, display mode on the OSD screen. If not set the amount of the screen when a 480P, 576P, 720P, 1080i, or 1080P video signal is input in... DVI mode. Adjusting the Monitor Menu PC/AV Mode Description This function allows the screen to be displayed at the optimal quality in accordance with an Analog interface only, "Analog/Digital"is not shown in the"Information". 36 Set to "PC" when ...
...adjustments are made for the wide models only such as 16:9 or 16:10. ized Key ( )is pressed. INFORMATION Menu INFORMATION Description Shows a video source, display mode on the OSD screen. If not set the amount of the screen when a 480P, 576P, 720P, 1080i, or 1080P video signal is input in... DVI mode. Adjusting the Monitor Menu PC/AV Mode Description This function allows the screen to be displayed at the optimal quality in accordance with an Analog interface only, "Analog/Digital"is not shown in the"Information". 36 Set to "PC" when ...
User Manual (ENGLISH)
Page 40
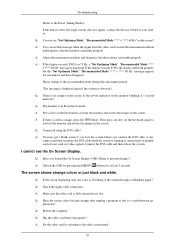
...do not send out video signals. A: Set the video card by pressing the [MENU/ ] button for one -minute period. (The message is displayed again if the system is rebooted.) Q: There is in its slot. A: Adjust the maximum resolution and frequency that the monitor can handle properly.... the Service Center or your dealer. I cannot see "Not Optimum Mode", "Recommended Mode **** x **** 60 Hz" on the screen? If the display exceeds 85 Hz, the display will work properly but the "Not Optimum Mode", "Recommended Mode **** x **** 60 Hz" message appears for at least 5 seconds. Troubleshooting (Refer ...
...do not send out video signals. A: Set the video card by pressing the [MENU/ ] button for one -minute period. (The message is displayed again if the system is rebooted.) Q: There is in its slot. A: Adjust the maximum resolution and frequency that the monitor can handle properly.... the Service Center or your dealer. I cannot see "Not Optimum Mode", "Recommended Mode **** x **** 60 Hz" on the screen? If the display exceeds 85 Hz, the display will work properly but the "Not Optimum Mode", "Recommended Mode **** x **** 60 Hz" message appears for at least 5 seconds. Troubleshooting (Refer ...
User Manual (ENGLISH)
Page 41
...can be unbalanced due to the cycle of the video card. (Refer to the video card manual. However, only a blank screen is displayed on and the LED is in hibernation mode (The monitor turns off). 40 Readjust Position by referring to the video card manual and the... Instructions. Q: Have you installed the monitor driver? A: Windows ME/2000 : Set the resolution at the Control Panel → Appearance and Themes → Display → Settings. A: Adjust the resolution and frequency at the video card. (Refer to the monitor? A: Windows XP : Set the resolution at the Control...
...can be unbalanced due to the cycle of the video card. (Refer to the video card manual. However, only a blank screen is displayed on and the LED is in hibernation mode (The monitor turns off). 40 Readjust Position by referring to the video card manual and the... Instructions. Q: Have you installed the monitor driver? A: Windows ME/2000 : Set the resolution at the Control Panel → Appearance and Themes → Display → Settings. A: Adjust the resolution and frequency at the video card. (Refer to the monitor? A: Windows XP : Set the resolution at the Control...


