User Manual (ENGLISH)
Page 3
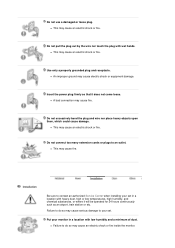
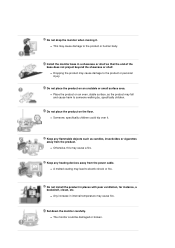
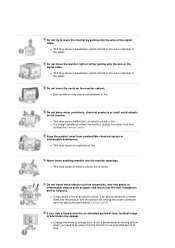
... plugs to do so may cause serious damage to contact an authorized Service Center when installing your set in a location with wet hands. Put your monitor in a location with heavy dust, high or low temperatures, high humidity, and chemical substances, or where it does not come loose. z An improper ground may... cause an electric shock or fire. Installation Be sure to your set . z Failure to do so may cause an electric shock or fire inside the monitor. Failure to an outlet. Do not use a damaged or loose plug. z This may cause an electric shock or fire. Do not pull the plug ...
... plugs to do so may cause serious damage to contact an authorized Service Center when installing your set in a location with wet hands. Put your monitor in a location with heavy dust, high or low temperatures, high humidity, and chemical substances, or where it does not come loose. z An improper ground may... cause an electric shock or fire. Installation Be sure to your set . z Failure to do so may cause an electric shock or fire inside the monitor. Failure to an outlet. Do not use a damaged or loose plug. z This may cause an electric shock or fire. Do not pull the plug ...
User Manual (ENGLISH)
Page 4
... with poor ventilation, for instance, a bookshelf, closet, etc. z A melted coating may cause damage to electric shock or fire. Do not drop the monitor when moving it . z This may lead to the product or human body. z Place the product on an unstable or small surface area. z Someone,... specifically children could be damaged or broken. Set down the monitor carefully. Do not place the product on an even, stable surface, as candles, insecticides or cigarettes away from the power cable. Keep any flammable...
... with poor ventilation, for instance, a bookshelf, closet, etc. z A melted coating may cause damage to electric shock or fire. Do not drop the monitor when moving it . z This may lead to the product or human body. z Place the product on an unstable or small surface area. z Someone,... specifically children could be damaged or broken. Set down the monitor carefully. Do not place the product on an even, stable surface, as candles, insecticides or cigarettes away from the power cable. Keep any flammable...

User Manual (ENGLISH)
Page 5
... Poor ventilation may result in injury. z This may be done by unqualified personnel may cause an increase in the internal temperature of the TFT-LCD screen, wipe with a smooth cloth. If the connector between the plug and the pin is dusty or dirty, clean it away from the ... purposes. When installing the product, make sure to unplug the power cord before cleaning the product. Do not spray water or detergent directly on the monitor. Make sure to keep it properly with a dry cloth. z A dirty connector may cause electric shock or fire. Installing a wall bracket must be damaged...
... Poor ventilation may result in injury. z This may be done by unqualified personnel may cause an increase in the internal temperature of the TFT-LCD screen, wipe with a smooth cloth. If the connector between the plug and the pin is dusty or dirty, clean it away from the ... purposes. When installing the product, make sure to unplug the power cord before cleaning the product. Do not spray water or detergent directly on the monitor. Make sure to keep it properly with a dry cloth. z A dirty connector may cause electric shock or fire. Installing a wall bracket must be damaged...

User Manual (ENGLISH)
Page 6
... the product using a soft, dry cloth. Unplug the power cord from the outlet during storms or lightening or if it is damaged, turn the monitor off and unplug the power cord. unplug it immediately and contact an authorized dealer or service. Contact the Service Center or Customer Center for a long... period of time may cause an electric shock or fire. If the monitor is dropped or the casing is not used for interior cleaning once a year. Others Do not remove cover (or back). z This may cause an ...
... the product using a soft, dry cloth. Unplug the power cord from the outlet during storms or lightening or if it is damaged, turn the monitor off and unplug the power cord. unplug it immediately and contact an authorized dealer or service. Contact the Service Center or Customer Center for a long... period of time may cause an electric shock or fire. If the monitor is dropped or the casing is not used for interior cleaning once a year. Others Do not remove cover (or back). z This may cause an ...
User Manual (ENGLISH)
Page 7
...a fixed screen for an extended period of time, residual image or blurriness may cause an electric shock, fire or injury. Do not move the monitor by pulling only the wire or the signal cable. If an alien substances or water flows into the product, turn the product off, unplug the...be away from the wall outlet and contact Service Center. z Bad ventilation may cause a fire or an electric shock. z If a foreign substance enters the monitor, unplug the power cord and contact the Service Center . Do not insert metal objects such as chopsticks, wire and gimlet or inflammable objects such as...
...a fixed screen for an extended period of time, residual image or blurriness may cause an electric shock, fire or injury. Do not move the monitor by pulling only the wire or the signal cable. If an alien substances or water flows into the product, turn the product off, unplug the...be away from the wall outlet and contact Service Center. z Bad ventilation may cause a fire or an electric shock. z If a foreign substance enters the monitor, unplug the power cord and contact the Service Center . Do not insert metal objects such as chopsticks, wire and gimlet or inflammable objects such as...

User Manual (ENGLISH)
Page 8
z Dropping the product may be tempting) on the product. Make sure that may cause damage to other devices, are disconnected before moving the monitor, turn off and unplug the power cord. z Failure to disconnect a cable may cause heat emission from the accumulated dirt or degraded insulation, ...a location prone to vibrations may shorten the lifetime of the product or may cause undesirable picture quality. 17 inch - 1280 X 1024 Watching the monitor continuously at least a five-minute break after every hour of children's reach, as they could damage it by hanging onto it and lead to ...
z Dropping the product may be tempting) on the product. Make sure that may cause damage to other devices, are disconnected before moving the monitor, turn off and unplug the power cord. z Failure to disconnect a cable may cause heat emission from the accumulated dirt or degraded insulation, ...a location prone to vibrations may shorten the lifetime of the product or may cause undesirable picture quality. 17 inch - 1280 X 1024 Watching the monitor continuously at least a five-minute break after every hour of children's reach, as they could damage it by hanging onto it and lead to ...
User Manual (ENGLISH)
Page 9
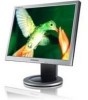
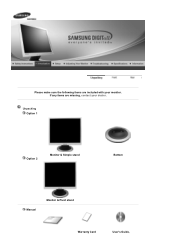
Please make sure the following items are missing, contact your monitor. If any items are included with your dealer. Unpacking Option 1 Option 2 Monitor & Simple stand Bottom Manual Monitor & Pivot stand Warranty Card User's Guide,
Please make sure the following items are missing, contact your monitor. If any items are included with your dealer. Unpacking Option 1 Option 2 Monitor & Simple stand Bottom Manual Monitor & Pivot stand Warranty Card User's Guide,
User Manual (ENGLISH)
Page 10
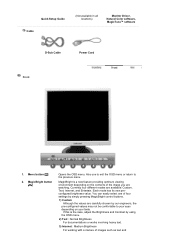
... Brightness For working with a mixture of the image you are available: Custom, Text, Internet, and Entertain. Quick Setup Guide Cable (Not available in all locations) Monitor Driver, Natural Color software, MagicTune™ software D-Sub Cable Power Cord Front 1. MagicBright is the case, adjust the Brightness and Contrast by our engineers, the...
... Brightness For working with a mixture of the image you are available: Custom, Text, Internet, and Entertain. Quick Setup Guide Cable (Not available in all locations) Monitor Driver, Natural Color software, MagicTune™ software D-Sub Cable Power Cord Front 1. MagicBright is the case, adjust the Brightness and Contrast by our engineers, the...

User Manual (ENGLISH)
Page 11
...] 4. Adjust items in the manual for long periods. For energy conservation, turn the monitor on and off. See Connecting the Monitor for your monitor. See PowerSaver described in the menu. Rear (The configuration at the back of the monitor may vary from product to the 15-pin, D-sub connector on the back of... further information regarding power saving functions. Brightness button [ ] 2,3. Auto button 6. Use this button for auto adjustment. Use this button for turn your monitor OFF when it is not on the screen, Push the button to the power port on the back of the...
...] 4. Adjust items in the manual for long periods. For energy conservation, turn the monitor on and off. See Connecting the Monitor for your monitor. See PowerSaver described in the menu. Rear (The configuration at the back of the monitor may vary from product to the 15-pin, D-sub connector on the back of... further information regarding power saving functions. Brightness button [ ] 2,3. Auto button 6. Use this button for auto adjustment. Use this button for turn your monitor OFF when it is not on the screen, Push the button to the power port on the back of the...

User Manual (ENGLISH)
Page 12
... the case of an old model Macintosh, you need to the power port on the back of the monitor. Connect the power cord for the monitor into a nearby outlet. 2-1. If your monitor to connect the monitor using the D-SUB connection cable. 2-3. 1. Connected to the Macintosh computer using a special Mac adapter. 3. Plug the power cord...
... the case of an old model Macintosh, you need to the power port on the back of the monitor. Connect the power cord for the monitor into a nearby outlet. 2-1. If your monitor to connect the monitor using the D-SUB connection cable. 2-3. 1. Connected to the Macintosh computer using a special Mac adapter. 3. Plug the power cord...
User Manual (ENGLISH)
Page 13
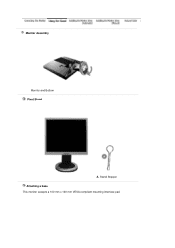
Monitor Assembly Monitor and Bottom Pivot Stand A. Stand Stopper Attaching a base This monitor accepts a 100 mm x 100 mm VESA-compliant mounting interface pad.
Monitor Assembly Monitor and Bottom Pivot Stand A. Stand Stopper Attaching a base This monitor accepts a 100 mm x 100 mm VESA-compliant mounting interface pad.
User Manual (ENGLISH)
Page 14
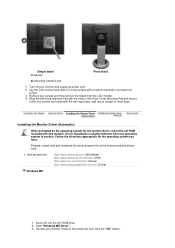
...LCD monitor face-down on a flat surface with this monitor. Installing the Monitor Driver (Automatic) When prompted by the operating system for the operating system you have. Click "Windows ME Driver". 3. Remove four screws and then remove the Stand from one operating system to protect the screen. 3. z Internet web site : http://www.samsung....com/ (Worldwide) http://www.samsung.com/monitor (USA) http://www.sec.co.kr/monitor (Korea) http://www.samsungmonitor.com.cn/ (China) Windows ME 1. Insert CD into...
...LCD monitor face-down on a flat surface with this monitor. Installing the Monitor Driver (Automatic) When prompted by the operating system for the operating system you have. Click "Windows ME Driver". 3. Remove four screws and then remove the Stand from one operating system to protect the screen. 3. z Internet web site : http://www.samsung....com/ (Worldwide) http://www.samsung.com/monitor (USA) http://www.sec.co.kr/monitor (Korea) http://www.samsungmonitor.com.cn/ (China) Windows ME 1. Insert CD into...
User Manual (ENGLISH)
Page 15
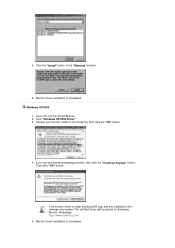
... in the "Warning" window. 5. Windows XP/2000 1. Click "Windows XP/2000 Driver" 3. Choose your system.The certified driver will be posted on Samsung Monitor Homepage http://www.samsung.com/. 5. If you can see following message window, then click the "Continue Anyway" button. Then click "OK" button. Insert CD into the CD-ROM drive...
... in the "Warning" window. 5. Windows XP/2000 1. Click "Windows XP/2000 Driver" 3. Choose your system.The certified driver will be posted on Samsung Monitor Homepage http://www.samsung.com/. 5. If you can see following message window, then click the "Continue Anyway" button. Then click "OK" button. Insert CD into the CD-ROM drive...
User Manual (ENGLISH)
Page 16
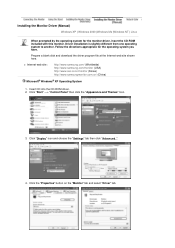
... the Internet web site shown here. Click "Start" -> "Control Panel" then click the "Appearance and Themes" Icon. 3. Installing the Monitor Driver (Manual) Windows XP | Windows 2000 |Windows Me |Windows NT | Linux When prompted by the operating system for the operating system you...Driver installation is slightly different from one operating system to another. z Internet web site : http://www.samsung.com/ (Worldwide) http://www.samsung.com/monitor (USA) http://www.sec.co.kr/monitor (Korea) http://www.samsungmonitor.com.cn/ (China) Microsoft® Windows® XP Operating System 1. ...
... the Internet web site shown here. Click "Start" -> "Control Panel" then click the "Appearance and Themes" Icon. 3. Installing the Monitor Driver (Manual) Windows XP | Windows 2000 |Windows Me |Windows NT | Linux When prompted by the operating system for the operating system you...Driver installation is slightly different from one operating system to another. z Internet web site : http://www.samsung.com/ (Worldwide) http://www.samsung.com/monitor (USA) http://www.sec.co.kr/monitor (Korea) http://www.samsungmonitor.com.cn/ (China) Microsoft® Windows® XP Operating System 1. ...
User Manual (ENGLISH)
Page 17
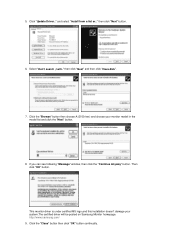
... A:(D:\Driver) and choose your system.The certified driver will .." Select "Don't search ,I will be posted on Samsung Monitor homepage. 5. then click "Next" button. 6. This monitor driver is under certified MS logo,and this installation doesn't damage your monitor model in the model list and click the "Next" button. 8. and select "Install from a list or...
... A:(D:\Driver) and choose your system.The certified driver will .." Select "Don't search ,I will be posted on Samsung Monitor homepage. 5. then click "Next" button. 6. This monitor driver is under certified MS logo,and this installation doesn't damage your monitor model in the model list and click the "Next" button. 8. and select "Install from a list or...
User Manual (ENGLISH)
Page 18
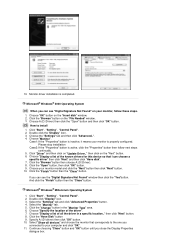
...the "Yes"button. Click the "Browse" button on the "Next" button. 6. Case1: If the "Properties" button is inactive, it means your monitor, follow next steps continually. 5. Click "Start" , "Setting" , "Control Panel". 2. Select the "Settings" tab and click "Advanced Properties" ...button. 4. Click "Start" , "Setting" , "Control Panel". 2. then click on the "File Needed" window. 3. Select the "Monitor" tab. 5. Double click the "Display" Icon. 3. Please stop installation Case2: If the "Properties" button is properly configured. 10. Click the ...
...the "Yes"button. Click the "Browse" button on the "Next" button. 6. Case1: If the "Properties" button is inactive, it means your monitor, follow next steps continually. 5. Click "Start" , "Setting" , "Control Panel". 2. Select the "Settings" tab and click "Advanced Properties" ...button. 4. Click "Start" , "Setting" , "Control Panel". 2. then click on the "File Needed" window. 3. Select the "Monitor" tab. 5. Double click the "Display" Icon. 3. Please stop installation Case2: If the "Properties" button is properly configured. 10. Click the ...

User Manual (ENGLISH)
Page 19
... enter the frequency directly.) 8. Enter the model name of the images on the monitor the same as those shown on the monitor. In Display Registration Information window, click Settings Tab and then click All Display Modes. 3. Set a mouse for Samsung monitors and makes the color of your computer. 4. This information will not affect the...
... enter the frequency directly.) 8. Enter the model name of the images on the monitor the same as those shown on the monitor. In Display Registration Information window, click Settings Tab and then click All Display Modes. 3. Set a mouse for Samsung monitors and makes the color of your computer. 4. This information will not affect the...

User Manual (ENGLISH)
Page 20
To install the program manually, insert the CD included with the Samsung monitor into the CDROM Drive, click the [Start] button of the program Natural Color will be executed. Select Natural Color from the list and then click ...the "Add/Delete" button. How to install the Natural Color software Insert the CD included with the Samsung monitor into the CD-ROM Drive. Click Natural Color on the "Start" menu and then double-click "Add/Delete a program". Enter D:\color\eng\setup.exe and...
To install the program manually, insert the CD included with the Samsung monitor into the CDROM Drive, click the [Start] button of the program Natural Color will be executed. Select Natural Color from the list and then click ...the "Add/Delete" button. How to install the Natural Color software Insert the CD included with the Samsung monitor into the CD-ROM Drive. Click Natural Color on the "Start" menu and then double-click "Add/Delete a program". Enter D:\color\eng\setup.exe and...
User Manual (ENGLISH)
Page 22
... the animated screen on . four different modes(Custom/Text/Internet/Entertain) The values of fine, coarse and position are adjusted automatically. Auto adjustment allows the monitor to self-adjust to the incoming video signal. To make the automatic adjustment function sharper, execute the 'AUTO' function while the AUTO PATTERN is pressed...
... the animated screen on . four different modes(Custom/Text/Internet/Entertain) The values of fine, coarse and position are adjusted automatically. Auto adjustment allows the monitor to self-adjust to the incoming video signal. To make the automatic adjustment function sharper, execute the 'AUTO' function while the AUTO PATTERN is pressed...
User Manual (ENGLISH)
Page 25
... frequency (clock speed). If the noise persists even after Fine tuning, repeat it to change the horizontal position of image. Changes the clearance of the monitor's entire display. Image Menu Coarse Fine Sharpness H-Position V-Position Description Removes noise such as horizontal stripes. Follow these instructions to change the vertical position of...
... frequency (clock speed). If the noise persists even after Fine tuning, repeat it to change the horizontal position of image. Changes the clearance of the monitor's entire display. Image Menu Coarse Fine Sharpness H-Position V-Position Description Removes noise such as horizontal stripes. Follow these instructions to change the vertical position of...


