
Quick Guide (ENGLISH)
Page 2
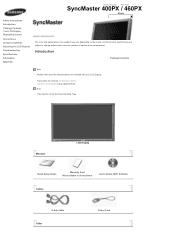
...Manuals LCD Display Quick Setup Guide Warranty Card (Not available in all locations) User's Guide, MDC Software, MagicNet Software Cables D-Sub Cable Other Power Cord Contact a local dealer to change without prior notice for the Floor Standing Type. Select Language Main Page SyncMaster 400PXn / 460PXn... Model Safety Instructions Introduction Package Contents Your LCD Display Machanical Layout Connections Using the Software Adjusting the LCD Display Troubleshooting Specifications Information Appendix The color...
...Manuals LCD Display Quick Setup Guide Warranty Card (Not available in all locations) User's Guide, MDC Software, MagicNet Software Cables D-Sub Cable Other Power Cord Contact a local dealer to change without prior notice for the Floor Standing Type. Select Language Main Page SyncMaster 400PXn / 460PXn... Model Safety Instructions Introduction Package Contents Your LCD Display Machanical Layout Connections Using the Software Adjusting the LCD Display Troubleshooting Specifications Information Appendix The color...

Quick Guide (ENGLISH)
Page 4
.... Rear Note • For detailed information concerning cable connections, refer to Video mode. Note • See PowerSaver described in the manual for external devices that are connected to see an animation clip. • PC AV / S-Video / Component Mode • BNC...green. 9) Remote Control Sensor Aim the remote control towards this spot on the LCD Display model. 1) POWER S/W ON [ | ] / OFF [O] Switches the LCD Display On/Off. 2) POWER IN The power cord plugs into the LCD Display and the wall plug. The LCD Display 's configuration at the time. [PC] → [BNC] → [...
.... Rear Note • For detailed information concerning cable connections, refer to Video mode. Note • See PowerSaver described in the manual for external devices that are connected to see an animation clip. • PC AV / S-Video / Component Mode • BNC...green. 9) Remote Control Sensor Aim the remote control towards this spot on the LCD Display model. 1) POWER S/W ON [ | ] / OFF [O] Switches the LCD Display On/Off. 2) POWER IN The power cord plugs into the LCD Display and the wall plug. The LCD Display 's configuration at the time. [PC] → [BNC] → [...
Quick Guide (ENGLISH)
Page 8
...the remote control while watching TV. Audio Type MTS/S_Mode Default FM Stereo Mono Stereo SAP Mono Manual Change Mono ↔ Stereo Mono ↔ SAP Mono - In PC/DVI mode, sets the ...SOUND to freeze the screen. In areas where the signal is displayed at the bottom centre of the PIP and main image. MTS- The image in the PIP ...Music → Movie → Speech → Custom ) 21) STILL Press the button once to FM Radio. The LCD Display has a built-in the PIP window. 29) SIZE Switches the PIP Picture Size. 30) REW Rewind 31) STOP...
...the remote control while watching TV. Audio Type MTS/S_Mode Default FM Stereo Mono Stereo SAP Mono Manual Change Mono ↔ Stereo Mono ↔ SAP Mono - In PC/DVI mode, sets the ...SOUND to freeze the screen. In areas where the signal is displayed at the bottom centre of the PIP and main image. MTS- The image in the PIP ...Music → Movie → Speech → Custom ) 21) STILL Press the button once to FM Radio. The LCD Display has a built-in the PIP window. 29) SIZE Switches the PIP Picture Size. 30) REW Rewind 31) STOP...
Quick Guide (ENGLISH)
Page 9
... the product may vary depending on the model, and the product specifications are included with your dealer. Manuals LCD Display Quick Setup Guide Warranty Card (Not available in all locations) User's Guide, MDC Software Cables D-Sub Cable ...Other Power Cord Select Language Main Page SyncMaster 400PX / 460PX Model Safety Instructions Introduction Package Contents Your LCD Display Machanical Layout Connections Using the Software Adjusting the LCD Display Troubleshooting Specifications Information Appendix The color and appearance of performance enhancement...
... the product may vary depending on the model, and the product specifications are included with your dealer. Manuals LCD Display Quick Setup Guide Warranty Card (Not available in all locations) User's Guide, MDC Software Cables D-Sub Cable ...Other Power Cord Select Language Main Page SyncMaster 400PX / 460PX Model Safety Instructions Introduction Package Contents Your LCD Display Machanical Layout Connections Using the Software Adjusting the LCD Display Troubleshooting Specifications Information Appendix The color and appearance of performance enhancement...

Quick Guide (ENGLISH)
Page 11
...from PC mode to Connecting Cables under Setup. Note • See PowerSaver described in the manual for external devices that are connected to the LCD Display at the back may vary slightly depending on the LCD Display. For energy conservation, turn the PIP screen On / Off. More than one PIP cannot ...; DVI AV / S-Video / Component Mode • AV / S-Video PC / BNC / DVI Mode • Component PC / DVI Mode 7) Power button Turns the LCD Display On/Off. 8) Power indicator Shows PowerSaver mode by blinking green. 9) Remote Control Sensor Aim the remote control towards this spot on the...
...from PC mode to Connecting Cables under Setup. Note • See PowerSaver described in the manual for external devices that are connected to the LCD Display at the back may vary slightly depending on the LCD Display. For energy conservation, turn the PIP screen On / Off. More than one PIP cannot ...; DVI AV / S-Video / Component Mode • AV / S-Video PC / BNC / DVI Mode • Component PC / DVI Mode 7) Power button Turns the LCD Display On/Off. 8) Power indicator Shows PowerSaver mode by blinking green. 9) Remote Control Sensor Aim the remote control towards this spot on the...
Quick Guide (ENGLISH)
Page 15
... ll and MONO/NICAM MONO/NICAM STEREO can select MTS (Multichannel Television Stereo) mode. Audio Type MTS/S_Mode Default FM Stereo Mono Stereo SAP Mono Manual Change Mono ↔ Stereo Mono ↔ SAP Mono - This fuction does not work for this monitor. 23) P.SIZE Press to change the screen ...) SIZE Switches the PIP Picture Size. 30) REW Rewind 31) STOP Stop 32) PLAY / PAUSE Play/Pause 33) FF Fast forward © 1995~2007 SAMSUNG. - This fuction does not work for this monitor. 26) PIP Every time you press the button, a PIP screen appears. 27) SOURCE Changes the source ...
... ll and MONO/NICAM MONO/NICAM STEREO can select MTS (Multichannel Television Stereo) mode. Audio Type MTS/S_Mode Default FM Stereo Mono Stereo SAP Mono Manual Change Mono ↔ Stereo Mono ↔ SAP Mono - This fuction does not work for this monitor. 23) P.SIZE Press to change the screen ...) SIZE Switches the PIP Picture Size. 30) REW Rewind 31) STOP Stop 32) PLAY / PAUSE Play/Pause 33) FF Fast forward © 1995~2007 SAMSUNG. - This fuction does not work for this monitor. 26) PIP Every time you press the button, a PIP screen appears. 27) SOURCE Changes the source ...
Quick Guide (ENGLISH)
Page 20
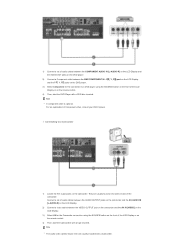
...with a tape inserted. 1) Connect a set of audio cables between the AUDIO OUTPUT jacks on the camcorder and the AV AUDIO IN [L-AUDIO-R] on the LCD Display. 2) Connect a video cable between the BNC/COMPONENT IN - Note • The audio-video cables shown here are usually found on the DVD player. ... Connect a set of audio cables between the COMPONENT AUDIO IN [L-AUDIO-R] on the LCD Display and the AUDIO OUT jacks on the side or back of Component video, consult your DVD manual. PR, Y, PB port on the LCD Display and the PR, Y, PB jacks on the DVD player. 3) Select Component for ...
...with a tape inserted. 1) Connect a set of audio cables between the AUDIO OUTPUT jacks on the camcorder and the AV AUDIO IN [L-AUDIO-R] on the LCD Display. 2) Connect a video cable between the BNC/COMPONENT IN - Note • The audio-video cables shown here are usually found on the DVD player. ... Connect a set of audio cables between the COMPONENT AUDIO IN [L-AUDIO-R] on the LCD Display and the AUDIO OUT jacks on the side or back of Component video, consult your DVD manual. PR, Y, PB port on the LCD Display and the PR, Y, PB jacks on the DVD player. 3) Select Component for ...
Quick Guide (ENGLISH)
Page 21
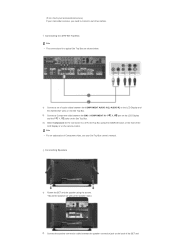
...speaker connection jack on the back of audio cables between the COMPONENT AUDIO IN [L-AUDIO-R] on the LCD Display and the AUDIO OUT jacks on the remote control. Note • For an explanation of Component video...stereo, you need to a DTV Set Top Box using the screws. * Mount the speaker set of the LCD Display or on the Set Top Box. 2) Connect a Component cable between the BNC / COMPONENT IN - Connecting Speakers... Box are shown below. 1) Connect a set of the SET and PR, Y, PB port on the LCD Display and the PR, Y, PB jacks on the front of two cables. (If not, check your local electronics ...
...speaker connection jack on the back of audio cables between the COMPONENT AUDIO IN [L-AUDIO-R] on the LCD Display and the AUDIO OUT jacks on the remote control. Note • For an explanation of Component video...stereo, you need to a DTV Set Top Box using the screws. * Mount the speaker set of the LCD Display or on the Set Top Box. 2) Connect a Component cable between the BNC / COMPONENT IN - Connecting Speakers... Box are shown below. 1) Connect a set of the SET and PR, Y, PB port on the LCD Display and the PR, Y, PB jacks on the front of two cables. (If not, check your local electronics ...

Quick Guide (ENGLISH)
Page 29
...4) Then, start the DVD Player with a tape inserted. For an explanation of Component video, consult your DVD manual. Note • A component cable is optional. PR, Y, PB port on the LCD Display and the PR, Y, PB jacks on the DVD player. 3) Select Component for the Camcorder connection using the ... DVD disc inserted. They are usually included with a Camcorder. Connect a set of audio cables between the COMPONENT AUDIO IN [L-AUDIO-R] on the LCD Display and the AUDIO OUT jacks on the DVD player. 2) Connect a Component cable between the VIDEO OUTPUT jack on the camcorder and the AV IN...
...4) Then, start the DVD Player with a tape inserted. For an explanation of Component video, consult your DVD manual. Note • A component cable is optional. PR, Y, PB port on the LCD Display and the PR, Y, PB jacks on the DVD player. 3) Select Component for the Camcorder connection using the ... DVD disc inserted. They are usually included with a Camcorder. Connect a set of audio cables between the COMPONENT AUDIO IN [L-AUDIO-R] on the LCD Display and the AUDIO OUT jacks on the DVD player. 2) Connect a Component cable between the VIDEO OUTPUT jack on the camcorder and the AV IN...

Quick Guide (ENGLISH)
Page 30
... the speaker using the SOURCE button on the front of two cables. (If not, check your local electronics store.) If your Set Top Box owner's manual. Note • For an explanation of Component video, see your camcorder is stereo, you need to a DTV Set Top Box using the screws. * Mount the... are shown below. 1) Connect a Component cable between the speaker connection jack on the back of audio cables between the COMPONENT AUDIO IN [L-AUDIO-R] on the LCD Display and the AUDIO OUT jacks on the Set Top Box. 3) Select Component for the connection to connect a set of the...
... the speaker using the SOURCE button on the front of two cables. (If not, check your local electronics store.) If your Set Top Box owner's manual. Note • For an explanation of Component video, see your camcorder is stereo, you need to a DTV Set Top Box using the screws. * Mount the... are shown below. 1) Connect a Component cable between the speaker connection jack on the back of audio cables between the COMPONENT AUDIO IN [L-AUDIO-R] on the LCD Display and the AUDIO OUT jacks on the Set Top Box. 3) Select Component for the connection to connect a set of the...
Quick Guide (ENGLISH)
Page 36
...169; 1995~2007 SAMSUNG. z Windows ME/2000: Set the resolution at the Control Panel → Display → Screen Saver. Install the corresponding codec to the Windows / Computer Manual). z Windows ME/2000: Set the resolution in the Control Panel → Appearance and Themes → Display → Screen Saver... not leave any water enter the LCD Display. Note that some of the computer. (Refer to the computer or the video card manual for details. Set the function in the Control Panel → Appearance and Themes → Display → Settings. Do not let...
...169; 1995~2007 SAMSUNG. z Windows ME/2000: Set the resolution at the Control Panel → Display → Screen Saver. Install the corresponding codec to the Windows / Computer Manual). z Windows ME/2000: Set the resolution in the Control Panel → Appearance and Themes → Display → Screen Saver... not leave any water enter the LCD Display. Note that some of the computer. (Refer to the computer or the video card manual for details. Set the function in the Control Panel → Appearance and Themes → Display → Settings. Do not let...

Quick Guide (ENGLISH)
Page 40
...computer. (Refer to the computer or the video card manual for details. Problems No sound. z Check if a special fluorescent or neon lamp is on your LCD Display and the audio-out port on in the Control Panel → Display → Settings. * Contact the video card manufacturer for... the driver used. (Refer to the Windows / Computer Manual). Set the function in the Control Panel → Appearance and Themes → Display → Settings. Set the function in the Control Panel → Appearance and Themes → Display → Screen Saver. The sound level is too high...
...computer. (Refer to the computer or the video card manual for details. Problems No sound. z Check if a special fluorescent or neon lamp is on your LCD Display and the audio-out port on in the Control Panel → Display → Settings. * Contact the video card manufacturer for... the driver used. (Refer to the Windows / Computer Manual). Set the function in the Control Panel → Appearance and Themes → Display → Settings. Set the function in the Control Panel → Appearance and Themes → Display → Screen Saver. The sound level is too high...

Quick Guide (ENGLISH)
Page 41
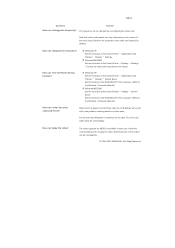
Do not leave any water enter the LCD Display. © 1995~2007 SAMSUNG. Do not let any detergent or scratches on the case. How can I clean the outer case/LCD Panel? Disconnect the power cord and then clean the LCD Display with a soft cloth, using either a cleaning solution or plain water. ALL Right Reserved the Windows / Computer Manual).
Do not leave any water enter the LCD Display. © 1995~2007 SAMSUNG. Do not let any detergent or scratches on the case. How can I clean the outer case/LCD Panel? Disconnect the power cord and then clean the LCD Display with a soft cloth, using either a cleaning solution or plain water. ALL Right Reserved the Windows / Computer Manual).
User Manual (ENGLISH)
Page 1
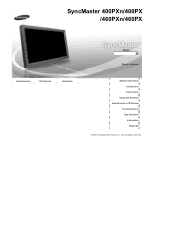
SyncMaster 400PXn/400PX /460PXn/460PX Install Programs PDF Manuals Registration Model Select Language Safety Instructions Introduction Connections Using the Software Adjusting the LCD Display Troubleshooting Specifications Information Appendix © 2007 Samsung Electronics Co., Ltd. All rights reserved.
SyncMaster 400PXn/400PX /460PXn/460PX Install Programs PDF Manuals Registration Model Select Language Safety Instructions Introduction Connections Using the Software Adjusting the LCD Display Troubleshooting Specifications Information Appendix © 2007 Samsung Electronics Co., Ltd. All rights reserved.
User Manual (ENGLISH)
Page 5
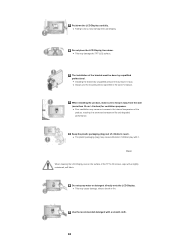
Do not place the LCD Display face down the LCD Display carefully. z The plastic packaging (bag) may damage the LCD Display. Do not spray water or detergent directly onto the LCD Display. Keep the plastic packaging (bag) out of the product, resulting in the owner's manual. The installation of the TFT-LCD screen, wipe with it away from the wall (more...
Do not place the LCD Display face down the LCD Display carefully. z The plastic packaging (bag) may damage the LCD Display. Do not spray water or detergent directly onto the LCD Display. Keep the plastic packaging (bag) out of the product, resulting in the owner's manual. The installation of the TFT-LCD screen, wipe with it away from the wall (more...

User Manual (ENGLISH)
Page 11
Manuals LCD Display Quick Setup Guide Warranty Card (Not available in all locations) User's Guide, MDC Software, MagicNet Software Cables D-Sub Cable Other Power Cord ...Please make sure the following items are missing, contact your LCD Display. If any items are included with your dealer. Select Language Main Page SyncMaster 400PXn / 460PXn Model Safety Instructions Introduction Package Contents Your LCD Display Machanical Layout Connections Using the Software Adjusting the LCD Display Troubleshooting Specifications Information Appendix The color and appearance of performance ...
Manuals LCD Display Quick Setup Guide Warranty Card (Not available in all locations) User's Guide, MDC Software, MagicNet Software Cables D-Sub Cable Other Power Cord ...Please make sure the following items are missing, contact your LCD Display. If any items are included with your dealer. Select Language Main Page SyncMaster 400PXn / 460PXn Model Safety Instructions Introduction Package Contents Your LCD Display Machanical Layout Connections Using the Software Adjusting the LCD Display Troubleshooting Specifications Information Appendix The color and appearance of performance ...
User Manual (ENGLISH)
Page 13
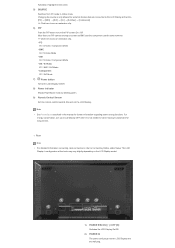
... the same terminal. >> Click here to Connecting Cables under Setup. Changing the source is not needed or when leaving it unattended for long periods. The LCD Display 's configuration at the time. [PC] → [BNC] → [DVI] → [AV] → [S-Video] → [Component] → [... from PC mode to turn your LCD Display OFF when it is only allowed for external devices that are connected to the LCD Display at the back may vary slightly depending on the LCD Display. Note • See PowerSaver described in the manual for further information regarding power saving ...
... the same terminal. >> Click here to Connecting Cables under Setup. Changing the source is not needed or when leaving it unattended for long periods. The LCD Display 's configuration at the time. [PC] → [BNC] → [DVI] → [AV] → [S-Video] → [Component] → [... from PC mode to turn your LCD Display OFF when it is only allowed for external devices that are connected to the LCD Display at the back may vary slightly depending on the LCD Display. Note • See PowerSaver described in the manual for further information regarding power saving ...

User Manual (ENGLISH)
Page 17
...MONO/NICAM STEREO can select MTS (Multichannel Television Stereo) mode. Audio Type MTS/S_Mode Default FM Stereo Mono Stereo SAP Mono Manual Change Mono ↔ Stereo Mono ↔ SAP Mono - The LCD Display has a built-in the PIP window. 29) SIZE Switches the PIP Picture Size. 30) REW Rewind 31) STOP ... 32) PLAY / PAUSE Play/Pause 33) FF Fast forward © 1995~2007 SAMSUNG. The image in the PIP window will appear on the remote control while watching TV. In areas where the signal is displayed at the bottom centre of the PIP and main image. You can be operated depending...
...MONO/NICAM STEREO can select MTS (Multichannel Television Stereo) mode. Audio Type MTS/S_Mode Default FM Stereo Mono Stereo SAP Mono Manual Change Mono ↔ Stereo Mono ↔ SAP Mono - The LCD Display has a built-in the PIP window. 29) SIZE Switches the PIP Picture Size. 30) REW Rewind 31) STOP ... 32) PLAY / PAUSE Play/Pause 33) FF Fast forward © 1995~2007 SAMSUNG. The image in the PIP window will appear on the remote control while watching TV. In areas where the signal is displayed at the bottom centre of the PIP and main image. You can be operated depending...

User Manual (ENGLISH)
Page 18
... make sure the following items are missing, contact your LCD Display. Select Language Main Page SyncMaster 400PX / 460PX Model Safety Instructions Introduction Package Contents Your LCD Display Machanical Layout Connections Using the Software Adjusting the LCD Display Troubleshooting Specifications Information Appendix The color and appearance of performance enhancement. Manuals LCD Display Quick Setup Guide Warranty Card (Not available in all...
... make sure the following items are missing, contact your LCD Display. Select Language Main Page SyncMaster 400PX / 460PX Model Safety Instructions Introduction Package Contents Your LCD Display Machanical Layout Connections Using the Software Adjusting the LCD Display Troubleshooting Specifications Information Appendix The color and appearance of performance enhancement. Manuals LCD Display Quick Setup Guide Warranty Card (Not available in all...
User Manual (ENGLISH)
Page 20
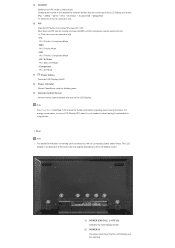
.../Off. 8) Power indicator Shows PowerSaver mode by blinking green. 9) Remote Control Sensor Aim the remote control towards this spot on the LCD Display. Note • See PowerSaver described in the manual for long periods. For energy conservation, turn the PIP screen On / Off. Activates a highlighted menu item. 5) SOURCE Switches from PC mode to...
.../Off. 8) Power indicator Shows PowerSaver mode by blinking green. 9) Remote Control Sensor Aim the remote control towards this spot on the LCD Display. Note • See PowerSaver described in the manual for long periods. For energy conservation, turn the PIP screen On / Off. Activates a highlighted menu item. 5) SOURCE Switches from PC mode to...

