

Quick Guide (ENGLISH)
Page 2
... stand is not for reasons of the product may vary depending on the model, and the product specifications are included with your dealer. Select Language Main Page SyncMaster 400PXn / 460PXn Model Safety Instructions Introduction Package Contents Your LCD Display ...Machanical Layout Connections Using the Software Adjusting the LCD Display Troubleshooting Specifications Information Appendix The color and appearance of performance...
... stand is not for reasons of the product may vary depending on the model, and the product specifications are included with your dealer. Select Language Main Page SyncMaster 400PXn / 460PXn Model Safety Instructions Introduction Package Contents Your LCD Display ...Machanical Layout Connections Using the Software Adjusting the LCD Display Troubleshooting Specifications Information Appendix The color and appearance of performance...

Quick Guide (ENGLISH)
Page 3
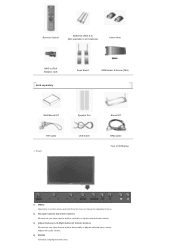
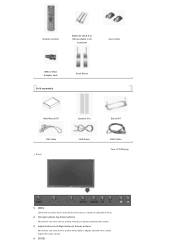
... (AAA X 2) (Not available in all locations) Cover-Hole BNC to RCA Adaptor Jack Sold separately Semi Stand USB Holder & Screw (1EA) Wall Mount KIT Speaker Set DVI Cable Front LAN Cable Stand KIT BNC Cable Your LCD Display 1) MENU Opens the on-screen menu and exits from the menu or closes the adjustment menu...
... (AAA X 2) (Not available in all locations) Cover-Hole BNC to RCA Adaptor Jack Sold separately Semi Stand USB Holder & Screw (1EA) Wall Mount KIT Speaker Set DVI Cable Front LAN Cable Stand KIT BNC Cable Your LCD Display 1) MENU Opens the on-screen menu and exits from the menu or closes the adjustment menu...
Quick Guide (ENGLISH)
Page 9
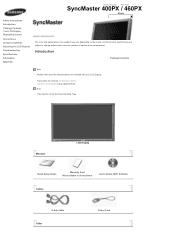
... Other Power Cord Contact a local dealer to change without prior notice for the Floor Standing Type. Select Language Main Page SyncMaster 400PX / 460PX Model Safety Instructions Introduction Package Contents Your LCD Display Machanical Layout Connections Using the Software Adjusting the LCD Display Troubleshooting Specifications Information Appendix The color and appearance of performance enhancement. If any items are...
... Other Power Cord Contact a local dealer to change without prior notice for the Floor Standing Type. Select Language Main Page SyncMaster 400PX / 460PX Model Safety Instructions Introduction Package Contents Your LCD Display Machanical Layout Connections Using the Software Adjusting the LCD Display Troubleshooting Specifications Information Appendix The color and appearance of performance enhancement. If any items are...

Quick Guide (ENGLISH)
Page 10
... Control Batteries (AAA X 2) (Not available in all locations) Cover-Hole BNC to RCA Adaptor Jack Sold separately Semi Stand Wall Mount KIT Speaker Set DVI Cable Front LAN Cable Stand KIT BNC Cable Your LCD Display 1) MENU Opens the on-screen menu and exits from the menu or closes the adjustment menu. 2) Navigate buttons...
... Control Batteries (AAA X 2) (Not available in all locations) Cover-Hole BNC to RCA Adaptor Jack Sold separately Semi Stand Wall Mount KIT Speaker Set DVI Cable Front LAN Cable Stand KIT BNC Cable Your LCD Display 1) MENU Opens the on-screen menu and exits from the menu or closes the adjustment menu. 2) Navigate buttons...

Quick Guide (ENGLISH)
Page 16
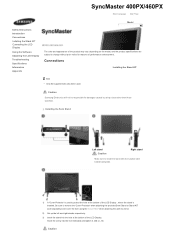
SyncMaster 400PXn/460PXn Select Language Main Page Model Safety Instructions Introduction Connections Installing the Stand KIT Connecting the LCD Display Using the Software Adjusting the LCD Display Troubleshooting Specifications Information Appendix The color and appearance of the product may vary.... Caution Samsung Electronics will not be used to install the stand with the Caution label folded backwards. 1) A 'Cover-Protector' is inserted. Insert the screw into the hole at the bottom of the LCD Display. Installing the Semi Stand Left stand Caution Right stand Make sure...
SyncMaster 400PXn/460PXn Select Language Main Page Model Safety Instructions Introduction Connections Installing the Stand KIT Connecting the LCD Display Using the Software Adjusting the LCD Display Troubleshooting Specifications Information Appendix The color and appearance of the product may vary.... Caution Samsung Electronics will not be used to install the stand with the Caution label folded backwards. 1) A 'Cover-Protector' is inserted. Insert the screw into the hole at the bottom of the LCD Display. Installing the Semi Stand Left stand Caution Right stand Make sure...

Quick Guide (ENGLISH)
Page 17
...When un-wiring the earth lead, make sure to the User Controls under Adjusting Your LCD Display. Connecting to the LCD Display. Installing the Stand KIT (sold separately) and cover the hole using this stand. This stand is designed for any problem caused when using the 'Cover-Hole' when attaching the...the right place. (M4 × L15) 3) Insert the stand into the hole indicated and tighten it. (M4 × L15) Connecting the LCD Display Using a Power cord with Earth In the event of the LCD Display , where the stand is inserted. Under no circumstances use the product as your computer...
...When un-wiring the earth lead, make sure to the User Controls under Adjusting Your LCD Display. Connecting to the LCD Display. Installing the Stand KIT (sold separately) and cover the hole using this stand. This stand is designed for any problem caused when using the 'Cover-Hole' when attaching the...the right place. (M4 × L15) 3) Insert the stand into the hole indicated and tighten it. (M4 × L15) Connecting the LCD Display Using a Power cord with Earth In the event of the LCD Display , where the stand is inserted. Under no circumstances use the product as your computer...
Quick Guide (ENGLISH)
Page 21
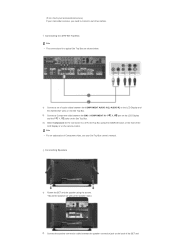
...of Component video, see your camcorder is stereo, you need to a DTV Set Top Box using the screws. * Mount the speaker set without the speaker stand. 2) Connect the speaker connection cable between the BNC / COMPONENT IN - Connecting Speakers 1) Fasten the SET and the speaker using the SOURCE button on ... AUDIO OUT jacks on the Set Top Box. 2) Connect a Component cable between the speaker connection jack on the remote control. PR, Y, PB port on the LCD Display and the PR, Y, PB jacks on the Set Top Box. 3) Select Component for a typical Set Top Box are shown below. 1) Connect a set of ...
...of Component video, see your camcorder is stereo, you need to a DTV Set Top Box using the screws. * Mount the speaker set without the speaker stand. 2) Connect the speaker connection cable between the BNC / COMPONENT IN - Connecting Speakers 1) Fasten the SET and the speaker using the SOURCE button on ... AUDIO OUT jacks on the Set Top Box. 2) Connect a Component cable between the speaker connection jack on the remote control. PR, Y, PB port on the LCD Display and the PR, Y, PB jacks on the Set Top Box. 3) Select Component for a typical Set Top Box are shown below. 1) Connect a set of ...
Quick Guide (ENGLISH)
Page 25
Installing the Semi Stand Left stand Caution Right stand Make sure to install the stand with the Caution label folded backwards. 1) A 'Cover-Protector' is inserted. SyncMaster 400PX/460PX Select Language Main Page Model Safety Instructions Introduction Connections Installing the Stand KIT Connecting the LCD Display Using the Software Adjusting the LCD Display Troubleshooting Specifications Information Appendix The color and appearance of the...
Installing the Semi Stand Left stand Caution Right stand Make sure to install the stand with the Caution label folded backwards. 1) A 'Cover-Protector' is inserted. SyncMaster 400PX/460PX Select Language Main Page Model Safety Instructions Introduction Connections Installing the Stand KIT Connecting the LCD Display Using the Software Adjusting the LCD Display Troubleshooting Specifications Information Appendix The color and appearance of the...

Quick Guide (ENGLISH)
Page 26
...AC power in the right place. (M4 × L15) 3) Insert the stand into the hole indicated and tighten it. (M4 × L15) Connecting the LCD Display Using a Power cord with Earth In the event of the LCD Display , where the stand is not responsible for adjusting the screen angle. Note • AV input ...devices such as DVD players, VCR's or camcorders as well as a stand for placing something on connecting AV input devices, refer to protect the hole at the bottom of the LCD Display. 4) Insert the screw into the hole at the bottom of failure, the earth lead may ...
...AC power in the right place. (M4 × L15) 3) Insert the stand into the hole indicated and tighten it. (M4 × L15) Connecting the LCD Display Using a Power cord with Earth In the event of the LCD Display , where the stand is not responsible for adjusting the screen angle. Note • AV input ...devices such as DVD players, VCR's or camcorders as well as a stand for placing something on connecting AV input devices, refer to protect the hole at the bottom of the LCD Display. 4) Insert the screw into the hole at the bottom of failure, the earth lead may ...

Quick Guide (ENGLISH)
Page 30
... the speaker set without the speaker stand. 2) Connect the speaker connection cable between the speaker connection jack on the back of Component video, see your camcorder is stereo, you need to connect a set of audio cables between the COMPONENT AUDIO IN [L-AUDIO-R] on the LCD Display and the AUDIO OUT jacks on the...
... the speaker set without the speaker stand. 2) Connect the speaker connection cable between the speaker connection jack on the back of Component video, see your camcorder is stereo, you need to connect a set of audio cables between the COMPONENT AUDIO IN [L-AUDIO-R] on the LCD Display and the AUDIO OUT jacks on the...

User Manual (ENGLISH)
Page 11
Select Language Main Page SyncMaster 400PXn / 460PXn Model Safety Instructions Introduction Package Contents Your LCD Display Machanical Layout Connections Using the Software Adjusting the LCD Display Troubleshooting Specifications Information Appendix The color and appearance of performance enhancement. Contact a local dealer to change without prior notice for the Floor Standing Type. Introduction Package Contents Note • Please make...
Select Language Main Page SyncMaster 400PXn / 460PXn Model Safety Instructions Introduction Package Contents Your LCD Display Machanical Layout Connections Using the Software Adjusting the LCD Display Troubleshooting Specifications Information Appendix The color and appearance of performance enhancement. Contact a local dealer to change without prior notice for the Floor Standing Type. Introduction Package Contents Note • Please make...
User Manual (ENGLISH)
Page 12
... (AAA X 2) (Not available in all locations) Cover-Hole BNC to RCA Adaptor Jack Sold separately Semi Stand USB Holder & Screw (1EA) Wall Mount KIT Speaker Set DVI Cable Front LAN Cable Stand KIT BNC Cable Your LCD Display 1) MENU Opens the on-screen menu and exits from the menu or closes the adjustment menu...
... (AAA X 2) (Not available in all locations) Cover-Hole BNC to RCA Adaptor Jack Sold separately Semi Stand USB Holder & Screw (1EA) Wall Mount KIT Speaker Set DVI Cable Front LAN Cable Stand KIT BNC Cable Your LCD Display 1) MENU Opens the on-screen menu and exits from the menu or closes the adjustment menu...

User Manual (ENGLISH)
Page 18
... and the product specifications are subject to change without prior notice for the Floor Standing Type. If any items are missing, contact your LCD Display. Manuals LCD Display Quick Setup Guide Warranty Card (Not available in all locations) User's Guide,...items are included with your dealer. Select Language Main Page SyncMaster 400PX / 460PX Model Safety Instructions Introduction Package Contents Your LCD Display Machanical Layout Connections Using the Software Adjusting the LCD Display Troubleshooting Specifications Information Appendix The color and appearance of performance ...
... and the product specifications are subject to change without prior notice for the Floor Standing Type. If any items are missing, contact your LCD Display. Manuals LCD Display Quick Setup Guide Warranty Card (Not available in all locations) User's Guide,...items are included with your dealer. Select Language Main Page SyncMaster 400PX / 460PX Model Safety Instructions Introduction Package Contents Your LCD Display Machanical Layout Connections Using the Software Adjusting the LCD Display Troubleshooting Specifications Information Appendix The color and appearance of performance ...
User Manual (ENGLISH)
Page 19
... Control Batteries (AAA X 2) (Not available in all locations) Cover-Hole BNC to RCA Adaptor Jack Sold separately Semi Stand Wall Mount KIT Speaker Set DVI Cable Front LAN Cable Stand KIT BNC Cable Your LCD Display 1) MENU Opens the on-screen menu and exits from the menu or closes the adjustment menu. 2) Navigate buttons...
... Control Batteries (AAA X 2) (Not available in all locations) Cover-Hole BNC to RCA Adaptor Jack Sold separately Semi Stand Wall Mount KIT Speaker Set DVI Cable Front LAN Cable Stand KIT BNC Cable Your LCD Display 1) MENU Opens the on-screen menu and exits from the menu or closes the adjustment menu. 2) Navigate buttons...
User Manual (ENGLISH)
Page 25
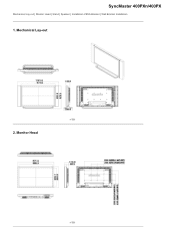
Monitor Head Mechanical Lay-out Dodatak 2. SyncMaster 400PXn/400PX Mechanical Lay-out | Monitor Head | Stand | Speaker | Installation VESA Bracket | Wall Bracket Installation 1.
Monitor Head Mechanical Lay-out Dodatak 2. SyncMaster 400PXn/400PX Mechanical Lay-out | Monitor Head | Stand | Speaker | Installation VESA Bracket | Wall Bracket Installation 1.

User Manual (ENGLISH)
Page 26
Stand 4. 3. z Purchasing VESA Bracket and Installation Information : Please contact your order is not responsible for any product damage or any injury caused by installation at customer's discretion. After your nearest Samsung Distributor to place an order. Dimensions z At least 2 persons are needed in order to comply with the international VESA standards. z Samsung is placed, installation professionals will visit you and install the bracket. Installation VESA Bracket z When installing VESA, make sure to move the LCD Monitor. Speaker 5.
Stand 4. 3. z Purchasing VESA Bracket and Installation Information : Please contact your order is not responsible for any product damage or any injury caused by installation at customer's discretion. After your nearest Samsung Distributor to place an order. Dimensions z At least 2 persons are needed in order to comply with the international VESA standards. z Samsung is placed, installation professionals will visit you and install the bracket. Installation VESA Bracket z When installing VESA, make sure to move the LCD Monitor. Speaker 5.
User Manual (ENGLISH)
Page 31
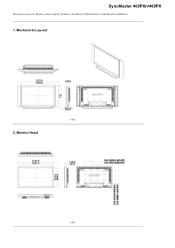
SyncMaster 460PXn/460PX Mechanical Lay-out | Monitor Head | Stand | Speaker | Installation VESA Bracket | Wall Bracket Installation 1. Mechanical Lay-out Dodatak 2. Monitor Head
SyncMaster 460PXn/460PX Mechanical Lay-out | Monitor Head | Stand | Speaker | Installation VESA Bracket | Wall Bracket Installation 1. Mechanical Lay-out Dodatak 2. Monitor Head

User Manual (ENGLISH)
Page 32
z At least 2 persons are needed in order to comply with the international VESA standards. Dimensions After your nearest Samsung Distributor to place an order. z Purchasing VESA Bracket and Installation Information : Please contact your order is not responsible for any product damage or any injury caused by installation at customer's discretion. 3. z Samsung is placed, installation professionals will visit you and install the bracket. Installation VESA Bracket z When installing VESA, make sure to move the LCD Monitor. Speaker 5. Stand 4.
z At least 2 persons are needed in order to comply with the international VESA standards. Dimensions After your nearest Samsung Distributor to place an order. z Purchasing VESA Bracket and Installation Information : Please contact your order is not responsible for any product damage or any injury caused by installation at customer's discretion. 3. z Samsung is placed, installation professionals will visit you and install the bracket. Installation VESA Bracket z When installing VESA, make sure to move the LCD Monitor. Speaker 5. Stand 4.
User Manual (ENGLISH)
Page 37
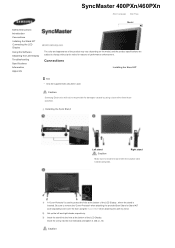
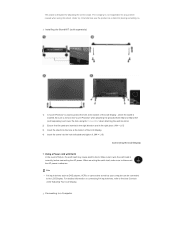
SyncMaster 400PXn/460PXn Select Language Main Page Model Safety Instructions Introduction Connections Installing the Stand KIT Connecting the LCD Display Using the Software Adjusting the LCD Display Troubleshooting Specifications Information Appendix The color and appearance of the product may vary depending on the ...Hole' when attaching the wall mount kit. 2) Set up the left and right stands respectively. 3) Insert the stand into the hole indicated and tighten it. (M4 x L15) Caution Caution Samsung Electronics will not be used to remove the 'Cover-Protector' when attaching the provided ...
SyncMaster 400PXn/460PXn Select Language Main Page Model Safety Instructions Introduction Connections Installing the Stand KIT Connecting the LCD Display Using the Software Adjusting the LCD Display Troubleshooting Specifications Information Appendix The color and appearance of the product may vary depending on the ...Hole' when attaching the wall mount kit. 2) Set up the left and right stands respectively. 3) Insert the stand into the hole indicated and tighten it. (M4 x L15) Caution Caution Samsung Electronics will not be used to remove the 'Cover-Protector' when attaching the provided ...
User Manual (ENGLISH)
Page 38
... to protect the hole at the bottom of the LCD Display. 4) Insert the screw into the hole indicated and tighten it. (M4 × L15) Connecting the LCD Display Using a Power cord with Earth In the event of the LCD Display , where the stand is inserted. When un-wiring the earth lead,... the AC power in advance. Be sure to remove the 'Cover-Protector' when attaching the provided Semi Stand or Stand KIT (sold separately) 1) A 'Cover-Protector' is used to the LCD Display. This stand is not responsible for any problem caused when using the 'Cover-Hole' when attaching the wall mount kit...
... to protect the hole at the bottom of the LCD Display. 4) Insert the screw into the hole indicated and tighten it. (M4 × L15) Connecting the LCD Display Using a Power cord with Earth In the event of the LCD Display , where the stand is inserted. When un-wiring the earth lead,... the AC power in advance. Be sure to remove the 'Cover-Protector' when attaching the provided Semi Stand or Stand KIT (sold separately) 1) A 'Cover-Protector' is used to the LCD Display. This stand is not responsible for any problem caused when using the 'Cover-Hole' when attaching the wall mount kit...


