Quick Guide (ENGLISH)
Page 2
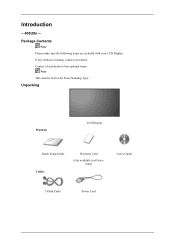
Contact a local dealer to buy optional items. Note This stand is not for the Floor Standing Type. Unpacking Manuals LCD Display Quick Setup Guide Cables Warranty Card (Not available in all locations) User's Guide D-Sub Cable Power Cord Introduction -- 400UXn -Package Contents Note Please make sure the following items are missing, contact your LCD Display. If any items are included with your dealer.
Contact a local dealer to buy optional items. Note This stand is not for the Floor Standing Type. Unpacking Manuals LCD Display Quick Setup Guide Cables Warranty Card (Not available in all locations) User's Guide D-Sub Cable Power Cord Introduction -- 400UXn -Package Contents Note Please make sure the following items are missing, contact your LCD Display. If any items are included with your dealer.
Quick Guide (ENGLISH)
Page 3
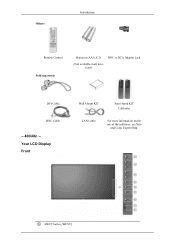
Others Introduction Remote Control Sold separately Batteries (AAA X 2) (Not available in all locations) BNC to RCA Adaptor Jack DVI Cable BNC Cable -- 400UXn -Your LCD Display Front Wall Mount KIT Semi Stand KIT Calibrater LAN Cable For more information on the use of the calibrater, see Nat- MENU button [MENU] ural Color Expert Help.
Others Introduction Remote Control Sold separately Batteries (AAA X 2) (Not available in all locations) BNC to RCA Adaptor Jack DVI Cable BNC Cable -- 400UXn -Your LCD Display Front Wall Mount KIT Semi Stand KIT Calibrater LAN Cable For more information on the use of the calibrater, see Nat- MENU button [MENU] ural Color Expert Help.
Quick Guide (ENGLISH)
Page 4
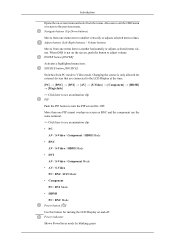
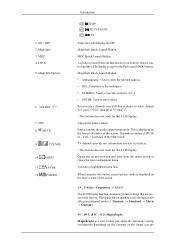
When OSD is only allowed for external devices that are connected to the LCD Display at the time. [PC] → [BNC] → [DVI] → [AV] → [S-Video] → [Component] → [HDMI] → [MagicInfo] >> Click here to see an animation clip &#... • AV / S-Video PC / BNC / DVI Mode • Component PC / DVI Mode • HDMI PC / BNC Mode Power button [ ] Use this button for turning the LCD Display on and off. SOURCE button [SOURCE] Switches from the menu. Adjust buttons (Left-Right buttons) / Volume buttons Moves from one PIP cannot overlap on screen...
When OSD is only allowed for external devices that are connected to the LCD Display at the time. [PC] → [BNC] → [DVI] → [AV] → [S-Video] → [Component] → [HDMI] → [MagicInfo] >> Click here to see an animation clip &#... • AV / S-Video PC / BNC / DVI Mode • Component PC / DVI Mode • HDMI PC / BNC Mode Power button [ ] Use this button for turning the LCD Display on and off. SOURCE button [SOURCE] Switches from the menu. Adjust buttons (Left-Right buttons) / Volume buttons Moves from one PIP cannot overlap on screen...
Quick Guide (ENGLISH)
Page 5
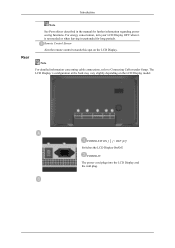
... at the back may vary slightly depending on the LCD Display. POWER S/W ON [ │ ] / OFF [O] Switches the LCD Display On/Off. POWER IN The power cord plugs into the LCD Display and the wall plug. Remote Control Sensor Aim the remote control towards this spot on the LCD Display model. Introduction Rear Note See PowerSaver described in the...
... at the back may vary slightly depending on the LCD Display. POWER S/W ON [ │ ] / OFF [O] Switches the LCD Display On/Off. POWER IN The power cord plugs into the LCD Display and the wall plug. Remote Control Sensor Aim the remote control towards this spot on the LCD Display model. Introduction Rear Note See PowerSaver described in the...
Quick Guide (ENGLISH)
Page 6
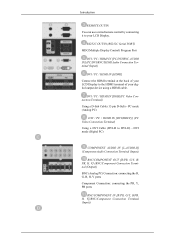
... PC) DVI / PC / HDMI IN [DVI(HDCP)] (PC Video Connection Terminal) Using a DVI Cable (DVI-D to the HDMI terminal of your LCD Display. RS232C OUT/IN (RS232C Serial PORT) MDC(Multiple Display Control) Program Port DVI / PC / HDMI IN [PC/DVI/BNC AUDIO IN] (PC/DVI/BNC/HDMI Audio Connection Terminal (Input)) DVI... BNC/COMPONENT IN [R/PR, G/Y, B/PB, H, V](BNC/Component Connection Terminal (Input)) Introduction REMOTE OUT/IN You can use a wired remote control by connecting it to your LCD Display to DVI-D) -
... PC) DVI / PC / HDMI IN [DVI(HDCP)] (PC Video Connection Terminal) Using a DVI Cable (DVI-D to the HDMI terminal of your LCD Display. RS232C OUT/IN (RS232C Serial PORT) MDC(Multiple Display Control) Program Port DVI / PC / HDMI IN [PC/DVI/BNC AUDIO IN] (PC/DVI/BNC/HDMI Audio Connection Terminal (Input)) DVI... BNC/COMPONENT IN [R/PR, G/Y, B/PB, H, V](BNC/Component Connection Terminal (Input)) Introduction REMOTE OUT/IN You can use a wired remote control by connecting it to your LCD Display to DVI-D) -
Quick Guide (ENGLISH)
Page 7
...Note See Connecting Cables for sound output of LCD Displays that can be connected to ten LCD Displays can be connected. Note The number of PC, DVI or BNC. L - +, - - R - +] (EXT Speaker Connection Terminal) AUDIO OUT [L-AUDIO-R] (LCD Display Audio Connection Terminal (Output))AUDIO OUT is ...signal source etc. With cables where there is the terminal for further information regarding cable connections. Introduction AV AUDIO IN [L-AUDIO-R] (LCD Display Audio Connection Terminal (Input)) AV OUT [VIDEO](VIDEO Connection Terminal) AV mode (Output) AV IN [VIDEO](VIDEO Connection Terminal) ...
...Note See Connecting Cables for sound output of LCD Displays that can be connected to ten LCD Displays can be connected. Note The number of PC, DVI or BNC. L - +, - - R - +] (EXT Speaker Connection Terminal) AUDIO OUT [L-AUDIO-R] (LCD Display Audio Connection Terminal (Output))AUDIO OUT is ...signal source etc. With cables where there is the terminal for further information regarding cable connections. Introduction AV AUDIO IN [L-AUDIO-R] (LCD Display Audio Connection Terminal (Input)) AV OUT [VIDEO](VIDEO Connection Terminal) AV mode (Output) AV IN [VIDEO](VIDEO Connection Terminal) ...
Quick Guide (ENGLISH)
Page 8
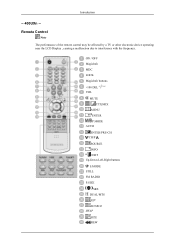
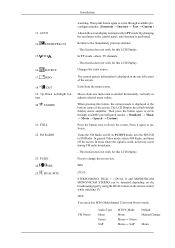
Remote Control Note The performance of the remote control may be affected by a TV or other electronic device operating near the LCD Display , causing a malfunction due to interference with the frequency. ON / OFF MagicInfo MDC LOCK MagicInfo buttons +100 DEL VOL MUTE TTX/MIX MENU ENTER P.MODE AUTO ENTER/PRE-CH CH/P SOURCE INFO EXIT Up-Down Left-Right buttons S.MODE STILL FM RADIO P.SIZE SRS DUAL/MTS PIP SOURCE SWAP SIZE REW Introduction -- 400UXn --
Remote Control Note The performance of the remote control may be affected by a TV or other electronic device operating near the LCD Display , causing a malfunction due to interference with the frequency. ON / OFF MagicInfo MDC LOCK MagicInfo buttons +100 DEL VOL MUTE TTX/MIX MENU ENTER P.MODE AUTO ENTER/PRE-CH CH/P SOURCE INFO EXIT Up-Down Left-Right buttons S.MODE STILL FM RADIO P.SIZE SRS DUAL/MTS PIP SOURCE SWAP SIZE REW Introduction -- 400UXn --
Quick Guide (ENGLISH)
Page 9
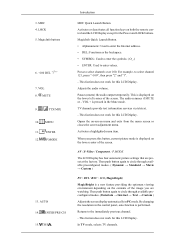
...exits from the menu screen or closes the screen adjustment menu. Activates a highlighted menu item. P.MODE Introduction STOP PLAY/PAUSE FF Turns the LCD Display On/Off. ON / OFF 2. MENU 11. MagicInfo Quick Launch Button. • Alphanumeric: Used to enter the Internet address. •... DVI / BNC : M/B (MagicBright) MagicBright is a new feature providing the optimum viewing environment depending on both the remote control and the LCD Display except for this button, current picture mode is pressed in the Mute mode. Then push button again to enter values. LOCK 5. Activates or ...
...exits from the menu screen or closes the screen adjustment menu. Activates a highlighted menu item. P.MODE Introduction STOP PLAY/PAUSE FF Turns the LCD Display On/Off. ON / OFF 2. MENU 11. MagicInfo Quick Launch Button. • Alphanumeric: Used to enter the Internet address. •... DVI / BNC : M/B (MagicBright) MagicBright is a new feature providing the optimum viewing environment depending on both the remote control and the LCD Display except for this button, current picture mode is pressed in the Mute mode. Then push button again to enter values. LOCK 5. Activates or ...
Quick Guide (ENGLISH)
Page 10
CH/P 16. INFO 18. STILL 22. By changing the resolution in high fidelity ... TV mode, selects TV channels. - Moves from the menu screen. When pressing this LCD Display. The LCD Display has a built-in the control panel, auto function is displayed at the bottom centre of the screen. Press it again to circle through available preconfigured... P.SIZE 24. DUAL/MTS watching. Then push button again to unfreeze. This fuction does not work for this LCD Display. The current picture information is weak, noise may occur during FM radio broadcasts. - Exits from one menu item ...
CH/P 16. INFO 18. STILL 22. By changing the resolution in high fidelity ... TV mode, selects TV channels. - Moves from the menu screen. When pressing this LCD Display. The LCD Display has a built-in the control panel, auto function is displayed at the bottom centre of the screen. Press it again to circle through available preconfigured... P.SIZE 24. DUAL/MTS watching. Then push button again to unfreeze. This fuction does not work for this LCD Display. The current picture information is weak, noise may occur during FM radio broadcasts. - Exits from one menu item ...
Quick Guide (ENGLISH)
Page 11
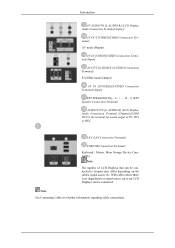
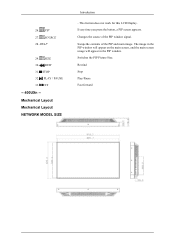
SWAP 29. Every time you press the button, a PIP screen appears. Switches the PIP Picture Size. Rewind Stop Play/Pause Fast forward PIP 27. FF -- 400UXn -Mechanical Layout Mechanical Layout NETWORK MODEL SIZE Introduction - SOURCE 28. The image in the PIP window will appear on the main screen, and the main screen image will appear in the PIP window. Swaps the contents of the PIP window signal. PLAY / PAUSE 33. This fuction does not work for this LCD Display. SIZE 30. 26. REW 31. STOP 32. Changes the source of the PIP and main image.
SWAP 29. Every time you press the button, a PIP screen appears. Switches the PIP Picture Size. Rewind Stop Play/Pause Fast forward PIP 27. FF -- 400UXn -Mechanical Layout Mechanical Layout NETWORK MODEL SIZE Introduction - SOURCE 28. The image in the PIP window will appear on the main screen, and the main screen image will appear in the PIP window. Swaps the contents of the PIP window signal. PLAY / PAUSE 33. This fuction does not work for this LCD Display. SIZE 30. 26. REW 31. STOP 32. Changes the source of the PIP and main image.
Quick Guide (ENGLISH)
Page 12
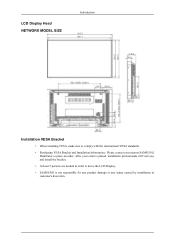
LCD Display Head NETWORK MODEL SIZE Introduction Installation VESA Bracket • When installing VESA, make sure to comply with the international VESA standards. • Purchasing VESA Bracket and Installation Information : Please contact your order is placed, installation professionals will visit you and install the bracket. • At least 2 persons are needed in order to place an order. After your nearest SAMSUNG Distributor to move the LCD Display. • SAMSUNG is not responsible for any product damage or any injury caused by installation at customer's discretion.
LCD Display Head NETWORK MODEL SIZE Introduction Installation VESA Bracket • When installing VESA, make sure to comply with the international VESA standards. • Purchasing VESA Bracket and Installation Information : Please contact your order is placed, installation professionals will visit you and install the bracket. • At least 2 persons are needed in order to place an order. After your nearest SAMSUNG Distributor to move the LCD Display. • SAMSUNG is not responsible for any product damage or any injury caused by installation at customer's discretion.
Quick Guide (ENGLISH)
Page 16
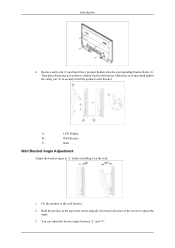
... the arrow) to -2° before installing it is firmly fixed to the wall bracket. 2. You can adjust the bracket angle between -2° and 15°. LCD Display B - Remove safety pin (3) and insert the 4 product holders into the corresponding bracket holes (1). Wall Wall Bracket Angle Adjustment Adjust the bracket angle to adjust the...
... the arrow) to -2° before installing it is firmly fixed to the wall bracket. 2. You can adjust the bracket angle between -2° and 15°. LCD Display B - Remove safety pin (3) and insert the 4 product holders into the corresponding bracket holes (1). Wall Wall Bracket Angle Adjustment Adjust the bracket angle to adjust the...
Quick Guide (ENGLISH)
Page 17
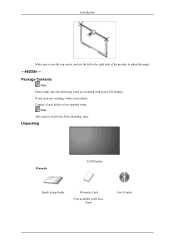
Contact a local dealer to adjust the angle. -- 460DXn -Package Contents Note Please make sure the following items are missing, contact your LCD Display. If any items are included with your dealer. Unpacking Manuals LCD Display Quick Setup Guide Warranty Card (Not available in all locations) User's Guide Introduction Make sure to use the top center, and not the leftor the right side of the product to buy optional items. Note This stand is not for the Floor Standing Type.
Contact a local dealer to adjust the angle. -- 460DXn -Package Contents Note Please make sure the following items are missing, contact your LCD Display. If any items are included with your dealer. Unpacking Manuals LCD Display Quick Setup Guide Warranty Card (Not available in all locations) User's Guide Introduction Make sure to use the top center, and not the leftor the right side of the product to buy optional items. Note This stand is not for the Floor Standing Type.

Quick Guide (ENGLISH)
Page 19
...mode to Video mode. SOURCE button [SOURCE] Switches from one menu item to another vertically or adjusts selected menu values. -- 460DXn -Your LCD Display Front Introduction MENU button [MENU] Opens the on-screen menu and exits from one menu item to another horizontally or adjusts selected menu values... PIP Push the PIP button to see an animation clip • PC When OSD is only allowed for external devices that are connected to the LCD Display at the time. [PC] → [BNC] → [DVI] → [AV] → [S-Video] → [Component] → [HDMI] → [MagicInfo] >> Click ...
...mode to Video mode. SOURCE button [SOURCE] Switches from one menu item to another vertically or adjusts selected menu values. -- 460DXn -Your LCD Display Front Introduction MENU button [MENU] Opens the on-screen menu and exits from one menu item to another horizontally or adjusts selected menu values... PIP Push the PIP button to see an animation clip • PC When OSD is only allowed for external devices that are connected to the LCD Display at the time. [PC] → [BNC] → [DVI] → [AV] → [S-Video] → [Component] → [HDMI] → [MagicInfo] >> Click ...
Quick Guide (ENGLISH)
Page 20
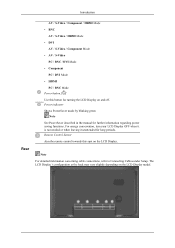
...S-Video PC / BNC / DVI Mode • Component PC / DVI Mode • HDMI PC / BNC Mode Power button [ ] Use this spot on the LCD Display. Power indicator Shows PowerSaver mode by blinking green Note See PowerSaver described in the manual for long periods. For energy conservation, turn your... LCD Display OFF when it is not needed or when leaving it unattended for further information regarding power saving functions. The LCD Display 's configuration at the back may vary slightly depending on the...
...S-Video PC / BNC / DVI Mode • Component PC / DVI Mode • HDMI PC / BNC Mode Power button [ ] Use this spot on the LCD Display. Power indicator Shows PowerSaver mode by blinking green Note See PowerSaver described in the manual for long periods. For energy conservation, turn your... LCD Display OFF when it is not needed or when leaving it unattended for further information regarding power saving functions. The LCD Display 's configuration at the back may vary slightly depending on the...
Quick Guide (ENGLISH)
Page 21
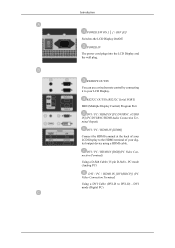
...PC/DVI/BNC/HDMI Audio Connection Terminal (Input)) DVI / PC / HDMI IN [HDMI] Connect the HDMI terminal at the back of your LCD Display to the HDMI terminal of your LCD Display. PC mode (Analog PC) DVI / PC / HDMI IN [DVI(HDCP)] (PC Video Connection Terminal) Using a DVI Cable (DVI-D... to your digital output device using a HDMI cable. POWER IN The power cord plugs into the LCD Display and the wall plug. Introduction POWER S/W ON [ │ ] / OFF [O] Switches the LCD Display On/Off. DVI mode (Digital PC) DVI / PC / HDMI IN [RGB](PC Video Connection Terminal) Using a ...
...PC/DVI/BNC/HDMI Audio Connection Terminal (Input)) DVI / PC / HDMI IN [HDMI] Connect the HDMI terminal at the back of your LCD Display to the HDMI terminal of your LCD Display. PC mode (Analog PC) DVI / PC / HDMI IN [DVI(HDCP)] (PC Video Connection Terminal) Using a DVI Cable (DVI-D... to your digital output device using a HDMI cable. POWER IN The power cord plugs into the LCD Display and the wall plug. Introduction POWER S/W ON [ │ ] / OFF [O] Switches the LCD Display On/Off. DVI mode (Digital PC) DVI / PC / HDMI IN [RGB](PC Video Connection Terminal) Using a ...

Quick Guide (ENGLISH)
Page 22
R - +] (EXT Speaker Connection Terminal) AUDIO OUT [L-AUDIO-R] (LCD Display Audio Connection Terminal (Output))AUDIO OUT is the terminal for sound output of PC, DVI or BNC. L - +, - - Introduction COMPONENT AUDIO IN [L-AUDIO... R, G, B, H, V ports Component Connection: connecting the PR, Y, PB ports BNC/COMPONENT IN [R/PR, G/Y, B/PB, H, V](BNC/Component Connection Terminal (Input)) AV AUDIO IN [L-AUDIO-R] (LCD Display Audio Connection Terminal (Input)) AV OUT [VIDEO](VIDEO Connection Terminal) AV mode (Output) AV IN [VIDEO](VIDEO Connection Terminal) (Input) AV OUT [S-VIDEO] (S-VIDEO Connection...
R - +] (EXT Speaker Connection Terminal) AUDIO OUT [L-AUDIO-R] (LCD Display Audio Connection Terminal (Output))AUDIO OUT is the terminal for sound output of PC, DVI or BNC. L - +, - - Introduction COMPONENT AUDIO IN [L-AUDIO... R, G, B, H, V ports Component Connection: connecting the PR, Y, PB ports BNC/COMPONENT IN [R/PR, G/Y, B/PB, H, V](BNC/Component Connection Terminal (Input)) AV AUDIO IN [L-AUDIO-R] (LCD Display Audio Connection Terminal (Input)) AV OUT [VIDEO](VIDEO Connection Terminal) AV mode (Output) AV IN [VIDEO](VIDEO Connection Terminal) (Input) AV OUT [S-VIDEO] (S-VIDEO Connection...

Quick Guide (ENGLISH)
Page 23
... cables where there is no degradation or signal source, up to ten LCD Displays can be connected to interference with the frequency. Remote Control Note The performance of LCD Displays that can be affected by a TV or other electronic device operating near the LCD Display , causing a malfunction due to loopout may be connected. Note The number...
... cables where there is no degradation or signal source, up to ten LCD Displays can be connected to interference with the frequency. Remote Control Note The performance of LCD Displays that can be affected by a TV or other electronic device operating near the LCD Display , causing a malfunction due to loopout may be connected. Note The number...

Quick Guide (ENGLISH)
Page 24
MagicInfo Quick Launch Button. MagicInfo Introduction ON / OFF MagicInfo MDC LOCK MagicInfo buttons +100 DEL VOL MUTE TTX/MIX MENU ENTER P.MODE AUTO ENTER/PRE-CH CH/P SOURCE INFO EXIT Up-Down Left-Right buttons S.MODE STILL FM RADIO P.SIZE SRS DUAL/MTS PIP SOURCE SWAP SIZE REW STOP PLAY/PAUSE FF Turns the LCD Display On/Off. 1. ON / OFF 2.
MagicInfo Quick Launch Button. MagicInfo Introduction ON / OFF MagicInfo MDC LOCK MagicInfo buttons +100 DEL VOL MUTE TTX/MIX MENU ENTER P.MODE AUTO ENTER/PRE-CH CH/P SOURCE INFO EXIT Up-Down Left-Right buttons S.MODE STILL FM RADIO P.SIZE SRS DUAL/MTS PIP SOURCE SWAP SIZE REW STOP PLAY/PAUSE FF Turns the LCD Display On/Off. 1. ON / OFF 2.
Quick Guide (ENGLISH)
Page 25
...new feature providing the optimum viewing environment depending on the lower center of the screen. This fuction does not work for this LCD Display. Then push button again to circle through available preconfigured modes. ( Dynamic → Standard → Movie → Custom ) PC .../ DVI / BNC : M/B (MagicBright) MagicBright is displayed on the contents of the image you press this LCD Display. MagicInfo buttons 6. +100 DEL 7. AUTO 14. LOCK 5. This fuction does not work for the Power and LOCK...
...new feature providing the optimum viewing environment depending on the lower center of the screen. This fuction does not work for this LCD Display. Then push button again to circle through available preconfigured modes. ( Dynamic → Standard → Movie → Custom ) PC .../ DVI / BNC : M/B (MagicBright) MagicBright is displayed on the contents of the image you press this LCD Display. MagicInfo buttons 6. +100 DEL 7. AUTO 14. LOCK 5. This fuction does not work for the Power and LOCK...


