Quick Guide (ENGLISH)
Page 5
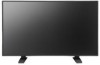
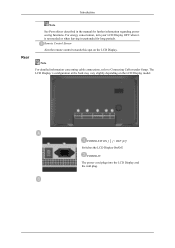
... remote control towards this spot on the LCD Display model. POWER S/W ON [ │ ] / OFF [O] Switches the LCD Display On/Off. POWER IN The power cord plugs into the LCD Display and the wall plug. Note For detailed information concerning cable connections, refer to Connecting Cables under Setup. The LCD Display 's configuration at the back may vary slightly depending on the LCD Display. Introduction Rear Note See PowerSaver described in the manual for long periods. For energy conservation, turn your LCD Display...
... remote control towards this spot on the LCD Display model. POWER S/W ON [ │ ] / OFF [O] Switches the LCD Display On/Off. POWER IN The power cord plugs into the LCD Display and the wall plug. Note For detailed information concerning cable connections, refer to Connecting Cables under Setup. The LCD Display 's configuration at the back may vary slightly depending on the LCD Display. Introduction Rear Note See PowerSaver described in the manual for long periods. For energy conservation, turn your LCD Display...

Quick Guide (ENGLISH)
Page 10
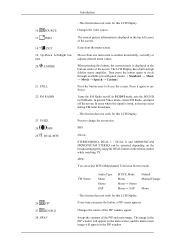
... TV mode, selects TV channels. - The current picture information is displayed at the bottom centre of the screen. This fuction does not work for this button, the current mode is displayed in PC mode. Press to FM Radio. CH/P 16. Turns the FM Radio on the remote control while watching TV. In PC/DVI mode, sets the SOUND to change the screen size. INFO 18. In areas where the signal is...
... TV mode, selects TV channels. - The current picture information is displayed at the bottom centre of the screen. This fuction does not work for this button, the current mode is displayed in PC mode. Press to FM Radio. CH/P 16. Turns the FM Radio on the remote control while watching TV. In PC/DVI mode, sets the SOUND to change the screen size. INFO 18. In areas where the signal is...

Quick Guide (ENGLISH)
Page 22
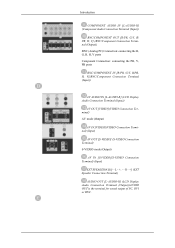
.../COMPONENT OUT [R/PR, G/Y, B/ PB, H, V] (BNC/Component Connection Terminal (Output)) BNC (Analog PC) Connection: connecting the R, G, B, H, V ports Component Connection: connecting the PR, Y, PB ports BNC/COMPONENT IN [R/PR, G/Y, B/PB, H, V](BNC/Component Connection Terminal (Input)) AV AUDIO IN [L-AUDIO-R] (LCD Display Audio Connection Terminal (Input)) AV OUT [VIDEO](VIDEO Connection Terminal) AV mode (Output) AV IN [VIDEO](VIDEO Connection Terminal) (Input) AV OUT [S-VIDEO] (S-VIDEO Connection Terminal) S-VIDEO mode (Output) AV IN [S-VIDEO](S-VIDEO Connection Terminal) (Input) EXT SPEAKER...
.../COMPONENT OUT [R/PR, G/Y, B/ PB, H, V] (BNC/Component Connection Terminal (Output)) BNC (Analog PC) Connection: connecting the R, G, B, H, V ports Component Connection: connecting the PR, Y, PB ports BNC/COMPONENT IN [R/PR, G/Y, B/PB, H, V](BNC/Component Connection Terminal (Input)) AV AUDIO IN [L-AUDIO-R] (LCD Display Audio Connection Terminal (Input)) AV OUT [VIDEO](VIDEO Connection Terminal) AV mode (Output) AV IN [VIDEO](VIDEO Connection Terminal) (Input) AV OUT [S-VIDEO] (S-VIDEO Connection Terminal) S-VIDEO mode (Output) AV IN [S-VIDEO](S-VIDEO Connection Terminal) (Input) EXT SPEAKER...
Quick Guide (ENGLISH)
Page 26
.... In PC/DVI mode, sets the SOUND to unfreeze. This fuction does not work for this LCD Display. SWAP FM Stereo Audio Type Mono Stereo SAP MTS/S_Mode Mono Mono ↔ Stereo Mono ↔ SAP Default Manual Change Mono - Changes the source of the PIP and main image. S.MODE 21. Exits from one menu item to change the screen size. Press to another horizontally, vertically or adjusts selected menu values. STEREO...
.... In PC/DVI mode, sets the SOUND to unfreeze. This fuction does not work for this LCD Display. SWAP FM Stereo Audio Type Mono Stereo SAP MTS/S_Mode Mono Mono ↔ Stereo Mono ↔ SAP Default Manual Change Mono - Changes the source of the PIP and main image. S.MODE 21. Exits from one menu item to change the screen size. Press to another horizontally, vertically or adjusts selected menu values. STEREO...

Quick Guide (ENGLISH)
Page 33
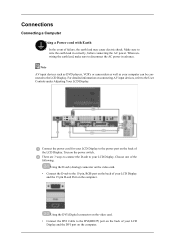
... well as your LCD Display to disconnect the AC power in correctly, before connecting the AC power. Connections Connecting a Computer Using a Power cord with Earth • In the event of your LCD Display and the 15 pin D-sub Port on the computer. When unwiring the earth lead, make sure to the power port on the power switch. There are 3 ways to connect the D-sub to the User Controls under Adjusting Your LCD Display.
... well as your LCD Display to disconnect the AC power in correctly, before connecting the AC power. Connections Connecting a Computer Using a Power cord with Earth • In the event of your LCD Display and the 15 pin D-sub Port on the computer. When unwiring the earth lead, make sure to the power port on the power switch. There are 3 ways to connect the D-sub to the User Controls under Adjusting Your LCD Display.

Quick Guide (ENGLISH)
Page 45
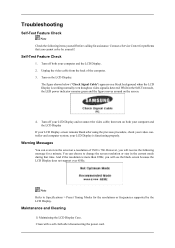
..., check your LCD Display and reconnect the video cable; Turn off your video controller and computer system; Warning Messages You can choose to Specifications > Preset Timing Modes for assistance. Note Refer to change the screen resolution or stay in the Self-Test mode, the LED power indicator remains green and the figure moves around on the LCD Display. The figure shown below ("Check Signal Cable") appears on both your LCD Display is more...
..., check your LCD Display and reconnect the video cable; Turn off your video controller and computer system; Warning Messages You can choose to Specifications > Preset Timing Modes for assistance. Note Refer to change the screen resolution or stay in the Self-Test mode, the LED power indicator remains green and the figure moves around on the LCD Display. The figure shown below ("Check Signal Cable") appears on both your LCD Display is more...
Quick Guide (ENGLISH)
Page 46
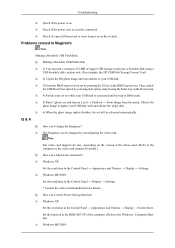
... the power cord and the video cables are listed. Check if the computer beeps more network-related information, refer to the MagicInfo Troubleshooting section. If you can cause the LCD Display to become blank, have problems in installing the Adaptor (video) driver, boot the computer in Safe Mode, remove the Display Adaptor in this section to see if you have poor coloring, become noisy, and video mode not supported, etc...
... the power cord and the video cables are listed. Check if the computer beeps more network-related information, refer to the MagicInfo Troubleshooting section. If you can cause the LCD Display to become blank, have problems in installing the Adaptor (video) driver, boot the computer in Safe Mode, remove the Display Adaptor in this section to see if you have poor coloring, become noisy, and video mode not supported, etc...
Quick Guide (ENGLISH)
Page 49
... Control Panel → Appearance and Themes → Display → Settings. Q: Making a Bootable USB Flash Disk A: 1) You can I Adjusts the resolution? Then, enable the USB Boot First option by pressing the F2 key in the BIOS logo screen. Set the function in the BIOS-SETUP of the driver used. (Refer to the computer or the video card manual for details. A: 4) Switch your USB disk. A: Windows ME/2000: Problems related to update...
... Control Panel → Appearance and Themes → Display → Settings. Q: Making a Bootable USB Flash Disk A: 1) You can I Adjusts the resolution? Then, enable the USB Boot First option by pressing the F2 key in the BIOS logo screen. Set the function in the BIOS-SETUP of the driver used. (Refer to the computer or the video card manual for details. A: 4) Switch your USB disk. A: Windows ME/2000: Problems related to update...
User Manual (ENGLISH)
Page 6
...If you are not using headphones or earphones, do not turn the volume too high. • Having the sound too loud may damage your eyesight may be damaged. Make sure that the ventilating opening is not blocked by pulling only the wire or the signal cable. • Otherwise...material enters the product, disconnect the power cord and contact a Service Center. • This may result in electric shock, damage to the product or fire due to damage to the cable. When using a fixed screen for a long period of time, put it into sleep mode or use or keep combustible spray or flammable ...
...If you are not using headphones or earphones, do not turn the volume too high. • Having the sound too loud may damage your eyesight may be damaged. Make sure that the ventilating opening is not blocked by pulling only the wire or the signal cable. • Otherwise...material enters the product, disconnect the power cord and contact a Service Center. • This may result in electric shock, damage to the product or fire due to damage to the cable. When using a fixed screen for a long period of time, put it into sleep mode or use or keep combustible spray or flammable ...
User Manual (ENGLISH)
Page 17
... work for this button, the current mode is displayed at the bottom centre of the screen. MTS- The current picture information is displayed in the control panel, auto function is weak, noise may occur during FM radio broadcasts. - In areas where the signal is performed. FM Stereo Audio Type Mono Stereo SAP MTS/S_Mode Mono Mono ↔ Stereo Mono ↔ SAP Default Manual Change Mono Changes the video source...
... work for this button, the current mode is displayed at the bottom centre of the screen. MTS- The current picture information is displayed in the control panel, auto function is weak, noise may occur during FM radio broadcasts. - In areas where the signal is performed. FM Stereo Audio Type Mono Stereo SAP MTS/S_Mode Mono Mono ↔ Stereo Mono ↔ SAP Default Manual Change Mono Changes the video source...
User Manual (ENGLISH)
Page 29
.../COMPONENT OUT [R/PR, G/Y, B/ PB, H, V] (BNC/Component Connection Terminal (Output)) BNC (Analog PC) Connection: connecting the R, G, B, H, V ports Component Connection: connecting the PR, Y, PB ports BNC/COMPONENT IN [R/PR, G/Y, B/PB, H, V](BNC/Component Connection Terminal (Input)) AV AUDIO IN [L-AUDIO-R] (LCD Display Audio Connection Terminal (Input)) AV OUT [VIDEO](VIDEO Connection Terminal) AV mode (Output) AV IN [VIDEO](VIDEO Connection Terminal) (Input) AV OUT [S-VIDEO] (S-VIDEO Connection Terminal) S-VIDEO mode (Output) AV IN [S-VIDEO](S-VIDEO Connection Terminal) (Input) EXT SPEAKER...
.../COMPONENT OUT [R/PR, G/Y, B/ PB, H, V] (BNC/Component Connection Terminal (Output)) BNC (Analog PC) Connection: connecting the R, G, B, H, V ports Component Connection: connecting the PR, Y, PB ports BNC/COMPONENT IN [R/PR, G/Y, B/PB, H, V](BNC/Component Connection Terminal (Input)) AV AUDIO IN [L-AUDIO-R] (LCD Display Audio Connection Terminal (Input)) AV OUT [VIDEO](VIDEO Connection Terminal) AV mode (Output) AV IN [VIDEO](VIDEO Connection Terminal) (Input) AV OUT [S-VIDEO] (S-VIDEO Connection Terminal) S-VIDEO mode (Output) AV IN [S-VIDEO](S-VIDEO Connection Terminal) (Input) EXT SPEAKER...
User Manual (ENGLISH)
Page 40
... information on the power switch. Connections Connecting a Computer Using a Power cord with Earth • In the event of the LCD Display. Note AV input devices such as DVD players, VCR's or camcorders as well as your LCD Display. Trun on connecting AV input devices, refer to wire the earth lead in advance. Make sure to the User Controls under Adjusting Your LCD Display. Connect the power cord for your LCD Display and the DVI port on the...
... information on the power switch. Connections Connecting a Computer Using a Power cord with Earth • In the event of the LCD Display. Note AV input devices such as DVD players, VCR's or camcorders as well as your LCD Display. Trun on connecting AV input devices, refer to wire the earth lead in advance. Make sure to the User Controls under Adjusting Your LCD Display. Connect the power cord for your LCD Display and the DVI port on the...
User Manual (ENGLISH)
Page 94
... program (MagicInfo) may stop . Set up external devices only if the LCD Display turns on the screen. • For MagicInfo, a remote control is recommended using a separate USB keyboard. • For MagicInfo in Device mode, moving external devices while booting may cause errors. Otherwise, the program (MagicInfo) may stop . If you do unplug the cable, restart the system. • Do not unplug the LAN cable used for the network (ex: video display...
... program (MagicInfo) may stop . Set up external devices only if the LCD Display turns on the screen. • For MagicInfo, a remote control is recommended using a separate USB keyboard. • For MagicInfo in Device mode, moving external devices while booting may cause errors. Otherwise, the program (MagicInfo) may stop . If you do unplug the cable, restart the system. • Do not unplug the LAN cable used for the network (ex: video display...
User Manual (ENGLISH)
Page 105
... the screen. 4. your video controller and computer system; Turn off your computer and the LCD Display. 2. Self-Test Feature Check 1. The figure shown below ("Check Signal Cable") appears on both your LCD Display and reconnect the video cable; Troubleshooting Self-Test Feature Check Note Check the following message for a minute; Note Refer to change the screen resolution or stay in the Self-Test mode, the LED power indicator remains green...
... the screen. 4. your video controller and computer system; Turn off your computer and the LCD Display. 2. Self-Test Feature Check 1. The figure shown below ("Check Signal Cable") appears on both your LCD Display and reconnect the video cable; Troubleshooting Self-Test Feature Check Note Check the following message for a minute; Note Refer to change the screen resolution or stay in the Self-Test mode, the LED power indicator remains green...
User Manual (ENGLISH)
Page 112
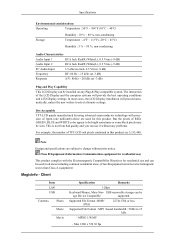
... to change without any Plug & Play compatible system. Client Item LAN USB Contents Photo Music Movie Specification Remarks 1 Gbps Keyboard/Mouse, Mass Stor- Supported File Format : BMP/ JPEG 2274x1704 or less Supported File Format : MP3 Sound bandwidth : 50 Hz to select alternate settings. USB removable storage can be installed on any problems. For example, the number of the LCD Display and the computer systems will proceed automatically, unless the user...
... to change without any Plug & Play compatible system. Client Item LAN USB Contents Photo Music Movie Specification Remarks 1 Gbps Keyboard/Mouse, Mass Stor- Supported File Format : BMP/ JPEG 2274x1704 or less Supported File Format : MP3 Sound bandwidth : 50 Hz to select alternate settings. USB removable storage can be installed on any problems. For example, the number of the LCD Display and the computer systems will proceed automatically, unless the user...
User Manual (ENGLISH)
Page 113
... to set up this feature. G XP er PowerSaver This LCD Display has a built-in your computer to the video card manual and adjusts the screen as the following Preset Timing Modes, the screen will be supporPower Point), HTML, PDF ted depending on . Not Support Flash, Java Applet, Security Site MagicInfo Pro - The PowerSaver system operates with a VESA DPM compliant video card installed in power management system called PowerSaver. Specifications...
... to set up this feature. G XP er PowerSaver This LCD Display has a built-in your computer to the video card manual and adjusts the screen as the following Preset Timing Modes, the screen will be supporPower Point), HTML, PDF ted depending on . Not Support Flash, Java Applet, Security Site MagicInfo Pro - The PowerSaver system operates with a VESA DPM compliant video card installed in power management system called PowerSaver. Specifications...

User Manual (ENGLISH)
Page 117
... power LED is on your computer. The PowerSaver system operates with a VESA DPM compliant video card installed in power management system called PowerSaver. G XP er PowerSaver This LCD Display has a built-in your computer to low-power mode when it unattended for a certain amount of time. The LCD Display automatically returns to the video card manual and adjusts the screen as a normal monitor) State Normal Operation Power saving mode Power off Power Indicator Power Consumption Green...
... power LED is on your computer. The PowerSaver system operates with a VESA DPM compliant video card installed in power management system called PowerSaver. G XP er PowerSaver This LCD Display has a built-in your computer to low-power mode when it unattended for a certain amount of time. The LCD Display automatically returns to the video card manual and adjusts the screen as a normal monitor) State Normal Operation Power saving mode Power off Power Indicator Power Consumption Green...
User Manual (ENGLISH)
Page 121
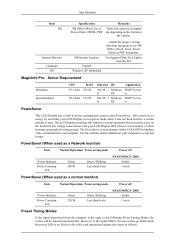
... your monitor from Image retention is to turn Power off, or set your PC, or System to operate a Screen Saver program when you are not using Grey colors, which can cause Image retention easily. Apply the Screen Scroll function on instruction guide. Avoid using it. Select method • Instruction Guide : OSD Menu -> Set Up -> Safety Screen -> Screen Scroll • Time Interval : 1 ~ 10 hours ( Recommend : 1 ) • Time Period : 1 ~ 5 second ( Recommend : 5 ) Cycle: Display moving...
... your monitor from Image retention is to turn Power off, or set your PC, or System to operate a Screen Saver program when you are not using Grey colors, which can cause Image retention easily. Apply the Screen Scroll function on instruction guide. Avoid using it. Select method • Instruction Guide : OSD Menu -> Set Up -> Safety Screen -> Screen Scroll • Time Interval : 1 ~ 10 hours ( Recommend : 1 ) • Time Period : 1 ~ 5 second ( Recommend : 5 ) Cycle: Display moving...
User Manual (ENGLISH)
Page 122
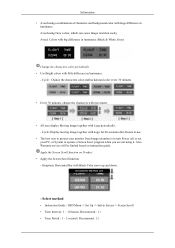
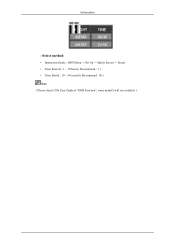
Symptom: Horizontal / Vertical Bar with Black Color move up and down . - Information Note ( Please check CD's User Guide at "OSD Function", some model's will not available. ) Apply the Screen Erasing function on Product • Apply the Screen Pixel function - Select method • Instruction Guide : OSD Menu -> Set Up -> Safety Screen -> Bar • Time Interval : 1 ~ 10 hours ( Recommend : 1 ) • Time Period : 10 ~ 50 second ( Recommend : 50...
Symptom: Horizontal / Vertical Bar with Black Color move up and down . - Information Note ( Please check CD's User Guide at "OSD Function", some model's will not available. ) Apply the Screen Erasing function on Product • Apply the Screen Pixel function - Select method • Instruction Guide : OSD Menu -> Set Up -> Safety Screen -> Bar • Time Interval : 1 ~ 10 hours ( Recommend : 1 ) • Time Period : 10 ~ 50 second ( Recommend : 50...
User Manual (ENGLISH)
Page 123
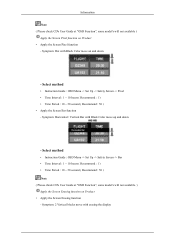
Select method • Instruction Guide : OSD Menu -> Set Up -> Safety Screen -> Eraser • Time Interval : 1 ~ 10 hours ( Recommend : 1 ) • Time Period : 10 ~ 50 second ( Recommend : 50 ) Note ( Please check CD's User Guide at "OSD Function", some model's will not available ) Information -
Select method • Instruction Guide : OSD Menu -> Set Up -> Safety Screen -> Eraser • Time Interval : 1 ~ 10 hours ( Recommend : 1 ) • Time Period : 10 ~ 50 second ( Recommend : 50 ) Note ( Please check CD's User Guide at "OSD Function", some model's will not available ) Information -


