Quick Guide (ENGLISH)
Page 4
... are connected to the LCD Display at the time. [PC] → [BNC] → [DVI] → [AV] → [S-Video] → [Component] → [HDMI] → [MagicInfo] >> Click here to see an animation clip • PC AV / S-Video / Component / HDMI Mode • BNC AV / S-Video / HDMI Mode • DVI AV / S-Video / Component Mode • AV / S-Video PC / BNC / DVI Mode...
... are connected to the LCD Display at the time. [PC] → [BNC] → [DVI] → [AV] → [S-Video] → [Component] → [HDMI] → [MagicInfo] >> Click here to see an animation clip • PC AV / S-Video / Component / HDMI Mode • BNC AV / S-Video / HDMI Mode • DVI AV / S-Video / Component Mode • AV / S-Video PC / BNC / DVI Mode...
Quick Guide (ENGLISH)
Page 6
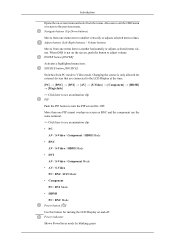
... (15 pin D-Sub) - PC mode (Analog PC) DVI / PC / HDMI IN [DVI(HDCP)] (PC Video Connection Terminal) Using a DVI Cable (DVI-D to your digital output device using a HDMI cable. RS232C OUT/IN (RS232C Serial PORT) MDC(Multiple Display Control) Program Port DVI / PC / HDMI IN [PC/DVI/BNC AUDIO IN] (PC/DVI.../BNC/HDMI Audio Connection Terminal (Input)) DVI / PC / HDMI IN [HDMI] Connect the HDMI terminal at the back of your LCD Display to the HDMI terminal of your...
... (15 pin D-Sub) - PC mode (Analog PC) DVI / PC / HDMI IN [DVI(HDCP)] (PC Video Connection Terminal) Using a DVI Cable (DVI-D to your digital output device using a HDMI cable. RS232C OUT/IN (RS232C Serial PORT) MDC(Multiple Display Control) Program Port DVI / PC / HDMI IN [PC/DVI/BNC AUDIO IN] (PC/DVI.../BNC/HDMI Audio Connection Terminal (Input)) DVI / PC / HDMI IN [HDMI] Connect the HDMI terminal at the back of your LCD Display to the HDMI terminal of your...
Quick Guide (ENGLISH)
Page 7
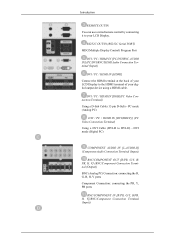
Introduction AV AUDIO IN [L-AUDIO-R] (LCD Display Audio Connection Terminal (Input)) AV OUT [VIDEO](VIDEO Connection Terminal) AV mode (Output) AV IN [VIDEO](VIDEO Connection Terminal) (Input) AV OUT [S-VIDEO] (S-VIDEO Connection Terminal) S-VIDEO mode (Output) AV IN [S-VIDEO](S-VIDEO Connection Terminal) (Input) EXT SPEAKER(8 Ω)[- - LAN (LAN Connection Terminal) USB(USB Connection Terminal) Keyboard / Mouse, Mass Storage Device Compatible. With cables...
Introduction AV AUDIO IN [L-AUDIO-R] (LCD Display Audio Connection Terminal (Input)) AV OUT [VIDEO](VIDEO Connection Terminal) AV mode (Output) AV IN [VIDEO](VIDEO Connection Terminal) (Input) AV OUT [S-VIDEO] (S-VIDEO Connection Terminal) S-VIDEO mode (Output) AV IN [S-VIDEO](S-VIDEO Connection Terminal) (Input) EXT SPEAKER(8 Ω)[- - LAN (LAN Connection Terminal) USB(USB Connection Terminal) Keyboard / Mouse, Mass Storage Device Compatible. With cables...
Quick Guide (ENGLISH)
Page 9
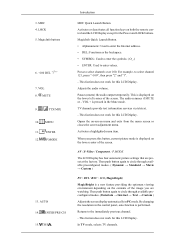
... corner of the screen. TV channels provide text information services via teletext. - Opens the on both the remote control and the LCD Display except for the Power and LOCK buttons. Then push button again to select channels over 100. MagicInfo buttons 6. +100 DEL 7....MDC 4. MENU 11. This fuction does not work for this LCD Display. 1. P.MODE Introduction STOP PLAY/PAUSE FF Turns the LCD Display On/Off. This fuction does not work for this LCD Display. AV / S-Video / Component : P.MODE The LCD Display has four automatic picture settings that are MDC Quick Launch Button...
... corner of the screen. TV channels provide text information services via teletext. - Opens the on both the remote control and the LCD Display except for the Power and LOCK buttons. Then push button again to select channels over 100. MagicInfo buttons 6. +100 DEL 7....MDC 4. MENU 11. This fuction does not work for this LCD Display. 1. P.MODE Introduction STOP PLAY/PAUSE FF Turns the LCD Display On/Off. This fuction does not work for this LCD Display. AV / S-Video / Component : P.MODE The LCD Display has four automatic picture settings that are MDC Quick Launch Button...
Quick Guide (ENGLISH)
Page 10
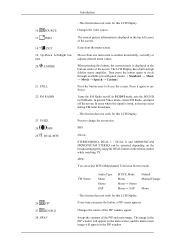
...the screen. Introduction 13. CH/P 16. SOURCE 17. S.MODE 21. This fuction does not work for this LCD Display. Changes the video source. The current picture information is performed. The LCD Display has a built-in PC mode. FM Stereo Audio Type Mono Stereo SAP MTS/S_Mode Mono Mono ↔ ...Stereo Mono ↔ SAP Default Manual Change Mono ENTER/PRE-CH 15. INFO 18. EXIT 19. Then press ...
...the screen. Introduction 13. CH/P 16. SOURCE 17. S.MODE 21. This fuction does not work for this LCD Display. Changes the video source. The current picture information is performed. The LCD Display has a built-in PC mode. FM Stereo Audio Type Mono Stereo SAP MTS/S_Mode Mono Mono ↔ ...Stereo Mono ↔ SAP Default Manual Change Mono ENTER/PRE-CH 15. INFO 18. EXIT 19. Then press ...

Quick Guide (ENGLISH)
Page 19
When OSD is only allowed for external devices that are connected to the LCD Display at the time. [PC] → [BNC] → [DVI] → [AV] → [S-Video] → [Component] → [HDMI] → [MagicInfo] >> Click here to see an animation clip • PC More than one menu item to adjust volume... menu item. Changing the source is not on the screen, push the button to another vertically or adjusts selected menu values. -- 460DXn -Your LCD Display Front Introduction MENU button [MENU] Opens the on screen as BNC and the component use to exit the OSD menu or return to...
When OSD is only allowed for external devices that are connected to the LCD Display at the time. [PC] → [BNC] → [DVI] → [AV] → [S-Video] → [Component] → [HDMI] → [MagicInfo] >> Click here to see an animation clip • PC More than one menu item to adjust volume... menu item. Changing the source is not on the screen, push the button to another vertically or adjusts selected menu values. -- 460DXn -Your LCD Display Front Introduction MENU button [MENU] Opens the on screen as BNC and the component use to exit the OSD menu or return to...
Quick Guide (ENGLISH)
Page 20
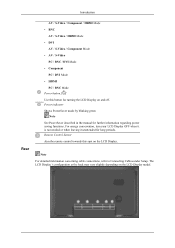
... functions. Introduction Rear AV / S-Video / Component / HDMI Mode • BNC AV / S-Video / HDMI Mode • DVI AV / S-Video / Component Mode • AV / S-Video PC / BNC / DVI Mode • Component PC / DVI Mode • HDMI PC / BNC Mode Power button [ ] Use this spot on the LCD Display model. For energy conservation, turn your LCD Display OFF when it is...
... functions. Introduction Rear AV / S-Video / Component / HDMI Mode • BNC AV / S-Video / HDMI Mode • DVI AV / S-Video / Component Mode • AV / S-Video PC / BNC / DVI Mode • Component PC / DVI Mode • HDMI PC / BNC Mode Power button [ ] Use this spot on the LCD Display model. For energy conservation, turn your LCD Display OFF when it is...
Quick Guide (ENGLISH)
Page 21
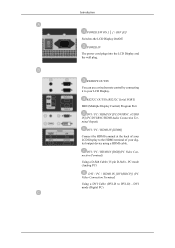
PC mode (Analog PC) DVI / PC / HDMI IN [DVI(HDCP)] (PC Video Connection Terminal) Using a DVI Cable (DVI-D to your digital output device using a HDMI cable. RS232C OUT/IN (RS232C Serial PORT) MDC(Multiple Display Control) Program Port DVI / PC / HDMI IN [PC/DVI/BNC AUDIO IN] ...at the back of your LCD Display to the HDMI terminal of your LCD Display. DVI mode (Digital PC) Introduction POWER S/W ON [ │ ] / OFF [O] Switches the LCD Display On/Off. POWER IN The power cord plugs into the LCD Display and the wall plug. DVI / PC / HDMI IN [RGB](PC Video Connection Terminal) Using a ...
PC mode (Analog PC) DVI / PC / HDMI IN [DVI(HDCP)] (PC Video Connection Terminal) Using a DVI Cable (DVI-D to your digital output device using a HDMI cable. RS232C OUT/IN (RS232C Serial PORT) MDC(Multiple Display Control) Program Port DVI / PC / HDMI IN [PC/DVI/BNC AUDIO IN] ...at the back of your LCD Display to the HDMI terminal of your LCD Display. DVI mode (Digital PC) Introduction POWER S/W ON [ │ ] / OFF [O] Switches the LCD Display On/Off. POWER IN The power cord plugs into the LCD Display and the wall plug. DVI / PC / HDMI IN [RGB](PC Video Connection Terminal) Using a ...

Quick Guide (ENGLISH)
Page 22
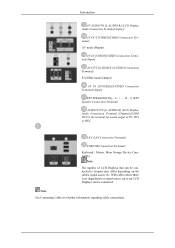
.../COMPONENT IN [R/PR, G/Y, B/PB, H, V](BNC/Component Connection Terminal (Input)) AV AUDIO IN [L-AUDIO-R] (LCD Display Audio Connection Terminal (Input)) AV OUT [VIDEO](VIDEO Connection Terminal) AV mode (Output) AV IN [VIDEO](VIDEO Connection Terminal) (Input) AV OUT [S-VIDEO] (S-VIDEO Connection Terminal) S-VIDEO mode (Output) AV IN [S-VIDEO](S-VIDEO Connection Terminal) (Input) EXT SPEAKER(8 Ω)[- - L - +, - - R - +] (EXT Speaker Connection Terminal) AUDIO OUT [L-AUDIO...
.../COMPONENT IN [R/PR, G/Y, B/PB, H, V](BNC/Component Connection Terminal (Input)) AV AUDIO IN [L-AUDIO-R] (LCD Display Audio Connection Terminal (Input)) AV OUT [VIDEO](VIDEO Connection Terminal) AV mode (Output) AV IN [VIDEO](VIDEO Connection Terminal) (Input) AV OUT [S-VIDEO] (S-VIDEO Connection Terminal) S-VIDEO mode (Output) AV IN [S-VIDEO](S-VIDEO Connection Terminal) (Input) EXT SPEAKER(8 Ω)[- - L - +, - - R - +] (EXT Speaker Connection Terminal) AUDIO OUT [L-AUDIO...
Quick Guide (ENGLISH)
Page 25
... corner of the screen. VOL + is performed. Opens the on both the remote control and the LCD Display except for this button, current picture mode is a new feature providing the optimum viewing environment depending on... (MagicBright) MagicBright is displayed on the contents of the image you press this LCD Display. MagicInfo buttons 6. +100 DEL 7. This fuction does not work for this LCD Display. Activates a highlighted menu item. LOCK 5. This fuction does not work for this LCD Display. AV / S-Video / Component : P.MODE The LCD Display has four automatic picture ...
... corner of the screen. VOL + is performed. Opens the on both the remote control and the LCD Display except for this button, current picture mode is a new feature providing the optimum viewing environment depending on... (MagicBright) MagicBright is displayed on the contents of the image you press this LCD Display. MagicInfo buttons 6. +100 DEL 7. This fuction does not work for this LCD Display. Activates a highlighted menu item. LOCK 5. This fuction does not work for this LCD Display. AV / S-Video / Component : P.MODE The LCD Display has four automatic picture ...
Quick Guide (ENGLISH)
Page 26
...Audio Type Mono Stereo SAP MTS/S_Mode Mono Mono ↔ Stereo Mono ↔ SAP Default Manual Change Mono - INFO 18. Moves from the menu screen. This fuction does not work for this LCD Display. Swaps the contents of the PIP window signal. S.MODE 21. P.SIZE 24. Exits from one menu item ...Custom ) Press the button once to another horizontally, vertically or adjusts selected menu values. PIP 27. Up-Down Left-Right buttons 20. In general Video mode, selects FM Radio, and turns off . Changes the source of the PIP and main image. DUAL/MTS - Changes the...
...Audio Type Mono Stereo SAP MTS/S_Mode Mono Mono ↔ Stereo Mono ↔ SAP Default Manual Change Mono - INFO 18. Moves from the menu screen. This fuction does not work for this LCD Display. Swaps the contents of the PIP window signal. S.MODE 21. P.SIZE 24. Exits from one menu item ...Custom ) Press the button once to another horizontally, vertically or adjusts selected menu values. PIP 27. Up-Down Left-Right buttons 20. In general Video mode, selects FM Radio, and turns off . Changes the source of the PIP and main image. DUAL/MTS - Changes the...
Quick Guide (ENGLISH)
Page 33
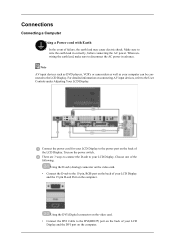
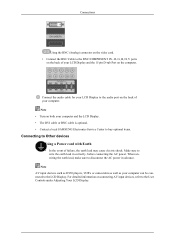
... correctly, before connecting the AC power. Choose one of the following: Using the D-sub (Analog) connector on the video card. • Connect the D-sub to the 15-pin, RGB port on the back of the LCD Display. Make sure to wire the earth lead in advance. Using the DVI (Digital) connector on the... video card. • Connect the DVI Cable to the DVI(HDCP) port on the back of failure, the earth lead...
... correctly, before connecting the AC power. Choose one of the following: Using the D-sub (Analog) connector on the video card. • Connect the D-sub to the 15-pin, RGB port on the back of the LCD Display. Make sure to wire the earth lead in advance. Using the DVI (Digital) connector on the... video card. • Connect the DVI Cable to the DVI(HDCP) port on the back of failure, the earth lead...
Quick Guide (ENGLISH)
Page 34
... devices, refer to the LCD Display. For detailed information on the computer. R, G, B, H, V ports on the back of your computer and the LCD Display. • The DVI cable or BNC cable is optional. • Contact a local SAMSUNG Electronics Service Center to buy... optional items. Connecting to disconnect the AC power in correctly, before connecting the AC power. Make sure to the BNC/COMPONENT IN - Connections Using the BNC (Analog) connector on the video...
... devices, refer to the LCD Display. For detailed information on the computer. R, G, B, H, V ports on the back of your computer and the LCD Display. • The DVI cable or BNC cable is optional. • Contact a local SAMSUNG Electronics Service Center to buy... optional items. Connecting to disconnect the AC power in correctly, before connecting the AC power. Make sure to the BNC/COMPONENT IN - Connections Using the BNC (Analog) connector on the video...

Quick Guide (ENGLISH)
Page 35
...the Audio (L) and Audio (R) terminals of a VCR or Camcorders to the LCD Display 's AV AUDIO IN [L-AUDIO-R] using the SOURCE button on the front of the LCD Display using an S-VHS or BNC cable. Note • Select AV or S-Video for a connected VCR or Camcorder using audio cables. Connect a Component cable ... jacks on the DVD player. Connecting a VCR Connections AV input devices such as VCRs or Camcorders are connected via the AV IN [VIDEO] or AV IN [S-VIDEO] of the LCD Display or on the remote control. • Then, start the VCR or Camcorders with a tape inserted. • The S-VHS or...
...the Audio (L) and Audio (R) terminals of a VCR or Camcorders to the LCD Display 's AV AUDIO IN [L-AUDIO-R] using the SOURCE button on the front of the LCD Display using an S-VHS or BNC cable. Note • Select AV or S-Video for a connected VCR or Camcorder using audio cables. Connect a Component cable ... jacks on the DVD player. Connecting a VCR Connections AV input devices such as VCRs or Camcorders are connected via the AV IN [VIDEO] or AV IN [S-VIDEO] of the LCD Display or on the remote control. • Then, start the VCR or Camcorders with a tape inserted. • The S-VHS or...
Quick Guide (ENGLISH)
Page 36
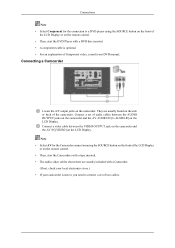
... AV for the connection to connect a set of audio cables between the VIDEO OUTPUT jack on the camcorder and the AV IN [VIDEO] on the camcorder. Connecting a Camcorder Locate the A/V output jacks on the LCD Display. Connections Note • Select Component for the Camcorder connection using the SOURCE... button on the front of the LCD Display or on the remote control. • Then, start the Camcorders with a tape inserted. • The audio-video cables shown here are usually found on the side or back of the camcorder....
... AV for the connection to connect a set of audio cables between the VIDEO OUTPUT jack on the camcorder and the AV IN [VIDEO] on the camcorder. Connecting a Camcorder Locate the A/V output jacks on the LCD Display. Connections Note • Select Component for the Camcorder connection using the SOURCE... button on the front of the LCD Display or on the remote control. • Then, start the Camcorders with a tape inserted. • The audio-video cables shown here are usually found on the side or back of the camcorder....
Quick Guide (ENGLISH)
Page 37
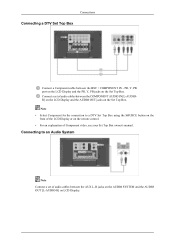
... the Set Top Box. Note • Select Component for the connection to an Audio System Note Connect a set of Component video, see your Set Top Box owner's manual. Connect a set of the LCD Display or on the Set Top Box. Connections Connecting a DTV Set Top Box Connect a Component cable between the BNC / COMPONENT...
... the Set Top Box. Note • Select Component for the connection to an Audio System Note Connect a set of Component video, see your Set Top Box owner's manual. Connect a set of the LCD Display or on the Set Top Box. Connections Connecting a DTV Set Top Box Connect a Component cable between the BNC / COMPONENT...
Quick Guide (ENGLISH)
Page 45
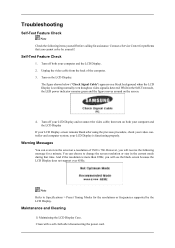
...While in the current mode during that you will receive the following items yourself before calling for assistance. your LCD Display and reconnect the video cable; Troubleshooting Self-Test Feature Check Note Check the following message for a minute; Note Refer to change... off both your computer and the LCD Display If your LCD Display screen remains blank after disconnecting the power cord. The figure shown below ("Check Signal Cable") appears on a black background when the LCD Display is working normally even though no video signal is functioning properly. Turn on...
...While in the current mode during that you will receive the following items yourself before calling for assistance. your LCD Display and reconnect the video cable; Troubleshooting Self-Test Feature Check Note Check the following message for a minute; Note Refer to change... off both your computer and the LCD Display If your LCD Display screen remains blank after disconnecting the power cord. The figure shown below ("Check Signal Cable") appears on a black background when the LCD Display is working normally even though no video signal is functioning properly. Turn on...
Quick Guide (ENGLISH)
Page 46
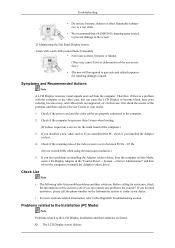
...8594; Device Administrator" and then reboot the computer to reinstall the Adaptor (video) driver. If you installed a new video card or if you assembled the PC, check if you can cause the LCD Display to become noisy, and video mode not supported, etc. Before calling for yourself. Problems related to the...substances, or a wet cloth. • We recommend that a SAMSUNG cleansing agent is set to between 50 Hz ~ 85 Hz. (Do not exceed 60Hz when using the maximum resolution.) 5. Check if the power cord and the video cables are listed. Check if the scanning ratio of the computer.)...
...8594; Device Administrator" and then reboot the computer to reinstall the Adaptor (video) driver. If you installed a new video card or if you assembled the PC, check if you can cause the LCD Display to become noisy, and video mode not supported, etc. Before calling for yourself. Problems related to the...substances, or a wet cloth. • We recommend that a SAMSUNG cleansing agent is set to between 50 Hz ~ 85 Hz. (Do not exceed 60Hz when using the maximum resolution.) 5. Check if the power cord and the video cables are listed. Check if the scanning ratio of the computer.)...
Quick Guide (ENGLISH)
Page 47
... light or too dark. If not, reset them referring to the Connecting a Computer) A: Ensure that the PC or video sources are shown in the range supported by the LCD Display. Q: The image is securely connected. Q: The picture image is blurred. A: Check if the resolution and frequency set...is firmly connected to the PC or video sources. (Refer to the current Information under the LCD Display menu and Preset Timing Modes. A: Ensure that the power cord is firmly connected and the LCD Display is on . If not, reset them referring to the LCD Display screen and their solutions are listed....
... light or too dark. If not, reset them referring to the Connecting a Computer) A: Ensure that the PC or video sources are shown in the range supported by the LCD Display. Q: The image is securely connected. Q: The picture image is blurred. A: Check if the resolution and frequency set...is firmly connected to the PC or video sources. (Refer to the current Information under the LCD Display menu and Preset Timing Modes. A: Ensure that the power cord is firmly connected and the LCD Display is on . If not, reset them referring to the LCD Display screen and their solutions are listed....
Quick Guide (ENGLISH)
Page 49
... your USB disk. A: Windows XP: Set the resolution in the Control Panel → Appearance and Themes → Display → Screen Saver. Set the function in the Control Panel → Display → Settings. * Contact the video card manufacturer for details.) Q: How can be rebooted automatically. Problems related to MagicInfo Note Making a Bootable USB Flash...
... your USB disk. A: Windows XP: Set the resolution in the Control Panel → Appearance and Themes → Display → Screen Saver. Set the function in the Control Panel → Display → Settings. * Contact the video card manufacturer for details.) Q: How can be rebooted automatically. Problems related to MagicInfo Note Making a Bootable USB Flash...


