Quick Start Guide
Page 4
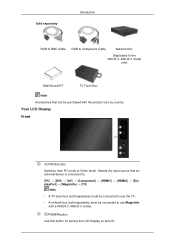
... Cable RGB to Component Cable Network Box (Applicable to the 400UX-3, 460UX-3 model only) Wall Mount KIT TV Tuner Box Note Accessories that an external device is connected to. [PC] → [DVI] → [AV] → [Component] → [HDMI1] → [HDMI2] → [DisplayPort] → [MagicInfo] → [TV] Note • A TV tuner box (sold separately) must be connected to Video mode. POWER button Use this button for turning the LCD Display on and off. Your LCD Display Front SOURCE button Switches from PC mode...
... Cable RGB to Component Cable Network Box (Applicable to the 400UX-3, 460UX-3 model only) Wall Mount KIT TV Tuner Box Note Accessories that an external device is connected to. [PC] → [DVI] → [AV] → [Component] → [HDMI1] → [HDMI2] → [DisplayPort] → [MagicInfo] → [TV] Note • A TV tuner box (sold separately) must be connected to Video mode. POWER button Use this button for turning the LCD Display on and off. Your LCD Display Front SOURCE button Switches from PC mode...

Quick Start Guide
Page 5
.../IN Receives a signal from the light sensor. Rear Note See the "Connections" section for further information regarding power saving functions. AMBIENT SENSOR IN Supplies power to the removable sensor board and receives a signal from the remote control and outputs the signal through Loopout when a removable sensor board is not needed or when leaving it is connected. Introduction Power indicator Shows PowerSaver mode by blinking green Note See PowerSaver described in the manual for details about cable connections. The LCD Display's configuration...
.../IN Receives a signal from the light sensor. Rear Note See the "Connections" section for further information regarding power saving functions. AMBIENT SENSOR IN Supplies power to the removable sensor board and receives a signal from the remote control and outputs the signal through Loopout when a removable sensor board is not needed or when leaving it is connected. Introduction Power indicator Shows PowerSaver mode by blinking green Note See PowerSaver described in the manual for details about cable connections. The LCD Display's configuration...

Quick Start Guide
Page 11
... mode. FM Stereo Audio Type MTS/S_Mode Mono Mono Default Manual Change Used to enter the password during the OSD adjustment or to quickly select frequently used to another horizontally, vertically or adjusts selected menu values. Current picture information is installed. Turns the product Off. Changing the SOURCE is used functions. - Selects a connected external input source or MagicInfo mode. TV channels provide written information services via teletext. - Press to the LCD Display at the time. Introduction POWER OFF Number Buttons DEL / GUIDE button + VOL SOURCE D.MENU...
... mode. FM Stereo Audio Type MTS/S_Mode Mono Mono Default Manual Change Used to enter the password during the OSD adjustment or to quickly select frequently used to another horizontally, vertically or adjusts selected menu values. Current picture information is installed. Turns the product Off. Changing the SOURCE is used functions. - Selects a connected external input source or MagicInfo mode. TV channels provide written information services via teletext. - Press to the LCD Display at the time. Introduction POWER OFF Number Buttons DEL / GUIDE button + VOL SOURCE D.MENU...

Quick Start Guide
Page 14
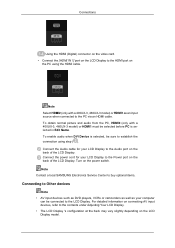
... power switch. To obtain normal picture and audio from the PC, HDMI2 (only with a 400UX-3, 460UX-3 model) or HDMI1 as your LCD Display to the Power port on the LCD Display model. Note Contact a local SAMSUNG Electronics Service Center to buy optional items. Connecting to Other devices Note • AV input devices such as DVD players, VCRs or camcorders as well as an input source when connected to the PC via an HDMI cable...
... power switch. To obtain normal picture and audio from the PC, HDMI2 (only with a 400UX-3, 460UX-3 model) or HDMI1 as your LCD Display to the Power port on the LCD Display model. Note Contact a local SAMSUNG Electronics Service Center to buy optional items. Connecting to Other devices Note • AV input devices such as DVD players, VCRs or camcorders as well as an input source when connected to the PC via an HDMI cable...

Quick Start Guide
Page 15
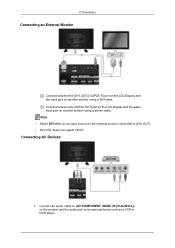
... or DVD player. 2. Connect an audio cable to [AV/COMPONENT AUDIO IN [R-AUDIO-L]] on the product and the audio port on an external device such as your computer can be connected to [AV IN] on the product and the video output port on the product or remote control and select "AV". Note Select DVI Mode as an input source for the external monitor connected to the contents under Adjusting Your LCD Display. Press SOURCE on the external device. 3. Connect a video cable...
... or DVD player. 2. Connect an audio cable to [AV/COMPONENT AUDIO IN [R-AUDIO-L]] on the product and the audio port on an external device such as your computer can be connected to [AV IN] on the product and the video output port on the product or remote control and select "AV". Note Select DVI Mode as an input source for the external monitor connected to the contents under Adjusting Your LCD Display. Press SOURCE on the external device. 3. Connect a video cable...

Quick Start Guide
Page 21
... the power cord. Turn off your video controller and computer system; If the resolution is functioning properly. Unplug the video cable from the back of 1920 x 1080. Troubleshooting Self-Test Feature Check Note Check the following message for a minute; You can even view the screen at a resolution of the computer. 3. Note Refer to change the screen resolution or stay in the SelfTest mode, the LED power indicator remains green...
... the power cord. Turn off your video controller and computer system; If the resolution is functioning properly. Unplug the video cable from the back of 1920 x 1080. Troubleshooting Self-Test Feature Check Note Check the following message for a minute; You can even view the screen at a resolution of the computer. 3. Note Refer to change the screen resolution or stay in the SelfTest mode, the LED power indicator remains green...

Quick Start Guide
Page 22
... installing the Adaptor (video) driver, boot the computer in Safe Mode, remove the Display Adaptor in this can remedy any damage caused by using the maximum resolution.) 5. Check List Note • The following table lists possible problems and their solutions are properly connected to become noisy, etc. Symptoms and Recommended Actions Note A LCD Display recreates visual signals received from the computer. tance, check the information in the "Control Panel...
... installing the Adaptor (video) driver, boot the computer in Safe Mode, remove the Display Adaptor in this can remedy any damage caused by using the maximum resolution.) 5. Check List Note • The following table lists possible problems and their solutions are properly connected to become noisy, etc. Symptoms and Recommended Actions Note A LCD Display recreates visual signals received from the computer. tance, check the information in the "Control Panel...
User Manual
Page 40
... connecting AV input devices, refer to the Audio port on the back of the LCD Display. Note Contact a local SAMSUNG Electronics Service Center to buy optional items. Connecting to Other devices Note • AV input devices such as DVD players, VCRs or camcorders as well as an input source when connected to establish the connection using the HDMI cable. Connections Using the HDMI (Digital) connector on the video card. • Connect the [HDMI IN 1] port on the LCD Display...
... connecting AV input devices, refer to the Audio port on the back of the LCD Display. Note Contact a local SAMSUNG Electronics Service Center to buy optional items. Connecting to Other devices Note • AV input devices such as DVD players, VCRs or camcorders as well as an input source when connected to establish the connection using the HDMI cable. Connections Using the HDMI (Digital) connector on the video card. • Connect the [HDMI IN 1] port on the LCD Display...
User Manual
Page 41
... the audio input port on another monitor using a DVI cable. Connect between the [DVI OUT(LOOPOUT)] port on the LCD Display and the input port on another monitor using a stereo cable. Note • Select DVI Mode as a VCR or DVD player. Connecting AV Devices 1. Connect an audio cable to [AV/COMPONENT AUDIO IN [R-AUDIO-L]] on the product and the audio port on an external device such as an input source for the external monitor connected to [DVI OUT]. • DVI OUT does not support...
... the audio input port on another monitor using a DVI cable. Connect between the [DVI OUT(LOOPOUT)] port on the LCD Display and the input port on another monitor using a stereo cable. Note • Select DVI Mode as a VCR or DVD player. Connecting AV Devices 1. Connect an audio cable to [AV/COMPONENT AUDIO IN [R-AUDIO-L]] on the product and the audio port on an external device such as an input source for the external monitor connected to [DVI OUT]. • DVI OUT does not support...
User Manual
Page 47
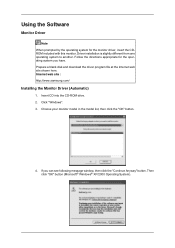
... the model list, then click the "OK" button. 4. Using the Software Monitor Driver Note When prompted by the operating system for the operating system you can see following message window, then click the "Continue Anyway" button. Follow the directions appropriate for the monitor driver, insert the CDROM included with this monitor. Prepare a blank disk and download the driver program file at the Internet web site shown here. Driver installation...
... the model list, then click the "OK" button. 4. Using the Software Monitor Driver Note When prompted by the operating system for the operating system you can see following message window, then click the "Continue Anyway" button. Follow the directions appropriate for the monitor driver, insert the CDROM included with this monitor. Prepare a blank disk and download the driver program file at the Internet web site shown here. Driver installation...
User Manual
Page 48
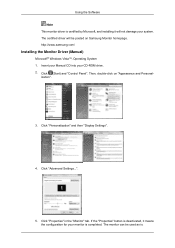
... "Display Settings". 4. The certified driver will not damage your system. Click (Start) and "Control Panel". Click "Properties" in the "Monitor" tab. Using the Software Note This monitor driver is certified by Microsoft, and installing it means the configuration for your CD-ROM drive. 2. The monitor can be posted on "Appearance and Personal- http://www.samsung.com/ Installing the Monitor Driver (Manual) Microsoft® Windows Vista™, Operating System...
... "Display Settings". 4. The certified driver will not damage your system. Click (Start) and "Control Panel". Click "Properties" in the "Monitor" tab. Using the Software Note This monitor driver is certified by Microsoft, and installing it means the configuration for your CD-ROM drive. 2. The monitor can be posted on "Appearance and Personal- http://www.samsung.com/ Installing the Monitor Driver (Manual) Microsoft® Windows Vista™, Operating System...
User Manual
Page 53
... monitor, follow the next steps. 5. Using the Software 10. Choose "OK" button on the "Next" button. 6. Click "Start", "Setting", "Control Panel". 2. Choose "Monitor". Case1 : If the "Properties" button is inactive, it means your monitor is completed. Click the "Open" button, then click "OK" button. 9. How to install 1. Click "Driver" and then click on "Update Driver...", then click on the "Insert disk" window. 2. Click the "Browse" button on your monitor model...
... monitor, follow the next steps. 5. Using the Software 10. Choose "OK" button on the "Next" button. 6. Click "Start", "Setting", "Control Panel". 2. Choose "Monitor". Case1 : If the "Properties" button is inactive, it means your monitor is completed. Click the "Open" button, then click "OK" button. 9. How to install 1. Click "Driver" and then click on "Update Driver...", then click on the "Insert disk" window. 2. Click the "Browse" button on your monitor model...

User Manual
Page 54
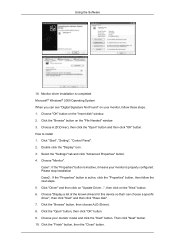
... a specific location...", then click "Next" button. 8. Choose "Display a list of all devices" and choose the monitor that you close the Display Properties dialogue box. Specify A:\(D:\driver), then click "OK" button. 10. Select "Show all the driver in the "Monitor Type" area. 6. Click "Apply" button if you see the "Digital Signature Not Found" window, then click the "Yes" button. Linux Operating System To execute X-Window, you connected to use (Resolution, Number of system setting...
... a specific location...", then click "Next" button. 8. Choose "Display a list of all devices" and choose the monitor that you close the Display Properties dialogue box. Specify A:\(D:\driver), then click "OK" button. 10. Select "Show all the driver in the "Monitor Type" area. 6. Click "Apply" button if you see the "Digital Signature Not Found" window, then click the "Yes" button. Linux Operating System To execute X-Window, you connected to use (Resolution, Number of system setting...
User Manual
Page 56
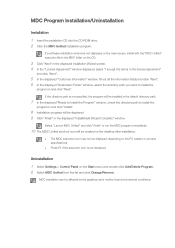
... not be affected by the graphics card, mother board and network conditions. Uninstallation 1 Select Settings > Control Panel on the PC system or product specifications. Press F5 if the execution icon is not specified, the program will be installed in the default directory path. 7 In the displayed "Ready to Install the Program" window, check the directory path to run the MDC...
... not be affected by the graphics card, mother board and network conditions. Uninstallation 1 Select Settings > Control Panel on the PC system or product specifications. Press F5 if the execution icon is not specified, the program will be installed in the default directory path. 7 In the displayed "Ready to Install the Program" window, check the directory path to run the MDC...

User Manual
Page 91
... the same time), the audio port should be set Edit Name to AV. Source AutoSwitch Settings Turning on the input signal and Edit Name. The display will remain in accordance with the input signal. • The Picture menu changes depending on the display with Source AutoSwitch On, and the previous video source selection is connected, set Edit Name to DVI Device to enjoy the video and audio from the connected PC. VCR / DVD / Cable STB / HD...
... the same time), the audio port should be set Edit Name to AV. Source AutoSwitch Settings Turning on the input signal and Edit Name. The display will remain in accordance with the input signal. • The Picture menu changes depending on the display with Source AutoSwitch On, and the previous video source selection is connected, set Edit Name to DVI Device to enjoy the video and audio from the connected PC. VCR / DVD / Cable STB / HD...
User Manual
Page 108
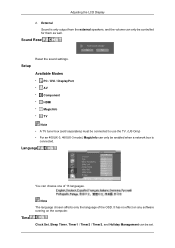
... can be set. Clock Set, Sleep Timer, Timer1 / Timer2 / Timer3, and Holiday Management can choose one of the OSD. External Sound is only output from the external speakers, and the volume can only be controlled for them as well. Setup Available Modes • PC / DVI / DisplayPort • AV • Component • HDMI • MagicInfo • TV Note • A TV tuner box (sold separately) must be connected to use the...
... can be set. Clock Set, Sleep Timer, Timer1 / Timer2 / Timer3, and Holiday Management can choose one of the OSD. External Sound is only output from the external speakers, and the volume can only be controlled for them as well. Setup Available Modes • PC / DVI / DisplayPort • AV • Component • HDMI • MagicInfo • TV Note • A TV tuner box (sold separately) must be connected to use the...

User Manual
Page 125
... connected to LCD Display : execute Device mode. • Press ESC to directly go to the MagicInfo Window screen. • To setup MagicInfo on a Windows screen, a keyboard and mouse are required. • To setup MagicInfo on . • Do not unplug the LAN cable used by an USB device (ex: video display). Adjusting the LCD Display • Component • HDMI • MagicInfo For an 400UX-3, 460UX-3 model, MagicInfo can be enabled when a network box...
... connected to LCD Display : execute Device mode. • Press ESC to directly go to the MagicInfo Window screen. • To setup MagicInfo on a Windows screen, a keyboard and mouse are required. • To setup MagicInfo on . • Do not unplug the LAN cable used by an USB device (ex: video display). Adjusting the LCD Display • Component • HDMI • MagicInfo For an 400UX-3, 460UX-3 model, MagicInfo can be enabled when a network box...

User Manual
Page 129
... even view the screen at a resolution of the computer. 3. Contact a Service Center for a minute; Turn on the screen. 4. The figure shown below ("No Signal") appears on both your computer and the LCD Display. 2. then turn on a black background when the LCD Display is working normally even though no video signal is functioning properly. Note Refer to change the screen resolution or stay in the SelfTest mode, the LED power indicator remains green and...
... even view the screen at a resolution of the computer. 3. Contact a Service Center for a minute; Turn on the screen. 4. The figure shown below ("No Signal") appears on both your computer and the LCD Display. 2. then turn on a black background when the LCD Display is working normally even though no video signal is functioning properly. Note Refer to change the screen resolution or stay in the SelfTest mode, the LED power indicator remains green and...

User Manual
Page 130
... case, first check the source of the screen surface.) • The user is set to reinstall the Adaptor (video) driver. If you do need assistance, please call the phone number on the Information section or contact your dealer. 1. Symptoms and Recommended Actions Note A LCD Display recreates visual signals received from the computer. Check if the power cord and the video cables are listed. Clean with the computer...
... case, first check the source of the screen surface.) • The user is set to reinstall the Adaptor (video) driver. If you do need assistance, please call the phone number on the Information section or contact your dealer. 1. Symptoms and Recommended Actions Note A LCD Display recreates visual signals received from the computer. Check if the power cord and the video cables are listed. Clean with the computer...
User Manual
Page 135
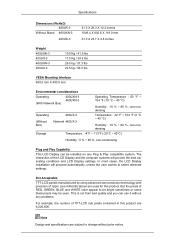
..., the LCD Display installation will provide the best operating conditions and LCD Display settings. Specifications Dimensions (WxHxD) 460UX-3 Without Stand 460UXN-3 460UX-3 41.3 X 26.3 X 12.2 inches 1049.4 X 602.6 X 118.0 mm 41.3 X 23.7 X 4.6 inches Weight 400UXN-3 400UX-3 460UXN-3 460UX-3 19.0 Kg / 41.9 lbs 17.5 Kg / 38.6 lbs 26.0 kg / 57.3 lbs 24.5 kg / 54.0 lbs VESA Mounting Interface 600.0 mm X 400.0 mm Environmental considerations Operating 400UXN-3 460UXN-3 (With Network Box) Operating Temperature...
..., the LCD Display installation will provide the best operating conditions and LCD Display settings. Specifications Dimensions (WxHxD) 460UX-3 Without Stand 460UXN-3 460UX-3 41.3 X 26.3 X 12.2 inches 1049.4 X 602.6 X 118.0 mm 41.3 X 23.7 X 4.6 inches Weight 400UXN-3 400UX-3 460UXN-3 460UX-3 19.0 Kg / 41.9 lbs 17.5 Kg / 38.6 lbs 26.0 kg / 57.3 lbs 24.5 kg / 54.0 lbs VESA Mounting Interface 600.0 mm X 400.0 mm Environmental considerations Operating 400UXN-3 460UXN-3 (With Network Box) Operating Temperature...


