Quick Start Guide
Page 6
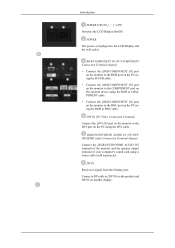
...COMPONENT IN] port on the monitor to the COMPONENT port on the external device using the RGB to the DVI port on the PC using a stereo cable (sold separately). DP IN Receives a signal from the Display port. Introduction POWER S/W ON [ │ ] / OFF Switches the LCD Display On/Off. DVI IN (PC... Video Connection Terminal) Connect the [DVI IN] port on the monitor to BNC cable. RGB/DVI/DP/HDMI AUDIO IN (PC/DVI/ DP/HDMI...
...COMPONENT IN] port on the monitor to the COMPONENT port on the external device using the RGB to the DVI port on the PC using a stereo cable (sold separately). DP IN Receives a signal from the Display port. Introduction POWER S/W ON [ │ ] / OFF Switches the LCD Display On/Off. DVI IN (PC... Video Connection Terminal) Connect the [DVI IN] port on the monitor to BNC cable. RGB/DVI/DP/HDMI AUDIO IN (PC/DVI/ DP/HDMI...
Quick Start Guide
Page 7
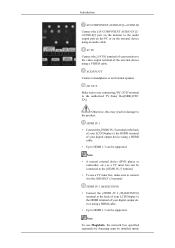
.... AUDIO OUT Connect a headphone or an External speaker. HDMI IN 1 • Connect the [HDMI IN 1] terminal at the back of your LCD Display to the HDMI terminal of your monitor to HDMI 1.3 can be supported. DC OUT Make sure to use a TV tuner box, make sure to connect it to HDMI 1.3 can... be supported. Note To use MagicInfo, the network box specified separately by Samsung must be connected to the [HDMI IN 1] terminal. • ...
.... AUDIO OUT Connect a headphone or an External speaker. HDMI IN 1 • Connect the [HDMI IN 1] terminal at the back of your LCD Display to the HDMI terminal of your monitor to HDMI 1.3 can be supported. DC OUT Make sure to use a TV tuner box, make sure to connect it to HDMI 1.3 can... be supported. Note To use MagicInfo, the network box specified separately by Samsung must be connected to the [HDMI IN 1] terminal. • ...
Quick Start Guide
Page 10
... POWER S/W ON [ I ] / OFF Turns the network box on for details about cable connections. • The power switches of both of the monitor using a power extension cable. Note • See the "Connections" section for the network box to interference with the frequency. SOURCE D.MENU TOOLS Up-...to a mains socket via the power cord. Introduction POWER Connect the [POWER] terminal of the product and the [POWER] terminal of the monitor and the network box must be affected by a TV or other electronic device operating near the LCD Display , causing a malfunction due to operate normally.
... POWER S/W ON [ I ] / OFF Turns the network box on for details about cable connections. • The power switches of both of the monitor using a power extension cable. Note • See the "Connections" section for the network box to interference with the frequency. SOURCE D.MENU TOOLS Up-...to a mains socket via the power cord. Introduction POWER Connect the [POWER] terminal of the product and the [POWER] terminal of the monitor and the network box must be affected by a TV or other electronic device operating near the LCD Display , causing a malfunction due to operate normally.
Quick Start Guide
Page 14
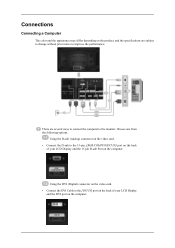
... Connecting a Computer The color and the appearance may differ depending on the product, and the specifications are several ways to connect the computer to the monitor. Choose one from the following options. Using the D-sub (Analog) connector on the video card. • Connect the D-sub to the [DVI IN] port... on the back of your LCD Display and the DVI port on the computer. Using the DVI (Digital) connector on the video card. • Connect the DVI Cable to the 15-pin...
... Connecting a Computer The color and the appearance may differ depending on the product, and the specifications are several ways to connect the computer to the monitor. Choose one from the following options. Using the D-sub (Analog) connector on the video card. • Connect the D-sub to the [DVI IN] port... on the back of your LCD Display and the DVI port on the computer. Using the DVI (Digital) connector on the video card. • Connect the DVI Cable to the 15-pin...
User Manual
Page 5
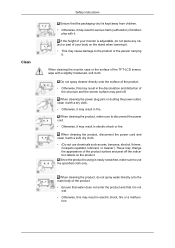
... carrying it. When cleaning the product, do not place any object or part of your body on the product. If the height of your monitor is adjustable, do not spray water directly onto the main body of the product. • Ensure that water does not enter the product and...alcohol, thinner, mosquito repellant, lubricant, or cleaner.) These may change the appearance of the product surface and peel off . When cleaning the monitor case or the surface of the TFT-LCD screen, wipe with a soft, dry cloth. • (Do not use the specified cloth only. When cleaning the product, disconnect the ...
... carrying it. When cleaning the product, do not place any object or part of your body on the product. If the height of your monitor is adjustable, do not spray water directly onto the main body of the product. • Ensure that water does not enter the product and...alcohol, thinner, mosquito repellant, lubricant, or cleaner.) These may change the appearance of the product surface and peel off . When cleaning the monitor case or the surface of the TFT-LCD screen, wipe with a soft, dry cloth. • (Do not use the specified cloth only. When cleaning the product, disconnect the ...

User Manual
Page 14
...)) Connect the [RGB/DVI/DP/HDMI AUDIO IN] terminal of the monitor and the speaker output terminal of your computer's sound card using the DVI cable. DP IN Receives a signal from the Display port. POWER The power cord plugs into the LCD Display and the wall outlet. Connect a DP cable to [DP IN] on... the product and DP IN on the PC using the RGB to COMPONENT cable. • Connect the [RGB/COMPONENT IN] port on the monitor to the DVI port on the PC using a stereo...
...)) Connect the [RGB/DVI/DP/HDMI AUDIO IN] terminal of the monitor and the speaker output terminal of your computer's sound card using the DVI cable. DP IN Receives a signal from the Display port. POWER The power cord plugs into the LCD Display and the wall outlet. Connect a DP cable to [DP IN] on... the product and DP IN on the PC using the RGB to COMPONENT cable. • Connect the [RGB/COMPONENT IN] port on the monitor to the DVI port on the PC using a stereo...

User Manual
Page 15
.... AUDIO OUT Connect a headphone or an External speaker. HDMI IN 1 • Connect the [HDMI IN 1] terminal at the back of your LCD Display to the HDMI terminal of your monitor to the video output terminal of your digital output device using a HDMI cable. • Up to HDMI 1.3 can be supported. HDMI IN... [HDMI IN 2 (MAGICINFO)] terminal at the back of your LCD Display to the product. DC OUT Make sure to use a TV tuner box (US Only), make sure to connect it to the audio output port on the PC or on the monitor to the [HDMI IN 1] terminal. Introduction AV/COMPONENT AUDIO IN...
.... AUDIO OUT Connect a headphone or an External speaker. HDMI IN 1 • Connect the [HDMI IN 1] terminal at the back of your LCD Display to the HDMI terminal of your monitor to the video output terminal of your digital output device using a HDMI cable. • Up to HDMI 1.3 can be supported. HDMI IN... [HDMI IN 2 (MAGICINFO)] terminal at the back of your LCD Display to the product. DC OUT Make sure to use a TV tuner box (US Only), make sure to connect it to the audio output port on the PC or on the monitor to the [HDMI IN 1] terminal. Introduction AV/COMPONENT AUDIO IN...

User Manual
Page 18
... to operate normally. Note • See the "Connections" section for details about cable connections. • The power switches of both of the monitor and the network box must be connected to use the TV. (US Only) POWER Connects to a mains socket via the power cord. A ...] terminal of the product and the [POWER] terminal of the remote control may be affected by a TV or other electronic device operating near the LCD Display , causing a malfunction due to interference with the frequency. Introduction RS232C (RS232C Serial PORT) Serial port Connecting a Network Box (sold separately) must ...
... to operate normally. Note • See the "Connections" section for details about cable connections. • The power switches of both of the monitor and the network box must be connected to use the TV. (US Only) POWER Connects to a mains socket via the power cord. A ...] terminal of the product and the [POWER] terminal of the remote control may be affected by a TV or other electronic device operating near the LCD Display , causing a malfunction due to interference with the frequency. Introduction RS232C (RS232C Serial PORT) Serial port Connecting a Network Box (sold separately) must ...

User Manual
Page 40
...card. • Connect the D-sub to the 15-pin, [RGB/COMPONENT IN] port on the back of your LCD Display and the 15 pin D-sub Port on the computer. Using the DVI (Digital) connector on the video card. •... Connect the DVI Cable to the [DVI IN] port on the back of your LCD Display and the DVI port on the computer. Choose one from the following options. Connections Connecting a Computer The color and... and the specifications are several ways to connect the computer to the monitor. There are subject to change without prior notice to improve the performance.
...card. • Connect the D-sub to the 15-pin, [RGB/COMPONENT IN] port on the back of your LCD Display and the 15 pin D-sub Port on the computer. Using the DVI (Digital) connector on the video card. •... Connect the DVI Cable to the [DVI IN] port on the back of your LCD Display and the DVI port on the computer. Choose one from the following options. Connections Connecting a Computer The color and... and the specifications are several ways to connect the computer to the monitor. There are subject to change without prior notice to improve the performance.

User Manual
Page 122
Adjusting the LCD Display • It is best to use the product at temperatures 75 - 80°C (based on ambient temperature of the product. Auto Power Enables or disables Auto Power for details about operating conditions. Button Lock Locks or unlocks the monitor control buttons on automatically as soon as it is connected to... the product. • Off • On Note When Auto Power is best to set Fan Control to power. Current Temperature Shows the current temperature of 40°C).
Adjusting the LCD Display • It is best to use the product at temperatures 75 - 80°C (based on ambient temperature of the product. Auto Power Enables or disables Auto Power for details about operating conditions. Button Lock Locks or unlocks the monitor control buttons on automatically as soon as it is connected to... the product. • Off • On Note When Auto Power is best to set Fan Control to power. Current Temperature Shows the current temperature of 40°C).

User Manual
Page 142
When cleaning the monitor and the panel outside, please apply a small amount of time, a residual image or ... be slight difference in voltage between electrodes that is appeared as continuously changing video patterns. When the LCD panel is operated for an extended period of black pixels could be decreased. The voltage difference between electrodes ...• Resolution: 1920 x 1080 • Vertical frequency (refresh rate): 60 Hz TFT-LCD panels manufactured by performing the "Auto Adjustment" function in display screen that work the liquid crystal (LC) in a pixel. But the pixels of RED,...
When cleaning the monitor and the panel outside, please apply a small amount of time, a residual image or ... be slight difference in voltage between electrodes that is appeared as continuously changing video patterns. When the LCD panel is operated for an extended period of black pixels could be decreased. The voltage difference between electrodes ...• Resolution: 1920 x 1080 • Vertical frequency (refresh rate): 60 Hz TFT-LCD panels manufactured by performing the "Auto Adjustment" function in display screen that work the liquid crystal (LC) in a pixel. But the pixels of RED,...


