Quick Start Guide
Page 4
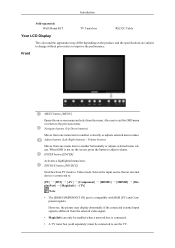
... the performance. ENTER button [ENTER] Activates a highlighted menu item. However, the picture may differ depending on the product, and the specifications are subject to change without prior notice to another horizontally or adjusts selected menu values. Front MENU button [MENU] Opens the on the...from PC mode to the previous menu. Introduction Sold separately Wall Mount KIT TV Tuner box RS232C Cable Your LCD Display The color and the appearance may display abnormally if the connected external input signal is different from the menu. Also use the TV. Selects the input...
... the performance. ENTER button [ENTER] Activates a highlighted menu item. However, the picture may differ depending on the product, and the specifications are subject to change without prior notice to another horizontally or adjusts selected menu values. Front MENU button [MENU] Opens the on the...from PC mode to the previous menu. Introduction Sold separately Wall Mount KIT TV Tuner box RS232C Cable Your LCD Display The color and the appearance may display abnormally if the connected external input signal is different from the menu. Also use the TV. Selects the input...
Quick Start Guide
Page 14
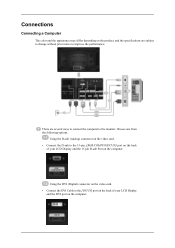
...Analog) connector on the video card. • Connect the D-sub to the 15-pin, [RGB/COMPONENT IN] port on the back of your LCD Display and the 15 pin D-sub Port on the computer. Choose one from the following options. Connections Connecting a Computer The color and the appearance may ...differ depending on the product, and the specifications are several ways to connect the computer to the monitor. There are subject to change without prior notice to improve the performance.
...Analog) connector on the video card. • Connect the D-sub to the 15-pin, [RGB/COMPONENT IN] port on the back of your LCD Display and the 15 pin D-sub Port on the computer. Choose one from the following options. Connections Connecting a Computer The color and the appearance may ...differ depending on the product, and the specifications are several ways to connect the computer to the monitor. There are subject to change without prior notice to improve the performance.
Quick Start Guide
Page 23
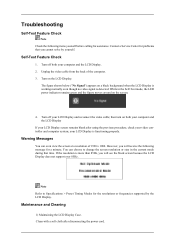
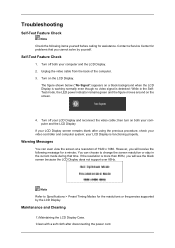
Contact a Service Center for a minute; Turn off your computer and the LCD Display. 2. Warning Messages You can choose to Specifications > Preset Timing Modes for assistance. If the resolution is more than 85Hz, you will see the black screen because the LCD Display does not support over 85Hz. Unplug the video cable from the back of 1920...
Contact a Service Center for a minute; Turn off your computer and the LCD Display. 2. Warning Messages You can choose to Specifications > Preset Timing Modes for assistance. If the resolution is more than 85Hz, you will see the black screen because the LCD Display does not support over 85Hz. Unplug the video cable from the back of 1920...
User Manual
Page 1
SyncMaster 400MX-3, 460MX-3, 400FP-3, 460FP-3 LCD Display User Manuals The color and the appearance may differ depending on the product, and the specifications are subject to change without prior notice to improve the performance.
SyncMaster 400MX-3, 460MX-3, 400FP-3, 460FP-3 LCD Display User Manuals The color and the appearance may differ depending on the product, and the specifications are subject to change without prior notice to improve the performance.

User Manual
Page 12
When OSD is different from the selected video signal. However, the picture may differ depending on the product, and the specifications are subject to change without prior notice to Video mode. Also use to exit the OSD menu or return to another vertically or ...SOURCE button [SOURCE] Switches from the menu. Introduction Sold separately Wall Mount KIT TV Tuner box (US Only) RS232C Cable Your LCD Display The color and the appearance may display abnormally if the connected external input signal is not on the screen, press the button to adjust volume. Front MENU button [MENU...
When OSD is different from the selected video signal. However, the picture may differ depending on the product, and the specifications are subject to change without prior notice to Video mode. Also use to exit the OSD menu or return to another vertically or ...SOURCE button [SOURCE] Switches from the menu. Introduction Sold separately Wall Mount KIT TV Tuner box (US Only) RS232C Cable Your LCD Display The color and the appearance may display abnormally if the connected external input signal is not on the screen, press the button to adjust volume. Front MENU button [MENU...

User Manual
Page 40
... Connecting a Computer The color and the appearance may differ depending on the product, and the specifications are several ways to connect the computer to the 15-pin, [RGB/COMPONENT IN] port on the back of your LCD Display and the 15 pin D-sub Port on the computer. Using the D-sub (Analog) connector on... the computer. There are subject to change without prior notice to the [DVI IN] port on the back of your LCD Display and the DVI port on the video card. • Connect the D-sub to the monitor. Choose one from the following options.
... Connecting a Computer The color and the appearance may differ depending on the product, and the specifications are several ways to connect the computer to the 15-pin, [RGB/COMPONENT IN] port on the back of your LCD Display and the 15 pin D-sub Port on the computer. Using the D-sub (Analog) connector on... the computer. There are subject to change without prior notice to the [DVI IN] port on the back of your LCD Display and the DVI port on the video card. • Connect the D-sub to the monitor. Choose one from the following options.
User Manual
Page 55
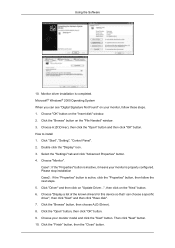
Microsoft® Windows® 2000 Operating System When you can choose a specific driver", then click "Next" and then click "Have disk". 7. Click the "Browse" button on your monitor, follow the next steps. 5. Choose A:(D:\Driver...the "File Needed" window. 3. Then click "Next" button. 10. How to install 1. Choose your monitor is completed. Click "Start", "Setting", "Control Panel". 2. Choose "Monitor". Double click the "Display" icon. 3. Please stop installation Case2 : If the "Properties" button is active, click the "Properties" button, then follow these steps. 1. Click the "...
Microsoft® Windows® 2000 Operating System When you can choose a specific driver", then click "Next" and then click "Have disk". 7. Click the "Browse" button on your monitor, follow the next steps. 5. Choose A:(D:\Driver...the "File Needed" window. 3. Then click "Next" button. 10. How to install 1. Choose your monitor is completed. Click "Start", "Setting", "Control Panel". 2. Choose "Monitor". Double click the "Display" icon. 3. Please stop installation Case2 : If the "Properties" button is active, click the "Properties" button, then follow these steps. 1. Click the "...
User Manual
Page 56
..."Finish" button and the "Close" button. Double click the "Display" icon. 3. Select the "Monitor" tab. 5. Select "Show all the driver in a specific location...", then click "Next" button. 8. Click "Start", "Settings", "Control Panel", and then double-click "Display" icon. 2. Choose "Specify the location of Colors and Vertical ..."Apply" button if you see the "Digital Signature Not Found" window, then click the "Yes" button. Press "Enter" at All Display Modes, select the level of all devices" and choose the monitor that you wish to your computer and click "OK". 11. Using...
..."Finish" button and the "Close" button. Double click the "Display" icon. 3. Select the "Monitor" tab. 5. Select "Show all the driver in a specific location...", then click "Next" button. 8. Click "Start", "Settings", "Control Panel", and then double-click "Display" icon. 2. Choose "Specify the location of Colors and Vertical ..."Apply" button if you see the "Digital Signature Not Found" window, then click the "Yes" button. Press "Enter" at All Display Modes, select the level of all devices" and choose the monitor that you wish to your computer and click "OK". 11. Using...
User Manual
Page 58
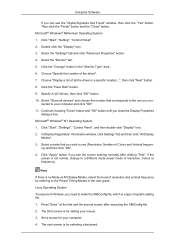
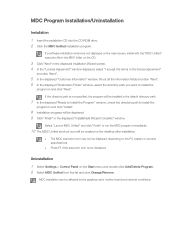
... in the displayed "InstallShield Wizard Complete" window. Uninstallation 1 Select Settings > Control Panel on the CD. 3 Click "Next" in the displayed Installation Wizard screen. 4 In the "License Agreement" window displayed, select "I accept the terms in the license agreement" and click "Next". 5 In the displayed "Customer Information... desktop after installation. The MDC execution icon may not be displayed depending on the PC system or product specifications. Press F5 if the execution icon is not displayed on the main screen, install with the "MDC Unified" execution file ...
... in the displayed "InstallShield Wizard Complete" window. Uninstallation 1 Select Settings > Control Panel on the CD. 3 Click "Next" in the displayed Installation Wizard screen. 4 In the "License Agreement" window displayed, select "I accept the terms in the license agreement" and click "Next". 5 In the displayed "Customer Information... desktop after installation. The MDC execution icon may not be displayed depending on the PC system or product specifications. Press F5 if the execution icon is not displayed on the main screen, install with the "MDC Unified" execution file ...

User Manual
Page 62
Auto Set ID Auto Set ID feature assigns a Set ID for cloning, using the copy setting option window. Cloning Using the Cloning feature, you can copy the setting of 100 LFDs in a connection. The Set ID is assigned sequentially in daisy-chain of a selected connection. You can be a maximum of one LFD and apply it to Set ID 0. There can select specific tab categories or all tab categories for all the LFDs connected in the daisychain running from 1 to 99, and then finally to multiple selected LFDs.
Auto Set ID Auto Set ID feature assigns a Set ID for cloning, using the copy setting option window. Cloning Using the Cloning feature, you can copy the setting of 100 LFDs in a connection. The Set ID is assigned sequentially in daisy-chain of a selected connection. You can be a maximum of one LFD and apply it to Set ID 0. There can select specific tab categories or all tab categories for all the LFDs connected in the daisychain running from 1 to 99, and then finally to multiple selected LFDs.

User Manual
Page 122
Current Temperature Shows the current temperature of 40°C). Adjusting the LCD Display • It is best to use the product at temperatures 75 - 80°C (based on automatically as soon as it is On, the product will ... the Temperature Control setting. Auto Power Enables or disables Auto Power for details about operating conditions. Note It is best to set Fan Control to "Specifications" herein for the product. • Off • On Note When Auto Power is connected to power. Button Lock Locks or unlocks the monitor control buttons...
Current Temperature Shows the current temperature of 40°C). Adjusting the LCD Display • It is best to use the product at temperatures 75 - 80°C (based on automatically as soon as it is On, the product will ... the Temperature Control setting. Auto Power Enables or disables Auto Power for details about operating conditions. Note It is best to set Fan Control to "Specifications" herein for the product. • Off • On Note When Auto Power is connected to power. Button Lock Locks or unlocks the monitor control buttons...

User Manual
Page 130
Select Screen Type - Adjusting the LCD Display When using multiple languages, you can select which rotation type will be applied to your device. 5. Setup Information step 4 You can choose and set a specific language among them. 4.
Select Screen Type - Adjusting the LCD Display When using multiple languages, you can select which rotation type will be applied to your device. 5. Setup Information step 4 You can choose and set a specific language among them. 4.
User Manual
Page 132
...Specifications > Preset Timing Modes for the resolutions or frequencies supported by yourself. then turn on a black background when the LCD Display is working normally even though no video signal is more than 85Hz, you cannot solve by the LCD Display. However, you will see the black screen because the LCD Display... the LED power indicator remains green and the figure moves around on the LCD Display. Turn off your computer and the LCD Display. 2. The figure shown below ("No Signal") appears on both your LCD Display and reconnect the video cable; You can even view the screen at a ...
...Specifications > Preset Timing Modes for the resolutions or frequencies supported by yourself. then turn on a black background when the LCD Display is working normally even though no video signal is more than 85Hz, you cannot solve by the LCD Display. However, you will see the black screen because the LCD Display... the LED power indicator remains green and the figure moves around on the LCD Display. Turn off your computer and the LCD Display. 2. The figure shown below ("No Signal") appears on both your LCD Display and reconnect the video cable; You can even view the screen at a ...

User Manual
Page 137
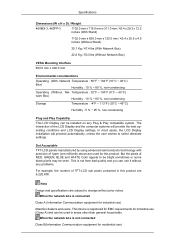
Specifications General General Model Name 400MX-3 , 460MX-3, 400FP-3, 460FP-3 LCD Panel Size Display Area 400MX-3, 400FP-3 460MX-3, 460FP-3 400MX-3, 400FP-3 460MX-3, 460FP-3 40.0 inch / 101 cm 46.0 inch / 116 cm 885.6 mm(H) x 498.15 mm (V) 1018.08 mm(H) x 572.67 mm(V) Synchronization Horizontal Vertical 30~81 kHz 56~85 Hz Display...Out, Audio In(L/R), RJ45, (RS232C, USB, LAN, D-sub out, HDMI out, Audio out → Slide in Network Box) Dimensions (W x H x D) / Weight 400MX-3, 400FP-3 971.0 mm x 641.5 mm x 311.0 mm / 38.2 x 25.3 x 12.2 inches (With Stand) 971.0 mm x 582.0 mm x 119.0 ...
Specifications General General Model Name 400MX-3 , 460MX-3, 400FP-3, 460FP-3 LCD Panel Size Display Area 400MX-3, 400FP-3 460MX-3, 460FP-3 400MX-3, 400FP-3 460MX-3, 460FP-3 40.0 inch / 101 cm 46.0 inch / 116 cm 885.6 mm(H) x 498.15 mm (V) 1018.08 mm(H) x 572.67 mm(V) Synchronization Horizontal Vertical 30~81 kHz 56~85 Hz Display...Out, Audio In(L/R), RJ45, (RS232C, USB, LAN, D-sub out, HDMI out, Audio out → Slide in Network Box) Dimensions (W x H x D) / Weight 400MX-3, 400FP-3 971.0 mm x 641.5 mm x 311.0 mm / 38.2 x 25.3 x 12.2 inches (With Stand) 971.0 mm x 582.0 mm x 119.0 ...
User Manual
Page 138
...Acceptable TFT-LCD panels manufactured ... for industrial use it without prior notice. In most cases, the LCD Display installation will provide the best operating conditions and LCD Display settings. This is registered for EMC requirements for industrial use ) Specifications Dimensions (W x H x D) / Weight 460MX-3, 460FP-3 1102.0...176;F (0°C ~ 40°C) work Box) Humidity : 10 % ~ 80 %, non-condensing Storage Temperature : -4°F ~ 113°F (-20°C ~ 45°C) Humidity : 5 % ~ 95 %, non-condensing Plug and Play Capability This LCD Display can be seen. But...
...Acceptable TFT-LCD panels manufactured ... for industrial use it without prior notice. In most cases, the LCD Display installation will provide the best operating conditions and LCD Display settings. This is registered for EMC requirements for industrial use ) Specifications Dimensions (W x H x D) / Weight 460MX-3, 460FP-3 1102.0...176;F (0°C ~ 40°C) work Box) Humidity : 10 % ~ 80 %, non-condensing Storage Temperature : -4°F ~ 113°F (-20°C ~ 45°C) Humidity : 5 % ~ 95 %, non-condensing Plug and Play Capability This LCD Display can be seen. But...

User Manual
Page 139
... returns to our website: www.samsung.com/recyclingdirect Or call, (877) 278 - 0799 PowerSaver This LCD Display has a built-in all areas. (Class B equipment emits less electromagnetic waves than Class A equipment.) (USA only) Dispose unwanted electronics ...Network Box) 400MX-3, 400FP-3 193 Watts (Without Network Power Con- This system saves energy by switching your LCD Display OFF when it is registered for EMC requirements for home use (Class B). For energy conservation, turn your LCD Display to set up this feature. PowerSaverd State Normal Op- Specifications This device ...
... returns to our website: www.samsung.com/recyclingdirect Or call, (877) 278 - 0799 PowerSaver This LCD Display has a built-in all areas. (Class B equipment emits less electromagnetic waves than Class A equipment.) (USA only) Dispose unwanted electronics ...Network Box) 400MX-3, 400FP-3 193 Watts (Without Network Power Con- This system saves energy by switching your LCD Display OFF when it is registered for EMC requirements for home use (Class B). For energy conservation, turn your LCD Display to set up this feature. PowerSaverd State Normal Op- Specifications This device ...
User Manual
Page 140
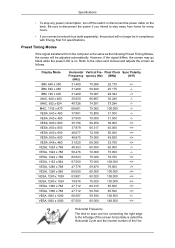
... you connect a network box (sold separately), the product will be in compliance with Energy Star 5.0 specifications. Refer to the left edge of the Hor- Display Mode IBM, 640 x 350 IBM, 640 x 480 IBM, 720 x 400 MAC, 640 x ... -/- 37.500 75.000 31.500 -/- 35.156 56.250 36.000 +/+ 37.879 60.317 40.000 +/+ 48.077 72.188 50.000 +/+ 46.875 75.000 49.500 +/+ 31.020 60...the screen as the following Preset Timing Modes, the screen will no longer be adjusted automatically. Specifications • To stop any power consumption, turn off the switch or disconnect the power cable ...
... you connect a network box (sold separately), the product will be in compliance with Energy Star 5.0 specifications. Refer to the left edge of the Hor- Display Mode IBM, 640 x 350 IBM, 640 x 480 IBM, 720 x 400 MAC, 640 x ... -/- 37.500 75.000 31.500 -/- 35.156 56.250 36.000 +/+ 37.879 60.317 40.000 +/+ 48.077 72.188 50.000 +/+ 46.875 75.000 49.500 +/+ 31.020 60...the screen as the following Preset Timing Modes, the screen will no longer be adjusted automatically. Specifications • To stop any power consumption, turn off the switch or disconnect the power cable ...

User Manual
Page 141
The frequency of this repetition is called the Vertical Frequency or Refresh Rate. Specifications izontal Cycle is called the Horizontal Frequency. Unit: Hz Unit: kHz Vertical Frequency Like a fluorescent lamp, the screen has to repeat the same image many times per second to display an image to the user.
The frequency of this repetition is called the Vertical Frequency or Refresh Rate. Specifications izontal Cycle is called the Horizontal Frequency. Unit: Hz Unit: kHz Vertical Frequency Like a fluorescent lamp, the screen has to repeat the same image many times per second to display an image to the user.


