Quick Start Guide
Page 4
..., the picture may differ depending on the product, and the specifications are subject to change without prior notice to improve the performance. Introduction Sold separately Wall Mount KIT TV Tuner box RS232C Cable Your LCD Display The color and the appearance may display abnormally if the connected external input signal is different from PC...
..., the picture may differ depending on the product, and the specifications are subject to change without prior notice to improve the performance. Introduction Sold separately Wall Mount KIT TV Tuner box RS232C Cable Your LCD Display The color and the appearance may display abnormally if the connected external input signal is different from PC...
Quick Start Guide
Page 14
...connector on the video card. • Connect the DVI Cable to the [DVI IN] port on the back of your LCD Display and the DVI port on the computer. Using the D-sub (Analog) connector on the video card. • Connect ...the D-sub to the 15-pin, [RGB/COMPONENT IN] port on the back of your LCD Display and the 15 pin D-sub Port on the computer. There are subject to change without prior notice to improve the performance... The color and the appearance may differ depending on the product, and the specifications are several ways to connect the computer to the monitor.
...connector on the video card. • Connect the DVI Cable to the [DVI IN] port on the back of your LCD Display and the DVI port on the computer. Using the D-sub (Analog) connector on the video card. • Connect ...the D-sub to the 15-pin, [RGB/COMPONENT IN] port on the back of your LCD Display and the 15 pin D-sub Port on the computer. There are subject to change without prior notice to improve the performance... The color and the appearance may differ depending on the product, and the specifications are several ways to connect the computer to the monitor.
Quick Start Guide
Page 23
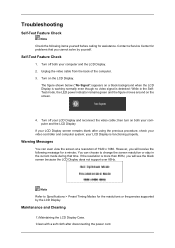
... and computer system; Clean with a soft cloth after using the previous procedure, check your LCD Display is more than 85Hz, you will receive the following items yourself before calling for assistance. Warning Messages You can choose to Specifications > Preset Timing Modes for the resolutions or frequencies supported by yourself. Note Refer to change...
... and computer system; Clean with a soft cloth after using the previous procedure, check your LCD Display is more than 85Hz, you will receive the following items yourself before calling for assistance. Warning Messages You can choose to Specifications > Preset Timing Modes for the resolutions or frequencies supported by yourself. Note Refer to change...
User Manual
Page 1
SyncMaster 400MX-3, 460MX-3, 400FP-3, 460FP-3 LCD Display User Manuals The color and the appearance may differ depending on the product, and the specifications are subject to change without prior notice to improve the performance.
SyncMaster 400MX-3, 460MX-3, 400FP-3, 460FP-3 LCD Display User Manuals The color and the appearance may differ depending on the product, and the specifications are subject to change without prior notice to improve the performance.

User Manual
Page 12
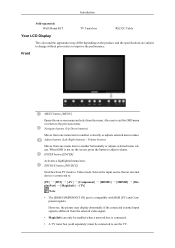
... to Video mode. When OSD is different from the selected video signal. However, the picture may differ depending on the product, and the specifications are subject to change without prior notice to improve the performance. ENTER button [ENTER] Activates a highlighted menu item. SOURCE button [SOURCE] ...connected to the previous menu. Introduction Sold separately Wall Mount KIT TV Tuner box (US Only) RS232C Cable Your LCD Display The color and the appearance may display abnormally if the connected external input signal is not on the screen, press the button to adjust volume. Also use...
... to Video mode. When OSD is different from the selected video signal. However, the picture may differ depending on the product, and the specifications are subject to change without prior notice to improve the performance. ENTER button [ENTER] Activates a highlighted menu item. SOURCE button [SOURCE] ...connected to the previous menu. Introduction Sold separately Wall Mount KIT TV Tuner box (US Only) RS232C Cable Your LCD Display The color and the appearance may display abnormally if the connected external input signal is not on the screen, press the button to adjust volume. Also use...

User Manual
Page 40
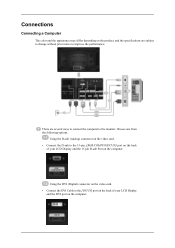
... options. Using the DVI (Digital) connector on the video card. • Connect the DVI Cable to the [DVI IN] port on the back of your LCD Display and the DVI port on the computer. Using the D-sub (Analog) connector on the video card. • Connect the D-sub to the 15-pin, [RGB.../COMPONENT IN] port on the back of your LCD Display and the 15 pin D-sub Port on the computer. There are subject to change without prior notice to improve the performance. Connections Connecting a Computer The...
... options. Using the DVI (Digital) connector on the video card. • Connect the DVI Cable to the [DVI IN] port on the back of your LCD Display and the DVI port on the computer. Using the D-sub (Analog) connector on the video card. • Connect the D-sub to the 15-pin, [RGB.../COMPONENT IN] port on the back of your LCD Display and the 15 pin D-sub Port on the computer. There are subject to change without prior notice to improve the performance. Connections Connecting a Computer The...
User Manual
Page 55
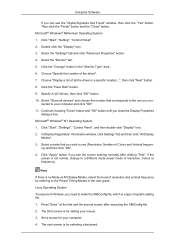
...button. Microsoft® Windows® 2000 Operating System When you can choose a specific driver", then click "Next" and then click "Have disk". 7. Choose "OK" button on the "Next" button. 6. Click "Start", "Setting", "Control Panel". 2. Select the "Settings" tab and click "Advanced Properties" button. 4...."OK" button. Click "Driver" and then click on "Update Driver...", then click on the "Insert disk" window. 2. Double click the "Display" icon. 3. Please stop installation Case2 : If the "Properties" button is active, click the "Properties" button, then follow these steps. 1. ...
...button. Microsoft® Windows® 2000 Operating System When you can choose a specific driver", then click "Next" and then click "Have disk". 7. Choose "OK" button on the "Next" button. 6. Click "Start", "Setting", "Control Panel". 2. Select the "Settings" tab and click "Advanced Properties" button. 4...."OK" button. Click "Driver" and then click on "Update Driver...", then click on the "Insert disk" window. 2. Double click the "Display" icon. 3. Please stop installation Case2 : If the "Properties" button is active, click the "Properties" button, then follow these steps. 1. ...
User Manual
Page 56
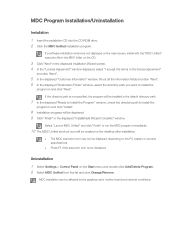
..." tab and click "Advanced Properties" button. 4. Click the "Change" button in a specific location...", then click "Next" button. 8. Choose "Specify the location of system setting file. 1. Choose "Display a list of all devices" and choose the monitor that you wish to the Preset Timing...(lower mode of Colors and Vertical frequency) and then click "OK". 4. Click "Start", "Setting", "Control Panel". 2. Click "Start", "Settings", "Control Panel", and then double-click "Display" icon. 2. The third screen is no Mode at the first and the second screen after clicking "Test". ...
..." tab and click "Advanced Properties" button. 4. Click the "Change" button in a specific location...", then click "Next" button. 8. Choose "Specify the location of system setting file. 1. Choose "Display a list of all devices" and choose the monitor that you wish to the Preset Timing...(lower mode of Colors and Vertical frequency) and then click "OK". 4. Click "Start", "Setting", "Control Panel". 2. Click "Start", "Settings", "Control Panel", and then double-click "Display" icon. 2. The third screen is no Mode at the first and the second screen after clicking "Test". ...
User Manual
Page 58
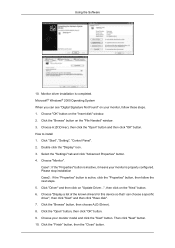
...Change/Remove. Select "Launch MDC Unified" and click "Finish" to install the program in and click "Next". Uninstallation 1 Select Settings > Control Panel on the desktop after installation. The MDC execution icon may not be affected by the graphics card, mother board and network conditions. ... directory path. 7 In the displayed "Ready to Install the Program" window, check the directory path to run the MDC program immediately. 10 The MDC Unified shortcut icon will be displayed. 9 Click "Finish" in the MDC folder on the PC system or product specifications. Press F5 if ...
...Change/Remove. Select "Launch MDC Unified" and click "Finish" to install the program in and click "Next". Uninstallation 1 Select Settings > Control Panel on the desktop after installation. The MDC execution icon may not be affected by the graphics card, mother board and network conditions. ... directory path. 7 In the displayed "Ready to Install the Program" window, check the directory path to run the MDC program immediately. 10 The MDC Unified shortcut icon will be displayed. 9 Click "Finish" in the MDC folder on the PC system or product specifications. Press F5 if ...

User Manual
Page 62
There can copy the setting of one LFD and apply it to Set ID 0. Cloning Using the Cloning feature, you can be a maximum of a selected connection. Auto Set ID Auto Set ID feature assigns a Set ID for cloning, using the copy setting option window. You can select specific tab categories or all tab categories for all the LFDs connected in daisy-chain of 100 LFDs in the daisychain running from 1 to 99, and then finally to multiple selected LFDs. The Set ID is assigned sequentially in a connection.
There can copy the setting of one LFD and apply it to Set ID 0. Cloning Using the Cloning feature, you can be a maximum of a selected connection. Auto Set ID Auto Set ID feature assigns a Set ID for cloning, using the copy setting option window. You can select specific tab categories or all tab categories for all the LFDs connected in daisy-chain of 100 LFDs in the daisychain running from 1 to 99, and then finally to multiple selected LFDs. The Set ID is assigned sequentially in a connection.

User Manual
Page 122
Note It is best to use the product at temperatures 75 - 80°C (based on ambient temperature of the product. Refer to "Specifications" herein for the product. • Off • On Note When Auto Power is On, the product will power on the product. • Off Button... or unlocks the monitor control buttons on automatically as soon as it is connected to power. Current Temperature Shows the current temperature of 40°C). Adjusting the LCD Display • It is best to set Fan Control to Auto when you change the Temperature Control setting. Auto Power Enables or disables ...
Note It is best to use the product at temperatures 75 - 80°C (based on ambient temperature of the product. Refer to "Specifications" herein for the product. • Off • On Note When Auto Power is On, the product will power on the product. • Off Button... or unlocks the monitor control buttons on automatically as soon as it is connected to power. Current Temperature Shows the current temperature of 40°C). Adjusting the LCD Display • It is best to set Fan Control to Auto when you change the Temperature Control setting. Auto Power Enables or disables ...

User Manual
Page 130
step 4 You can choose and set a specific language among them. 4. Setup Information Select Screen Type - Adjusting the LCD Display When using multiple languages, you can select which rotation type will be applied to your device. 5.
step 4 You can choose and set a specific language among them. 4. Setup Information Select Screen Type - Adjusting the LCD Display When using multiple languages, you can select which rotation type will be applied to your device. 5.
User Manual
Page 132
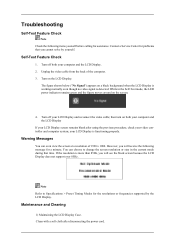
... turn on the screen. 4. Warning Messages You can choose to Specifications > Preset Timing Modes for assistance. Maintenance and Cleaning 1) Maintaining the LCD Display Case. Turn off both your computer and the LCD Display If your LCD Display screen remains blank after disconnecting the power cord. your LCD Display and reconnect the video cable; Note Refer to change the screen...
... turn on the screen. 4. Warning Messages You can choose to Specifications > Preset Timing Modes for assistance. Maintenance and Cleaning 1) Maintaining the LCD Display Case. Turn off both your computer and the LCD Display If your LCD Display screen remains blank after disconnecting the power cord. your LCD Display and reconnect the video cable; Note Refer to change the screen...

User Manual
Page 137
Specifications General General Model Name 400MX-3 , 460MX-3, 400FP-3, 460FP-3 LCD Panel Size Display Area 400MX-3, 400FP-3 460MX-3, 460FP-3 400MX-3, 400FP-3 460MX-3, 460FP-3 40.0 inch / 101 cm 46.0 inch / 116 cm 885.6 mm(H) x 498.15 mm (V) 1018.08 mm(H) x 572.67 mm(V) Synchronization Horizontal Vertical 30~81 kHz 56~85 Hz Display...Out, Audio In(L/R), RJ45, (RS232C, USB, LAN, D-sub out, HDMI out, Audio out → Slide in Network Box) Dimensions (W x H x D) / Weight 400MX-3, 400FP-3 971.0 mm x 641.5 mm x 311.0 mm / 38.2 x 25.3 x 12.2 inches (With Stand) 971.0 mm x 582.0 mm x 119.0 ...
Specifications General General Model Name 400MX-3 , 460MX-3, 400FP-3, 460FP-3 LCD Panel Size Display Area 400MX-3, 400FP-3 460MX-3, 460FP-3 400MX-3, 400FP-3 460MX-3, 460FP-3 40.0 inch / 101 cm 46.0 inch / 116 cm 885.6 mm(H) x 498.15 mm (V) 1018.08 mm(H) x 572.67 mm(V) Synchronization Horizontal Vertical 30~81 kHz 56~85 Hz Display...Out, Audio In(L/R), RJ45, (RS232C, USB, LAN, D-sub out, HDMI out, Audio out → Slide in Network Box) Dimensions (W x H x D) / Weight 400MX-3, 400FP-3 971.0 mm x 641.5 mm x 311.0 mm / 38.2 x 25.3 x 12.2 inches (With Stand) 971.0 mm x 582.0 mm x 119.0 ...
User Manual
Page 138
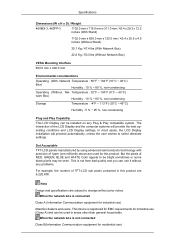
.... Dot Acceptable TFT-LCD panels manufactured by using advanced semiconductor technology with precision of the LCD Display and the computer systems will proceed automatically, unless the user wishes to change without any Plug & Play compatible system. Temperature : 32°F ~ 104°F (0°C ~ 40°C) work Box)... 6,220,800. This device is not from bad quality and you can use (Class A) and can be seen. Specifications Dimensions (W x H x D) / Weight 460MX-3, 460FP-3 1102.0 mm x 719.0 mm x 311.0 mm / 43.4 x 28.3 x 12.2 inches (With Stand) 1102.0 mm x 658.0 ...
.... Dot Acceptable TFT-LCD panels manufactured by using advanced semiconductor technology with precision of the LCD Display and the computer systems will proceed automatically, unless the user wishes to change without any Plug & Play compatible system. Temperature : 32°F ~ 104°F (0°C ~ 40°C) work Box)... 6,220,800. This device is not from bad quality and you can use (Class A) and can be seen. Specifications Dimensions (W x H x D) / Weight 460MX-3, 460FP-3 1102.0 mm x 719.0 mm x 311.0 mm / 43.4 x 28.3 x 12.2 inches (With Stand) 1102.0 mm x 658.0 ...

User Manual
Page 139
... Watts 1 Watts Power off eration ing mode Power Indicator 400MX-3, 400FP-3 On 250 Watts (With Network Box) 400MX-3, 400FP-3 193 Watts (Without Network Power Con- The LCD Display automatically returns to set up this feature. Specifications This device is not needed, or when leaving it has.... The PowerSaver system operates with a VESA DPM compliant video card installed in your LCD Display to our website: www.samsung.com/recyclingdirect Or call, (877) 278 - 0799 PowerSaver This LCD Display has a built-in all areas. (Class B equipment emits less electromagnetic waves than...
... Watts 1 Watts Power off eration ing mode Power Indicator 400MX-3, 400FP-3 On 250 Watts (With Network Box) 400MX-3, 400FP-3 193 Watts (Without Network Power Con- The LCD Display automatically returns to set up this feature. Specifications This device is not needed, or when leaving it has.... The PowerSaver system operates with a VESA DPM compliant video card installed in your LCD Display to our website: www.samsung.com/recyclingdirect Or call, (877) 278 - 0799 PowerSaver This LCD Display has a built-in all areas. (Class B equipment emits less electromagnetic waves than...
User Manual
Page 140
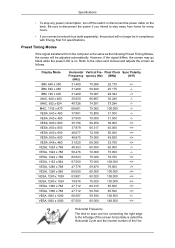
...However, if the signal differs, the screen may go blank while the power LED is on the back. Display Mode IBM, 640 x 350 IBM, 640 x 480 IBM, 720 x 400 MAC, 640 x 480 MAC....500 -/- 37.500 75.000 31.500 -/- 35.156 56.250 36.000 +/+ 37.879 60.317 40.000 +/+ 48.077 72.188 50.000 +/+ 46.875 75.000 49.500 +/+ 31.020 60.000 ...(sold separately), the product will be in compliance with Energy Star 5.0 specifications. Refer to the left edge of the screen horizontally is the same as follows. Specifications • To stop any power consumption, turn off the switch or disconnect...
...However, if the signal differs, the screen may go blank while the power LED is on the back. Display Mode IBM, 640 x 350 IBM, 640 x 480 IBM, 720 x 400 MAC, 640 x 480 MAC....500 -/- 37.500 75.000 31.500 -/- 35.156 56.250 36.000 +/+ 37.879 60.317 40.000 +/+ 48.077 72.188 50.000 +/+ 46.875 75.000 49.500 +/+ 31.020 60.000 ...(sold separately), the product will be in compliance with Energy Star 5.0 specifications. Refer to the left edge of the screen horizontally is the same as follows. Specifications • To stop any power consumption, turn off the switch or disconnect...

User Manual
Page 141
Unit: kHz Vertical Frequency Like a fluorescent lamp, the screen has to repeat the same image many times per second to display an image to the user. The frequency of this repetition is called the Vertical Frequency or Refresh Rate. Specifications izontal Cycle is called the Horizontal Frequency. Unit: Hz
Unit: kHz Vertical Frequency Like a fluorescent lamp, the screen has to repeat the same image many times per second to display an image to the user. The frequency of this repetition is called the Vertical Frequency or Refresh Rate. Specifications izontal Cycle is called the Horizontal Frequency. Unit: Hz


