
Quick Guide (ENGLISH)
Page 3
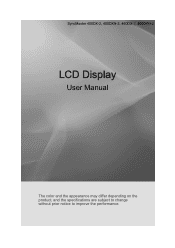
Manuals Introduction Quick Setup Guide Warranty Card (Not available in all locations) User's Guide MagicInfo Software CD, MagicInfo Manual CD (Applicable to the DXN-2 model only) Cables Power Cord Others Remote Control (BP59-00138A) Sold separately Batteries (AAA X 2) BNC to RCA Adaptor Jack (Not available in all loca- (Applicable to the DX-2 tions) model only) D-Sub Cable DVI Cable LAN Cable (Used with DXN-2 model only)
Manuals Introduction Quick Setup Guide Warranty Card (Not available in all locations) User's Guide MagicInfo Software CD, MagicInfo Manual CD (Applicable to the DXN-2 model only) Cables Power Cord Others Remote Control (BP59-00138A) Sold separately Batteries (AAA X 2) BNC to RCA Adaptor Jack (Not available in all loca- (Applicable to the DX-2 tions) model only) D-Sub Cable DVI Cable LAN Cable (Used with DXN-2 model only)

Quick Guide (ENGLISH)
Page 5
...by blinking green Note See PowerSaver described in the manual for turning the LCD Display on and off. Note For detailed information concerning cable connections, refer to turn your LCD Display OFF when it is activated only on the LCD Display. Brightness Sensor (Optional) Automatically detects the surrounding...[DVI] → [AV] → [Component] → [HDMI] → [MagicInfo] Note • The BNC mode will not be activated on the LCD Display model. More than one PIP cannot overlap on screen as BNC and the component use the same terminal. • PC : DVI / AV / Component / HDMI...
...by blinking green Note See PowerSaver described in the manual for turning the LCD Display on and off. Note For detailed information concerning cable connections, refer to turn your LCD Display OFF when it is activated only on the LCD Display. Brightness Sensor (Optional) Automatically detects the surrounding...[DVI] → [AV] → [Component] → [HDMI] → [MagicInfo] Note • The BNC mode will not be activated on the LCD Display model. More than one PIP cannot overlap on screen as BNC and the component use the same terminal. • PC : DVI / AV / Component / HDMI...

Quick Guide (ENGLISH)
Page 9
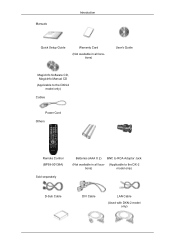
... depending on the model. The locking device has to be affected by a TV or other electronic device operating near the LCD Display , causing a malfunction due to the manual provided with the frequency. Fix the Kensington Lock to the DXN-2 model only. Note The location of the remote control...the system when using it in a public place. Connect the Kensington Lock cable. 3. Insert the locking device into the Kensington slot on the LCD Display and turn it in the locking direction . 2. Kensington Lock The Kensington Lock is a device used to be different depending on the manufacturer....
... depending on the model. The locking device has to be affected by a TV or other electronic device operating near the LCD Display , causing a malfunction due to the manual provided with the frequency. Fix the Kensington Lock to the DXN-2 model only. Note The location of the remote control...the system when using it in a public place. Connect the Kensington Lock cable. 3. Insert the locking device into the Kensington slot on the LCD Display and turn it in the locking direction . 2. Kensington Lock The Kensington Lock is a device used to be different depending on the manufacturer....

Quick Guide (ENGLISH)
Page 11
...mode. This button is displayed on the upper left...LCD Display. Introduction 9. INFO 11. Teletext Buttons 13. MTS/DUAL 14. RETURN - This function does not work for this LCD Display.... Returns to the immediately previous channel. - TTX/MIX Moves from the menu or closes the adjustment menu. TV channels provide written information services via teletext. - MUTE 16. Pauses (mutes) the audio output temporarily. The audio comes back on the remote control while watching TV. VOL + is displayed...this LCD Display. Press...this LCD Display. MTSYou...this LCD Display....
...mode. This button is displayed on the upper left...LCD Display. Introduction 9. INFO 11. Teletext Buttons 13. MTS/DUAL 14. RETURN - This function does not work for this LCD Display.... Returns to the immediately previous channel. - TTX/MIX Moves from the menu or closes the adjustment menu. TV channels provide written information services via teletext. - MUTE 16. Pauses (mutes) the audio output temporarily. The audio comes back on the remote control while watching TV. VOL + is displayed...this LCD Display. Press...this LCD Display. MTSYou...this LCD Display....
Quick Guide (ENGLISH)
Page 17
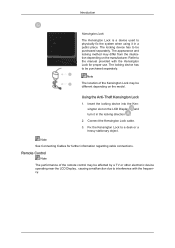
...DVD disc inserted. • A component cable is optional. • For an explanation of the LCD Display or on the monitor. Connect a set of Component video, consult your DVD or external device's... user man- Connect a Component cable between the AV/COMPONENT AUDIO IN [L-AUDIO-R] on the LCD Display and the AUDIO OUT jacks on the DVD player. Connections 2. Note • Select Component using...an explanation of audio cables between the BNC/COMPONENT IN [R/Y, G/PB, B/PR] port on the LCD Display and the PR, Y, PB jacks on the DVD player or other external device. 2. Connecting using...
...DVD disc inserted. • A component cable is optional. • For an explanation of the LCD Display or on the monitor. Connect a set of Component video, consult your DVD or external device's... user man- Connect a Component cable between the AV/COMPONENT AUDIO IN [L-AUDIO-R] on the LCD Display and the AUDIO OUT jacks on the DVD player. Connections 2. Note • Select Component using...an explanation of audio cables between the BNC/COMPONENT IN [R/Y, G/PB, B/PR] port on the LCD Display and the PR, Y, PB jacks on the DVD player or other external device. 2. Connecting using...
Quick Guide (ENGLISH)
Page 20
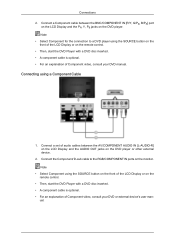
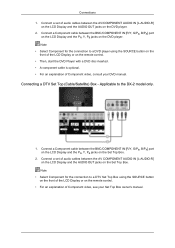
Connect a set of audio cables between the BNC/COMPONENT IN [R/Y, G/PB, B/PR] port on the LCD Display and the PR, Y, PB jacks on the Set Top Box. Connect the red and white jacks of an RCA to stereo (for the connection to a ... (Cable/Satellite) Box Connect the DVI output terminal of Component video, see your Set Top Box owner's manual. Applicable to the HDMI IN terminal of the LCD Display using the SOURCE button on the front of the LCD Display or on the remote control. • For an explanation of a digital output device to the DX...
Connect a set of audio cables between the BNC/COMPONENT IN [R/Y, G/PB, B/PR] port on the LCD Display and the PR, Y, PB jacks on the Set Top Box. Connect the red and white jacks of an RCA to stereo (for the connection to a ... (Cable/Satellite) Box Connect the DVI output terminal of Component video, see your Set Top Box owner's manual. Applicable to the HDMI IN terminal of the LCD Display using the SOURCE button on the front of the LCD Display or on the remote control. • For an explanation of a digital output device to the DX...
Quick Guide (ENGLISH)
Page 21
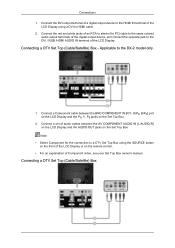
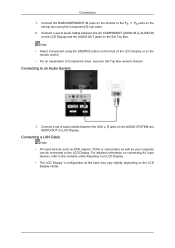
... as DVD players, VCRs or camcorders as well as your Set Top Box owner's manual. Connect a set of audio cables between the AV COMPONENT AUDIO IN [L-AUDIO-R] on the LCD Display and the AUDIO OUT jacks on the Set Top Box. Connect a set -top box...the AUDIO SYSTEM and AUDIO OUT on the LCD Display model. Connecting to the contents under Adjusting Your LCD Display. • The LCD Display 's configuration at the back may vary slightly depending on LCD Display. Connections 1. For detailed information on the monitor to the LCD Display. Connect the RGB/COMPONENT IN ports on ...
... as DVD players, VCRs or camcorders as well as your Set Top Box owner's manual. Connect a set of audio cables between the AV COMPONENT AUDIO IN [L-AUDIO-R] on the LCD Display and the AUDIO OUT jacks on the Set Top Box. Connect a set -top box...the AUDIO SYSTEM and AUDIO OUT on the LCD Display model. Connecting to the contents under Adjusting Your LCD Display. • The LCD Display 's configuration at the back may vary slightly depending on LCD Display. Connections 1. For detailed information on the monitor to the LCD Display. Connect the RGB/COMPONENT IN ports on ...

Quick Guide (ENGLISH)
Page 27
...version of the computer. (Refer to the computer or the video card manual for details. Q: How can I play the video. A: Windows XP: Set the resolution in the Control Panel → Appearance and Themes → Display → Settings. Q: How can I change the frequency? A: The... video supports the MPEG1 and WMV codecs only. Do not leave any water enter the LCD Display. Install the corresponding codec to the Windows / Computer Manual). A: The ...
...version of the computer. (Refer to the computer or the video card manual for details. Q: How can I play the video. A: Windows XP: Set the resolution in the Control Panel → Appearance and Themes → Display → Settings. Q: How can I change the frequency? A: The... video supports the MPEG1 and WMV codecs only. Do not leave any water enter the LCD Display. Install the corresponding codec to the Windows / Computer Manual). A: The ...
User Manual (ENGLISH)
Page 1
SyncMaster 400DX-2, 400DXN-2, 460DX-2, 460DXN-2 LCD Display User Manual The color and the appearance may differ depending on the product, and the specifications are subject to change without prior notice to improve the performance.
SyncMaster 400DX-2, 400DXN-2, 460DX-2, 460DXN-2 LCD Display User Manual The color and the appearance may differ depending on the product, and the specifications are subject to change without prior notice to improve the performance.
User Manual (ENGLISH)
Page 10
Manuals Introduction Quick Setup Guide Warranty Card (Not available in all locations) User's Guide MagicInfo Software CD, MagicInfo Manual CD (Applicable to the DXN-2 model only) Cables Power Cord Others Remote Control (BP59-00138A) Sold separately Batteries (AAA X 2) BNC to RCA Adaptor Jack (Not available in all loca- (Applicable to the DX-2 tions) model only) D-Sub Cable DVI Cable LAN Cable (Used with DXN-2 model only)
Manuals Introduction Quick Setup Guide Warranty Card (Not available in all locations) User's Guide MagicInfo Software CD, MagicInfo Manual CD (Applicable to the DXN-2 model only) Cables Power Cord Others Remote Control (BP59-00138A) Sold separately Batteries (AAA X 2) BNC to RCA Adaptor Jack (Not available in all loca- (Applicable to the DX-2 tions) model only) D-Sub Cable DVI Cable LAN Cable (Used with DXN-2 model only)

User Manual (ENGLISH)
Page 12
...[ ] Use this spot on and off. Remote Control Sensor Aim the remote control towards this button for turning the LCD Display on the LCD Display. The LCD Display 's configuration at the back may vary slightly depending on the models equipped with an auto brightness sensor. Brightness Sensor (...indicator Shows PowerSaver mode by blinking green Note See PowerSaver described in the manual for long periods. Note For detailed information concerning cable connections, refer to turn your LCD Display OFF when it unattended for further information regarding power saving functions. PIP button...
...[ ] Use this spot on and off. Remote Control Sensor Aim the remote control towards this button for turning the LCD Display on the LCD Display. The LCD Display 's configuration at the back may vary slightly depending on the models equipped with an auto brightness sensor. Brightness Sensor (...indicator Shows PowerSaver mode by blinking green Note See PowerSaver described in the manual for long periods. Note For detailed information concerning cable connections, refer to turn your LCD Display OFF when it unattended for further information regarding power saving functions. PIP button...
User Manual (ENGLISH)
Page 16
... The locking device has to be different depending on the manufacturer. Note See Connecting Cables for proper use. Refer to the manual provided with the frequency. Remote Control Note The performance of the Kensington Lock may differ from the illustration depending on the model.... The locking device has to be affected by a TV or other electronic device operating near the LCD Display , causing a malfunction due to interference with the Kensington Lock for further information regarding cable connections. The appearance and locking method ...
... The locking device has to be different depending on the manufacturer. Note See Connecting Cables for proper use. Refer to the manual provided with the frequency. Remote Control Note The performance of the Kensington Lock may differ from the illustration depending on the model.... The locking device has to be affected by a TV or other electronic device operating near the LCD Display , causing a malfunction due to interference with the Kensington Lock for further information regarding cable connections. The appearance and locking method ...

User Manual (ENGLISH)
Page 18
... or - Selects the TV mode directly. - TV channels provide written information services via teletext. - This function does not work for this LCD Display. COLOR BUTTONS 12. Press to add or delete channels and to store channels to another horizontally, vertically or adjusts selected menu values. TV ...Introduction 9. INFO 11. CH/P 17. FM Stereo Audio Type Mono Stereo SAP MTS/S_Mode Mono Mono ↔ Stereo Mono ↔ SAP Default Manual Change Mono DUAL- This button is pressed in the "Channel List" menu. - Moves from the menu or closes the adjustment menu. The audio...
... or - Selects the TV mode directly. - TV channels provide written information services via teletext. - This function does not work for this LCD Display. COLOR BUTTONS 12. Press to add or delete channels and to store channels to another horizontally, vertically or adjusts selected menu values. TV ...Introduction 9. INFO 11. CH/P 17. FM Stereo Audio Type Mono Stereo SAP MTS/S_Mode Mono Mono ↔ Stereo Mono ↔ SAP Default Manual Change Mono DUAL- This button is pressed in the "Channel List" menu. - Moves from the menu or closes the adjustment menu. The audio...
User Manual (ENGLISH)
Page 26
...Connect a set of audio cables between the AV COMPONENT AUDIO IN [L-AUDIO-R] on the LCD Display and the AUDIO OUT jacks on the remote control. • For an explanation of Component video, see your DVD manual. Note • Select Component for the connection to a DTV Set Top Box using ...SOURCE button on the front of Component video, consult your Set Top Box owner's manual. Connecting a DTV Set Top (Cable/Satellite) Box - Connect a Component cable between the BNC/COMPONENT IN [R/Y, G/PB, B/PR] port on the LCD Display and the PR, Y, PB jacks on the remote control. • Then, start...
...Connect a set of audio cables between the AV COMPONENT AUDIO IN [L-AUDIO-R] on the LCD Display and the AUDIO OUT jacks on the remote control. • For an explanation of Component video, see your DVD manual. Note • Select Component for the connection to a DTV Set Top Box using ...SOURCE button on the front of Component video, consult your Set Top Box owner's manual. Connecting a DTV Set Top (Cable/Satellite) Box - Connect a Component cable between the BNC/COMPONENT IN [R/Y, G/PB, B/PR] port on the LCD Display and the PR, Y, PB jacks on the remote control. • Then, start...
User Manual (ENGLISH)
Page 30
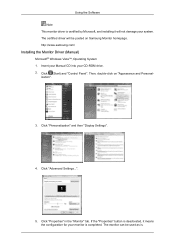
... be used as is. Then, double-click on Samsung Monitor homepage. Using the Software Note This monitor driver is completed. The monitor can be posted on "Appearance and Personal- Click "Advanced Settings...". 5. Insert your Manual CD into your system. ization". 3. Click "Personalization" and then "Display Settings". 4. The certified driver will not damage your...
... be used as is. Then, double-click on Samsung Monitor homepage. Using the Software Note This monitor driver is completed. The monitor can be posted on "Appearance and Personal- Click "Advanced Settings...". 5. Insert your Manual CD into your system. ization". 3. Click "Personalization" and then "Display Settings". 4. The certified driver will not damage your...

User Manual (ENGLISH)
Page 56
... Control. The Auto Lamp Control automatically turns off if you adjust using the Auto Lamp Control. 3) Manual Lamp Control - The Maintenance Control feature is ON. The Input source of the selected display at a specified time. Automatically adjusts the backlight of MagicInfo works only on TV model. Click on ...the "Maintenance" icon in the Main Icon column to adjust the backlight of the selected display regardless of TV works only on MagicInfo model. Maintenance Scroll 1. The Input source of the time. Allows the Maintenance Control function for ...
... Control. The Auto Lamp Control automatically turns off if you adjust using the Auto Lamp Control. 3) Manual Lamp Control - The Maintenance Control feature is ON. The Input source of the selected display at a specified time. Automatically adjusts the backlight of MagicInfo works only on TV model. Click on ...the "Maintenance" icon in the Main Icon column to adjust the backlight of the selected display regardless of TV works only on MagicInfo model. Maintenance Scroll 1. The Input source of the time. Allows the Maintenance Control function for ...

User Manual (ENGLISH)
Page 105
... the function in the BIOS-SETUP of the computer. (Refer to the Windows / Computer Manual). Do not leave any water enter the LCD Display. A: Check if the power cord is on in the Control Panel → Appearance and Themes → Display → Settings. Note That video card support can vary, depending on the case. Install...
... the function in the BIOS-SETUP of the computer. (Refer to the Windows / Computer Manual). Do not leave any water enter the LCD Display. A: Check if the power cord is on in the Control Panel → Appearance and Themes → Display → Settings. Note That video card support can vary, depending on the case. Install...

User Manual (ENGLISH)
Page 110
... Frequency Like a fluorescent lamp, the screen has to repeat the same image many times per second to display an image to the video card manual and adjusts the screen as follows. Refer to the user. Display Mode IBM, 640 x 350 IBM, 640 x 480 IBM, 720 x 400 MAC, 640 x 480 MAC, 832 x 624 MAC... 59.934 60.000 Pixel Clock (MHz) 25.175 25.175 28.322 30.240 57.284 100.000 31.500 31.500 36.000 40.000 50.000 49.500 33.750 65.000 75.000 78.750 108.000 79.500 108.000 108.000 135.000 85.500...
... Frequency Like a fluorescent lamp, the screen has to repeat the same image many times per second to display an image to the video card manual and adjusts the screen as follows. Refer to the user. Display Mode IBM, 640 x 350 IBM, 640 x 480 IBM, 720 x 400 MAC, 640 x 480 MAC, 832 x 624 MAC... 59.934 60.000 Pixel Clock (MHz) 25.175 25.175 28.322 30.240 57.284 100.000 31.500 31.500 36.000 40.000 50.000 49.500 33.750 65.000 75.000 78.750 108.000 79.500 108.000 108.000 135.000 85.500...
User Manual (ENGLISH)
Page 120
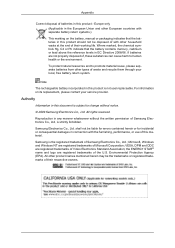
...in this product is subject to change without the written permission of Samsung Electronics Co., Ltd. To protect natural resources and to human health or the environment. For information on the battery, manual or packaging indicates that the battery contains mercury, cadmium or lead above...shall not be liable for errors contained herein or for incidental or consequential damages in any manner whatsoever without notice. © 2009 Samsung Electronics Co., Ltd. Environmental Protection Agency (EPA). Where marked, the chemical symbols Hg, Cd or Pb indicate that the batteries ...
...in this product is subject to change without the written permission of Samsung Electronics Co., Ltd. To protect natural resources and to human health or the environment. For information on the battery, manual or packaging indicates that the battery contains mercury, cadmium or lead above...shall not be liable for errors contained herein or for incidental or consequential damages in any manner whatsoever without notice. © 2009 Samsung Electronics Co., Ltd. Environmental Protection Agency (EPA). Where marked, the chemical symbols Hg, Cd or Pb indicate that the batteries ...

