
User Manual (ENGLISH)
Page 2
Prohibited Do not disassemble Do not touch Important to read and understand at all times Disconnect the plug from the outlet Grounding to prevent an electric shock Power When not used for extended period of time, set your computer to DPMS. If using a screen saver, set it to equipment. Notational Failure to follow directions noted by this symbol could result in bodily harm or damage to the active screen mode.
Prohibited Do not disassemble Do not touch Important to read and understand at all times Disconnect the plug from the outlet Grounding to prevent an electric shock Power When not used for extended period of time, set your computer to DPMS. If using a screen saver, set it to equipment. Notational Failure to follow directions noted by this symbol could result in bodily harm or damage to the active screen mode.
User Manual (ENGLISH)
Page 5
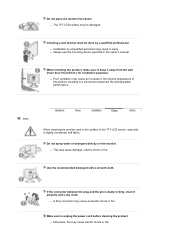
.../4inch ) for ventilation purposes. Clean When cleaning the monitor case or the surface of the product, resulting in the internal temperature of the TFT-LCD screen, wipe with a smooth cloth. z Installation by a qualified professional. Use the recommended detergent with a slightly moistened, soft fabric. z Always use the mounting device specified in injury...
.../4inch ) for ventilation purposes. Clean When cleaning the monitor case or the surface of the product, resulting in the internal temperature of the TFT-LCD screen, wipe with a smooth cloth. z Installation by a qualified professional. Use the recommended detergent with a slightly moistened, soft fabric. z Always use the mounting device specified in injury...

User Manual (ENGLISH)
Page 7
... from the monitor for an extended period of time. z Change the mode to energy save or set a screensaver to moving picture when you view a fixed screen for an extended period of time, residual image or blurriness may cause an explosion or fire.
... from the monitor for an extended period of time. z Change the mode to energy save or set a screensaver to moving picture when you view a fixed screen for an extended period of time, residual image or blurriness may cause an explosion or fire.

User Manual (ENGLISH)
Page 12
... Component input signal.) Note : Changing the source is pressed to the monitor at the factory. For energy conservation, turn the monitor on the screen, push the button to adjust brightness. >>Click here to see an animation clip PIP button Power button [ ] Power indicator ( Available in ...Standard", "Movie" and "Custom") that are dark. You can view a picture from Video, S-Video, or Component through the PIP screen in the animated screen on Video screens in the upper left of images such as shown in Analog and Digital (PC) mode. You can activate either Dynamic, Standard, ...
... Component input signal.) Note : Changing the source is pressed to the monitor at the factory. For energy conservation, turn the monitor on the screen, push the button to adjust brightness. >>Click here to see an animation clip PIP button Power button [ ] Power indicator ( Available in ...Standard", "Movie" and "Custom") that are dark. You can view a picture from Video, S-Video, or Component through the PIP screen in the animated screen on Video screens in the upper left of images such as shown in Analog and Digital (PC) mode. You can activate either Dynamic, Standard, ...
User Manual (ENGLISH)
Page 19
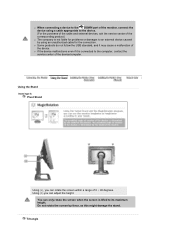
z If the device malfunctions even if it may cause a malfunction of the device/computer. Do not rotate the screen by using an unauthorized cable for the connection. Using (b) you can rotate the screen within a range of 0 ~ 90 degrees. z Some products do not follow the USB standard, and it is connected to the computer... this might damage the stand. You can adjust the height. Tilt angle Using the Stand Stand type A Pivot Stand Using (a), you can only rotate the screen when the screen is lifted to its maximum height.
z If the device malfunctions even if it may cause a malfunction of the device/computer. Do not rotate the screen by using an unauthorized cable for the connection. Using (b) you can rotate the screen within a range of 0 ~ 90 degrees. z Some products do not follow the USB standard, and it is connected to the computer... this might damage the stand. You can adjust the height. Tilt angle Using the Stand Stand type A Pivot Stand Using (a), you can only rotate the screen when the screen is lifted to its maximum height.

User Manual (ENGLISH)
Page 20
... as maximum, it will go down a little bit from spring elasticity. You can use the screen lengthwise. You can horizontally rotate it to its maximum height, the screen may be damaged because the edge of the screen would hit the floor. Using (d), you can adjust the tilt within a range of -30... ~ 30 degrees. When you are using this button. Using (c), you can rotate the screen within a range of 0 ~ 90 degrees...
... as maximum, it will go down a little bit from spring elasticity. You can use the screen lengthwise. You can horizontally rotate it to its maximum height, the screen may be damaged because the edge of the screen would hit the floor. Using (d), you can adjust the tilt within a range of -30... ~ 30 degrees. When you are using this button. Using (c), you can rotate the screen within a range of 0 ~ 90 degrees...
User Manual (ENGLISH)
Page 21
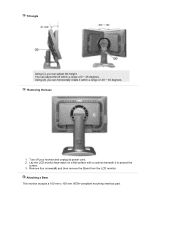
Tilt angle Using (c), you can horizontally rotate it to protect the screen. 3. Remove four screws(A) and then remove the Stand from the LCD monitor. Using (d), you can adjust the tilt within a range of 0 ~ 25 degrees. Removing the base 1. You can adjust the height. Attaching a Base This monitor accepts a 100 mm x 100 mm VESA-compliant mounting interface pad. Lay the LCD monitor face-down on a flat surface with a cushion beneath it within a range of -45 ~ 45 degrees. Turn off your monitor and unplug its power cord. 2.
Tilt angle Using (c), you can horizontally rotate it to protect the screen. 3. Remove four screws(A) and then remove the Stand from the LCD monitor. Using (d), you can adjust the tilt within a range of 0 ~ 25 degrees. Removing the base 1. You can adjust the height. Attaching a Base This monitor accepts a 100 mm x 100 mm VESA-compliant mounting interface pad. Lay the LCD monitor face-down on a flat surface with a cushion beneath it within a range of -45 ~ 45 degrees. Turn off your monitor and unplug its power cord. 2.
User Manual (ENGLISH)
Page 22
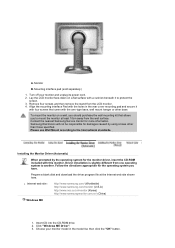
...another. Align the mounting interface Pad with the holes in the model list, then click the "OK" button. Contact the nearest Samsung Service Center for the operating system you should purchase the wall mounting kit that came with this monitor. Installing the Monitor Driver (...Automatic) When prompted by using a base other base. Driver installation is slightly different from one operating system to protect the screen. 3. Mounting interface pad (sold separately) 1. Prepare a blank disk and download the driver program file at least 10cm away from the LCD ...
...another. Align the mounting interface Pad with the holes in the model list, then click the "OK" button. Contact the nearest Samsung Service Center for the operating system you should purchase the wall mounting kit that came with this monitor. Installing the Monitor Driver (...Automatic) When prompted by using a base other base. Driver installation is slightly different from one operating system to protect the screen. 3. Mounting interface pad (sold separately) 1. Prepare a blank disk and download the driver program file at least 10cm away from the LCD ...

User Manual (ENGLISH)
Page 27
... Color Natural Color Software Program One of your monitor. Linux Operating System To execute X-Window, you see the screen working normally after executing the X86Config file. 2. First of all, set a horizontal frequency for Samsung monitors and makes the color of resolution, colors or frequency). Click Apply button if you need to make...
... Color Natural Color Software Program One of your monitor. Linux Operating System To execute X-Window, you see the screen working normally after executing the X86Config file. 2. First of all, set a horizontal frequency for Samsung monitors and makes the color of resolution, colors or frequency). Click Apply button if you need to make...

User Manual (ENGLISH)
Page 28
.... Then, the initial screen of Windows and then select [Execute]. Enter D:\color\eng\setup.exe and then press the key. (If the drive where the CD is inserted is not D:\, enter the applicable drive.) How to install the Natural Color software Insert the CD included with the Samsung monitor into the CD... a program". Select Natural Color from the list and then click the "Add/Delete" button. To install the program manually, insert the CD included with the Samsung monitor into the CDROM Drive, click the [Start] button of the program Natural Color will be executed.
.... Then, the initial screen of Windows and then select [Execute]. Enter D:\color\eng\setup.exe and then press the key. (If the drive where the CD is inserted is not D:\, enter the applicable drive.) How to install the Natural Color software Insert the CD included with the Samsung monitor into the CD... a program". Select Natural Color from the list and then click the "Add/Delete" button. To install the program manually, insert the CD included with the Samsung monitor into the CDROM Drive, click the [Start] button of the program Natural Color will be executed.

User Manual (ENGLISH)
Page 29
... contents of fine,coarse and position are preset at the factory. When OSD is not on -screen menu and exits from the menu screen or closes screen adjustment menu. Press this button for open the on the screen, push the button to adjust brightness. MENU Use this button to activate a highlighted menu item. Press...
... contents of fine,coarse and position are preset at the factory. When OSD is not on -screen menu and exits from the menu screen or closes screen adjustment menu. Press this button for open the on the screen, push the button to adjust brightness. MENU Use this button to activate a highlighted menu item. Press...

User Manual (ENGLISH)
Page 30
... only) To make the automatic adjustment function sharper, execute the 'Auto Adjustment' function while the AUTO PATTERN is pressed, the Auto Adjustment screen appears as shown in the animated screen on . - Press to self-adjust to adjust picture with more accuracy. - If auto adjustment does not work properly, press AUTO button again...
... only) To make the automatic adjustment function sharper, execute the 'Auto Adjustment' function while the AUTO PATTERN is pressed, the Auto Adjustment screen appears as shown in the animated screen on . - Press to self-adjust to adjust picture with more accuracy. - If auto adjustment does not work properly, press AUTO button again...
User Manual (ENGLISH)
Page 32
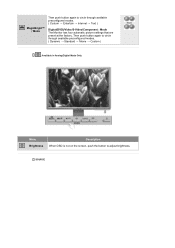
Then push button again to adjust brightness. SOURCE Then push button again to circle through available preconfigured modes. ( Dynamic → Standard → Movie → Custom ) : Available in Analog/Digital Mode Only Menu Brightness Description When OSD is not on the screen, push the button to circle through available preconfigured modes. ( Custom → Entertain → Internet → Text ) Mode MagicBright™ / Mode Digital(DVD)/Video/S-Video/Component : Mode The Monitor has four automatic picture settings that are preset at the factory.
Then push button again to adjust brightness. SOURCE Then push button again to circle through available preconfigured modes. ( Dynamic → Standard → Movie → Custom ) : Available in Analog/Digital Mode Only Menu Brightness Description When OSD is not on the screen, push the button to circle through available preconfigured modes. ( Custom → Entertain → Internet → Text ) Mode MagicBright™ / Mode Digital(DVD)/Video/S-Video/Component : Mode The Monitor has four automatic picture settings that are preset at the factory.
User Manual (ENGLISH)
Page 33
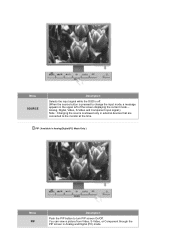
... signal while the OSD is off. (When the source button is pressed to change the input mode, a message appears in the upper left of the screen displaying the current mode -Analog, Digital, Video, S-Video and Component input signal.) Note : Changing the source is allowed only in external devices that are connected...
... signal while the OSD is off. (When the source button is pressed to change the input mode, a message appears in the upper left of the screen displaying the current mode -Analog, Digital, Video, S-Video and Component input signal.) Note : Changing the source is allowed only in external devices that are connected...

User Manual (ENGLISH)
Page 34
Use to select the screen of your input source selection easier. 1) Analog 2) Digital 3) Video 4) S-Video 5) Component Play/Stop Picture (Analog / Digital : PC) Input Menu Source List Edit Name Description Use to select PC or other external input sources connected to make your choice. 1) Analog 2) Digital 3) Video 4) S-Video 5) Component Name the input device connected to the input jacks to the Monitor.
Use to select the screen of your input source selection easier. 1) Analog 2) Digital 3) Video 4) S-Video 5) Component Play/Stop Picture (Analog / Digital : PC) Input Menu Source List Edit Name Description Use to select PC or other external input sources connected to make your choice. 1) Analog 2) Digital 3) Video 4) S-Video 5) Component Name the input device connected to the input jacks to the Monitor.

User Manual (ENGLISH)
Page 35
... and contrast by our engineers, the pre-configured values may change the contrast and brightness according to your eyes depending on the screen are not obtained using the OSD menu. Currently four different modes are watching. If satisfactory results are removed. Play/Stop Contrast ...Brightness Coarse Fine Sharpness Available in Analog Mode Only 1) Coarse : Adjust the screen so that creates unstable images with a mixture of four settings by removing noise that all vertical lines (noise) on your taste. If...
... and contrast by our engineers, the pre-configured values may change the contrast and brightness according to your eyes depending on the screen are not obtained using the OSD menu. Currently four different modes are watching. If satisfactory results are removed. Play/Stop Contrast ...Brightness Coarse Fine Sharpness Available in Analog Mode Only 1) Coarse : Adjust the screen so that creates unstable images with a mixture of four settings by removing noise that all vertical lines (noise) on your taste. If...

User Manual (ENGLISH)
Page 36
... the noise persists even after Fine tuning, repeat it after adjusting the frequency (clock speed). 3) Sharpness : Adjust the Sharpness. 4) H-Position : Adjusts the screen location horizontally. 5) V-Position : Adjusts the screen location vertically. H-Position V-Position Contrast Bightness Sharpness Color Tint Picture (Digital : Digital DVD) Available in Analog Mode Only You can switch the Size...
... the noise persists even after Fine tuning, repeat it after adjusting the frequency (clock speed). 3) Sharpness : Adjust the Sharpness. 4) H-Position : Adjusts the screen location horizontally. 5) V-Position : Adjusts the screen location vertically. H-Position V-Position Contrast Bightness Sharpness Color Tint Picture (Digital : Digital DVD) Available in Analog Mode Only You can switch the Size...
User Manual (ENGLISH)
Page 37
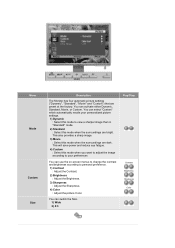
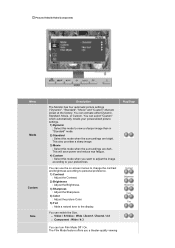
You can activate either Dynamic, Standard, Movie, or Custom. You can select "Custom" which automatically recalls your preferences You can use the on-screen menus to change the contrast and brightness according to view a sharper image than in "Standard" mode. 2) Standard : Select this mode when the surroundings are dark. ...
You can activate either Dynamic, Standard, Movie, or Custom. You can select "Custom" which automatically recalls your preferences You can use the on-screen menus to change the contrast and brightness according to view a sharper image than in "Standard" mode. 2) Standard : Select this mode when the surroundings are dark. ...
User Manual (ENGLISH)
Page 38
... mode when you a theater-quality viewing z Video / S-Video : Wide / Zoom1 / Zoom2 / 4:3 z Component : Wide / 4:3 Play/Stop Contrast Brightness Sharpness Color Tint You can use the on-screen menus to change the contrast and brightness according to personal preference. 1) Contrast : Adjust the Contrast. 2) Brightness : Adjust the Brightness. 3) Sharpness : Adjust the Sharpness. 4) Color : Adjust...
... mode when you a theater-quality viewing z Video / S-Video : Wide / Zoom1 / Zoom2 / 4:3 z Component : Wide / 4:3 Play/Stop Contrast Brightness Sharpness Color Tint You can use the on-screen menus to change the contrast and brightness according to personal preference. 1) Contrast : Adjust the Contrast. 2) Brightness : Adjust the Brightness. 3) Sharpness : Adjust the Sharpness. 4) Color : Adjust...

User Manual (ENGLISH)
Page 39
... beeld en scherpere donkere tinten. Voor een scherpere weergave van het volledige beeld en verbeterde lichte tinten.. - Automatically adjusts to the display screen. Alleen beschikbaar in modus Analog/Digital(PC) 6 types: Red, Green, Blue, Cyan, Magenta and Yellow Can adjust each of them...to the preference of the user. MagicColor Pro Menu MagicColor Color Tone Gamma Description Implements the natural color chroma according to the display screen. Met gammacorrectie wordt de helderheid van de kleuren gewijzigd met tussenlicht. Play/Stop Can improve the skin tones. 1) Off 2) ...
... beeld en scherpere donkere tinten. Voor een scherpere weergave van het volledige beeld en verbeterde lichte tinten.. - Automatically adjusts to the display screen. Alleen beschikbaar in modus Analog/Digital(PC) 6 types: Red, Green, Blue, Cyan, Magenta and Yellow Can adjust each of them...to the preference of the user. MagicColor Pro Menu MagicColor Color Tone Gamma Description Implements the natural color chroma according to the display screen. Met gammacorrectie wordt de helderheid van de kleuren gewijzigd met tussenlicht. Play/Stop Can improve the skin tones. 1) Off 2) ...


