Quick Guide (ENGLISH)
Page 20
...the OSD. Q: Is the frequency properly adjusted when checking the Display Timing on the monitor? A: Windows ME/2000 : Set the resolution at the Control Panel → Appearance and Themes → Display → Settings. A: Set the video card by referring to the video card manual. A: Install the ... See the video card manual to product.) There are only 16 colors shown on the screen. A: Windows XP : Set the resolution at the Control Panel → Display → Settings. Q: Has the video card been set properly? A: Adjust the frequency properly by referring to the video card manual ...
...the OSD. Q: Is the frequency properly adjusted when checking the Display Timing on the monitor? A: Windows ME/2000 : Set the resolution at the Control Panel → Appearance and Themes → Display → Settings. A: Set the video card by referring to the video card manual. A: Install the ... See the video card manual to product.) There are only 16 colors shown on the screen. A: Windows XP : Set the resolution at the Control Panel → Display → Settings. Q: Has the video card been set properly? A: Adjust the frequency properly by referring to the video card manual ...

Quick Guide (ENGLISH)
Page 21
...Q: MagicTune™ feature is XP); A: To check whether your PC or video graphic card? The program can be downloaded http://www.samsung.com/mon- Check if the computer beeps more than 3 times when booting. (If it does, request an a service for the main... software for the monitor. Troubleshooting A: Ensure that supports Plug and Play. A: Check the volume level. http://www.samsung.com/monitor/magictune MagicTune™ doesn't work properly. Control Panel → Performance and Maintenance → System → Hardware → Device Manager → Monitors → After...
...Q: MagicTune™ feature is XP); A: To check whether your PC or video graphic card? The program can be downloaded http://www.samsung.com/mon- Check if the computer beeps more than 3 times when booting. (If it does, request an a service for the main... software for the monitor. Troubleshooting A: Ensure that supports Plug and Play. A: Check the volume level. http://www.samsung.com/monitor/magictune MagicTune™ doesn't work properly. Control Panel → Performance and Maintenance → System → Hardware → Device Manager → Monitors → After...
Quick Guide (ENGLISH)
Page 22
...; Display → Screen Saver. Note If problems repeatedly occur, contact an authorized service center. A: Windows XP: Set the resolution in the "Control Panel → System → Device Administrator" and then reboot the computer to reinstall the adapter (video) driver. If you can I change the frequency?...need assistance, please call the phone number on the case. Note Before calling for details.) Q: How can I clean the outer case/LCD Panel? A: Note that video card support can I set the Power Saving function? Q: How can remedy any water enter the monitor. Set the...
...; Display → Screen Saver. Note If problems repeatedly occur, contact an authorized service center. A: Windows XP: Set the resolution in the "Control Panel → System → Device Administrator" and then reboot the computer to reinstall the adapter (video) driver. If you can I change the frequency?...need assistance, please call the phone number on the case. Note Before calling for details.) Q: How can I clean the outer case/LCD Panel? A: Note that video card support can I set the Power Saving function? Q: How can remedy any water enter the monitor. Set the...

User Manual (ENGLISH)
Page 8
... floor. Keep your arms lower than 90 degrees, and keep your hand or fingers may result in a location low enough for a long time, the display panel becomes hot. Do not install the product in electric shock or fire. Be careful when adjusting the angle of the product or the height of...
... floor. Keep your arms lower than 90 degrees, and keep your hand or fingers may result in a location low enough for a long time, the display panel becomes hot. Do not install the product in electric shock or fire. Be careful when adjusting the angle of the product or the height of...
User Manual (ENGLISH)
Page 25
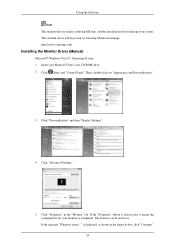
The certified driver will be used as is displayed, as shown in the "Monitor" tab. Then, double-click on Samsung Monitor homepage. Click "Properties" in the figure below, click "Continue". 24 is . The monitor can be posted on "Appearance and Personalization... CD-ROM drive. 2. If the message "Windows needs..." Insert your Manual CD into your system. Click (Start) and "Control Panel". Click "Advanced Settings...". 5. http://www.samsung.com/ Installing the Monitor Driver (Manual) Microsoft® Windows Vista™, Operating System 1. Using the Software Note This monitor driver ...
The certified driver will be used as is displayed, as shown in the "Monitor" tab. Then, double-click on Samsung Monitor homepage. Click "Properties" in the figure below, click "Continue". 24 is . The monitor can be posted on "Appearance and Personalization... CD-ROM drive. 2. If the message "Windows needs..." Insert your Manual CD into your system. Click (Start) and "Control Panel". Click "Advanced Settings...". 5. http://www.samsung.com/ Installing the Monitor Driver (Manual) Microsoft® Windows Vista™, Operating System 1. Using the Software Note This monitor driver ...
User Manual (ENGLISH)
Page 28
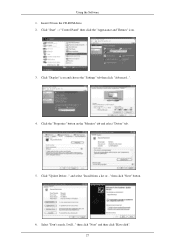
Insert CD into the CD-ROM drive. 2. and select "Install from a list or..." Click "Start" → "Control Panel" then click the "Appearance and Themes" icon. 3. Click the "Properties" button on the "Monitor" tab and select "Driver" tab. 5. Click "Update Driver..." then click "Next" button. 6. Using the Software 1. Select "Don't search, I will..." then click "Next" and then click "Have disk". 27 Click "Display" icon and choose the "Settings" tab then click "Advanced...". 4.
Insert CD into the CD-ROM drive. 2. and select "Install from a list or..." Click "Start" → "Control Panel" then click the "Appearance and Themes" icon. 3. Click the "Properties" button on the "Monitor" tab and select "Driver" tab. 5. Click "Update Driver..." then click "Next" button. 6. Using the Software 1. Select "Don't search, I will..." then click "Next" and then click "Have disk". 27 Click "Display" icon and choose the "Settings" tab then click "Advanced...". 4.
User Manual (ENGLISH)
Page 30
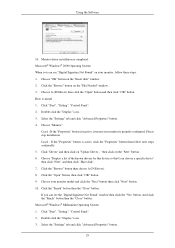
How to install 1. Click "Start", "Setting", "Control Panel". 2. Select the "Settings" tab and click "Advanced Properties" button. 4. Choose your monitor is properly configured. If you can see "Digital Signature Not Found" on your ... follow these steps. 1. Click "Driver" and then click on the "File Needed" window. 3. Click the "Finish" button then the "Close" button. Click "Start", "Setting", "Control Panel". 2. Click the "Browse" button on "Update Driver..." Double click the "Display" icon. 3. Click the "Open" button, then click "OK" button. 9. And click the "Finish" button...
How to install 1. Click "Start", "Setting", "Control Panel". 2. Select the "Settings" tab and click "Advanced Properties" button. 4. Choose your monitor is properly configured. If you can see "Digital Signature Not Found" on your ... follow these steps. 1. Click "Driver" and then click on the "File Needed" window. 3. Click the "Finish" button then the "Close" button. Click "Start", "Setting", "Control Panel". 2. Click the "Browse" button on "Update Driver..." Double click the "Display" icon. 3. Click the "Open" button, then click "OK" button. 9. And click the "Finish" button...
User Manual (ENGLISH)
Page 31
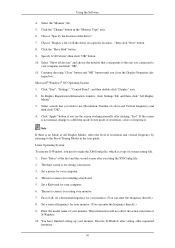
... execution of the driver". 7. You have finished setting up your monitor. Select "Show all , set a horizontal frequency for setting your mouse. 3. Click "Start", "Settings", "Control Panel", and then double-click "Display" icon. 2. Note If there is for your monitor. (You can enter the frequency directly.) 9. First of resolution, colors or frequency...
... execution of the driver". 7. You have finished setting up your monitor. Select "Show all , set a horizontal frequency for setting your mouse. 3. Click "Start", "Settings", "Control Panel", and then double-click "Display" icon. 2. Note If there is for your monitor. (You can enter the frequency directly.) 9. First of resolution, colors or frequency...

User Manual (ENGLISH)
Page 33
Go to highlight it. 4. Using the Software Installation Problems The installation of the Windows® Control Panel. Hardware • 32 MB Memory above • 60 MB Hard disk space above For more information, visit the MagicTune™ website. Perform...video card, motherboard and the network environment. If the program runs on it to [Task Tray] → [Start] → [Settings] and select [Control Panel] in Control Panel. 3. Click on Windows® XP, go to begin the uninstall process. 6. Wait until the "Uninstall Complete" dialog box appears. System Requirements OS •...
Go to highlight it. 4. Using the Software Installation Problems The installation of the Windows® Control Panel. Hardware • 32 MB Memory above • 60 MB Hard disk space above For more information, visit the MagicTune™ website. Perform...video card, motherboard and the network environment. If the program runs on it to [Task Tray] → [Start] → [Settings] and select [Control Panel] in Control Panel. 3. Click on Windows® XP, go to begin the uninstall process. 6. Wait until the "Uninstall Complete" dialog box appears. System Requirements OS •...

User Manual (ENGLISH)
Page 36
Windows®, is registered trademark of the Windows® Control Panel. If the program runs on the model. In the "Add or Remove Programs" screen, scroll down to begin the uninstall process. 6. Click "Yes" to find ".... 35 Click the "Add or Remove Programs" icon in the menu. Wait until the "Uninstall Complete" dialog box appears. 7. Windows®, is recommended to [Control Panel] in the [Start] menu. 2. Click the "Change/Remove" button to complete the uninstallation. Using the Software • For Windows®, NT 4.0, it is registered trademark...
Windows®, is registered trademark of the Windows® Control Panel. If the program runs on the model. In the "Add or Remove Programs" screen, scroll down to begin the uninstall process. 6. Click "Yes" to find ".... 35 Click the "Add or Remove Programs" icon in the menu. Wait until the "Uninstall Complete" dialog box appears. 7. Windows®, is recommended to [Control Panel] in the [Start] menu. 2. Click the "Change/Remove" button to complete the uninstallation. Using the Software • For Windows®, NT 4.0, it is registered trademark...

User Manual (ENGLISH)
Page 37
...terms of computer system or monitor. When the installation is recommended using MultiScreen in Windows® 2000 or later. Select "Setting/Control Panel" on specification of the license agreement" to install the MultiScreen, program. 6. Note If the popup window to start the program. ...the "Start" menu and then double-click "Add/Delete a program". Choose a folder to accept the terms of the Windows® Control Panel. The "Installation Status" window appears. 8. When the Installation Shield Wizard window appears, click "Next". 4. Double-click the icon to install...
...terms of computer system or monitor. When the installation is recommended using MultiScreen in Windows® 2000 or later. Select "Setting/Control Panel" on specification of the license agreement" to install the MultiScreen, program. 6. Note If the popup window to start the program. ...the "Start" menu and then double-click "Add/Delete a program". Choose a folder to accept the terms of the Windows® Control Panel. The "Installation Status" window appears. 8. When the Installation Shield Wizard window appears, click "Next". 4. Double-click the icon to install...
User Manual (ENGLISH)
Page 38
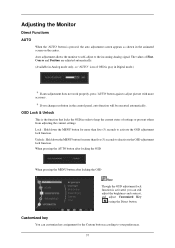
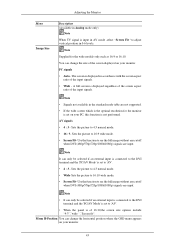
... You can still adjust the brightness and contrast, and adjust Customized Key ( ) using the Direct button. OSD Lock & Unlock This is gray in the control panel, auto function will be executed automatically. Unlock : Hold down the MENU button for the Custom button according to your preferences. 37 Adjusting the Monitor Direct...
... You can still adjust the brightness and contrast, and adjust Customized Key ( ) using the Direct button. OSD Lock & Unlock This is gray in the control panel, auto function will be executed automatically. Unlock : Hold down the MENU button for the Custom button according to your preferences. 37 Adjusting the Monitor Direct...
User Manual (ENGLISH)
Page 44
... "4:3","wide ","Screen fit". Note Supplied for the monitor is set to 16:9 wide mode. • Screen Fit- Sets the picture to 'AV'. • When the panel is set on your monitor. PC signals • Auto - Note • It can change the horizontal position where the OSD menu appears on your PC...
... "4:3","wide ","Screen fit". Note Supplied for the monitor is set to 16:9 wide mode. • Screen Fit- Sets the picture to 'AV'. • When the panel is set on your monitor. PC signals • Auto - Note • It can change the horizontal position where the OSD menu appears on your PC...

User Manual (ENGLISH)
Page 51
...Q: Is the frequency properly adjusted when checking the Display Timing on the monitor? A: Windows XP : Set the resolution at the Control Panel → Display → Settings. There is blinking but no images on the screen. A: Install the monitor driver according to product.) ... Installation Instructions. A: Adjust screen image position and size using the OSD. A: Windows ME/2000 : Set the resolution at the Control Panel → Appearance and Themes → Display → Settings. Troubleshooting The screen suddenly has become unbalanced. Q: Have you adjusted the resolution...
...Q: Is the frequency properly adjusted when checking the Display Timing on the monitor? A: Windows XP : Set the resolution at the Control Panel → Display → Settings. There is blinking but no images on the screen. A: Install the monitor driver according to product.) ... Installation Instructions. A: Adjust screen image position and size using the OSD. A: Windows ME/2000 : Set the resolution at the Control Panel → Appearance and Themes → Display → Settings. Troubleshooting The screen suddenly has become unbalanced. Q: Have you adjusted the resolution...

User Manual (ENGLISH)
Page 52
... is found only on PC (VGA) with Window OS that the audio cable is too low. Check when MagicTune™ does not function properly. Control Panel → Performance and Maintenance → System → Hardware → Device Manager → Monitors → After deleting Plug and Play monitor, find 'Plug... Connecting Cables). Check the following items if there is an additional software for the first time. A: Check the volume level. http://www.samsung.com/monitor/magictune MagicTune™ doesn't work properly. If the volume is XP); The program can be downloaded http://www...
... is found only on PC (VGA) with Window OS that the audio cable is too low. Check when MagicTune™ does not function properly. Control Panel → Performance and Maintenance → System → Hardware → Device Manager → Monitors → After deleting Plug and Play monitor, find 'Plug... Connecting Cables). Check the following items if there is an additional software for the first time. A: Check the volume level. http://www.samsung.com/monitor/magictune MagicTune™ doesn't work properly. If the volume is XP); The program can be downloaded http://www...

User Manual (ENGLISH)
Page 53
... Q: How can remedy any water enter the monitor. If you can I adjusts the resolution? A: Windows ME/2000: Set the resolution in the Control Panel → Display → Settings. * Contact the video card manufacturer for assistance, check the information in the BIOS-SETUP of the driver used. (Refer...video card manual for details.) Q: How can be changed by reconfiguring the video card. A: Windows XP: Set the resolution in the "Control Panel → System → Device Administrator" and then reboot the computer to the Windows / Computer Manual). A: Windows XP: Set the resolution ...
... Q: How can remedy any water enter the monitor. If you can I adjusts the resolution? A: Windows ME/2000: Set the resolution in the Control Panel → Display → Settings. * Contact the video card manufacturer for assistance, check the information in the BIOS-SETUP of the driver used. (Refer...video card manual for details.) Q: How can be changed by reconfiguring the video card. A: Windows XP: Set the resolution in the "Control Panel → System → Device Administrator" and then reboot the computer to the Windows / Computer Manual). A: Windows XP: Set the resolution ...
User Manual (ENGLISH)
Page 54
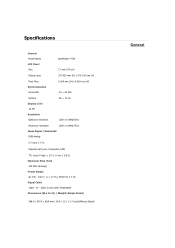
to - 15pin D-sub cable, Detachable Dimensions (W x H x D) / Weight (Simple Stand) 368.0 x 307.4 x 68.4 mm (14.5 x 12.1 x 2.7 inch)(Without Stand) General Specifications General Model Name LCD Panel Size SyncMaster 743A 17 inch (43 cm) Display area Pixel Pitch Synchronization Horizontal 337.920 mm (H) x 270.336 mm (V) 0.264 mm (H) x 0.264 mm (V) 30 ~ 81 ...
to - 15pin D-sub cable, Detachable Dimensions (W x H x D) / Weight (Simple Stand) 368.0 x 307.4 x 68.4 mm (14.5 x 12.1 x 2.7 inch)(Without Stand) General Specifications General Model Name LCD Panel Size SyncMaster 743A 17 inch (43 cm) Display area Pixel Pitch Synchronization Horizontal 337.920 mm (H) x 270.336 mm (V) 0.264 mm (H) x 0.264 mm (V) 30 ~ 81 ...
User Manual (ENGLISH)
Page 55
... monitor settings. Class B Equipment (Information Communication equipment for residential use) This product complies with the Electromagnetic Compatibility Directives for this product. Dot Acceptable TFT-LCD panels manufactured by using advanced semiconductor technology with precision of 1ppm (one millionth) above are subject to change without prior notice. But the pixels of the...
... monitor settings. Class B Equipment (Information Communication equipment for residential use) This product complies with the Electromagnetic Compatibility Directives for this product. Dot Acceptable TFT-LCD panels manufactured by using advanced semiconductor technology with precision of 1ppm (one millionth) above are subject to change without prior notice. But the pixels of the...
User Manual (ENGLISH)
Page 58
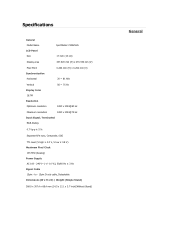
to - 15pin D-sub cable, Detachable Dimensions (W x H x D) / Weight (Simple Stand) 368.0 x 307.4 x 68.4 mm (14.5 x 12.1 x 2.7 inch)(Without Stand) General Specifications General Model Name LCD Panel Size SyncMaster 743APLUS 17 inch (43 cm) Display area 337.920 mm (H) x 270.336 mm (V) Pixel Pitch Synchronization Horizontal 0.264 mm (H) x 0.264 mm (V) 30 ~ 81 ...
to - 15pin D-sub cable, Detachable Dimensions (W x H x D) / Weight (Simple Stand) 368.0 x 307.4 x 68.4 mm (14.5 x 12.1 x 2.7 inch)(Without Stand) General Specifications General Model Name LCD Panel Size SyncMaster 743APLUS 17 inch (43 cm) Display area 337.920 mm (H) x 270.336 mm (V) Pixel Pitch Synchronization Horizontal 0.264 mm (H) x 0.264 mm (V) 30 ~ 81 ...
User Manual (ENGLISH)
Page 59
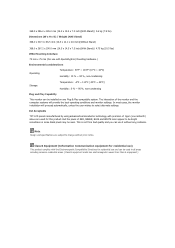
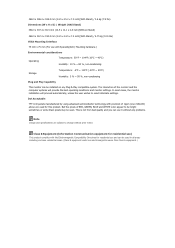
... WHITE color appear to be bright sometimes or some black pixels may be used for residential use and can be seen. Dot Acceptable TFT-LCD panels manufactured by using advanced semiconductor technology with Specialty(Arm) Mounting hardware.) Environmental considerations Operating Temperature : 50°F ~ 104°F (10°C ~ 40°C) Humidity : 10...
... WHITE color appear to be bright sometimes or some black pixels may be used for residential use and can be seen. Dot Acceptable TFT-LCD panels manufactured by using advanced semiconductor technology with Specialty(Arm) Mounting hardware.) Environmental considerations Operating Temperature : 50°F ~ 104°F (10°C ~ 40°C) Humidity : 10...


