Quick Guide (easy Manual) (ver.1.0) (Korean)
Page 8
...product or the person carrying it. When viewing a fixed screen for an extended period of the product or may cause the product to catch fire. Using the product in damage to your eyesight....Make sure that all cables, including the antenna cable and cables connected to a changing picture when away from the wall outlet and contact the Service Center. Change the mode to energy saving mode or set a screensaver to other devices, are disconnected before moving the monitor, turn the product off and unplug the power cord. Never insert anything metallic into the vent, headphone port or AV ports...
...product or the person carrying it. When viewing a fixed screen for an extended period of the product or may cause the product to catch fire. Using the product in damage to your eyesight....Make sure that all cables, including the antenna cable and cables connected to a changing picture when away from the wall outlet and contact the Service Center. Change the mode to energy saving mode or set a screensaver to other devices, are disconnected before moving the monitor, turn the product off and unplug the power cord. Never insert anything metallic into the vent, headphone port or AV ports...
Quick Guide (easy Manual) (ver.1.0) (Korean)
Page 16
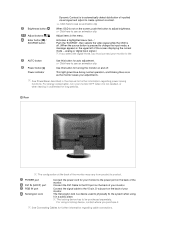
... button for auto adjustment. >> Click here to product. For using it . For energy conservation, turn your monitor OFF when it unattended for further information regarding power saving functions. Connect the DVI Cable to change the input mode, a message appears in a public place. Activates a highlighted menu item. / Push the 'SOURCE', then selects the video signal while the OSD is off . POWER port DVI IN (HDCP) port RGB IN port Kensington Lock Connect the power cord for further information regarding cable connections. Connect the signal cable...
... button for auto adjustment. >> Click here to product. For using it . For energy conservation, turn your monitor OFF when it unattended for further information regarding power saving functions. Connect the DVI Cable to change the input mode, a message appears in a public place. Activates a highlighted menu item. / Push the 'SOURCE', then selects the video signal while the OSD is off . POWER port DVI IN (HDCP) port RGB IN port Kensington Lock Connect the power cord for further information regarding cable connections. Connect the signal cable...
Quick Guide (easy Manual) (ver.1.0) (Korean)
Page 19
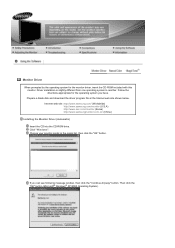
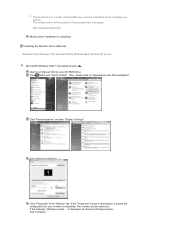
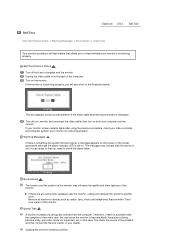
... the "OK" button (Microsoft® Windows® XP/2000 Operating System). Follow the directions appropriate for the monitor driver, insert the CD-ROM included with this monitor. Prepare a blank disk and download the driver program file at the Internet web site shown below. Choose your monitor model in the model list, then click the "OK" button. If you have. Driver installation is slightly...
... the "OK" button (Microsoft® Windows® XP/2000 Operating System). Follow the directions appropriate for the monitor driver, insert the CD-ROM included with this monitor. Prepare a blank disk and download the driver program file at the Internet web site shown below. Choose your monitor model in the model list, then click the "OK" button. If you have. Driver installation is slightly...
Quick Guide (easy Manual) (ver.1.0) (Korean)
Page 20
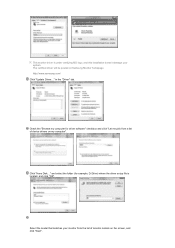
... be used as shown in the "Monitor" tab. This monitor driver is displayed, as is completed. If the message "Windows needs..." is under certifying MS logo, and this installation doesn't damage your system. Installing the Monitor Driver (Manual) Windows Vista | Windows XP | Windows 2000 | Windows ME | Windows NT | Linux Microsoft® Windows Vista™ Operating System Insert your Manual CD into your monitor is completed. Click (Start) and "Control Panel". If the "Properties" button...
... be used as shown in the "Monitor" tab. This monitor driver is displayed, as is completed. If the message "Windows needs..." is under certifying MS logo, and this installation doesn't damage your system. Installing the Monitor Driver (Manual) Windows Vista | Windows XP | Windows 2000 | Windows ME | Windows NT | Linux Microsoft® Windows Vista™ Operating System Insert your Manual CD into your monitor is completed. Click (Start) and "Control Panel". If the "Properties" button...
Quick Guide (easy Manual) (ver.1.0) (Korean)
Page 21
... "Have Disk..." in the "Driver" tab. Check the "Browse my computer for example, D:\Drive) where the driver setup file is under certifying MS logo, and this installation doesn't damage your monitor from a list of monitor models on Samsung Monitor homepage http://www.samsung.com/ Click "Update Driver..." The certified driver will be posted on the screen, and click "Next". This monitor driver is located, and click "OK...
... "Have Disk..." in the "Driver" tab. Check the "Browse my computer for example, D:\Drive) where the driver setup file is under certifying MS logo, and this installation doesn't damage your monitor from a list of monitor models on Samsung Monitor homepage http://www.samsung.com/ Click "Update Driver..." The certified driver will be posted on the screen, and click "Next". This monitor driver is located, and click "OK...
Quick Guide (easy Manual) (ver.1.0) (Korean)
Page 25
... need to use (Resolution, Number of all , set a horizontal frequency for your monitor. (You can enter the frequency directly.) "Enter" the model name of resolution and vertical frequency by referring to a different mode (lower mode of the known drivers for selecting a keyboard. If the screen is for setting your monitor. The third screen is active, click the "Properties" button then follow next steps continually. Choose "Display a list of resolution, colors, or frequency). Click the "Finish" button...
... need to use (Resolution, Number of all , set a horizontal frequency for your monitor. (You can enter the frequency directly.) "Enter" the model name of resolution and vertical frequency by referring to a different mode (lower mode of the known drivers for selecting a keyboard. If the screen is for setting your monitor. The third screen is active, click the "Properties" button then follow next steps continually. Choose "Display a list of resolution, colors, or frequency). Click the "Finish" button...
Quick Guide (easy Manual) (ver.1.0) (Korean)
Page 38
... the monitor status is displayed. Please change the frequency of the video card. (Refer to see the initial screen(the login screen), which can be seen. If you see "Not Optimum Mode", "Recommended Mode 1680 X 1050 60 Hz" on the screen? I cannot turn on the screen. Press SOURCE button to analog. Can you see "Check Signal Cable" on the screen? (Connected using the D-sub cable) Check the signal cable connection. (Connected using the DVI cable) If you can remedy any problems yourself. Check...
... the monitor status is displayed. Please change the frequency of the video card. (Refer to see the initial screen(the login screen), which can be seen. If you see "Not Optimum Mode", "Recommended Mode 1680 X 1050 60 Hz" on the screen? I cannot turn on the screen. Press SOURCE button to analog. Can you see "Check Signal Cable" on the screen? (Connected using the D-sub cable) Check the signal cable connection. (Connected using the DVI cable) If you can remedy any problems yourself. Check...
Quick Guide (easy Manual) (ver.1.0) (Korean)
Page 39
... you locked the On Screen Display (OSD) Menu to the cycle of the video card signals. Is the frequency properly adjusted when checking the Display Timing on the screen. The screen colors have changed the Adjust screen image position and size using the DVI cable? Windows ME/2000 : Set the resolution at the Control Panel Appearance and Themes Display Settings. There is out of focus or OSD cannot be unbalanced due to prevent changes? Connected using video card or the driver? Have you installed the reads "Unrecognized monitor driver? Check the signal cable connection...
... you locked the On Screen Display (OSD) Menu to the cycle of the video card signals. Is the frequency properly adjusted when checking the Display Timing on the screen. The screen colors have changed the Adjust screen image position and size using the DVI cable? Windows ME/2000 : Set the resolution at the Control Panel Appearance and Themes Display Settings. There is out of focus or OSD cannot be unbalanced due to prevent changes? Connected using video card or the driver? Have you installed the reads "Unrecognized monitor driver? Check the signal cable connection...
Quick Guide (easy Manual) (ver.1.0) (Korean)
Page 40
... driver used. (Refer to the Windows/Computer Manual Disconnect the power cord and then clean the monitor with the monitor. Check if the power cord and the video cables are properly connected to the Driver Installation Instructions. Q & A Question How can I change the frequency? Answer The frequency can I set to see if the Plug & Play (VESA DDC) function can vary, depending on the case. Windows ME/2000 : Set the resolution in the Control Panel Display Screen Saver. Set the function in the BIOS-SETUP...
... driver used. (Refer to the Windows/Computer Manual Disconnect the power cord and then clean the monitor with the monitor. Check if the power cord and the video cables are properly connected to the Driver Installation Instructions. Q & A Question How can I change the frequency? Answer The frequency can I set to see if the Plug & Play (VESA DDC) function can vary, depending on the case. Windows ME/2000 : Set the resolution in the Control Panel Display Screen Saver. Set the function in the BIOS-SETUP...
Quick Guide (easy Manual) (ver.1.0) (Korean)
Page 41
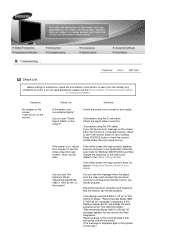
... monitor is a problem with the input signal, a message appears on the screen or the screen goes blank although the power indicator LED is functioning properly. If your monitor screen remains blank after using the previous procedure, check your monitor and reconnect the video cable; Warning Messages If there is something wrong with the computer or the video card, this case, first check the source of the problem, and then contact the Service...
... monitor is a problem with the input signal, a message appears on the screen or the screen goes blank although the power indicator LED is functioning properly. If your monitor screen remains blank after using the previous procedure, check your monitor and reconnect the video cable; Warning Messages If there is something wrong with the computer or the video card, this case, first check the source of the problem, and then contact the Service...

Quick Guide (easy Manual) (ver.1.0) (Korean)
Page 44
But the pixels of RED, GREEN, BLUE and WHITE color appear to be bright sometimes or some black pixels may be used in power management system called PowerSaver. State Power Indicator Power Consumption Normal Operation Blue Less than 55 W Power saving mode Blue, Blinking Less than 1 W (Off-mode) Power off (Power button) EPA/ENERGY 2000 Black Less than Class A equipment.) PowerSaver This monitor has a built-in all areas including common residential areas. (Class B equipment emits less...
But the pixels of RED, GREEN, BLUE and WHITE color appear to be bright sometimes or some black pixels may be used in power management system called PowerSaver. State Power Indicator Power Consumption Normal Operation Blue Less than 55 W Power saving mode Blue, Blinking Less than 1 W (Off-mode) Power off (Power button) EPA/ENERGY 2000 Black Less than Class A equipment.) PowerSaver This monitor has a built-in all areas including common residential areas. (Class B equipment emits less...

Quick Guide (easy Manual) (ver.1.0) (Korean)
Page 48
... the pixels of RED, GREEN, BLUE and WHITE color appear to be bright sometimes or some black pixels may be installed on any problelms. For example, the number of time. Use the software utility installed on the keyboard. The interaction of 1ppm (one millionth) above are subject to change without any Plug & Play compatible system. State Power Indicator Power Consumption Normal Operation Blue Less than 55 W Power saving mode Blue, Blinking Less than 1 W (Off-mode) Power off (Power button...
... the pixels of RED, GREEN, BLUE and WHITE color appear to be bright sometimes or some black pixels may be installed on any problelms. For example, the number of time. Use the software utility installed on the keyboard. The interaction of 1ppm (one millionth) above are subject to change without any Plug & Play compatible system. State Power Indicator Power Consumption Normal Operation Blue Less than 55 W Power saving mode Blue, Blinking Less than 1 W (Off-mode) Power off (Power button...
Quick Guide (easy Manual) (ver.1.0) (Korean)
Page 54
... automatic adjustment, use of black pixels could be seen. Samsung is strictly forbidden. Resolution : 1680 X 1050 Vertical frequency (refresh rate) : 60 Hz TFT LCD panel manufactured by using advanced semiconductor technology with precision of 1ppm (one millionth) above is used to compose the screen image is not provided in the screen if the best quality of RED, GREEN, BLUE and WHITE color seem to polish. Microsoft, Windows and Windows NT are registered trademarks of picture in TFT-LCD. the...
... automatic adjustment, use of black pixels could be seen. Samsung is strictly forbidden. Resolution : 1680 X 1050 Vertical frequency (refresh rate) : 60 Hz TFT LCD panel manufactured by using advanced semiconductor technology with precision of 1ppm (one millionth) above is used to compose the screen image is not provided in the screen if the best quality of RED, GREEN, BLUE and WHITE color seem to polish. Microsoft, Windows and Windows NT are registered trademarks of picture in TFT-LCD. the...

Service Manual
Page 3
... EDID Data Input ...3-1 3-4 Service Function Spec...3-2 3-5 Hidden Key list ...3-3 3-6 EDID Installation with Windows Program ...3-4 3-7 Execution Items after replacing the main board 3-4 4. Contents 1. Troubleshooting ...4-1 4-1 No Power ...4-1 4-2 No Video (PC Analog Signal) ...4-3 4-3 No Video (PC Digital Signal) ...4-5 5. Electrical Parts List ...6-1 7. Block Diagram ...7-1 Precautions ...1-1 1-1 Safety Precautions ...1-1 1-2 Servicing Precautions ...1-2 1-3 Electrostatically Sensitive Devices (ESD) Precautions 1-2 1-4 Installation Precautions ...1-3 2. Product specifications...
... EDID Data Input ...3-1 3-4 Service Function Spec...3-2 3-5 Hidden Key list ...3-3 3-6 EDID Installation with Windows Program ...3-4 3-7 Execution Items after replacing the main board 3-4 4. Contents 1. Troubleshooting ...4-1 4-1 No Power ...4-1 4-2 No Video (PC Analog Signal) ...4-3 4-3 No Video (PC Digital Signal) ...4-5 5. Electrical Parts List ...6-1 7. Block Diagram ...7-1 Precautions ...1-1 1-1 Safety Precautions ...1-1 1-2 Servicing Precautions ...1-2 1-3 Electrostatically Sensitive Devices (ESD) Precautions 1-2 1-4 Installation Precautions ...1-3 2. Product specifications...

Service Manual
Page 14
SMPS(Switching Mode Power Supply) Switching Mode Power supply. FRC(Frame Rate Controller) Technology that is a communication method between PC and Monitor. - DVI (Digital Visual Interface) This provides a high speed digital connection for one second. It can be used to LCD panel lamp. It can recognize the monitor information as Product data, Product name,Display mode,Serial number and Signal source,etc through DDC Line communicating with Video clock - DDC(Display data channel) It is display technology independent. so...
SMPS(Switching Mode Power Supply) Switching Mode Power supply. FRC(Frame Rate Controller) Technology that is a communication method between PC and Monitor. - DVI (Digital Visual Interface) This provides a high speed digital connection for one second. It can be used to LCD panel lamp. It can recognize the monitor information as Product data, Product name,Display mode,Serial number and Signal source,etc through DDC Line communicating with Video clock - DDC(Display data channel) It is display technology independent. so...

Service Manual
Page 28
2-6 Option Specification Item Item Name Quick Setup Guide 2 Product Specifications Code.No BH68-00376L Remark Warranty Card (Not available in all locations) BH68-00261F User's Guide, Monitor Driver, MagicTune™ software BN59-00521H D-Sub(15 Pin) Cable BN39-00244B Power Cord 3903-000085 DVI Cable BN39-00246F Sold separately 2-5
2-6 Option Specification Item Item Name Quick Setup Guide 2 Product Specifications Code.No BH68-00376L Remark Warranty Card (Not available in all locations) BH68-00261F User's Guide, Monitor Driver, MagicTune™ software BN59-00521H D-Sub(15 Pin) Cable BN39-00244B Power Cord 3903-000085 DVI Cable BN39-00246F Sold separately 2-5

Service Manual
Page 37
Power button Use this button for your monitor. 4. RGB IN port Connect the signal cable to the 15-pin, D-sub port on and off . (When the source button is a device used to be purchased separately. analog or digital input signal.) Note : If you select the digital mode, you purchase it in analog mode only) 6. POWER port Connect the power cord for turn the monitor on the back of the screen displaying the current mode -- Kensington Lock The Kensington lock is pressed to change the input mode, a message appears...
Power button Use this button for your monitor. 4. RGB IN port Connect the signal cable to the 15-pin, D-sub port on and off . (When the source button is a device used to be purchased separately. analog or digital input signal.) Note : If you select the digital mode, you purchase it in analog mode only) 6. POWER port Connect the power cord for turn the monitor on the back of the screen displaying the current mode -- Kensington Lock The Kensington lock is pressed to change the input mode, a message appears...

Service Manual
Page 54
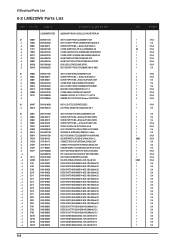
... BRACKET-VESA;LS20MEW,SECC,T1.0 COVER-REAR;LS20MEW,HIPS,HB,BK07 RUBBER-FOOT;LS20MEW,RUBBER,CR,LIGHT GRAY RUBBER-SET CAP;PO24FS,Elatomer,20~30 ASSY SHIELD;LS20MEWSFV/XAA SHIELD-LAMP;LS20MEW,SPTE,T0.3 ASSY LCD-ATZ;LS20MEW* LCD-PANEL;M201EW02 V8,Doppler,6bit Hi-FR ASSY CHASSIS-ATZ;W/W;LS20MEW* SCREW-TAPTITE;... CONNECTOR-DVI;24P,3R,FEMALE,ANGLE,AUF CONNECTOR-DSUB;15P,3R,FEMALE,ANGLE,AUF HEADER-BOARD TO BOARD;BOX,30P,2R,2mm,ANG ASSY HDCP;BN46-00018A,PS-42V6S,D73A,GENE KEY CODE-CERTIFICATE;(HDCP KEY)PPM42M5S, ASSY SMD;LS20MEWSFV/XAA,W/W SOLDER-CREAM;LST309-M,-,D20~45§-,96.5Sn/ DIODE-SWITCHING;...
... BRACKET-VESA;LS20MEW,SECC,T1.0 COVER-REAR;LS20MEW,HIPS,HB,BK07 RUBBER-FOOT;LS20MEW,RUBBER,CR,LIGHT GRAY RUBBER-SET CAP;PO24FS,Elatomer,20~30 ASSY SHIELD;LS20MEWSFV/XAA SHIELD-LAMP;LS20MEW,SPTE,T0.3 ASSY LCD-ATZ;LS20MEW* LCD-PANEL;M201EW02 V8,Doppler,6bit Hi-FR ASSY CHASSIS-ATZ;W/W;LS20MEW* SCREW-TAPTITE;... CONNECTOR-DVI;24P,3R,FEMALE,ANGLE,AUF CONNECTOR-DSUB;15P,3R,FEMALE,ANGLE,AUF HEADER-BOARD TO BOARD;BOX,30P,2R,2mm,ANG ASSY HDCP;BN46-00018A,PS-42V6S,D73A,GENE KEY CODE-CERTIFICATE;(HDCP KEY)PPM42M5S, ASSY SMD;LS20MEWSFV/XAA,W/W SOLDER-CREAM;LST309-M,-,D20~45§-,96.5Sn/ DIODE-SWITCHING;...
Service Manual
Page 61
...HIPS,HB,BK07 ASSY COVER P-REAR;LS22MEW,HIPS HB,BK07 BRACKET-VESA;LS20MEW,SECC,T1.0 COVER-REAR;LS22MEW,HIPS,HB,BK07 RUBBER FOOT;MO 15,17,19,CR,11*11,60,T1.5 RUBBER-SET CAP;PO24FS,Elatomer SANTOPREN 0.1 M0107 BN91-01035N ..2 M0215 BN07-00321A ASSY LCD-CTZ;LS22DPWCSQ/EDC LCD-PANEL;M220Z1-L01,Doppler,8bit...L6,ZPC(BLK),SWRC SCREW-TAPTITE;BH,+,-,S,M4,L8,ZPC(WHT),SW STAND OFF;M3,L5,Ni PLT,SUM24L,#4-40 LEAD CONNECTOR-LVDS;LS19BIC,UL1571#30,30 IP BOARD;IP-45130A(WN),226BW,3.0 ~5.0mA, ASSY PCB MAIN-STZ;LS22MEWSFV/XAA,W/W,AML SOLDER-WIRE FLUX;HSE-02 LFM48 SR-34 S,-, CONNECTOR-DVI;24P,3R,FEMALE,ANGLE...
...HIPS,HB,BK07 ASSY COVER P-REAR;LS22MEW,HIPS HB,BK07 BRACKET-VESA;LS20MEW,SECC,T1.0 COVER-REAR;LS22MEW,HIPS,HB,BK07 RUBBER FOOT;MO 15,17,19,CR,11*11,60,T1.5 RUBBER-SET CAP;PO24FS,Elatomer SANTOPREN 0.1 M0107 BN91-01035N ..2 M0215 BN07-00321A ASSY LCD-CTZ;LS22DPWCSQ/EDC LCD-PANEL;M220Z1-L01,Doppler,8bit...L6,ZPC(BLK),SWRC SCREW-TAPTITE;BH,+,-,S,M4,L8,ZPC(WHT),SW STAND OFF;M3,L5,Ni PLT,SUM24L,#4-40 LEAD CONNECTOR-LVDS;LS19BIC,UL1571#30,30 IP BOARD;IP-45130A(WN),226BW,3.0 ~5.0mA, ASSY PCB MAIN-STZ;LS22MEWSFV/XAA,W/W,AML SOLDER-WIRE FLUX;HSE-02 LFM48 SR-34 S,-, CONNECTOR-DVI;24P,3R,FEMALE,ANGLE...

Service Manual
Page 74
Troubleshooting ...4-1 4-1 No Power ...4-1 4-2 No Video (PC Analog Signal) ...4-3 4-3 No Video (PC Digital Signal) ...4-5 5. Exploded View and Parts List ...5-1 6. Block Diagram ...7-1 Product specifications ...2-1 2-1 Fashion Feature...2-1 2-2 Feature ...2-1 2-3 LME20WS Specifications ...2-2 2-4 LME22WS Specifications ...2-3 2-5 Spec Comparison ...2-4 2-6 Option Specification ...2-5 3. Electrical Parts List ...6-1 7. Precautions ...1-1 1-1 Safety Precautions ...1-1 1-2 Servicing Precautions ...1-2 1-3 Electrostatically Sensitive Devices (ESD) Precautions 1-2 1-4 Installation ...
Troubleshooting ...4-1 4-1 No Power ...4-1 4-2 No Video (PC Analog Signal) ...4-3 4-3 No Video (PC Digital Signal) ...4-5 5. Exploded View and Parts List ...5-1 6. Block Diagram ...7-1 Product specifications ...2-1 2-1 Fashion Feature...2-1 2-2 Feature ...2-1 2-3 LME20WS Specifications ...2-2 2-4 LME22WS Specifications ...2-3 2-5 Spec Comparison ...2-4 2-6 Option Specification ...2-5 3. Electrical Parts List ...6-1 7. Precautions ...1-1 1-1 Safety Precautions ...1-1 1-2 Servicing Precautions ...1-2 1-3 Electrostatically Sensitive Devices (ESD) Precautions 1-2 1-4 Installation ...


