User Manual (ENGLISH)
Page 3
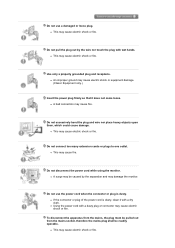
...This may damage the monitor. Do not connect too many extension cords or plugs to one outlet. To disconnect the apparatus from the mains, the plug must be pulled out from the mains socket, therefore the mains plug shall be caused by the wire nor touch the plug with a dry ... only.) Insert the power plug firmly so that it with wet hands. z An improper ground may cause electric shock or fire. Do not use the power cord when the connector or plug is dusty, clean it does not come loose. z This may cause fire. Do not disconnect the power cord while using the monitor.
...This may damage the monitor. Do not connect too many extension cords or plugs to one outlet. To disconnect the apparatus from the mains, the plug must be pulled out from the mains socket, therefore the mains plug shall be caused by the wire nor touch the plug with a dry ... only.) Insert the power plug firmly so that it with wet hands. z An improper ground may cause electric shock or fire. Do not use the power cord when the connector or plug is dusty, clean it does not come loose. z This may cause fire. Do not disconnect the power cord while using the monitor.
User Manual (ENGLISH)
Page 7
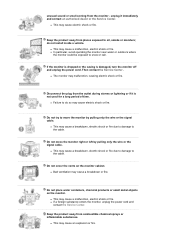
... the Service Center. Disconnect the plug from places exposed to do not install inside a vehicle. Do not move the monitor by pulling only the wire or the signal cable. z This may malfunction, causing electric shock or fire. z Failure to oil, smoke or moisture; Do not cover the vents on the monitor. z If a foreign substance enters the monitor, unplug the power cord...
... the Service Center. Disconnect the plug from places exposed to do not install inside a vehicle. Do not move the monitor by pulling only the wire or the signal cable. z This may malfunction, causing electric shock or fire. z Failure to oil, smoke or moisture; Do not cover the vents on the monitor. z If a foreign substance enters the monitor, unplug the power cord...
User Manual (ENGLISH)
Page 8
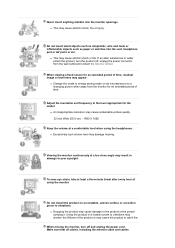
... the power connector from the monitor for the model. Adjust the resolution and frequency to the level appropriate for an extended period of the product or may result in damage to a changing picture when away from the wall outlet and contact the Service Center. When moving the monitor, turn the product off and unplug the power cord. Make sure that all cables, including the antenna cable and cables Never...
... the power connector from the monitor for the model. Adjust the resolution and frequency to the level appropriate for an extended period of the product or may result in damage to a changing picture when away from the wall outlet and contact the Service Center. When moving the monitor, turn the product off and unplug the power cord. Make sure that all cables, including the antenna cable and cables Never...
User Manual (ENGLISH)
Page 10
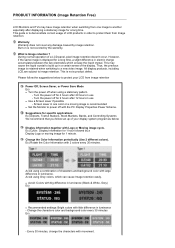
... liquid crystal. Change the characters color and background color every 30 minutes Ex) - Warranty Warranty does not cover any damage caused by the warranty. Avoid using a stationary pattern. - This guide is not a product defect. Please follow set up in luminance (Black & White, Grey) Ex) z Recommended settings: Bright colors with Logo or Moving image cycle. Change the Color Information periodically (Use 2 different colors). PRODUCT INFORMATION (Image Retention Free) LCD Monitors and TVs...
... liquid crystal. Change the characters color and background color every 30 minutes Ex) - Warranty Warranty does not cover any damage caused by the warranty. Avoid using a stationary pattern. - This guide is not a product defect. Please follow set up in luminance (Black & White, Grey) Ex) z Recommended settings: Bright colors with Logo or Moving image cycle. Change the Color Information periodically (Use 2 different colors). PRODUCT INFORMATION (Image Retention Free) LCD Monitors and TVs...
User Manual (ENGLISH)
Page 13
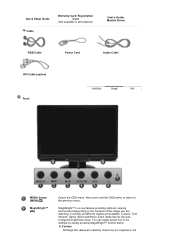
Quick Setup Guide Cable Warranty Card/ Registration Card (Not available in all locations) User's Guide, Monitor Driver RGB Cable Power Cord Audio Cable DVI Cable (option) Front MENU button [MENU/ ] MagicBright™ [] Opens the OSD menu. Each mode has its own preconfigured brightness value. Currently six different modes are carefully chosen by our engineers, the Also use to exit the OSD menu or return to the previous menu. You can easily select one of the image you are watching. MagicBright™ is a new...
Quick Setup Guide Cable Warranty Card/ Registration Card (Not available in all locations) User's Guide, Monitor Driver RGB Cable Power Cord Audio Cable DVI Cable (option) Front MENU button [MENU/ ] MagicBright™ [] Opens the OSD menu. Each mode has its own preconfigured brightness value. Currently six different modes are carefully chosen by our engineers, the Also use to exit the OSD menu or return to the previous menu. You can easily select one of the image you are watching. MagicBright™ is a new...
User Manual (ENGLISH)
Page 14
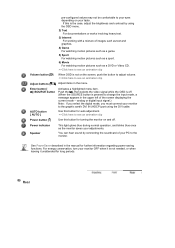
... SOURCE button is the case, adjust the brightness and contrast by connecting the soundcard of your PC to the monitor. Power indicator Speaker This light glows blue during normal operation, and blinks blue once as the monitor saves your monitor to the graphic card's DVI IN (HDCP) port using the OSD menu. 2) Text For documentations or works involving heavy text. 3) Internet For working with a mixture of the screen displaying the current mode -- AUTO button [ AUTO ] Use this button for turning the monitor on your monitor...
... SOURCE button is the case, adjust the brightness and contrast by connecting the soundcard of your PC to the monitor. Power indicator Speaker This light glows blue during normal operation, and blinks blue once as the monitor saves your monitor to the graphic card's DVI IN (HDCP) port using the OSD menu. 2) Text For documentations or works involving heavy text. 3) Internet For working with a mixture of the screen displaying the current mode -- AUTO button [ AUTO ] Use this button for turning the monitor on your monitor...
User Manual (ENGLISH)
Page 15
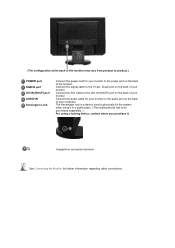
... from product to product.) POWER port RGB IN port DVI IN (HDCP) port AUDIO IN Kensington Lock Connect the power cord for your monitor to the power port on the back of your monitor. Headphone connection terminal See Connecting the Monitor for your monitor to the audio port on the back of your computer. Connect the signal cable to be purchased separately. ) For using a locking device, contact where you purchase it. Connect the audio cable for further information regarding...
... from product to product.) POWER port RGB IN port DVI IN (HDCP) port AUDIO IN Kensington Lock Connect the power cord for your monitor to the power port on the back of your monitor. Headphone connection terminal See Connecting the Monitor for your monitor to the audio port on the back of your computer. Connect the signal cable to be purchased separately. ) For using a locking device, contact where you purchase it. Connect the audio cable for further information regarding...
User Manual (ENGLISH)
Page 17
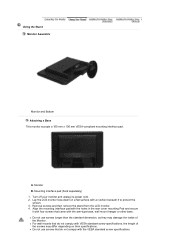
...-type base, wall mount hanger or other base. Align the mounting interface pad with the holes in the rear cover mounting Pad and secure it to protect the screen. 3. z For wall mounts that came with VESA standard screw specifications, the length of the Monitor. Monitor B. Remove screws and then remove the stand from the LCD monitor. 4. Mounting interface pad (Sold separately) 1. Lay the LCD monitor face-down on their specifications. Using the Stand Monitor Assembly Monitor and Bottom Attaching a Base This monitor...
...-type base, wall mount hanger or other base. Align the mounting interface pad with the holes in the rear cover mounting Pad and secure it to protect the screen. 3. z For wall mounts that came with VESA standard screw specifications, the length of the Monitor. Monitor B. Remove screws and then remove the stand from the LCD monitor. 4. Mounting interface pad (Sold separately) 1. Lay the LCD monitor face-down on their specifications. Using the Stand Monitor Assembly Monitor and Bottom Attaching a Base This monitor...
User Manual (ENGLISH)
Page 18
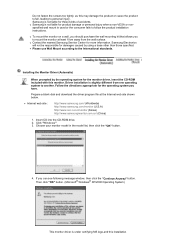
...) 1. Choose your monitor model in the model list, then click the "OK" button. 4. z Samsung is used or the consumer fails to mount the monitor at the Internet web site shown below. z To mount the monitor on a wall, you should purchase the wall mounting kit that allows you can see following message window, then click the "Continue Anyway" button. Click "Windows" 3. If you to follow the product installation instructions.
...) 1. Choose your monitor model in the model list, then click the "OK" button. 4. z Samsung is used or the consumer fails to mount the monitor at the Internet web site shown below. z To mount the monitor on a wall, you should purchase the wall mounting kit that allows you can see following message window, then click the "Continue Anyway" button. Click "Windows" 3. If you to follow the product installation instructions.

User Manual (ENGLISH)
Page 19
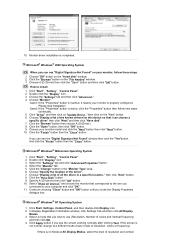
...://www.samsung.com/monitor (U.S.A) http://www.sec.co.kr/monitor (Korea) http://www.samsungmonitor.com.cn/ (China) Microsoft® Windows Vista™ Operating System 1. Click (Start) and "Control Panel". Driver installation is completed. Installing the Monitor Driver (Manual) Windows Vista | Windows XP | Windows 2000 | Windows ME | Windows NT | Linux When prompted by the operating system for the operating system you have. Click "Personalization" and then "Display Settings". 4. Click "Advanced Settings...". doesn...
...://www.samsung.com/monitor (U.S.A) http://www.sec.co.kr/monitor (Korea) http://www.samsungmonitor.com.cn/ (China) Microsoft® Windows Vista™ Operating System 1. Click (Start) and "Control Panel". Driver installation is completed. Installing the Monitor Driver (Manual) Windows Vista | Windows XP | Windows 2000 | Windows ME | Windows NT | Linux When prompted by the operating system for the operating system you have. Click "Personalization" and then "Display Settings". 4. Click "Advanced Settings...". doesn...
User Manual (ENGLISH)
Page 20
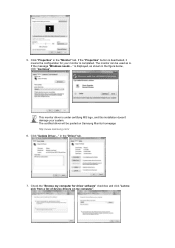
If the message "Windows needs..." Click "Update Driver..." in the "Monitor" tab. The certified driver will be used as shown in the figure below, click "Continue". Check the "Browse my computer for your system. If the "Properties" button is completed. This monitor driver is displayed, as is. Click "Properties" in the "Driver" tab. 7. The monitor can be posted on my computer". 5. is under certifying MS...
If the message "Windows needs..." Click "Update Driver..." in the "Monitor" tab. The certified driver will be used as shown in the figure below, click "Continue". Check the "Browse my computer for your system. If the "Properties" button is completed. This monitor driver is displayed, as is. Click "Properties" in the "Driver" tab. 7. The monitor can be posted on my computer". 5. is under certifying MS...
User Manual (ENGLISH)
Page 22
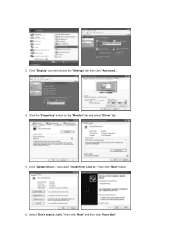
Click "Update Driver.." then click "Next" and then click "Have disk". Click the "Properties" button on the "Monitor" tab and select "Driver" tab. 5. then click "Next" button. 6. and select "Install from a list or.." Click "Display" icon and choose the "Settings" tab then click "Advanced..". 4. 3. Select "Don't search ,I will.."
Click "Update Driver.." then click "Next" and then click "Have disk". Click the "Properties" button on the "Monitor" tab and select "Driver" tab. 5. then click "Next" button. 6. and select "Install from a list or.." Click "Display" icon and choose the "Settings" tab then click "Advanced..". 4. 3. Select "Don't search ,I will.."
User Manual (ENGLISH)
Page 24
... location of colors and Vertical frequency) and then click OK. 4. In Display Registration Information window, click Settings Tab and then click All Display Modes. 3. Choose A:(D:\Driver) then click the "Open" button and then click "OK" button. Choose "Monitor". then click "Next" button. 8. Click Apply button if you can see "Digital Signature Not Found" on your monitor is active, click the "Properties" button then follow these steps. 1. Click "Start" , "Setting" , "Control Panel". 2. And...
... location of colors and Vertical frequency) and then click OK. 4. In Display Registration Information window, click Settings Tab and then click All Display Modes. 3. Choose A:(D:\Driver) then click the "Open" button and then click "OK" button. Choose "Monitor". then click "Next" button. 8. Click Apply button if you can see "Digital Signature Not Found" on your monitor is active, click the "Properties" button then follow these steps. 1. Click "Start" , "Setting" , "Control Panel". 2. And...

User Manual (ENGLISH)
Page 25
... setting file. 1. Execute X-Window after executing the X86Config file. 2. Set a vertical frequency for your mouse. 3. Set a mouse for your computer. 6. The next screen is for your monitor. (You can enter the frequency directly.) 8. You have finished setting up your monitor. 7. Linux Operating System To execute X-Window, you need to the Preset Timing Modes in the user guide. Set a Keyboard for setting your computer. 4. The next screen is a type of X-Window...
... setting file. 1. Execute X-Window after executing the X86Config file. 2. Set a vertical frequency for your mouse. 3. Set a mouse for your computer. 6. The next screen is for your monitor. (You can enter the frequency directly.) 8. You have finished setting up your monitor. 7. Linux Operating System To execute X-Window, you need to the Preset Timing Modes in the user guide. Set a Keyboard for setting your computer. 4. The next screen is a type of X-Window...
User Manual (ENGLISH)
Page 36
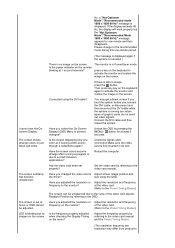
... resolution and frequency that the monitor can handle properly. Check the power cord connection and supply. If the power is set to see "Check Signal Cable" on the screen? (Connected using the D-sub cable) Check the signal cable connection. (Connected using the DVI cable) If you do need assistance, please call the phone number on , reboot the computer to analog. Check List Before calling for Windows ME/XP/2000) and then change the frequency of the video card. (Refer to have the monitor double-check the input signal source...
... resolution and frequency that the monitor can handle properly. Check the power cord connection and supply. If the power is set to see "Check Signal Cable" on the screen? (Connected using the D-sub cable) Check the signal cable connection. (Connected using the DVI cable) If you do need assistance, please call the phone number on , reboot the computer to analog. Check List Before calling for Windows ME/XP/2000) and then change the frequency of the video card. (Refer to have the monitor double-check the input signal source...
User Manual (ENGLISH)
Page 37
... On Screen Display (OSD) Menu to the OSD. Readjust Position by referring to activate the monitor and restore the image on the menu? press a key on the keyboard to the video card manual. The screen is running a program or due to the Preset Timing Modes). Connected using the OSD. Connect the DVI cable and then reboot the system. Unlock the OSD by referring to the video card manual and the Preset Timing Modes. (The maximum frequency per resolution...
... On Screen Display (OSD) Menu to the OSD. Readjust Position by referring to activate the monitor and restore the image on the menu? press a key on the keyboard to the video card manual. The screen is running a program or due to the Preset Timing Modes). Connected using the OSD. Connect the DVI cable and then reboot the system. Unlock the OSD by referring to the video card manual and the Preset Timing Modes. (The maximum frequency per resolution...
User Manual (ENGLISH)
Page 38
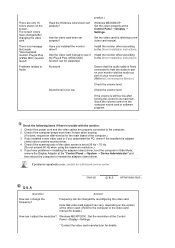
... sound card or software program. Check if the power cord and the video cables are only 16 colors shown on the version of the computer.) 3. Check if the scanning ratio of the video screen is a message that video card support can vary, depending on the screen. See the video card manual to see if Install the monitor driver according the Plug & Play (VESA DDC) to the Driver Installation Instructions. Frequency can I change the frequency? Check the volume level. There is set at the Control Panel...
... sound card or software program. Check if the power cord and the video cables are only 16 colors shown on the version of the computer.) 3. Check if the scanning ratio of the video screen is a message that video card support can vary, depending on the screen. See the video card manual to see if Install the monitor driver according the Plug & Play (VESA DDC) to the Driver Installation Instructions. Frequency can I change the frequency? Check the volume level. There is set at the Control Panel...
User Manual (ENGLISH)
Page 39
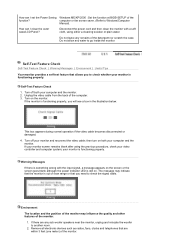
... monitor with the input signal, a message appears on . Self-Test Feature Check 1. If your monitor screen remains blank after using either a cleaning solution or plain water. The message may influence the quality and other features of the computer. 3. How can I set the Power Saving Windows ME/XP/2000 : Set the function at BIOS-SETUP of the function? How can I clean the outer case/LCD Panel? Unplug the video cable...
... monitor with the input signal, a message appears on . Self-Test Feature Check 1. If your monitor screen remains blank after using either a cleaning solution or plain water. The message may influence the quality and other features of the computer. 3. How can I set the Power Saving Windows ME/XP/2000 : Set the function at BIOS-SETUP of the function? How can I clean the outer case/LCD Panel? Unplug the video cable...
User Manual (ENGLISH)
Page 42
... and you press a key on the keyboard. Note: Design and specifications are 3,888,000. In most cases, monitor installation will provide the best operating conditions and monitor settings. Use a software utility installed on any Plug & Play compatible system. State Power Indicator Power Consumption Normal Operation Blue Less than 55 watts Power saving mode Blue blinking Less than 1 watts Power off (Power button OFF) EPA/ENERGY 2000 Off Less than Class A equipment.) PowerSaver...
... and you press a key on the keyboard. Note: Design and specifications are 3,888,000. In most cases, monitor installation will provide the best operating conditions and monitor settings. Use a software utility installed on any Plug & Play compatible system. State Power Indicator Power Consumption Normal Operation Blue Less than 55 watts Power saving mode Blue blinking Less than 1 watts Power off (Power button OFF) EPA/ENERGY 2000 Off Less than Class A equipment.) PowerSaver...
User Manual (ENGLISH)
Page 47
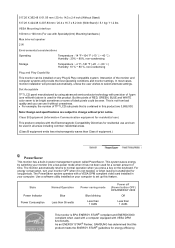
... an extended period of time, residual image or blurriness may be seen. All other product names mentioned herein may appear. When you view a fixed screen for energy efficiency. As an ENERGY STAR® Partner, Samsung Electronics Co., Ltd. But the pixels of RED, GREEN, BLUE and WHITE color seem to change without the written permission of black pixels could be the trademarks or registered...
... an extended period of time, residual image or blurriness may be seen. All other product names mentioned herein may appear. When you view a fixed screen for energy efficiency. As an ENERGY STAR® Partner, Samsung Electronics Co., Ltd. But the pixels of RED, GREEN, BLUE and WHITE color seem to change without the written permission of black pixels could be the trademarks or registered...


