User Manual (ENGLISH)
Page 8
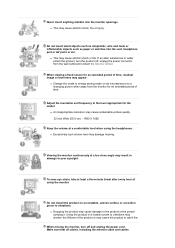
... the power connector from the monitor for an extended period of using the headphones. When viewing a fixed screen for the model. z Excessively loud volume level may appear. Viewing the monitor continuously at least a five...shorten the lifetime of time, residual image or blurriness may damage hearing. When moving the monitor, turn the product off and unplug the power cord. Make sure that all cables, ...tools or inflammable objects such as paper or matches into the monitor openings. Never insert anything metallic into the vent, headphone port or AV ports or etc...
... the power connector from the monitor for an extended period of using the headphones. When viewing a fixed screen for the model. z Excessively loud volume level may appear. Viewing the monitor continuously at least a five...shorten the lifetime of time, residual image or blurriness may damage hearing. When moving the monitor, turn the product off and unplug the power cord. Make sure that all cables, ...tools or inflammable objects such as paper or matches into the monitor openings. Never insert anything metallic into the vent, headphone port or AV ports or etc...
User Manual (ENGLISH)
Page 18
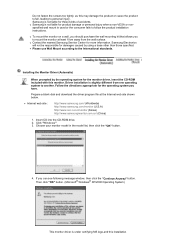
... wall surface. Driver installation is used or the consumer fails to personal injury. Samsung is under certifying MS logo,and this installation Installing the Monitor Driver (Automatic) When prompted by using a base other than those specified. Choose your monitor model in the model list, then click the "OK" button. 4. Then click "OK" button. (Microsoft®...
... wall surface. Driver installation is used or the consumer fails to personal injury. Samsung is under certifying MS logo,and this installation Installing the Monitor Driver (Automatic) When prompted by using a base other than those specified. Choose your monitor model in the model list, then click the "OK" button. 4. Then click "OK" button. (Microsoft®...
User Manual (ENGLISH)
Page 21
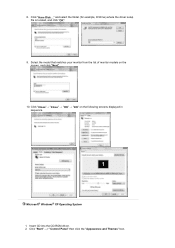
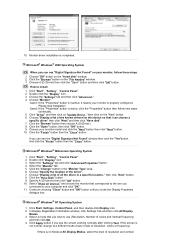
and select the folder (for example, D:\Drive) where the driver setup file is located, and click "OK". 9. Click "Close"→ "Close" → "OK" → "OK" on the screen, and click "Next". 10. Select the model that matches your monitor from the list of monitor models on the following screens displayed in sequence. Click "Start" -> "Control Panel" then click the "Appearance and Themes" Icon. Insert CD into the CD-ROM driver. 2. Click "Have Disk..." Microsoft® Windows® XP Operating System 1. 8.
and select the folder (for example, D:\Drive) where the driver setup file is located, and click "OK". 9. Click "Close"→ "Close" → "OK" → "OK" on the screen, and click "Next". 10. Select the model that matches your monitor from the list of monitor models on the following screens displayed in sequence. Click "Start" -> "Control Panel" then click the "Appearance and Themes" Icon. Insert CD into the CD-ROM driver. 2. Click "Have Disk..." Microsoft® Windows® XP Operating System 1. 8.
User Manual (ENGLISH)
Page 23
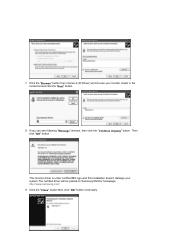
http://www.samsung.com/ 9. Then click "OK" button. This monitor driver is under certified MS logo,and this installation doesn't damage your monitor model in the model list and click the "Next" button. 8. Click the "Browse" button then choose A:(D:\Driver) and choose your system.The certified driver will be posted on Samsung Monitor homepage. If you can see following "Message" window, then click the "Continue Anyway" button. Click the "Close" button then click "OK" button continually. 7.
http://www.samsung.com/ 9. Then click "OK" button. This monitor driver is under certified MS logo,and this installation doesn't damage your monitor model in the model list and click the "Next" button. 8. Click the "Browse" button then choose A:(D:\Driver) and choose your system.The certified driver will be posted on Samsung Monitor homepage. If you can see following "Message" window, then click the "Continue Anyway" button. Click the "Close" button then click "OK" button continually. 7.
User Manual (ENGLISH)
Page 24
..."File Needed" window. 3. And click the "Finish" button then the "Close" button. Select the "Monitor" tab. 5. Choose "Display a list of all devices" and choose the monitor that corresponds to the one you wish to install 1. In Display Registration Information window, click Settings Tab and ... Driver.." If the screen is not normal, change to your monitor model and click the "Next" button then click "Next" button. 10. Choose "Monitor". Click the "Have Disk" button 9. Select "Show all the driver in the "Monitor Type" area. 6. Choose A:(D:\Driver) then click the "Open...
..."File Needed" window. 3. And click the "Finish" button then the "Close" button. Select the "Monitor" tab. 5. Choose "Display a list of all devices" and choose the monitor that corresponds to the one you wish to install 1. In Display Registration Information window, click Settings Tab and ... Driver.." If the screen is not normal, change to your monitor model and click the "Next" button then click "Next" button. 10. Choose "Monitor". Click the "Have Disk" button 9. Select "Show all the driver in the "Monitor Type" area. 6. Choose A:(D:\Driver) then click the "Open...

User Manual (ENGLISH)
Page 25
...a keyboard. 5. This information will not affect the actual execution of your monitor. The third screen is for your computer. 6. The next screen is a type of all, set a horizontal frequency for your monitor. (You can enter the frequency directly.) 8. First of system setting file.... 1. You have finished setting up your monitor. Execute X-Window after executing the X86Config file. 2. Enter the model name of X-Window. 10. Set a vertical frequency for your monitor. (You can enter the frequency directly.) 9. Set a mouse for your computer...
...a keyboard. 5. This information will not affect the actual execution of your monitor. The third screen is for your computer. 6. The next screen is a type of all, set a horizontal frequency for your monitor. (You can enter the frequency directly.) 8. First of system setting file.... 1. You have finished setting up your monitor. Execute X-Window after executing the X86Config file. 2. Enter the model name of X-Window. 10. Set a vertical frequency for your monitor. (You can enter the frequency directly.) 9. Set a mouse for your computer...

User Manual (ENGLISH)
Page 41
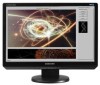
General General Model Name SyncMaster 2220WM LCD Panel Size 22 " Wide Diagonal (55.9 cm) Display area 473.76 mm(H) x 296.1 mm(V) Pixel Pitch 0.282 mm (H) x 0.282 mm (V) Synchronization Horizontal 30 ~ 81 kHz Vertical 56 Hz ~ ...
General General Model Name SyncMaster 2220WM LCD Panel Size 22 " Wide Diagonal (55.9 cm) Display area 473.76 mm(H) x 296.1 mm(V) Pixel Pitch 0.282 mm (H) x 0.282 mm (V) Synchronization Horizontal 30 ~ 81 kHz Vertical 56 Hz ~ ...

