
User Manual (ENGLISH)
Page 3
... Height 4 Viewing Angle 4 Kensington Security Slot 4 Connecting Your LCD Monitor 5 Plug and Play 6 Installing the Video Driver 6 Self-Test Feature Check (STFC 6 Getting Help 7 Warm-up Time 7 Adjusting Your LCD Monitor 8 User Controls 8 Automatic Save 9 Direct Access Features 10 OSD Lock/Unlock 10 On Screen Display (OSD 11 Accessing the Menu System 11 OSD functions and adjustment 12 By Remote-Control 19 Appendix 20 Power Saver 20 Troubleshooting 21 Specifications 23 Pin Assignments 24 Display Modes 25 Changing the Base 26 Removing the base...
... Height 4 Viewing Angle 4 Kensington Security Slot 4 Connecting Your LCD Monitor 5 Plug and Play 6 Installing the Video Driver 6 Self-Test Feature Check (STFC 6 Getting Help 7 Warm-up Time 7 Adjusting Your LCD Monitor 8 User Controls 8 Automatic Save 9 Direct Access Features 10 OSD Lock/Unlock 10 On Screen Display (OSD 11 Accessing the Menu System 11 OSD functions and adjustment 12 By Remote-Control 19 Appendix 20 Power Saver 20 Troubleshooting 21 Specifications 23 Pin Assignments 24 Display Modes 25 Changing the Base 26 Removing the base...
User Manual (ENGLISH)
Page 4
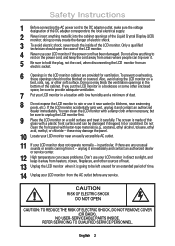
... and can clean the LCD monitor with keton-type materials (e.g., acetone), ethyl alcohol, toluene, ethyl acid, methyl, or chloride - Do not clean the front panel with a damp cloth when necessary, but be blocked or covered. English 2 Safety Instructions 1 Before connecting the AC power cord to the DC adapter outlet, make sure the voltage designation of the DC adapter corresponds to the local electrical supply. 2 Never...
... and can clean the LCD monitor with keton-type materials (e.g., acetone), ethyl alcohol, toluene, ethyl acid, methyl, or chloride - Do not clean the front panel with a damp cloth when necessary, but be blocked or covered. English 2 Safety Instructions 1 Before connecting the AC power cord to the DC adapter outlet, make sure the voltage designation of the DC adapter corresponds to the local electrical supply. 2 Never...
User Manual (ENGLISH)
Page 6
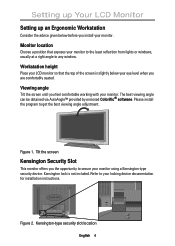
... monitor. Viewing angle Tilt the screen until you feel comfortable working with your monitor using a Kensington-type security device. The best viewing angle can be obtained via AutoAngle™ provided by enclosed Colorific® software. Kensington lock is slightly below before you install your monitor to the least reflection from lights or windows, usually at a right angle to any window. Figure 2. V1 V2 SOURCE PIP AUTO EXIT MENU Figure 1. Setting...
... monitor. Viewing angle Tilt the screen until you feel comfortable working with your monitor using a Kensington-type security device. The best viewing angle can be obtained via AutoAngle™ provided by enclosed Colorific® software. Kensington lock is slightly below before you install your monitor to the least reflection from lights or windows, usually at a right angle to any window. Figure 2. V1 V2 SOURCE PIP AUTO EXIT MENU Figure 1. Setting...
User Manual (ENGLISH)
Page 7
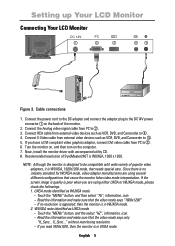
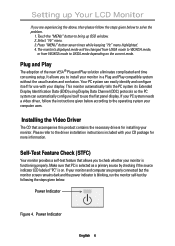
... that needs special care. English 5 Touch the "MENU" button, and then select "Hz", information, icon. - If the screen image is quality is designed to the DC14V power connector 1 on the computer. 7. Touch the "MENU" button, and the select "HZ", information, icon. - WUXGA node identified as WUXGA mode - V_Sync..." Recommended resolution of the monitor. 2. Connect the power cord to the DC adaptor and connect the adaptor plug to be compatible...
... that needs special care. English 5 Touch the "MENU" button, and then select "Hz", information, icon. - If the screen image is quality is designed to the DC14V power connector 1 on the computer. 7. Touch the "MENU" button, and the select "HZ", information, icon. - WUXGA node identified as WUXGA mode - V_Sync..." Recommended resolution of the monitor. 2. Connect the power cord to the DC adaptor and connect the adaptor plug to be compatible...
User Manual (ENGLISH)
Page 8
... CD package for installing your display. If your PC system needs a video driver, follow the steps given below to solve the problem. 1.Touch the "MENU" button to bring up Your LCD Monitor If you are properly connected but the monitor screen remains dark and the power indicator is blinking, run the monitor self-test by checking if the source indicator LED labeled "PC" is selected as a primary source by following the...
... CD package for installing your display. If your PC system needs a video driver, follow the steps given below to solve the problem. 1.Touch the "MENU" button to bring up Your LCD Monitor If you are properly connected but the monitor screen remains dark and the power indicator is blinking, run the monitor self-test by checking if the source indicator LED labeled "PC" is selected as a primary source by following the...
User Manual (ENGLISH)
Page 9
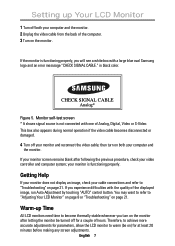
... monitor and reconnect the video cable; your monitor is not connected with one of Analog, Digital, Video or S-Video. If you will see a white box with the quality of the displayed image, run Auto Adjustment by touching "AUTO" control button. This box also appears during normal operation if the video cable becomes disconnected or damaged. 4 Turn off your video controller and computer system; If your monitor screen remains blank after letting the monitor be on the monitor. English 7 CHECK SIGNAL CABLE Analog...
... monitor and reconnect the video cable; your monitor is not connected with one of Analog, Digital, Video or S-Video. If you will see a white box with the quality of the displayed image, run Auto Adjustment by touching "AUTO" control button. This box also appears during normal operation if the video cable becomes disconnected or damaged. 4 Turn off your video controller and computer system; If your monitor screen remains blank after letting the monitor be on the monitor. English 7 CHECK SIGNAL CABLE Analog...
User Manual (ENGLISH)
Page 10
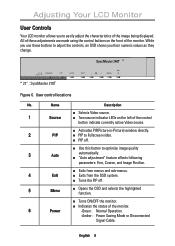
... MENU * 21" : SyncMaster 210T Figure 6. Name Description n Selects Video source. 1 Source n Two source indicator LEDs on the front of the monitor. 6 Power -Green : Normal Operation. -Amber : Power Saving Mode or Disconnected Signal Cable. n Exits from menus and sub-menus. 4 Exit n Exits from the OSD system. n Turns ON/OFF the monitor. While you use these adjustments are made using the control buttons on the left of the image being displayed. n Indicates the status of the monitor. n PIP off . 5 Menu n Opens...
... MENU * 21" : SyncMaster 210T Figure 6. Name Description n Selects Video source. 1 Source n Two source indicator LEDs on the front of the monitor. 6 Power -Green : Normal Operation. -Amber : Power Saving Mode or Disconnected Signal Cable. n Exits from menus and sub-menus. 4 Exit n Exits from the OSD system. n Turns ON/OFF the monitor. While you use these adjustments are made using the control buttons on the left of the image being displayed. n Indicates the status of the monitor. n PIP off . 5 Menu n Opens...
User Manual (ENGLISH)
Page 12
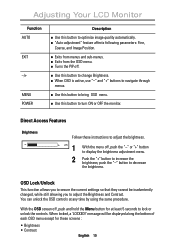
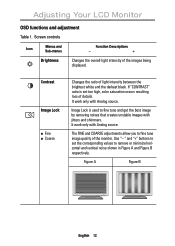
...menus and sub-menus. Adjusting Your LCD Monitor Function AUTO EXIT -/+ MENU POWER Description n Use this button to lock or unlock the controls. n Turns the PIP off , push the "-" or "+" button to change Brightness. OSD Lock/Unlock This function allows you to turn ON or OFF the monitor. n Use this button to display the brightness adjustment menu. Follow these screens : • Brightness • Contrast English 10 n Use this button to adjust the Brightness and Contrast. You can unlock the OSD controls at least 5 seconds to optimize image quality automatically. Push...
...menus and sub-menus. Adjusting Your LCD Monitor Function AUTO EXIT -/+ MENU POWER Description n Use this button to lock or unlock the controls. n Turns the PIP off , push the "-" or "+" button to change Brightness. OSD Lock/Unlock This function allows you to turn ON or OFF the monitor. n Use this button to display the brightness adjustment menu. Follow these screens : • Brightness • Contrast English 10 n Use this button to adjust the Brightness and Contrast. You can unlock the OSD controls at least 5 seconds to optimize image quality automatically. Push...
User Manual (ENGLISH)
Page 14
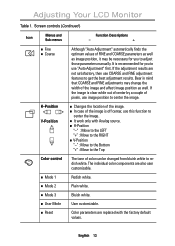
... the images being displayed. It work only with Analog source. Use "- Figure A Figure B SOURCE VIDEO PC PIP AUTO EXIT MENU SOURCE PIP AUTO EXIT VIDEO PC MENU English 12 It work only with Analog source. Contrast Image Lock n Fine n Coarse Changes the ratio of the monitor. " and "+" buttons to fine tune and get the best image by removing noises that creates unstable images with jitters and shimmers. The FINE and COARSE adjustments allow you to remove or minimize horizontal and vertical...
... the images being displayed. It work only with Analog source. Use "- Figure A Figure B SOURCE VIDEO PC PIP AUTO EXIT MENU SOURCE PIP AUTO EXIT VIDEO PC MENU English 12 It work only with Analog source. Contrast Image Lock n Fine n Coarse Changes the ratio of the monitor. " and "+" buttons to fine tune and get the best image by removing noises that creates unstable images with jitters and shimmers. The FINE and COARSE adjustments allow you to remove or minimize horizontal and vertical...
User Manual (ENGLISH)
Page 15
... the Bottom "+" : Move to redish white. The individual color components are not satisfactory, then use COARSE and FINE adjustment features to use this function to center the image. Bluish white. Color parameters are replaced with Analog source. n Changes the location of color can be necessary for you to adjust those parameters manually. English 13 Plain white. If the adjustment results are also user customizable. n It work only with the factory default values.
... the Bottom "+" : Move to redish white. The individual color components are not satisfactory, then use COARSE and FINE adjustment features to use this function to center the image. Bluish white. Color parameters are replaced with Analog source. n Changes the location of color can be necessary for you to adjust those parameters manually. English 13 Plain white. If the adjustment results are also user customizable. n It work only with the factory default values.

User Manual (ENGLISH)
Page 16
... Replace H-Position and V-Position values with the factory default values. Performs no image expansion. Notice. For example, 640x480, 800x600, and 1024x768 have the aspect ratio of 4:3, and 1280x1200 has the aspect ratio of the original video resolution. Performs full screen image expansion regardless of the aspect ratio of the input video resolution n Expand 2 n Normal RECALL Performs image expansion while keeping the aspect ratio of 5:4. Adjusting Your LCD Monitor...
... Replace H-Position and V-Position values with the factory default values. Performs no image expansion. Notice. For example, 640x480, 800x600, and 1024x768 have the aspect ratio of 4:3, and 1280x1200 has the aspect ratio of the original video resolution. Performs full screen image expansion regardless of the aspect ratio of the input video resolution n Expand 2 n Normal RECALL Performs image expansion while keeping the aspect ratio of 5:4. Adjusting Your LCD Monitor...

User Manual (ENGLISH)
Page 17
... smoother n Performs Digital Zoom. Screen controls (Continued ) Menus and Icon Sub-menus Function Descriptions - + Image Effect n Zoom n Performs digital image quality compensation. Portuguese Italiano Español Deutsch Français English Adjusting Your LCD Monitor Table 1. n Sharpen Makes image looked sharper n Medium Makes image looked sharper but not as sharper as changing the center of magnification can be arbitrarily changed by D-Sub or DVI connector.
... smoother n Performs Digital Zoom. Screen controls (Continued ) Menus and Icon Sub-menus Function Descriptions - + Image Effect n Zoom n Performs digital image quality compensation. Portuguese Italiano Español Deutsch Français English Adjusting Your LCD Monitor Table 1. n Sharpen Makes image looked sharper n Medium Makes image looked sharper but not as sharper as changing the center of magnification can be arbitrarily changed by D-Sub or DVI connector.
User Manual (ENGLISH)
Page 18
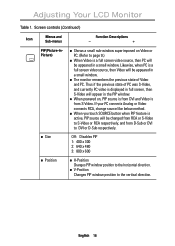
... Descriptions - + PIP(Picture-inPicture) n Size n Position n Shows a small sub-window superimposed on , PIP source is from DVI and Video is a full screen video source, then PC will be changed from RCA or S-Video to DVI or D-Sub respectively. Thus if the previous state of Video and PC. n When you touch SOURCE button when PIP feature is displayed in full screen, then S-Video will be appeared in the PIP window. Adjusting Your LCD Monitor Table 1.
... Descriptions - + PIP(Picture-inPicture) n Size n Position n Shows a small sub-window superimposed on , PIP source is from DVI and Video is a full screen video source, then PC will be changed from RCA or S-Video to DVI or D-Sub respectively. Thus if the previous state of Video and PC. n When you touch SOURCE button when PIP feature is displayed in full screen, then S-Video will be appeared in the PIP window. Adjusting Your LCD Monitor Table 1.

User Manual (ENGLISH)
Page 22
... video card installed in power management system called PowerSaver. You use a software utility installed on your monitor OFF when you move the computer's mouse or press a key on for 30 minuites that is EPA ENERGY STAR® compliant and NUTEK compliant when used for long periods. See Table 2 below for the unit to normal operation when horizontal and vertical sync return. Table 2. Power-saving modes...
... video card installed in power management system called PowerSaver. You use a software utility installed on your monitor OFF when you move the computer's mouse or press a key on for 30 minuites that is EPA ENERGY STAR® compliant and NUTEK compliant when used for long periods. See Table 2 below for the unit to normal operation when horizontal and vertical sync return. Table 2. Power-saving modes...
User Manual (ENGLISH)
Page 23
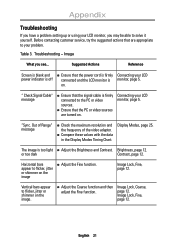
... Connecting your problem. Troubleshooting - Suggested Actions Reference Screen is blank and n Ensure that are turned on the image. on the image n Adjust the Fine function. n Ensure that the signal cable is firmly connected to flicker, jitter or shimmer on . English 21 Horizontal bars appear to your LCD power indicator is off connected and the LCD monitor is too light n Adjust the Brightness and Contrast. Vertical bars appear to the PC or video sources. "Sync. Image...
... Connecting your problem. Troubleshooting - Suggested Actions Reference Screen is blank and n Ensure that are turned on the image. on the image n Adjust the Fine function. n Ensure that the signal cable is firmly connected to flicker, jitter or shimmer on . English 21 Horizontal bars appear to your LCD power indicator is off connected and the LCD monitor is too light n Adjust the Brightness and Contrast. Vertical bars appear to the PC or video sources. "Sync. Image...
User Manual (ENGLISH)
Page 24
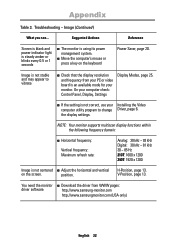
... display settings. s If the setting is an available mode for your monitor. V-Position, page 13. On your Installing the Video computer utility program to vibrate s Check that the display resolution and frequency from WWW pages: driver software http://www.samsung-monitor.com http://www.samsungmonitor.com (USA only) English 22 position. Image is not stable and may appear to change Driver, page 6. Appendix Table 3. Suggested Actions Reference Screen is blank and power indicator light...
... display settings. s If the setting is an available mode for your monitor. V-Position, page 13. On your Installing the Video computer utility program to vibrate s Check that the display resolution and frequency from WWW pages: driver software http://www.samsung-monitor.com http://www.samsungmonitor.com (USA only) English 22 position. Image is not stable and may appear to change Driver, page 6. Appendix Table 3. Suggested Actions Reference Screen is blank and power indicator light...
User Manual (ENGLISH)
Page 25
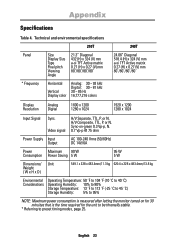
... 518.4 (H) x 324 (V) mm a-si TFT Active matrix 0.27 (H) x 0.27 (V) mm 80˚/80˚/80˚/80˚ Display Resolution Analog Digital 1600 x 1200 1280 x 1024 1920 x 1200 1280 x 1024 Input Signal Sync. H/V Composite, TTL, P. Sync-on-green 0.3 Vp-p, N. 0.7 Vp-p @ 75 ohm Power Supply Input Output AC 100-240 Vrms (50/60Hz) DC 14V/6A Power Maximum 90 W 95 W Consumption Power Saving 5 W 5 W Dimensions/ Unit Weight ( W x H x D ) 549...
... 518.4 (H) x 324 (V) mm a-si TFT Active matrix 0.27 (H) x 0.27 (V) mm 80˚/80˚/80˚/80˚ Display Resolution Analog Digital 1600 x 1200 1280 x 1024 1920 x 1200 1280 x 1024 Input Signal Sync. H/V Composite, TTL, P. Sync-on-green 0.3 Vp-p, N. 0.7 Vp-p @ 75 ohm Power Supply Input Output AC 100-240 Vrms (50/60Hz) DC 14V/6A Power Maximum 90 W 95 W Consumption Power Saving 5 W 5 W Dimensions/ Unit Weight ( W x H x D ) 549...

User Manual (ENGLISH)
Page 29
... arm-type base, wall mount hanger or other electrical apparatus. n To clean your LCD or any other base. English 27 If possible, use a cloth lightly dampened with a mild detergent. Appendix Attaching a base NOTE: This monitor accepts a 100mm x 100mm VESA-compliant mounting interface pad. User maintenance is restricted to the cable connectors as explained below: Unplug the monitor from the power outlet before cleaning. n To clean the monitor cabinet, use a special screen cleaning tissue or...
... arm-type base, wall mount hanger or other electrical apparatus. n To clean your LCD or any other base. English 27 If possible, use a cloth lightly dampened with a mild detergent. Appendix Attaching a base NOTE: This monitor accepts a 100mm x 100mm VESA-compliant mounting interface pad. User maintenance is restricted to the cable connectors as explained below: Unplug the monitor from the power outlet before cleaning. n To clean the monitor cabinet, use a special screen cleaning tissue or...

User Manual (ENGLISH)
Page 30
... D-sub connector 24 A Auto 8 Automatic Save 9 B Brightness 12 C Cable connections 5 Coarse 13 Color Control 13 Contrast 12 D DC adapter 3 Display Modes 25 DVI-D signal cable 3 E Exit 10 F Fine 13 Function icons 11 H H-pan 15 H-position 13 I Image effect 15 Image lock 12 Image size 14 Information 18 Installation CD 3 K Kensington security slot 4 M Menu 8 Menu control 17 Monitor self-test screen 7 Index O OSD Lock/Unlock 10 On Screen Display 11 P Pan 15 PBP 17 PIP 8, 16 Position 16 Power 8 Power Indicator 6 Power Saver 20 R Remote Controller 3 Recall 14 S Safety Instructions...
... D-sub connector 24 A Auto 8 Automatic Save 9 B Brightness 12 C Cable connections 5 Coarse 13 Color Control 13 Contrast 12 D DC adapter 3 Display Modes 25 DVI-D signal cable 3 E Exit 10 F Fine 13 Function icons 11 H H-pan 15 H-position 13 I Image effect 15 Image lock 12 Image size 14 Information 18 Installation CD 3 K Kensington security slot 4 M Menu 8 Menu control 17 Monitor self-test screen 7 Index O OSD Lock/Unlock 10 On Screen Display 11 P Pan 15 PBP 17 PIP 8, 16 Position 16 Power 8 Power Indicator 6 Power Saver 20 R Remote Controller 3 Recall 14 S Safety Instructions...
User Manual (ENGLISH)
Page 31
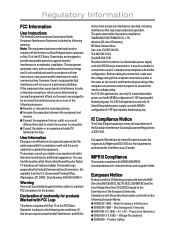
... is connected. Power Line Harmonics n EN61000-3-3:1995 - Voltage Fluctuations n EN60950 - You may cause undesired operation. For 240 Volt applications use only UL Listed Detachable power supply cord with these directives implies conformity to or exceeds the monitor voltage rating. European Notice Products with the CE Marking comply with similar configuration. For 120 Volt applications, use shielded signal interface cables...
... is connected. Power Line Harmonics n EN61000-3-3:1995 - Voltage Fluctuations n EN60950 - You may cause undesired operation. For 240 Volt applications use only UL Listed Detachable power supply cord with these directives implies conformity to or exceeds the monitor voltage rating. European Notice Products with the CE Marking comply with similar configuration. For 120 Volt applications, use shielded signal interface cables...


