
User Manual (ENGLISH)
Page 16
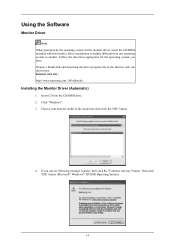
... you have. Then click "OK" button (Microsoft® Windows® XP/2000 Operating System). 14 Internet web site : http://www.samsung.com/ (Worldwide) Installing the Monitor Driver (Automatic) 1. Choose your monitor model in the model list, then click the "OK" button. 4. Driver installation is slightly different from one operating system to another. Insert CD into...
... you have. Then click "OK" button (Microsoft® Windows® XP/2000 Operating System). 14 Internet web site : http://www.samsung.com/ (Worldwide) Installing the Monitor Driver (Automatic) 1. Choose your monitor model in the model list, then click the "OK" button. 4. Driver installation is slightly different from one operating system to another. Insert CD into...
User Manual (ENGLISH)
Page 19
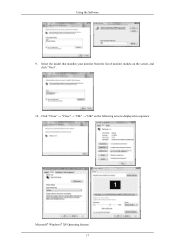
Click "Close" → "Close" → "OK" → "OK" on the screen, and click "Next". 10. Select the model that matches your monitor from the list of monitor models on the following screens displayed in sequence. Microsoft® Windows® XP Operating System 17 Using the Software 9.
Click "Close" → "Close" → "OK" → "OK" on the screen, and click "Next". 10. Select the model that matches your monitor from the list of monitor models on the following screens displayed in sequence. Microsoft® Windows® XP Operating System 17 Using the Software 9.
User Manual (ENGLISH)
Page 21
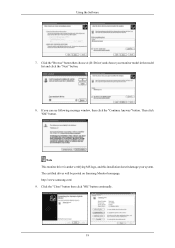
If you can see following message window, then click the "Continue Anyway" button. Then click "OK" button. http://www.samsung.com/ 9. Click the "Close" button then click "OK" button continually. 19 Note This monitor driver is under certifying MS logo, and this installation doesn't damage your monitor model in the model list and click the "Next" button. 8. Using the Software 7. The certified driver will be posted on Samsung Monitor homepage. Click the "Browse" button then choose A:(D:\Driver) and choose your system.
If you can see following message window, then click the "Continue Anyway" button. Then click "OK" button. http://www.samsung.com/ 9. Click the "Close" button then click "OK" button continually. 19 Note This monitor driver is under certifying MS logo, and this installation doesn't damage your monitor model in the model list and click the "Next" button. 8. Using the Software 7. The certified driver will be posted on Samsung Monitor homepage. Click the "Browse" button then choose A:(D:\Driver) and choose your system.
User Manual (ENGLISH)
Page 22
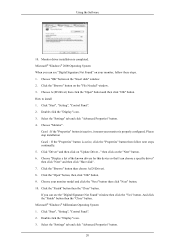
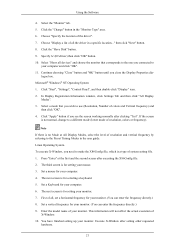
...Insert disk" window. 2. Choose "OK" button on the "Next" button. 6. How to install 1. Double click the "Display" icon. 3. Choose "Monitor". And click the "Finish" button then the "Close" button. Double click the "Display" icon. 3. Choose "Display a list of the known drivers ... Select the "Settings" tab and click "Advanced Properties" button. 20 Case1 : If the "Properties" button is properly configured. Click the "Browse" button then choose A:(D:\Driver). 8. Choose your monitor is inactive, it means your monitor model and click the "Next" button then click "Next" button. ...
...Insert disk" window. 2. Choose "OK" button on the "Next" button. 6. How to install 1. Double click the "Display" icon. 3. Choose "Monitor". And click the "Finish" button then the "Close" button. Double click the "Display" icon. 3. Choose "Display a list of the known drivers ... Select the "Settings" tab and click "Advanced Properties" button. 20 Case1 : If the "Properties" button is properly configured. Click the "Browse" button then choose A:(D:\Driver). 8. Choose your monitor is inactive, it means your monitor model and click the "Next" button then click "Next" button. ...
User Manual (ENGLISH)
Page 23
...button. 9. The next screen is a type of resolution and vertical frequency by referring to make the X86Config file, which is for your monitor. Enter the model name of X-Window. 10. Continue choosing "Close" button and "OK" button until you need to the Preset Timing Modes in the ...user guide. Choose "Specify the location of all the driver in the "Monitor Type" area. 6. Specify A:\(D:\driver) then click "OK" button. 10. Set a vertical ...
...button. 9. The next screen is a type of resolution and vertical frequency by referring to make the X86Config file, which is for your monitor. Enter the model name of X-Window. 10. Continue choosing "Close" button and "OK" button until you need to the Preset Timing Modes in the ...user guide. Choose "Specify the location of all the driver in the "Monitor Type" area. 6. Specify A:\(D:\driver) then click "OK" button. 10. Set a vertical ...
User Manual (ENGLISH)
Page 55
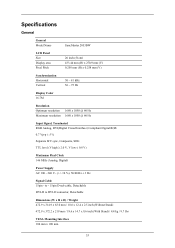
....9 x 372.2 x 219 mm / 18.6 x 14.7 x 8.6 inch (With Stand) / 4.4 kg / 9.7 Ibs VESA Mounting Interface 100 mm x 100 mm 53 Specifications General General Model Name SyncMaster 2053BW LCD Panel Size Display area Pixel Pitch 20 inch (51cm) 433.44 mm (H) x 270.9 mm (V) 0.258 mm (H) x 0.258 mm (V) Synchronization Horizontal Vertical 30 ~ 81 kHz 56 ~ 75 Hz Display Color...
....9 x 372.2 x 219 mm / 18.6 x 14.7 x 8.6 inch (With Stand) / 4.4 kg / 9.7 Ibs VESA Mounting Interface 100 mm x 100 mm 53 Specifications General General Model Name SyncMaster 2053BW LCD Panel Size Display area Pixel Pitch 20 inch (51cm) 433.44 mm (H) x 270.9 mm (V) 0.258 mm (H) x 0.258 mm (V) Synchronization Horizontal Vertical 30 ~ 81 kHz 56 ~ 75 Hz Display Color...


