
User Manual (user Manual) (ver.1.0) (English)
Page 4
... when necessary, but be damaged if dropped, hit or scratched. Safety Instructions 1 Before connecting the AC power cord to the DC adapter outlet, make sure the voltage designation of the DC adapter corresponds to hold the plug, not the cord, when disconnecting the LCD monitor from an electric socket....Place the LCD monitor on a bed, sofa, rug, or other sources of the LCD monitor. 4 Never use your LCD monitor if the power cord has been damaged. unplug it and contact an authorized dealer immediately. doing so may block the ventilation openings in particular, if there are...
... when necessary, but be damaged if dropped, hit or scratched. Safety Instructions 1 Before connecting the AC power cord to the DC adapter outlet, make sure the voltage designation of the DC adapter corresponds to hold the plug, not the cord, when disconnecting the LCD monitor from an electric socket....Place the LCD monitor on a bed, sofa, rug, or other sources of the LCD monitor. 4 Never use your LCD monitor if the power cord has been damaged. unplug it and contact an authorized dealer immediately. doing so may block the ventilation openings in particular, if there are...
User Manual (user Manual) (ver.1.0) (English)
Page 5
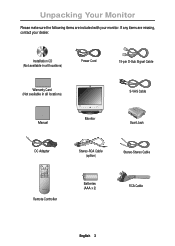
Installation CD (Not available in all locations) Power Cord 15-pin D-Sub Signal Cable Warranty Card (Not available in all locations) Manual PC V1 V2 TV Source PIP Exit Menu SyncMaster 150MB VOL Monitor S-VHS Cable Scart Jack DC Adapter Stereo-RCA Cable (option) Stereo-Stereo Cable Remote Controller Batteries (AAA x 2) RCA Cable English 3 Unpacking Your Monitor Please make sure the following items are missing, contact your monitor. If any items are included with your dealer.
Installation CD (Not available in all locations) Power Cord 15-pin D-Sub Signal Cable Warranty Card (Not available in all locations) Manual PC V1 V2 TV Source PIP Exit Menu SyncMaster 150MB VOL Monitor S-VHS Cable Scart Jack DC Adapter Stereo-RCA Cable (option) Stereo-Stereo Cable Remote Controller Batteries (AAA x 2) RCA Cable English 3 Unpacking Your Monitor Please make sure the following items are missing, contact your monitor. If any items are included with your dealer.

User Manual (user Manual) (ver.1.0) (English)
Page 7
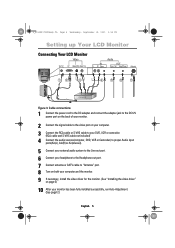
Setting up Your LCD Monitor Connecting Your LCD Monitor Figure 3. Cable connections 1 Connect the power cord to the DC adapter and connect the adapter jack to the DC12V power port on the back of your monitor. 2 Connect the signal cable to the video port on your computer. 3 Connect the RCA cable or S-VHS cable ... driver for the monitor. (See "Installing the video driver" on page 6) 9 After your monitor has been fully installed successfully, run Auto-Adjustment. (See page12) * For SyncMaster 150MP/170MP only (SyncMaster 150MP/170MP are products with a built-in TV tuner) English 5
Setting up Your LCD Monitor Connecting Your LCD Monitor Figure 3. Cable connections 1 Connect the power cord to the DC adapter and connect the adapter jack to the DC12V power port on the back of your monitor. 2 Connect the signal cable to the video port on your computer. 3 Connect the RCA cable or S-VHS cable ... driver for the monitor. (See "Installing the video driver" on page 6) 9 After your monitor has been fully installed successfully, run Auto-Adjustment. (See page12) * For SyncMaster 150MP/170MP only (SyncMaster 150MP/170MP are products with a built-in TV tuner) English 5
User Manual (user Manual) (ver.1.0) (English)
Page 32
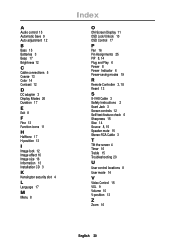
... 15 Automatic Save 9 Auto adjustment 12 B Bass 15 Batteries 3 Beep 17 Brightness 12 C Cable connections 5 Coarse 13 Color 14 Contrast 12 D DC adapter 3 Display Modes 26 Duration 17 E Exit 8 F Fine 13 Function icons 11 H Halftone 17 H-position 13 I Image lock 12 Image effect 16 Image... M Menu 8 Index O ON-Screen Display 11 OSD Lock/Unlock 10 OSD Control 17 P Pan 16 Pin Assignments 25 PIP 8, 14 Plug and Play 6 Power 8 Power Indicator 6 Power-saving modes 19 R Remote Controller 3, 18 Reset 13 S S-VHS Cable 3 Safety Instructions 2 Scart Jack 3 Screen controls 12 Self-test feature check 6 Sharpness...
... 15 Automatic Save 9 Auto adjustment 12 B Bass 15 Batteries 3 Beep 17 Brightness 12 C Cable connections 5 Coarse 13 Color 14 Contrast 12 D DC adapter 3 Display Modes 26 Duration 17 E Exit 8 F Fine 13 Function icons 11 H Halftone 17 H-position 13 I Image lock 12 Image effect 16 Image... M Menu 8 Index O ON-Screen Display 11 OSD Lock/Unlock 10 OSD Control 17 P Pan 16 Pin Assignments 25 PIP 8, 14 Plug and Play 6 Power 8 Power Indicator 6 Power-saving modes 19 R Remote Controller 3, 18 Reset 13 S S-VHS Cable 3 Safety Instructions 2 Scart Jack 3 Screen controls 12 Self-test feature check 6 Sharpness...
User Manual (user Manual) (ver.1.0) (English)
Page 4
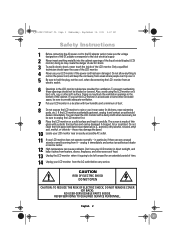
... may damage the panel. 10 Locate your LCD monitor in kitchens, near an easily accessible AC outlet. 11 If your LCD monitor if the power cord has been damaged. Doing so may create the danger of electric shock. 3 To avoid electric shock, never touch the inside of the LCD..., September 19, 2001 3:57 PM Safety Instructions 1 Before connecting the AC power cord to the DC adapter outlet, make sure the voltage designation of the DC adapter corresponds to the local electrical supply. 2 Never insert anything to rest on the power cord, and keep it away from heaters, stoves, fireplaces, and ...
... may damage the panel. 10 Locate your LCD monitor in kitchens, near an easily accessible AC outlet. 11 If your LCD monitor if the power cord has been damaged. Doing so may create the danger of electric shock. 3 To avoid electric shock, never touch the inside of the LCD..., September 19, 2001 3:57 PM Safety Instructions 1 Before connecting the AC power cord to the DC adapter outlet, make sure the voltage designation of the DC adapter corresponds to the local electrical supply. 2 Never insert anything to rest on the power cord, and keep it away from heaters, stoves, fireplaces, and ...

User Manual (user Manual) (ver.1.0) (English)
Page 5
... are missing, contact your monitor. Installation CD (Not available in all locations) Power Cord 15-pin D-Sub Signal Cable Warranty Card (Not available in all locations) Manual PC V1 V2 TV Source PIP Exit Menu SyncMaster 150MP CH VOL Monitor DC Adapter Stereo-RCA Cable (option) Scart Jack 1 2 3 4 5 6 7 8 9 Display 0 Pre.CH Stereo-Stereo...
... are missing, contact your monitor. Installation CD (Not available in all locations) Power Cord 15-pin D-Sub Signal Cable Warranty Card (Not available in all locations) Manual PC V1 V2 TV Source PIP Exit Menu SyncMaster 150MP CH VOL Monitor DC Adapter Stereo-RCA Cable (option) Scart Jack 1 2 3 4 5 6 7 8 9 Display 0 Pre.CH Stereo-Stereo...
User Manual (user Manual) (ver.1.0) (English)
Page 7
... up Your LCD Monitor Connecting Your LCD Monitor IN OUT 12 3 4 5 6 7 DVD or VCR Figure 3. Cable connections 1 Connect the power cord to the DC adapter and connect the adapter jack to the DC12V power port on the back of your monitor. 2 Connect the signal cable to the video port on your computer. 3 Connect the...
... up Your LCD Monitor Connecting Your LCD Monitor IN OUT 12 3 4 5 6 7 DVD or VCR Figure 3. Cable connections 1 Connect the power cord to the DC adapter and connect the adapter jack to the DC12V power port on the back of your monitor. 2 Connect the signal cable to the video port on your computer. 3 Connect the...
User Manual (user Manual) (ver.1.0) (English)
Page 35
...Auto adjustment 12 B Bass 17 Beep 18 Brightness 12 C Cable connections 5 CH 9 Channel 10 Channel Sort 16 Coarse 13 Color 14 Contrast 12 D DC adapter 3 Display Modes 28 Duration 18 E Exit 8 F Fine 13 Function icons 11 H Halftone 18 H-position 13 I Image lock 12 Image effect 18 Image ...OSD Lock/Unlock 10 OSD Control 18 P PAL-NTSC connector 3 PAL Broadcasting System 29 Pan 17 Pin Assignments 27 PIP 8, 14 Plug and Play 6 Power 8 Power Indicator 6 Power-saving modes 21 Program 10 R Remote Controller 3, 19 Reset 13 S S-VHS Cable 3 Safety Instructions 2 Scart Jack 3 Screen controls 12 Self-test feature...
...Auto adjustment 12 B Bass 17 Beep 18 Brightness 12 C Cable connections 5 CH 9 Channel 10 Channel Sort 16 Coarse 13 Color 14 Contrast 12 D DC adapter 3 Display Modes 28 Duration 18 E Exit 8 F Fine 13 Function icons 11 H Halftone 18 H-position 13 I Image lock 12 Image effect 18 Image ...OSD Lock/Unlock 10 OSD Control 18 P PAL-NTSC connector 3 PAL Broadcasting System 29 Pan 17 Pin Assignments 27 PIP 8, 14 Plug and Play 6 Power 8 Power Indicator 6 Power-saving modes 21 Program 10 R Remote Controller 3, 19 Reset 13 S S-VHS Cable 3 Safety Instructions 2 Scart Jack 3 Screen controls 12 Self-test feature...


